The tap on the mixer is turning, what should I do?
Unfortunately, plumbing fixtures have the unfortunate tendency to sometimes break down. This applies primarily to mixers and water taps. The most common malfunctions may be various leaks and leaks, noise when opening, low water pressure even when the valve is fully open, the valve turning or the inability to close it completely, as well as difficulty in rotating the faucet spout or the same valve head. If the faucet is leaking in the bathroom or kitchen, then, first of all, you need to find out the cause of the malfunction, and then try to repair it.
How to fix a leaking faucet: we look at different options for solving the problem
Faucet leakage is a common problem that even the presence of high-quality plumbing equipment cannot prevent. You can call a professional to fix the leak, but is it worth spending money if you can do the job yourself? First you need to find out the cause of the malfunction: it could be a worn gasket . which is easy and quick to replace, as well as failure of the device due to wear or breakage of structural parts .
Read: Toilet cistern fittings
How to unscrew a broken screw
If your attempts to unscrew the screw are unsuccessful, and the edges of the screw head have already been torn off, you should saw off two edges of the bolt with a hacksaw in order to make a smaller turnkey head. Then follow the previous procedure: fill the old bolt with kerosene or turpentine and leave everything for a while. After waiting a little, try to unscrew the screw.
A hammer and chisel will become faithful assistants in the fight against an unruly screw if all previous methods have proven ineffective. In order to remove an old screw, you need to place the chisel directly against the head of the screw and hit the chisel firmly with a hammer several times. In most cases, this method helps solve the problem of an unyielding screw.
After such operations, the bolt can be easily unscrewed using a wrench.
The main rule for easy handling of screws is their timely treatment with graphite lubricant.
Vinegar and soda - a folk remedy
These food products may well defeat rust, making it possible to unscrew the old nut. To implement this method, you will need to clean the connection with an iron brush, removing rust and dirt. Then you need to draw acetic acid into a medical syringe and moisten the connection on all sides. In this situation, you need to use safety glasses to prevent the acid from getting into your eyes while working.
Then you need to leave the connection alone for 2 hours. During this time, the acid should eat away the rust. After the waiting period has expired, you can unscrew the rusted part. In this case, it is enough to simply move the nut along the thread at least a little. If the process stops here, you can repeat the treatment with acetic acid again.
Ceramics take over
All hot and cold water mixers fail after a while. Their design provides for quickly wearing elements - the axle box tap for the mixer. In faucets made in old Soviet times, these are rubber gaskets. Time does not stand still and faucets have begun to improve, replacing rubber or bronze wear parts with ceramic ones.
Ceramics is not the clay from which dishes are made. These are powdery mixtures of various metals sintered at high temperatures. They have qualities superior to modern steel. Due to their increased hardness, ceramic parts are tens of times more durable than rubber parts.
Ceramic products have such useful properties as:
- mechanical strength,
- hardness,
- chemical and thermal resistance,
- do not rust.
- high cost compared to rubber ones.
Replacing the faucet gasket or its core
Share
Link
Share to other sites
- If the water tap is constantly dripping, then in most cases this is due to a leaky gasket. If the faucet valve begins to turn (scroll) and the water does not shut off, then the thread on the core has broken. Let's look at both of these problems and try to solve them. To do this, we will replace not only the rubber gasket, but also the entire core. We will carry out the operation on a standard water tap, where hot and cold water is released using two valves. Such faucets were popular in Soviet times, and are now still used by many unassuming owners.
First you need to turn off the water. In our case, the core responsible for starting hot water needs to be replaced, so we only turned it off. Then you can start disassembling the valve. To do this, you need to get to the screw with which the valve is screwed to the core. To do this we needed to unscrew the small cap (required large pliers). In your case, everything may be even simpler; the red or blue cap is pryed off with a stationery knife and removed. It all depends on the type of valve.
What to do if the faucet tap is difficult to turn
First of all, you need to remove the mixer and disassemble it to eliminate the cause of the breakdown. After this, clean all parts - first of all, the cartridge. Next, you need to assemble the mixer and check it for functionality.
Please note an important nuance - all these manipulations should be done only if you understand plumbing and have the skills to do such work. Otherwise, a repair attempt may result in another breakdown, and worst of all, complete inoperability of the plumbing fixture.
If the problem arose due to dirty water, then thorough rinsing and cleaning of all elements of the device will help correct the situation. After cleansing, all mechanisms begin to work correctly. There are 2 main methods that are best suited for washing:
- Using detergent. Mix hot water and mild detergent in a small bowl. Place all the elements in it and rinse. If you find old stains, you can wipe them with paste using a toothbrush. After this, rinse all elements under warm running water.
- Using chemicals. Wear gloves and use a special limescale remover. It will cope with any contamination. If it is not there, then ordinary table vinegar will help, but it cannot be used on iron parts. Dampen a cloth and lightly apply it to the faucet elements. After this, leave all the parts for 30 minutes, and after this time, rinse everything thoroughly under running water.
In the second case, the main thing is not to use a large amount of chemicals or vinegar, as they can damage the parts and elements of the faucet.
If the mixer's performance problem is related to mechanical faults, then it is important to understand which element needs repair. To do this, you will also have to disassemble the tap and study in detail all the components and components, and then replace the faulty one with a new one.
During operation of the mixer, the lubricant may dry out, which helps make the tap turn smoother. If for this reason it becomes difficult to turn, then the problem can be solved in just a couple of minutes by re-lubricating all the necessary elements.
Use only high-quality lubricant. Products of unknown origin can only harm the elements or dry out quickly, blocking all the holes, and thereby completely render the plumbing fixture unusable.
Ball valve jammed - how to turn it off
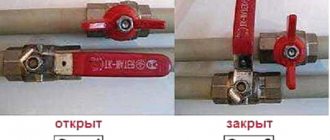
What to do if the tap is jammed (how to open or close):
- The first step is to remove the handle. Unscrew the fastening nut and remove the handle (butterfly) from the rod.
- We try to twist the rod with pliers. No need to use brute force. We twist it a little in different directions.
- If the rod does not fit, look for the clamping nut. In the picture it is number 3. We loosen it a little, literally half a turn, no more.
- After this, the oil seal will straighten a little, and water may begin to leak. It's not scary.
- We wrap the pliers around the rod again and slightly twist it in different directions.
- After a certain time it will begin to give in. I spent about 3 minutes developing it.
- Tighten the clamping nut back the same half turn. Screw on the handle.
- The tap can now be opened or closed. It will work as it should.
It’s worth warning right away: if the ball edge is cheap, Chinese (made of silumin, with a thin jacket), then attempts to develop it will lead to a flood. It will simply burst, and a stream of water will rush in all directions. It's not very pleasant, especially if it's a stream of hot water.
Fault categories
First, let's list the main categories into which typical problems with shut-off valves can be classified.
- The valve does not hold water.
Let us clarify: within the framework of this article we will consider malfunctions of screw valves exclusively. Ball joints fail extremely rarely; cork ones are practically not used in apartments and private houses.
- Water is leaking from under the valve stem.
- The faucet or mixer lever does not turn off the water.
- Water does not flow when the faucet taps are open.
- Water does not switch to shower.
Which ball valves can be opened halfway?
There are ball valves that can be used to regulate the working fluid, but they are rarely used in everyday life due to the large opening, design features and high price. Most often, such devices have a welded design and are a solid piece of pipe with a valve (shown in the figure). The O-rings here are reinforced and made of wear-resistant polymers. Although the seal is still deformed under the influence of the working flow, its service life is much longer than that of conventional household devices. Near the lever are indicated the positions in which the ball valve can be set.
The production also uses control ball valves without seat group sealing elements. That is, with complete overlap, there will still be leaks through the radial gaps. That is why such taps are used only to regulate the flow in the mains and must always be open. In this case, the temperature of the pumped liquid can be from -30 to 200 0 C.
Recommendations from specialists and possible difficulties
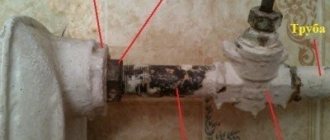
If the axle box is “stuck” to the mixer body, experienced craftsmen recommend several methods to unscrew the tap:
Figure 6: Sticky threaded connection
- Chemical. Use universal assistant WD 40, table vinegar or descaling agent. They need to wet the visible part of the thread and let it sit for 10 minutes to several hours, depending on the amount of deposits.
Important! After using chemicals, you need to thoroughly rinse all parts of the faucet with plenty of warm water.
- Thermal. Heat the connection with a construction or household hairdryer at low power, so as not to overheat the rubber parts. Due to the different coefficient of expansion, the steel case will expand more than the brass axlebox and can be unscrewed.
- Mechanical. Tapping with a rubber or wooden mallet on all sides 10-20 times destroys the lime deposits, and it will be possible to unscrew the stuck connection.
- Boiling. You will need to completely remove the mixer and boil it in a soda solution for 2-3 hours. The deposits should dissolve and the connection can be unscrewed.
Flexible connections should first be unscrewed from the main line. From this side, the nut can turn on the hose flange, and it will not tighten. The hoses must be passed through the hole in the sink one at a time so that the nuts do not get stuck.
If you are removing a faucet in a shower stall, you need to take into account the design of the cabin and the mixer. If a freestanding cabin is equipped with a mode switch, it is usually integrated with the mixer.
Figure 7: Integrated shower mixer
You will have to remove both handles and unscrew the nuts securing the controls.
Figure 8: Removing the handles. The cartridge and mode switch mounts are visible
This is best done with an assistant holding the reinforcement from the back.
Design of ceramic crane axle box
The part consists of a body, which in plumbing is called a bolt, a connecting part of the components of the faucet axle - a fitting and a hollow hexagon - a rod. The faucet housing has a thread with a gasket for easy connection with the mixer. The front part of the bolt has the shape of a hexagon for a wrench. The fitting is attached to the body using a washer, which also acts as a bearing and protects it from falling out of the mixer.
In ceramic faucet axle boxes, the body has the shape of a cylinder with holes on the sides. The fitting has two protrusions that connect to one of the polished disks - a movable one.
Both discs have holes for water supply. When the flywheel is turned, the discs either overlap each other (then water does not flow) or simultaneously open (then water flows).
The tightness of the ceramic faucet axlebox is achieved due to the fact that a rubber gasket is located between the discs. If the gasket becomes unusable, a characteristic noise appears.
Note! The shower stall is clogged, what should I do?
Mixer installation
Mixer installation diagram.
The beginning of such work is associated with the installation of decorative overlays on the flanges. The gaskets are then placed on the flanges, with the black soft rubber piece being the first. Then you should fix the solid base of paronite in color. This installation procedure protects the rubber gasket during the process of screwing on the eccentric fitting.
The final stage of installation work involves tightening the union nuts manually and tightening them with a wrench or adjustable wrench. It is important to ensure that the rubber gasket does not bend due to excessive force. Otherwise, water will leak and the gaskets in the taps will have to be replaced.
The installation of a kitchen faucet must ensure that the spacer ring remains in its original form during operation and is not allowed to be crushed. The shower in the bathroom is fixed in a similar way. Two gaskets are used here: rubber and parotin. In some types of shower such parts are not installed.
If changing the gasket does not bring the expected results, you can resort to replacing the tap itself. Before installing a new plumbing fixture, the water should be turned off and the broken tap should be unscrewed.
When the cross-section of water pipes is such that the outlet pipes of the tap do not correspond to the established dimensions, the problem is solved by using adapter bushings; they have threads on both sides. Here the axis of symmetry shifts, and this makes it possible to connect pipes of a different size and diameter. As soon as the new tap is installed and the union nuts are screwed in, its condition can be checked.
Repair of different types of crane axle boxes
The main component of most mixers is the faucet - the axle box. This device performs the function of opening/closing the water flow and adjusting its supply. Modern mixers use two types of faucet axle boxes: “worm” (with a rubber collar) and ceramic.
The main failure of the former is wear of the gasket, as a result of which the valve has to be clamped more and more each time. It is not difficult to make a gasket and replace it yourself. To do this, you need to perform the following steps: pry it with something sharp and remove the plastic plug from the valve, then unscrew the bolt located inside. Remove the valve. Using appropriate open-end wrenches, remove the valve - axle box. Using the model of the old gasket, cut it out of thick rubber or leather and install a new cuff. Install the repaired device on the mixer
In this case, it is important to check the presence of the o-ring. Reassemble the removed parts.
The failure of the rubber cuff may also be indicated by the presence of a hum in the pipes at high pressure in the water supply system. The noise occurs as a result of the resonance of a worn gasket.
The disadvantage of ceramic faucets is their high sensitivity to water blockages.
Automatic control gannHow to care for a steel bathtub
- How to connect a hygienic shower to a regular mixer
Main Factors
The main reason that caused a plumbing fixture to leak would be:
- gasket wear;
- abrasion of the rod thread, as a result of which the gasket is not tightly connected to the saddle;
- loss of the initial qualities of the cushioning base, complete decay and other reasons.
Tools for changing the gasket in the faucet.
The faulty faucet must be disassembled, after which the indications for leakage should be determined. Whatever the consequences of a malfunctioning plumbing product, the water should first be shut off, and after that you can begin repair work.
If a completely new faucet leaks, we can talk about the presence of a manufacturing defect.
To solve this problem, you can consult a specialist and, if the diagnosis is confirmed, return the mixer to the store.
If similar troubles occur with a ball valve, then a number of problems arise here. Their main reason is associated with the entry of debris into the product body.
Reasons for turning the tap on the mixer
Conventional faucet axle boxes installed on most modern two-valve mixers break quite often. A plumbing expert will be able to name several possible reasons why such a faucet begins to turn and stops recording the water supply. Among them:
- wear of the threads of the axlebox core (the most common and common cause);
- factory defective core (most often reveals itself when installing a new mixer);
- mechanical damage to the thread (may occur due to overtightening or poor-quality repair of the mixer).
Regardless of the nature and cause of the breakdown, only replacing the core with a new one will help to radically solve the problem . Next, we will consider a detailed algorithm for replacing it.
Attention! If you do not have at least a basic set of tools for carrying out minor plumbing repairs and have never dealt with repairing a faucet yourself, then it is better to leave the solution to the problem in the hands of professionals. It may cost more, but you will certainly avoid more serious damage and save a lot of time.
Repair methods
Removing and replacing the axle box
Before you repair the mixer tap, you need to determine its design. As a rule, two-valve products are equipped with locking axle boxes, and single-lever mixers are equipped with either cartridges or special ball valves. More detailed information about the locking mechanism is contained in the instructions, which should have been included with the product upon purchase.
Note! If there are no instructions, you should not select an axle box, cartridge or gasket by eye. It is better to remove the element that has come out of service from the tap and find a completely identical one in a store or market, otherwise problems may arise in the operation of the part.
We remove the axle box from the socket
Repairing a mixer if the faucet axle rotates
First, turn off the water supply. Typically, valves (taps) intended for these purposes are located just below the flexible supply hoses, however, if there are none, you will have to shut off the entire riser. By the way, you can limit yourself to shutting off only the flow whose valve core needs to be replaced.
Reference. If the hot and cold water pipes are not marked in any way, you can briefly open the tap and feel the supply hoses: the hot water hose will be much warmer.
After the supply is shut off, you need to stock up on the necessary tools. To replace the crank faucet core you will need:
- flat screwdriver;
- stationery knife;
- pliers;
- a set of wrenches or an adjustable wrench;
- new core.
Advice. In order not to make a mistake with your choice and not waste time searching for a new core of the required size, you can go to a plumbing store with the old one as a sample. By the way, if the seller offers you a choice of Chinese and original parts, feel free to choose the second: as you know, a stingy person pays twice, and in our case he also disassembles the mixer twice.
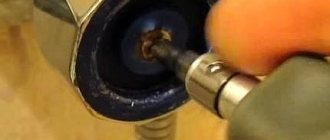
First, you need to carefully use a utility blade or a thin flat screwdriver to pry off the plastic or iron decorative cap that covers the axle box mounting bolt on the front side. Sometimes such a cap can only be removed with the help of pliers, so do not overdo it with the blade.
As soon as the cover is removed, you will see the screw that secures the axle box to the mixer. It may not be easy to unscrew it (such connections often rust, which greatly complicates the process of disassembling them), so you may need a screwdriver or a screwdriver with a comfortable wide handle.
- Which is better, bath or shower reviews?
- Which brand of bathtub mixer is better?
Installation of a bathroom faucet on polypropylene pipes
Advice. If the mount is stuck “tightly”, you can try treating it with a product called WD-40, familiar to every car enthusiast.
After the valve has been successfully removed, you will see the core, which needs to be replaced. The core is unscrewed counterclockwise using an adjustable wrench or spanner (at worst, with pliers). If the mixer has served faithfully for several years and has never been repaired, it may not be easy to unscrew the core, but just make a few turns with the key and things will go easier.
The new core is screwed into place of the old one clockwise using the same key. Try to tighten it as tightly as possible, but at the same time not damage the threads. If you feel that the part is not following the thread or is screwed in too tightly from the very beginning, it is better to immediately unscrew it and clean both threaded connections with a soft rag or brush.
When the valve returns to its place and the screw securing it is tightly tightened, you can insert the decorative cap into place. Next, you need to turn on the water supply and check the functionality and tightness of the mixer.
If you did everything correctly, the axle box will completely block the feed without much effort after just a couple of revolutions. If a sudden leak appears or the quality of work does not satisfy you for any other reason, it’s time to contact a professional plumber.
The Bugati ball valve is leaking, I urgently need advice, I can’t find a plumber
Please tell me the Bugatti 3/4 ball valve (original according to the characteristics) has been standing on the riser for 4 years; when the butterfly is turned, it does not reach the stop by 2-3 mm. The tap does not completely shut off the riser. Is it possible to do something in this situation without removing the faucet and/or without turning off the riser? There are also taps from other Chinese manufacturers on the wiring, they have become sour and do not turn, everything was bought at Maxidom. Please let this mini-house burn down.
- View profile
- Private message
Does the handle just not reach the stop, or does it reach but not block?
In the first case, the problem is probably deposits on the ball. Secondly, the mounting hole in the handle was simply broken. Remove it and carefully close the valve by the stem with the key.
By the way, what does it look like? Are the nuts rusty? If so, this rust may be preventing the handle from turning.
By the way, for some comrades: YES, BLADJAD, there was such a situation, and I’m not just making it up!
- View profile
- Private message
Pixel - to “extend the life” of the ball. tap - it cannot be used as an adjustment valve. There are only two acceptable positions - completely open, or completely closed, and you most likely had the valve handle in the middle position for a long time, or the ball valve was not fully open and the part of the ball protruding into the pipeline caught flying grains of sand from the flow , various abrasive particles, so under the seal the ball. tap, Teflon, or fluoroplastic got this abrasive and now it is difficult, and maybe even impossible, to revive it, you will only have to change it and, based on the experience gained, not repeat such mistakes in the future.
- View profile
- Private message
You can’t close the stem completely with pliers either, you can’t tighten it just a little and the water flows in a thin stream, there’s no rust, the faucet looks like new, I removed the handle and the nut under it, unscrewed the nut a little but nothing changed, why is this nut there anyway, it doesn’t hold anything ? If you tighten it with pliers, it crunches a little inside. scary under pressure
the valve has never been in the middle position, I know about this feature of ball valves
the system was assembled not 4, but 9 years ago, but the crane is 9 years old
- View profile
- Private message
Pixel wrote: . the system was assembled not 4, but 9 years ago, but the crane is 9 years old
Protection against souring of the ball is periodic (at least twice a month) manipulations completely “open-close”, but 9 years is a good period for a Bugatti, so it’s time to change it.
- View profile
- Private message
Most likely, the ball initially had some misalignment (this happens), and due to the fact that the ball was not opened “at 0,” there are now deposits on the edges of the ball. Unfortunately, nothing can be done “at home.” If only you try to move it back and forth, just until it “crunches,” to try to destroy the growths. Nothing should fall off if no effort is made, and the faucet itself does not look rotten.
- View profile
- Private message
manipulations were carried out very rarely.. is it possible to remove the handle and turn the tap one turn in the opposite direction? maybe this will help? after applying forceful pressure with pliers, the stream of water became noticeably smaller
- View profile
- Private message
There are also taps from other Chinese manufacturers on the wiring; they have become sour and do not turn
You still need to do something with your water supply, so it’s easier to turn off the riser. You will still have to take decisive measures sooner or later.
Now, as I understand it, you wanted to make some minor repairs?
- View profile
- Private message
The tap, as I understand it, is located at the inlet. Since it doesn’t close, contact the management company, let them repair it, change it, etc. This wound is under their jurisdiction. Something could have gotten in.
- View profile
- Private message
yes, the kitchen is being renovated, the faucet needs to be changed, the taps on the manifold have turned sour, so I wanted to turn off the input. In general, I understand, thank you very much, repairs in one place, as always, drag on everything else))
- View profile
- Private message
Is it possible to remove the handle and turn the tap one turn in the opposite direction?
I wanted to suggest the same thing. Try it, it won't get any worse.
- View profile
- Private message
ma-masha wrote: I wanted to suggest the same thing. Try it, it won't get any worse.
Masya, in this way you can break the seals of the ball, and the tap will already be pouring.
The author of the topic, there is a lot of advice in the topic above. Mine: Change EVERYTHING before you get into money. Then, as a rule, everything is too late.
- View profile
- Private message
I agree with the idea of going the other way. I won’t deify Bugatti, but local Fittingville supplies some strange Bugatti cranes to LM. There have been examples when the edge of the ball bites the fluoroplastic sealing ring and cannot move further. That's why turning it around can help.
- View profile
- Private message
IMHO, it sucks. There are FIV, Giacomini, Cimberio. Yes, there are a lot of good Italians.
- View profile
- Private message
The corner Giacominis were leaking a lot
- View profile
- Private message
Any corners are ugly. But, of course, they shouldn’t leak. Unfortunately, it happens to everyone.
- View profile
- Private message
I vaguely remember that Bugatti has a seal tightening function. I don’t remember how to pull it up, but I think one of the confectioners should remember))
- View profile
- Private message
The rod seal can be tightened. This will not affect the curve ball.
- View profile
- Private message
Similar problem. Two Bugatti Nevada 3/4 taps on the hot water riser. Only 10 months. Original. Immediately after the purchase, the balls on both taps were alarming: they did not open/close completely. I decided that since I bought two at once and bought them from the officials, I don’t have to worry. Today I dismantled one of the taps. Air hissed from the drained riser through the tap, i.e. he doesn't hold it anymore. The butterfly rests against the limiter. It shouldn’t turn sour in 10 months; besides, I covered them a couple of times during this period. Does it make sense to manipulate the butterfly: remove it and tighten it with pliers, or turn the butterfly the other way around? From the pictures with the design of ball valves, I concluded that without a butterfly and a limiter, the ball can rotate around its axis 360 degrees. Those. the butterfly does not allow it to open/close completely. Or the crooked ball that was written about here in the thread?
- View profile
- Private message
The ball is crooked, don't do anything. For prevention, periodically open and close to prevent biting.
- View profile
- Private message
I can't come to terms with it. Today I took an old faucet and turned the handle. The ball can be rotated 360 degrees. Now I want to remove the butterfly from my problem one and try to turn the ball to the desired position or turn it 180 degrees. I think it's due to casting defects on the travel stop. But I am afraid
Stc wrote: this way you can break the seals of the ball, and the tap will already be pouring.
If there were faucets for sale in the city and straight-armed plumbers, I wouldn’t have to worry - I’d replace them. PS The electrics somehow worked better (t-t-t) than this plumbing.
- View profile
- Private message
I checked all types of taps in the apartment: Valtec 1/2, Bugatti Oregon 1/2 and 3/4, Bugatti Nevada 1/2, brother of the problematic Bugatti Nevada and 3/4, Chinese VIR 1/2. For all of them, the ball can freely rotate 360 degrees when the handle is removed. And only this scoundrel’s ball moves strictly within 90 degrees and rests on something. To complete the picture, we would like to understand where exactly this ball has “irregular curvature”.
- View profile
- Private message
Incorrect curvature in the brains of the manufacturer. ALL ball valves with brass chrome-plated balls “sour” after 5-10 years. This is the so-called “sludge” corrosion from traces of rust, which is always present where there are steel pipes in risers and mains. Only by completely getting rid of steel pipes can you get rid of this corrosion. Where water (especially hot water) constantly touches the chrome shut-off ball. I posted a photo in the topic of copper soldering and corrosion. There are several new corroded ball valves after repair, they lasted 7-10 years. Everything is confirmed.
The fact is that the chromium layer on the copper substrate of the brass ball is POROUS. Because it is thin and without a nickel layer. It is very expensive to make several non-porous layers by electroplating. Chromium and nickel themselves are neutral to water. But rust, iron and copper react through the pores of chromium. As a result, a thin layer of rust is deposited through the pores of chromium onto copper or brass and “peels off” the layer of chromium or nickel. Over time, the layer of rust and salts from the water acquires relief and CUT the fluoroplastic seal of the ball valve when the ball is turned. The faucet begins to “dig”; if the layer is thick, it interferes with the turning of the faucet. At the same time, the tap itself can be as good as new, without traces of corrosion. That is, ONLY the ball itself deteriorates. The conclusion for stupid and greedy manufacturers is to make ONLY a ball from chromium-nickel stainless steel. But why? You already pay. Every 5-10 years. And it doesn’t matter whether it’s a branded faucet for a bunch of dollars or not. Corrosion doesn’t care about the company.
Well, taps whose ball does not close properly should be rejected upon purchase, not after.
The handles of the crane axlebox are dangling
Hello. I bought a Rossinka Silvermix G02-72 sink mixer 1.5 years ago
The cross handles on the crane axle rods are loose and one of the handles has started to turn idle. The water jet is poorly regulated. The splines (20 ribs) of the rods and the splines of the handles are poorly matched, there is a large gap. How to remove this gap so that the structure is free of backlash and detachable? Is there any special adhesive-sealant or solder to put in there?
For scrap metal, complete rubbish. Buy a new ball mixer.
At what distance from the bathtub should the faucet be installed?- How to choose a bathroom faucet with shower
Which kitchen faucets are the most reliable?
Buy a set of cheap Dexter keys.
There is a 2mm wrench there, just for tightening the handwheel screws. Wrap it tighter. It should help. If it weakens, repeat the procedure again.
The gap can be reduced using epoxylin. Insert a ball from it into the flywheel, and then press the splined end of the rod, lubricated with some kind of grease, into the socket until it stops. Excess epoxylin will be squeezed out. It is important to wrap the lower part of the splined rod with electrical tape to prevent the epoxy from catching the narrower part of the rod. Otherwise, the connection will be inseparable. The tip of the screw that is screwed in must also be lubricated with oil or grease so that it does not stick. Wrap it tighter. It should help. If we are talking about improvised materials, then use what you have on hand: electrical tape, adhesive tape, a plastic bag, etc. Some are filled with epoxy and the handle is no longer removable.
If, according to science, you don’t want to change the entire mixer, then:
- Change the handles to ones that match the already installed axle boxes.
- Change axle boxes that match your handles.
- Exchange your axlebox with handle for a set of axlebox with handle.
Removing decorative caps and valves - sequence of actions
To unscrew the faucet, decorative caps and nut with screw, you will need a flat-head screwdriver and a sharp knife. Before carrying out work, turn off the water. On the side of the valve, remove the decorative cap by prying it off with a screwdriver or knife. We do this carefully so as not to damage the coating. If the handle is solid, without a plug, just unscrew it. Remove the plastic rings. Next, use a flat screwdriver to unscrew the bolt mount and remove the valve.
If the handle is solid, without a plug, you should simply unscrew it
If the faucet valve cannot be turned off, lubricate the inside of the valve with a WD-40 solution, which is sold at any auto parts store, or pour in vinegar. Leave for a couple of hours so that the solution penetrates the threaded joint and softens hard deposits. After this, the tap should be easy to remove. In the next step, we’ll figure out how to unscrew a stuck faucet axle box.
When planning to restore the functionality of a ball valve, you should ensure not only the availability of the necessary tools, but also good lighting.
When restoring the operation of the faucet, you should first unscrew the self-locking nut (in some cases you should simply unscrew the screw that holds the rotary handle). All this can be easily done using a size 8 or 10 spanner wrench, and an open-end wrench also helps in this matter (everything initially depends on the crane model).
Next, you need to carefully remove the faucet handle. This, as a rule, is not easy, only after its gradual rocking, accomplished by alternating pressure on one or the other side of the structure. In this case, it is important not to knock on it - this will lead to the integrity of the flags and their breakage.
Now you should select the most suitable key, and then try to turn it, alternately changing the direction: first you can try to do it clockwise, and then counterclockwise. When carrying out the described actions, it is important to monitor their amplitude - it should be low, because with great effort there is always a risk of breaking the rod or tearing off the edges.
As soon as movement is noticed, the amplitude of the movements and their scope can be increased. When performing this work, it is very important to ensure that one of your hands holds the head on the rod, and the other turns it.
As soon as the rod moves as freely as possible, at this point you can put on the handle, and then secure it with a screw (or nut). Now you should continue the rocking process until the water supply is completely blocked.
Insure against breakdowns: how to choose a quality gander
When purchasing such a simple part, it is enough to pay attention to the main characteristics so that the issue of repair will not be relevant for a long time. The future acquisition will be assessed according to the following parameters:
- Rotating or non-rotating. If the mixer is to serve a bathtub and a washbasin installed next to it, there is no choice left, and you will have to buy a rotating model. In other cases, it is better to buy a fixed mixer, insuring yourself against leaks in the connection area.
- Mounting location. For installation on a bathtub, a model in which the gander is attached to the bottom of the body is preferable - this reduces the height of the water fall and the accompanying noise. Only faucets with top mounting are installed on the washbasin or sink. For the kitchen, take a closer look at kitchen faucets with a flexible gooseneck - they are convenient to adjust in length and height, adjusting them to the dimensions of the dishes or sink.
- Availability of an aerator. This is a very desirable option that reduces water consumption by increasing the volume of the stream due to air, which is especially important for houses with meters. Even if you have your own well and water consumption is irrelevant, think about the amount of wastewater, because calling sewerage equipment is also not a cheap pleasure.
- Diameter of the fixing nut. When replacing the spout, do not forget to make sure that the purchase will fit the faucet body. If you are not sure about the parameters of the old gander, take it with you to choose the right one on the spot.
- Aerator shape. Cleaning the aeration mesh will sooner or later become necessary, so it is better to choose cut models. To unscrew the round aerator you will have to work hard.
- Material. It is impossible to see what the part is made of under the chrome coating, so ask the seller for documents confirming that the gib is made of brass. Instead, under the chrome there may be silumin - a fragile, easily deformed material. You can simply test the weight of the selected spout: a brass one will be three times heavier.
- Length. This does not affect the functionality of the mixer in any way, but it is advisable to choose a model with a spout length such that the water stream falls directly on the drain hole. This little detail will significantly reduce the amount of splashes that, when dry, form streaks on the mirror, walls and furniture around.
Repair of single-lever mixer and prevention of breakdowns
The single-lever or joystick faucet has virtually replaced two-handle or wall-mounted faucets in bathrooms and kitchens. Single lever taps are easy to use and repair, and have a long service life. The main advantage of their design is that there are no metal parts rubbing against each other.
Types of lever faucets
The joystick mixer is a compact body with a lever handle. According to their internal structure, single-lever mixers come in ball and cartridge types.
Sectional view of the ball-type mixer mechanism
The design of a mixer with a ball mechanism means that water is mixed in a small ball located in the body and resting on sealing gaskets (seats). Three holes in the ball are designed for hot, cold and already mixed water. The space inside the ball is called the mixing chamber. When you turn the adjusting rod (mixer switch), the pressure of the incoming water, both cold and hot, changes, and its temperature and pressure at the outlet also change. It all depends on how much the hole in the ball and the corresponding incoming hole overlap each other.
To mix water, a cartridge-type faucet uses a cartridge made of a pair of ceramic plates (disks) with holes. In this design, discs replace a ball: the pressure and temperature of the water flowing from the tap depends on the degree to which the holes in the upper and lower discs overlap each other. If you have cartridge-type taps, then repairing a faucet in the kitchen or bathroom usually comes down to replacing the cartridge.
Problems that arise when operating a single-lever mixer
Although single-lever faucets are considered very reliable, they can also cause problems. Most often, repairs are required for leaks, cracks, decreased pressure, unsatisfactory adjustment (sharp transition from cold to hot water).
Problems under the sink
You notice constant dampness and notice water accumulating under the sink. What to do? The first thing suspicion falls on is the siphon or corrugated stainless steel hoses. If everything is fine with them and the sink is well sealed, then check the faucet itself.
Incorrect fit of the faucet body to the sink and displacement of the gasket to the side can cause quite severe leaks and urgent repairs.
Problems from above - troubleshooting faucets
- A typical problem with ball mixers is the rapid wear of the rubber or Teflon seats on which the ball rests. This causes water to leak. To prevent this malfunction of the mixer, you can change the seals every two to three years.
- Disc faucets break due to hard, clogged water. Chips and scratches occur on ceramic surfaces that fit tightly together. All this leads to leaks and reduced mixing accuracy. In this case, the cartridge needs to be changed.
- Another common problem with disc mixers is poor adjustment. This is a common problem with inexpensive models that have too low a setting angle. Choose cartridges and mixers from trusted brands and manufacturers, with a long service life, with an adjustment angle of up to 15°.
Recommended reading: Choosing a bathtub faucetRemoving the valve and checking the faucet seats for wear
General problems - water leaking through the faucet
- An incorrectly installed lever can cause constant leaks in the kitchen. If this is the reason for unsatisfactory operation, then the tap must be rebuilt and the lever must be tightly adjusted during installation.
- Some faults require the installation of a new faucet. These are cracks in the mixing ball or in the housing. If there are cracks, then there is always a puddle of water near the faucet. The same can happen if the sealing rings in the spout block wear out.
- Also, the problem may not be related to the mixing chamber. A decrease in pressure usually occurs due to clogging of the aerator at the outlet of the tap.
Repair of a single-lever mixer with a cartridge
Repair of a faucet with a cartridge must begin with dismantling. Before disassembling the single-lever mixer, turn off the water and drain the remaining water from the taps. It is recommended to cover the sink or at least the drain hole with something.
Cross-section of single lever cartridge mixer
- Unscrew the nut with the aerator from the faucet spout. This can usually be done by hand.
- Remove the decorative plugs and unscrew the screws that secure the lever. To do this, you need a hex wrench or a screwdriver with a suitable blade. As a last resort, you can use a drill with a thin drill bit. To find out which head the screw has, shine a flashlight into the hole. You need to act carefully: if you tear off the slot, dismantling the mixer will become a much more difficult task. If the screw does not budge, treat it with WD-40, wait a little and try again.
- Remove the lever: pull it up. This must be done carefully: for a number of models, removing the lever requires some effort.
- After removing the lever you will see a decorative cap. Take it out: it is made of plastic or weak metal and can be unscrewed by hand. If it doesn't work, try gently turning it with pliers or a gas wrench.
- After removing the cap, you need to remove the fixing nut under which the cartridge is located. To do this, you will need a Swedish adjustable wrench or open-end wrench.
How to buy a replacement ceramic cartridge
Cartridges have different hole diameters. Therefore, it is important to have a defective cartridge in hand when you go to buy a new one. In addition to different diameters, there are various types of clamps on the side of the bottom plate. Give preference to discs with silicone gaskets from well-known European companies. Then you won't have to repair your faucet for the next few years.
Single-grip ceramic cartridge disassembled
Installing a new cartridge and assembling the mixer
Reassembling the faucet after replacing the cartridge is performed in the reverse order:
- Use a soft cloth to clean the cylindrical cavity of the housing. Make sure the case is intact inside. Remove limescale.
- Insert the cartridge. It has centering lugs for proper installation. All that remains is to combine them with the recesses in the body.
- Tighten the locking nut, but do not over-tighten. Otherwise, the cartridge itself or the seals located below may be deformed. And this will cause new leaks. So tighten it halfway and turn on the water. If it protrudes from the sides of the housing holes, then turn off the water and tighten it a little more. Continue tightening the nut a little at a time until the housing remains dry after turning on the water.
- Next, proceed in the reverse order of disassembly: install the cap, install the lever and secure it with a screw, install plugs with cold and hot water indicators.
The new cartridge is inserted into the grooves in the faucet and aligned along the holes, as shown in the picture
Repair of a single lever mixer with a ball block
Single lever ball valve problems are usually caused by a broken valve mechanism. The lever, fixed with a screw, is removed in the same way as in the case of a mixer with a cartridge. The dome-shaped metal cap, which is located below, secures the entire valve mechanism in the body. Under the cap is a plastic cam that limits the movement of the control lever. At the bottom of the cam there is a dome-shaped washer for a tight fit to the mixer ball. We have already described the structure of the ball and the principle of mixing above.
The ball lies on rubber saddles, which are pressed by springs. Below, in the part of the spout block, the faucet with a ball mechanism is designed in the same way as a faucet with a ceramic cartridge.
Disassembly procedure
- Remove the plastic red and blue covers and unscrew the lever according to the diagram described above. The difference will be that the pin from which you need to twist the lever is not polymer and rectangular, but metal, with a thread for the screw securing the lever.
- Unscrew the dome cap. It can be equipped with slots for easy grip. But if there is no slot, use a screwdriver: press it into the groove and gently push it up and clockwise, tearing the part out of place. You can also use pliers, inserting them into the grooves from the inside of the cap.
- After removing the cap, remove the cam with the shaped washer. Clean them from dirt with a rag.
- Remove the mixing ball and examine its valve part.
- Remove the valve seats. They are easily removed using a thin screwdriver. You can use tweezers or a screwdriver to remove the pressure springs under the seats.
Scheme of assembly and repair of a single-lever ball-type mixer
Typical problems with the valve mechanism of a ball mixer
Leaks or excessive noise can be caused by the following problems:
- The inside of the dome washer or the socket in the housing where the lower part of the ball rests is worn or heavily soiled. These spherical cavities must be thoroughly cleaned.
- Ball wear. It may show cracks and grooves. All this is caused by dirty and hard water mixed with solid particles. The only way to fix this is by replacing the ball.
- Worn valve seats. If they begin to fit poorly to the ball, they let water through. They also need to be replaced.
- Poor seat fit can be caused not only by wear, but also by weakening springs. The issue is resolved by replacing the springs with new ones.
Recommended reading: DIY acrylic bathtub repair
Assembly of a single lever mixer with a ball mechanism
It is performed in the reverse order, with cleaning and lubricating the old parts and replacing new ones:
- Clean the faucet cavity.
- Insert new springs into the saddles, place the assembly in its designated slots.
- The cleaned ball is lubricated with silicone grease. The ball is inserted into the mixer body.
- The washer with the cam is installed. For proper assembly, there is a groove in the housing that should be aligned with the protrusion on the cam.
- Place a clean metal top cap and screw it on. It is important to avoid distortions.
- Place it on the metal rod and screw the lever to adjust the water.
Problems with the swivel spout block
If water from a single lever faucet flows above and below the swivel spout block, this is caused by worn seals. Rubber rings and, less commonly, cuffs are used as seals. To replace the rings, you need to disassemble the mixer as follows:
- After removing the cartridge, you need to remove the rotating side of the spout from the body. How to do this will become clear during disassembly. In some models this unit can be removed upwards. It is locked on the body with a special coupling. But more often the spout block is removed downwards, where a corrugated flexible hose is attached. To remove the unit, you need to disassemble it, including removing the faucet from the sink or sink.
- On the bottom side of the dismantled mixer, you need to unscrew the ring-shaped nut and remove the fluoroplastic ring located under it.
- Now you can remove the spout block from the body by pulling it down. Worn rubber seals will be found at the joints with the body. You should purchase the same new ones, and at the same time replace the fluoroplastic rings on top and bottom before installing the mixer.
Crack in the body
This malfunction is immediately noticeable and requires replacing the entire mixer. Some DIYers resort to silicone sealant to “repair” the case. But this is a temporary measure. Soon you will still have to go to the store for a new faucet.
The aerator is clogged
If, with the taps fully open, you observe insufficient pressure, then there may be several reasons. This is a blockage in pipes and inlet hoses, and simply poor pressure in the water supply network. But it could also be a clogged aerator on the spout pipe. To repair, unscrew the aerator. If your hands are not strong enough, use an adjustable wrench. The aerator has slots for unscrewing. On the mesh inside you will find a lot of solid particles and deposits that prevent water from flowing and reduce pressure. The mesh can be cleaned under running water.
If dirt remains, disassemble the aerator and clean the holes manually with a toothpick or needle.
Prevention of breakdowns of a mixer with a cartridge or ball
If your plumbing requires constant repairs, it means that the quality of water in the water supply pipes in your region is unsatisfactory. It is worth thinking about installing filters. Conventional mechanical filters connected to corrugated hoses will significantly extend the life of any plumbing fixtures in the house. Suspension and sediment from the water will not wear away silicone and rubber parts as quickly, as well as the ball and ceramic valve mechanism of the faucet.
abvmaster.ru
Diagnostic databases
Before you start repairing, you need to study the structure of the mixer tap and find out the nature of the breakdown. This can be done quite simply, especially if you use the table below:
- Siphon malfunction.
- Damage to the hose for the flexible faucet spout.
- Leaky connection of pipes with warm or cold water.
- Repair or replace the siphon.
- Replace the hose.
- Tighten the nuts where the pipes are attached, using plumbing sealant if necessary.
As can be seen from the analysis of the third column, to perform most of the work we do not need any special skills. All you need is some simple skill and study of the recommendations, which we will give below.
If the shower mixer in the bathroom is broken.
Broken shower switch.
Another common occurrence is the breakdown of the switch that regulates the shower spout. If this switch is plugged, the repair will be simple and take very little time. Quite often, the problem is that when using a shower, water also leaks from a regular tap. That is, the switch is not securely closed. This task can be easily solved - you just need to carefully check the condition of the O-rings and gaskets.
Main faults
Before repairing a water faucet, it is worth taking time to analyze the situation. This way we can understand exactly what actions should be taken, thereby saving quite a lot of time.
The list of breakdowns includes the following items:
| Breaking | Description |
| When the valve is closed, drops of water flow out of the tap | The locking mechanism becomes unusable. To fix the problem, you need to either replace the element responsible for blocking the pipe clearance, or install new sealing gaskets. |
| Water drips at the connection point of the spout, hose or valve | The tightness of the connection is broken. It is possible to return it either by replacing the gasket, or by installing a plumbing winder on the thread. |
| The flywheel turns | The flywheel housing has come off the rod or the rod has stopped working. In the first case, it is enough to put the part in place, in the second, you will need to replace the locking element. |
| The faucet makes a humming sound when operating | The gasket has worn out and its edges begin to vibrate under water pressure. In most cases, replacing the gasket is enough to eliminate extraneous sounds. |
| Leak on the body or on the spout | The integrity of the product has been compromised. It is temporarily possible to seal by “cold welding”, but it is worth replacing the valve as soon as possible. |
| Splashes fly from the aerator, water flow is obstructed. | The aerator grille is clogged and requires cleaning. |
In principle, this table outlines the main faults. Other situations that may arise during the operation of the crane are derivatives of those already analyzed, and therefore they must be repaired using a similar method.
In addition, before starting work, be sure to carefully familiarize yourself with the design features of the model you have installed. In most cases, the assembly drawing of the water tap comes with the product itself, so when installing a new faucet, this document should be kept.
Note! If you can’t find the diagram, then you should enter the query “assembly drawing for indicating a water tap” in a search engine and select your model. Most manufacturers post technical documentation online, so the chance of finding what you need is high.
Now let's figure out what to do in each specific case. And let's start with the most common situation, in particular with eliminating the circumstances of the leakage of the shut-off element.
I can’t screw the flexible hose into the faucet
We bought a mixer, everything is fine, but there is a problem. The connections where the hoses are twisted are located inside the faucet at a depth of about 4-5cm. The hoses can only be tightened by hand using the hose itself; no wrench can fit in there. I bought other hoses on the market with extended parts that screw into the mixer, but they are also not long enough. What to do? I'm tired of it. Of course, if you tighten it by hand, it won't leak, but that doesn't matter, there's more than 4 atmospheres there..
01/18/2012 at 11:15
and if instead of hoses you use nickel-plated tubes with a rigid liner, then you can tighten it stronger. and it will be more reliable
01/18/2012 at 11:18
I screwed the hoses before installing the mixer in place. remove the faucet (to tighten the nuts when installing the faucet, I used a socket wrench - a tube. If it is possible to remove the sink, it is better to remove it,
01/18/2012 at 11:28
Steh Of course, I removed and disassembled everything possible and the tap is in my hand, there is no way to tighten it.
01/18/2012 at 11:44
zalman I'm sorry, I've never seen such a design. if absolutely impossible, lubricate the threads with auto sealant to seal the connection
01/18/2012 at 15:54
For advice you need a photo of the mixer. as an option, the seller did not provide the connection pipes. Also, the installation procedure for the mixer should be described in the manual.
01/18/2012 at 16:01
werefish The manual was thrown out immediately. Photos are possible tomorrow. I bought the faucet from Leroy Merlin.
01/18/2012 at 18:21
If the product has a name and the eyeliner is standard, then after lubricating the rubber ring, you can tighten it by hand. I've seen this before. In principle, there are fits through a rubber ring, when nothing depends on the tightening force. Only fixation, but not tightness. Well, you can put it on anaerobic, but it won’t be understood.
01/18/2012 at 18:23
I have had such cases. I simply tightened the hoses by hand - as long as possible - and that’s all. There were no problems. The pressure, as it were, was 6-8 atm. But the taps were real (not for 1000 rubles)
01/18/2012 at 18:26
Hubert wrote: Take it back to them
They won’t take it without instructions - the complete set is broken!
but now there is something to talk about.
Question to topicstarter: is this actually a mixer? Is there a receipt left? what do they write?
01/18/2012 at 21:31 01/19/2012 at 20:47
I came across such an eyeliner, where two rubber rings are buried in the corresponding socket, nothing depends on how tightly it is twisted. Even if you turn it back a little, there will be no leakage. So screw it on by hand, everything will hold perfectly.
01/20/2012 at 06:26
YURI-G wrote: So screw it on by hand, everything will hold perfectly.
- 1 There is no need for tightening at all.
01/20/2012 at 22:44
but I still twisted the platypuses a little
01/20/2012 at 23:45
It just doesn't make much sense. The pressure is held by the rings, not the puff.
01/21/2012 at 08:12
There are often faucets where the instructions say that the hoses must be twisted by hand. Sometimes even in a categorical form - the use of the key is prohibited. The latter applies especially to the cheapest China, where the bushings for the hose are not molded into the body, but hang in the air, and their wall thickness is less than 1 mm. You screw them in by hand with the fear that they might burst. By the way, there were times when, when twisting, the thread of the hose broke off and remained in the mixer body. The problem occurs when replacing hoses that are located in the depths. If they are slightly stuck, you have to tinker. When a client purchases, I immediately dissuade them from these brands, especially if they are cheap.
DIY valve repair
Valve taps are also called classics in water supply. And, despite the fact that such cranes are gradually replacing newer designs, there are still enough of them. Over several decades, their structure has not changed, only the design, which has become many times better, more diverse, and more refined.
At the moment, you can find both the simplest models and quite unusual ones. Taps for water taps of this type are also used, as they are reliable and simple, and can last not just a few years, but several decades. If all the “insides” of the structure are made in accordance with all the requirements and GOSTs, then the only thing that can fail during all this time is the gaskets. Replacing rubber seals is the main way to repair a valve tap.
Replacing the rubber seal (gasket on the valve)
If the valve is completely closed, but water continues to drip in the bathroom or kitchen, then the whole problem is in the gasket on the valve, which has lost its elasticity. The fact is that over time it ceases to press tightly against the saddle, which is why water continues to flow, and because of this the faucet can not only drip, but even leak. In this case, fixing the faucet means changing the gasket. This will require a wrench, but it will be more convenient to use an adjustable wrench and a set of rubber gaskets.
Before you begin to repair a dripping faucet, you should turn off the water supply (if possible, turn off the water only in this branch). After this, check that the water is turned off, and if nothing is leaking, you can begin repairs. You will need an adjustable wrench or wrench to unscrew the head housing, i.e. upper part of the body.
Ideally, when repairing, you need to work with an adjustable wrench, and in order not to spoil the surface during the process, you should wrap it with a soft cloth, and then apply the wrench. When the head is unscrewed, remove the valve, and now you can change the gasket or install a new valve. The old valve should be pryed off with any sharp object - a screwdriver with a spatula, for example, or an awl.
When selecting a gasket, it is important to ensure that the edges are beveled at approximately 45 degrees, otherwise the water supply will begin to make noise. If you don’t have this in your arsenal, you can trim the edge with something sharp - scissors or a knife. So, to fix a dripping faucet in the absence of a suitable gasket, you can cut this element out of dense rubber (porous material is not suitable). The thickness of the rubber sheet should be 3.5 mm, and the internal diameter is slightly smaller than the diameter of the rod, please note that the outer edge should not protrude. Remember to bevel the edges at 45 degrees.
Once the gasket is installed, the valve can be put back in place and the head screwed back on. Newer models of taps do not require winding onto threads. Even more, winding is contraindicated, since it is precisely this that often causes cracks to form in the body. If you are repairing a USSR tap, you should lay tow on the threads and then tighten it. After this, turn on the water, but not at full pressure, but gradually.
Sometimes with such a gasket on the valve a completely different story can happen - the water barely flows or does not flow at all. In this case, it is obvious that the gasket flew off the rod and simply blocked the flow of water. To begin with, you can try closing and opening the tap several times, and if this does not help, then repeat the operation described above, i.e. change the rubber gasket. The main thing is that you do not forget to remove the old element that is stuck to the saddle.
Water leaking from under the stem
If water drips from under the valve, then the seals are worn out. A leaking faucet can be repaired using two methods. First, try to tighten the head housing harder. This all needs to be done using the same adjustable wrench. It is not advisable to use pliers as they leave marks. Tighten the head as much as possible, but not too much. If the threads are tightened perfectly, but water still oozes out, then you should also change the gaskets on the oil seal. To do this, you need to tighten the tap to the limit, and then remove the tap head again, remove it with a sharp object and remove both rubber rings, replacing them with new ones.
How to turn off the water if the ball valve is jammed
Ball valves have long been used in industrial pipelines, and in recent years they have become widespread in domestic water supply networks. These cranes are more convenient to use than devices equipped with a crane box and are more durable. But their use requires following some simple rules. For example, even on stationary flows, a ball valve needs to be opened and closed two or three times at least once a month. Otherwise, deposits of impurities, which are abundant in household water, can jam it. And then you should think about how to turn off the water if the ball valve is jammed. It will be necessary to undergo surgery to restore its functionality.
Operating principle of a ball valve
There are many design solutions for a household ball valve. Crane bodies can be all-welded or composite. All-welded, if broken, requires mandatory replacement. The last option is conditionally repairable. The convention is that not every owner will be able to reassemble it. But a skilled person can eliminate some troubles with his own hands.
The valve bodies are made of brass, silumin, carbon or stainless steel. The scope of its application is determined by the material. The locking ball is made from the same material as the body. The ball should be perfectly round and its surface should be perfectly smooth.
When the hole in the ball aligns with the lumen of the pipeline, liquid flows through the tap. When the tap handle is turned 90°, the flow is completely blocked. Intermediate positions regulate the flow of fluid through the pipe.
There is a slot on the ball itself into which the rod “screwdriver” fits. The rod is rotated by the handle, and it transmits rotation to the ball.
PHOTO: YouTube.com Disassembled ball valve
PHOTO: YouTube.com Long handle faucet
If the faucet has not been used for a long time, or the ball has not been rotated inside the body, then the suspended matter in the water will settle on its surface, and the faucet may jam. You can't turn it by hand anymore. But using the tool is dangerous, you can break something. Repairs need to be carried out according to the rules.
PHOTO: YouTube.com The tap by the handle (butterfly) does not turn
In this case, you need to unscrew the nut that secures the butterfly to the valve stem and remove the butterfly.
Then loosen the nut that presses the Teflon washer inside the housing.
PHOTO: YouTube.com Loosening the clamp nut
And drip some lubricant there.
PHOTO: YouTube.com Lubricant for the valve stem
After a few minutes you need to start “scrolling”. The rod is grabbed by the slots on it with a wrench or pliers. Now you need to very carefully, without using much effort, begin to twist the rod around its axis. Each subsequent movement will give a slightly larger angle of rotation. Just under no circumstances should you rush, otherwise you might break the tap. The whole procedure will take 10-15 minutes. As a result, the crane will turn 90° from stop to stop. The clamping nut should be screwed in until it stops, and the handle should be put in place. Now you can check it with water for leaks.
Conclusion
Not in every unpleasant case you need to call a plumber for help. You can fix a lot of things yourself. Now, if the valve body bursts, then it must be replaced with a serviceable one. But to do this you will have to turn off the water above the breakage. This is where a plumber may be needed.
Kinds
Let's start with definitions. There are taps and mixers in the bathroom and not in the kitchen. Taps only supply water; mixers also allow you to regulate its temperature by mixing two streams - cold and hot water. In this article we will talk specifically about taps and how to repair them. Faucet repair is very similar, but has its own characteristics. By the way, you can read about repairing single-lever faucets here.
There are several types of taps for the bathroom or kitchen:
- valve;
- single-lever (also called cartridge or flag).
Cranes - flag and valve
Their devices are different, so the repair, even with the same damage, is significantly different. Therefore, we will consider each type separately.
The spout is unscrewed
Good afternoon There is such a spout. The problem is the following. When turning to the sides, it strives to unscrew and gradually unscrews. The bottom part unscrews. I twist it with my hands, quite tightly. It spins a bit stiffly after that. If you tighten it with a key, I'm afraid it won't turn at all. I take it this shouldn't happen? Yesterday I discovered a hexagon bushing in the place where it is attached to the tee. Can it be adjusted?
02.11.2015 at 15:25
Nemiroff wrote: in the place of attachment to the tee there is a bushing for a hexagon.
Don't twist! This is for mounting the switch.
Nemiroff wrote: If you tighten it with a key, I'm afraid it won't turn at all.
02.11.2015 at 15:58
Kasimov, I'll try in the evening. Can you tell me more about installing the switch? The bushing in the spout itself is twisted
02.11.2015 at 18:45
Nemiroff wrote: It spins a little tight after that
unscrew, clean, lubricate and tighten with a wrench
02.11.2015 at 18:55
Nemiroff wrote: Can you tell me more about installing the switch?
Buy a new one tomorrow. Put it aside. And it will be possible to dig deeper into the old.
02.11.2015 at 19:06
If I understand correctly, this is the sleeve that secures the union nut. It doesn't regulate anything.
Usually, with a certain force of tightening the nut, the spout still turns quite normally, but the nut no longer unscrews. At least this is how things were with my 2 different (dacha, apartment) mixers
02.11.2015 at 19:37
If I also understood correctly, this crap is screwed into the “gander” and holds a union nut that is screwed to the diverter. On my Gishman mixer, I wound flax and smeared it with anaerobic (santechmastergel shtol is the only thing we have), it works on two mixtures for now, I got tired of this bullshit at the time.
02.11.2015 at 22:35
Nemiroff wrote: Can you tell me more about installing the switch?
Buy a new one tomorrow. Put it aside. And it will be possible to dig deeper into the old.
Very comprehensive answer
02.11.2015 at 22:36
Well, maybe. we'll check in an hour
02.11.2015 at 22:36 02.11.2015 at 22:38
Another thing. Although what does buying a new one have to do with it is still unclear
03.11.2015 at 00:24
In general, I removed the gander and did not unscrew the bushing. I turned it this way and that, tightened it with a wrench harder, the gander stopped rotating altogether, and when the force increased, it turned along with the tee. I took it off, sprayed silicone grease on the washer inside the union nut, tightened it by hand, everything seemed ok. But then I noticed that it started to drip in the place where the shower switch is located. Maybe it was dripping before, but I didn’t notice, maybe it’s starting now. But I don’t see any reason; I didn’t touch the switch at all. Now there’s a new task, how can I help him?