As you know, kitchen hoods come in classic and recirculating types.
The first discharges air into the ventilation shaft or directly to the street. The recirculation system simply pushes it through itself, trapping fat. It is designed with filters to remove odors from the air.
The main questions and problems arise when installing and connecting the classic version. We will consider it in as much detail as possible.
To begin with, we will briefly list the main mistakes that await you along this path. Below we present ways to solve them and the most popular installation methods.
Motor connection with 4 wires
How to determine the working and starting windings of a single-phase motor
Single-phase motors are low-power electrical machines. The magnetic circuit of single-phase motors contains a two-phase winding, consisting of a main winding and a starting winding.
Two windings are needed to cause the rotor of a single-phase motor to rotate. The most common motors of this type can be divided into two groups: single-phase motors with a starting winding and motors with a running capacitor.
For engines of the first type, the starting winding is switched on through a capacitor only at the time of start-up and after the engine has developed a normal rotation speed, it is disconnected from the network. The motor continues to operate with one working winding. The size of the capacitor is usually indicated on the motor nameplate and depends on its design.
For single-phase asynchronous AC motors with a running capacitor, the auxiliary winding is permanently connected through a capacitor. The value of the working capacitance of the capacitor is determined by the design of the engine.
That is, if the auxiliary winding of a single-phase motor is starting, its connection will occur only during the start-up, and if the auxiliary winding is a capacitor, then its connection will occur through a capacitor, which remains turned on during engine operation.
It is necessary to know the design of the starting and operating windings of a single-phase motor. The starting and operating windings of single-phase motors differ in both the cross-section of the wire and the number of turns. The working winding of a single-phase motor always has a larger wire cross-section, and therefore its resistance will be less.
Look at the photo and you can clearly see that the wire cross-sections are different. The winding with a smaller cross-section is the starting one. You can measure the resistance of the windings using dial and digital testers, as well as an ohmmeter. The winding with less resistance is the working one.
Rice. 1. Working and starting windings of a single-phase motor
Now here are a few examples you may encounter:
If the motor has 4 terminals, then having found the ends of the windings and after measuring, you can now easily figure out these four wires, less resistance is the working one, more resistance is the starting one. Everything is connected simply, 220V is supplied to the thick wires. And one end of the starting winding, for one of the workers. On which of them there is no difference, the direction of rotation does not depend on it. It also depends on how you insert the plug into the socket. The rotation will change depending on the connection of the starting winding, namely, by changing the ends of the starting winding.
Next example. This is when the motor has 3 terminals. Here the measurements will look like this, for example - 10 ohms, 25 ohms, 15 ohms. After several measurements, find the tip from which the readings, with two others, will be 15 ohms and 10 ohms. This will be one of the network wires. The tip that shows 10 ohms is also the network one and the third 15 ohm will be the starting one, which is connected to the second network one through a capacitor. In this example, the direction of rotation, you will not change what it is and will be. Here, in order to change the rotation, you will need to get to the winding diagram.
Another example when measurements can show 10 ohms, 10 ohms, 20 ohms. This is also one of the types of windings. These came on some models of washing machines, and not only that. In these motors, the working and starting windings are the same (according to the design of three-phase windings). It makes no difference what kind of working winding you have and what kind of starting winding. The starting winding of a single-phase motor is also connected via a capacitor.
Edited by A. Povny
Connecting the motor of an old washing machine is a little more complicated and will require you to find the necessary windings yourself using a multimeter. In order to find the wires, ring the motor windings and find a pair. Finding a pair of wires To do this, switch the multimeter to measuring resistance, touch the first wire with one end, and find its pair with the second in turn. Write down or remember the winding resistance - we will need it. Then, similarly, find the second pair of wires and fix the resistance. We ended up with two windings with different resistances. Now you need to determine which of them is working and which is starting. Everything is simple here, the resistance of the working winding should be less than that of the starting winding. Many people believe that a capacitor is needed to start such an engine. This is a mistake; the capacitor is used in other types of motors without a starting winding. Here it can burn the motor during operation. To start an engine of this type, you will need a button or a start relay. A button is needed with a non-fixed contact and, for example, a doorbell button will do. Now we connect the engine and the button according to the diagram: But the excitation winding (OB) is directly supplied with 220 V. The same voltage must be applied to the starting winding (SW), only to start the engine for a short period of time, and turn it off - this is why the button is needed ( SB). We connect the OB directly to the 220V network, and connect the software to the 220V network via the SB button. Motor connection diagram PO - starting winding. Intended only for starting the engine and is activated at the very beginning until the engine begins to rotate. OB – excitation winding. This is the working winding, which is constantly in operation; it rotates the engine all the time. SB is a button that applies voltage to the starting winding and turns it off after starting the motor. After you have made all the connections, just start the engine from the washing machine. To do this, press the SB button and, as soon as the engine starts to rotate, release it. In order to reverse (motor rotation in the opposite direction), you need to swap the contacts of the software winding. This will cause the motor to start rotating in the other direction. That's it, now the motor from the old washing machine can serve you as a new device.
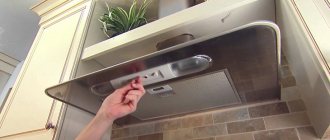
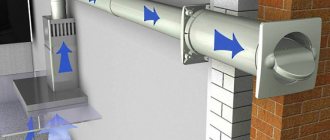
Why does the check valve sometimes not work and close?
On the kitchen side, a check valve is mounted on the tee. In the factory version it will be quite long. In this case, it is better to shorten it so that this “gun” does not stick out too much.
The valve is inserted inside a section of a standard air duct d-125mm, and this air duct is put on and siliconized onto the tee.
If this whole structure seems too cumbersome to you, and the protruding pipe with the valve is not very aesthetically pleasing, you can do it a little differently. You make the air duct not with a round pipe, but with rectangular channels.
In this case, you install the above check valve on a straight section, as close as possible to the turn.
You can't achieve a factory connection here, so you'll have to farm collectively. Buy a rectangular tee with a round outlet on one side. Next, this round timber is cut off and a check valve is glued in its place.
The valve is placed strictly at an angle (2 degrees). Otherwise, it will open every once in a while or not open at all.
Many people have encountered this problem and easily solved it this way.
The damper itself is also mounted with a vertical deviation. The upper turning point, based on the hour dial, is at 13.00 (1 o'clock), and the lower one is at 17.00 (5 o'clock). This is if your flow direction is from right to left.
Otherwise, the circle is placed at the 11 o'clock - 7 o'clock position.
For more reliable operation and stable opening of the damper, you can stick some kind of weighting material (no more than 2 grams) on one side. Glue it close to the edge.
By the way, do not throw away the previously cut round pipe. It is tightly inserted onto the valve from above, after which a decorative grille diffuser is mounted on it.
What nuances might there be with this method? If your hood stands exactly above the entrance to the ventilation shaft, and the duct pipe goes straight, without any turns in the horizontal plane, then the valve installed on such a straight section does not work normally, at least at 1st speed.
You will simply have nowhere to get the increased pressure to close it. The air will fly through this “turn” in a straight line. You definitely need an angle.
The valve cover and its rotating mechanisms are easy to clean and do not be afraid of them becoming overgrown with grease. For this to happen, you will have to fry huge wild boars on the stove and stew them in your oven for several hours a day, no less.
If you don’t want to see a protruding “hollow” under the ceiling at all, then, as an option, you can install a tee so that the middle elbow rests against the wall, otherwise, where the valve is located, it would look to the side. In this case, also close the hole with a decorative cover.
Everything will look much nicer. However, due to the additional rotation, the performance of natural ventilation will deteriorate slightly. And the grill will reduce it by another twenty percent.
In addition, it will no longer be possible to clean the channel by hand or with a vacuum cleaner. But many do this deliberately and even hide the entire structure in a wooden or plastic box.
As they say, beauty requires sacrifice.
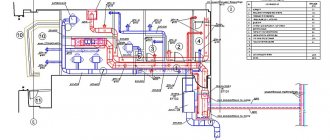
Electrical diagram of the hood Best
The numbers between the wires are the amount of resistance in Ohms between the indicated wires, namely:
Blue ∼22∼ White ∼22∼ Orange ∼22∼Black∼65∼ Red ∼22∼ Brown
Blue ∼…. 150 ….. ∼ Brown
Next, one wire of the 220 V power supply is connected to the Brown wire. The second wire of the 220v power supply is alternately connected to Blue, White or Orange, thereby changing the extraction speed from the third to the first through the second.
That's actually all the difficulties of the hood. And then what controls the gear shift. Or it is a mechanical speed switch (the speed is switched by pressing the corresponding buttons).
Or the shifting can be electronic, where the gear shift is controlled by an electronic control module. And you either move your finger to the corresponding sensor on the front panel of your kitchen hood, or lightly press the microswitch with an LED indicating the selected hood speed.
If the motor of your hood does not rotate, try to set some speed and somehow turn the motor manually; if it starts to rotate, then feel free to change the starting capacitor; it looks like it is out of order.
Book How to repair a kitchen hood Best:
A detailed description of the hood is provided. Exhaust device. Principle of operation. Various malfunctions of Best kitchen hoods are considered.
The malfunctions, their causes and the main detailed and step-by-step instructions for disassembly, fault detection, repair and subsequent assembly are described.
You will receive answers to the following categories of questions, as well as invaluable guidance on how to fix any kitchen hood malfunction yourself, quickly and efficiently at home:
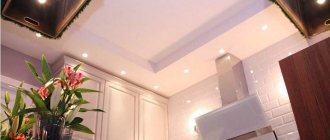
Different ceiling levels and a sleeve as an element of style
Arranging a ceiling in the form of several levels is another way to aesthetically design a hood hose.
The second-level design will help not only hide the sleeve, but also securely secure it in the area between the ventilation and the hood.
The main thing is to place the sleeve so that it does not deform. This method of masking is ideal in cases where:
- the owners have started renovations and plan to radically redo the ceiling;
- an apartment in a new building is being prepared;
- A very old building is being reconstructed;
- the ceiling height is very high, and there is a desire to reduce it by making a two-level structure;
- The usable area of the room is large enough or when decorating the interior of a studio apartment.
Kitchen_hood_motor connection
Kitchen hoods have now become such a common household appliance that they are installed in almost every home. Its main purpose is to remove soot, steam and odors that arise during cooking and pollute the kitchen. The hood is connected to a 220 V network, and the power consumption can reach 200 watts.
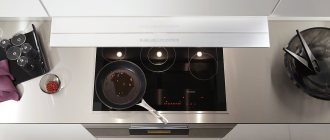
Let's look at the simplest electrical circuit diagram of a stove hood.
Here, power from the outlet is supplied to two current consumers - the motor and the lamps. Depending on the model, there may be several lamps, and 1 or 2 electric motors. Sometimes low-voltage halogen lamps are installed, then an electronic transformer is switched between them and the network, reducing the voltage to 12 V.
In general, hoods can use incandescent, fluorescent or halogen lamps. Hoods with fluorescent and halogen lamps are more expensive, but they save energy and are more efficient.
Hood diagrams BORA 1000
More expensive models of hoods have the ability to adjust the brightness of the lighting and motor speed.
Push-button control is carried out using recessed buttons, which are usually located on the front panel of the hood. This type of control is considered the cheapest, but also reliable.
Slider control using a movable lever. Moving along the panel on which the divisions are marked, the lever switches speeds and sometimes activates the lighting. This is also an inexpensive type of control.
Touch control is carried out by touching the control panel, which is often located on the front of the hood and is accompanied by a light indication. This panel looks very stylish and is easy to care for, but hoods with touch controls are much more expensive. This type of control allows you to program the operation of the kitchen hood for the entire period of its operation. The program automatically changes the fan rotation speed if necessary. If the amount of steam or burning increases, maximum performance is automatically switched on. If a person approaches the stove, the brightness of the lighting increases, if he moves away, it decreases. When work is completed, the hood is de-energized.
“Smart” models of hoods work without human intervention and are controlled from the kitchen stove. Ultrasonic sensors are built into the hood. As soon as fumes appear above the stove, the sensors detect them and send a signal to turn on the hood. Moreover, the sensors evaluate both the intensity of evaporation and its density, which allows you to select the required ventilation intensity. When all burners are turned off, the radio transmitter sends the command “turn off the hood.” The hood switches to minimum power and runs for a few more minutes. Then it automatically turns off and the light goes out.
This type of control is called control of the hood operation from a working stove. And this work is carried out by the radio control unit. It includes a coded radio transmitter and a radio receiver tuned specifically to this code.
Prices for hoods can vary significantly. For example, the simplest single-motor model without backlight will cost from $30, and the cost of top-end devices with smart electronics reaches up to a thousand.
It is difficult to imagine a modern kitchen without a good hood, which removes odors arising during cooking and renews the air in the room. Although the design of this device is not particularly complex, sometimes problems with its performance may arise. If you are one of the people who, when a household appliance breaks down, tries to find the cause of the problem on their own before turning to specialists, then this article is for you. Below we will look at how to repair kitchen hoods with your own hands when typical problems arise.
Drywall
Installing a plasterboard box around the hood ventilation pipe is the simplest and most functional way to preserve the aesthetics of the room. It is recommended to use a metal box that matches the diameter of the air duct as a sheathing. Next, the sheathing is lined with sheets of plasterboard along the entire length of the pipe along the wall and ceiling.
When installing a plasterboard box, you can simultaneously provide additional lighting for the work area, since the structure is located in the upper part of the room. The final finishing usually involves painting the sheets in a color that is in harmony with the overall design of the kitchen interior.
Sometimes this method of hiding the ventilation pipe is combined with the installation of a two-level suspended ceiling.
Kitchen hood design: schematic diagram ↑
The main components of any hood are:
Standard electrical diagram of a kitchen hood
Exhaust fan ↑
The fan is, without a doubt, the main element of this device. It is this that ensures the movement of air flows through the filtration elements on which fat is retained. Fan rotation in hoods is usually ensured by a high-speed asynchronous motor.
For your information! The design of a multi-speed AC motor includes a squirrel-cage rotor and a stator with several independent windings. Changing the engine speed is achieved through different connections of the stator windings.
Switching diagram for a three-speed motor: when the switch is in position L, the rotation speed is minimum, in position H - maximum
Common mistakes
The most common mistakes are made when installing corrugated or plastic air ducts. Thus, to install a plastic or corrugated pipe, it is important that its cross-section matches or exceeds in size the area of the air purifier outlet pipe. When purchasing hoses and exhaust equipment, you should pay attention to this.
The corrugated pipe must be installed as stretched as possible, which is not always observed. Its bends should not be less than the diameter of the corrugation itself.
When laying a plastic pipeline, the bend angles must be obtuse.
Typical hood problems: causes and repairs ↑
Repair of kitchen hoods at home may be required as a result of various operational problems, the most common of which are:
Insufficient pull - odors are not eliminated ↑
Possible reasons: clogged filtration element, broken exhaust fan impeller.
Repair: Wash the metal grease filter under water and detergent and/or change the disposable filter. If the fan malfunctions (as a rule, one or more blades break), it is necessary to replace it (how to disassemble a hood in the kitchen will be discussed a little below).
Insufficient performance of a kitchen hood in most cases is caused by untimely maintenance of filters
No lighting ↑
Possible reasons: one of the lighting fixtures or the lighting switch has failed.
Repair: Before you run to the store for a new lamp, you should check its functionality. Incandescent lamps and halogen lamps are checked with a tester (multimeter) in resistance measurement mode. The nominal resistance of the thread is usually several tens of ohms. The absence of readings on the device indicates a burnt-out filament.
Important! Before testing the lamp in another socket, make sure its rated voltage is 220 V.
If all the lighting fixtures are working properly, then there is a high probability that the light switch button is not working. It can also be checked with a tester - when pressed, the resistance between the contacts should be less than 1 Ohm.
Measuring the resistance of an incandescent lamp with a digital multimeter
Does not respond to switching on ↑
Possible reasons: lack of mains power, burnt track or fuse.
Repair: If the hood does not respond to any manipulations after connecting it to a 220 V network, first of all you need to check the voltage in the outlet, for which you use a multimeter in AC voltage measurement mode.
Note! Using a voltage indicator allows you to determine only the presence/absence of a phase, while it is impossible to identify a break in the neutral wire using this device.
If everything is fine with the input power, then a track on the control board or a fuse that is installed in the device to protect it from power surges may have blown. In this situation, repairing a kitchen hood requires at least basic knowledge in the field of electricity and electronics.
Checking the presence of voltage in the outlet
Speed does not change ↑
Possible causes: the exhaust fan speed switch is faulty.
Repair: The main reason a pushbutton or slide switch fails is natural wear and tear. In terms of maintainability, buttons are better, since it is possible to replace one element rather than the entire block. If the slide switch starts acting up, then you can try to disassemble it and clean the contacts. However, to prevent the problem from returning soon, it is more advisable to replace the old switch with a new one.
To replace the button, it is enough to know how to work with a soldering iron
The fan does not rotate ↑
Possible reasons: the thermal fuse has blown, the starting capacitor is faulty, the motor winding has burned out, the rotor wedge has burned out.
Repair: The exact cause of engine failure can be determined by indirect symptoms. If the unit does not make any sound when turning on any speed, and there is also no smell of a burnt winding, the thermal fuse is most likely blown.
Please note! The thermal fuse is installed directly in the motor housing and burns out due to severe overheating of the windings.
Breakdowns of the treatment plant and methods for correcting them
Almost all pumping station breakdowns are manifested by an increase in the level of wastewater in the receiving compartment. A rise in the level activates an emergency float, which triggers an alarm - a bell or a light signal. This alerts the user to the danger of flooding the system and releasing untreated wastewater outside the unit.
Flooding of sewage treatment plant
First of all, you need to check whether the drainage channel for purified waste from the device is clogged or frozen. If not, then you need to look for the cause of the station’s flooding based on the type of equipment. It can be with a gravity drainage system or with forced pumping.
In models with forced pumping, the problem may be a broken drain pump or a stuck float switch. To check the operation of the pump, remove it and connect it to another outlet. If the pump is in order, but does not turn on after connecting to the station, then most likely the problem is with the float switch - it needs to be replaced.
The following problems may be common to gravity and forced models. Check whether liquid is pumped from the receiving compartment to the aeration tank. If not, then the culprit is a faulty airlift. The reasons for the breakdown may be the following:
- the airlift tube is damaged;
- the airlift of the main pump is clogged;
- the float switch is faulty;
- The compressor membrane that supplies air to the airlift is damaged.
Breakdowns are eliminated by replacing damaged elements or cleaning clogged areas.
RCD tripping and problems with power supply
If, when starting the station, an RCD (residual current device) is triggered, the reason may lie in damage to the compressor or drain pump, or float switch. It is also necessary to check the electrical wiring and sockets.
Disturbances in the operation of the installation can also be caused by a prolonged power outage, and then there is a possibility of overflowing of the tanks and the occurrence of an unpleasant odor due to the onset of the development of anaerobic microorganisms. If the voltage drops in the network are within 3% of the nominal value, it is necessary to install a stabilizer.
Changing the water level in an idle station
It is not advisable to leave the TOPAS cleaning system idle for a long time. But if this does happen, and it is discovered that the water level in the tank is changing, then possible malfunctions may be the following:
- Failure of plumbing fixtures leading to water leakage. You need to find the source of the leaks and repair or replace them.
- The device casing is damaged. If the problems are minor, then you can try to solder the case; if not, you need to contact professionals for help, and they will replace the damaged area. And it’s good if you can get by with repairs, because replacing the entire body will not be cheap.
- Improper installation and, as a result, flooding with rain or flood water.
- The station tank must be installed so that the lid rises 15 cm above the ground surface.
A problem can also be a poorly organized exit of purified water from the system. The situation of poor outflow can be aggravated by poor soil throughput.
Disassembling the device: step-by-step instructions ↑
To repair a hood with your own hands, you need to know how to disassemble it. By following the instructions below, you should not have any serious difficulties with this process.
This instruction is an example of disassembling a modern kitchen hood. It is worth noting that in many models, individual blocks are mounted independently of each other. For example, to remove the engine, it is not necessary to unscrew the backlight unit.
Advice! If disassembly requires disconnecting connectors or wires, be sure to label or photograph the items before performing any manipulations. Thanks to this approach, you will not have any difficulties connecting blocks during assembly.
Plastic box
You can effectively hide the pipe using a plastic box. Such options exist in various designs and have a wide selection of shapes, colors and decor. Some models may even be equipped with built-in lighting. But the option with a plastic box is suitable only if the air duct opening is located in close proximity to the hood.
How to avoid damage to the hood: tips for proper operation ↑
In order not to resort to kitchen hood repair, you should adhere to the operating rules for this equipment, which are established by the manufacturer. Let's highlight the main points:
If a gas stove is used in the kitchen, the hood should be installed at a height of 70-80 cm from the hob, if electric - at a height of 60-70 cm. If the hood is located below this mark, overheating of the structural elements with subsequent deformation is possible. At the same time, a higher location will reduce the efficiency of the device.
If there is a manual speed switch, it is advisable to start starting from the lowest stage. Setting the maximum speed right away will increase the load on the electric motor, which can reduce its service life.
Untimely cleaning or replacement of filter elements leads to the fact that grease particles begin to penetrate inside the device, covering the engine, control board and backlight lamps with an oil film. In addition, practically no air passes through a clogged filter, so the efficiency of such a hood is zero.
Like any other electrical appliance, a kitchen hood must be protected from power surges. Of course, a fuse is usually installed inside the device, but it cannot always protect the equipment from an unstable network. This can be better dealt with by additionally installing a protective relay, which instantly turns off the power if the voltage deviation from the norm is too large.
Voltage relay – additional protection of equipment from power surges
The complexity of repairing a kitchen hood depends on the nature of the problem. Anyone can change a burnt-out light bulb, but restoring the operation of a fan can pose serious difficulties. If there is no experience at all in repairing electrical appliances, then it is more advisable to turn to specialists so that you do not have to buy new equipment.
How does a kitchen hood filter work?
Installing a hood in the kitchen with your own hands: installation tricks
The need to install a kitchen hood in an apartment is explained by its ease of use and the effectiveness of indoor air purification. A breakdown in the ventilation system in a home kitchen usually occurs due to a malfunction of the electric motor. What could be the problem, how to eliminate the defect and repair the motor yourself is described in detail in this article.
Suspended ceiling
An interesting solution could be to install a multi-level ceiling in the kitchen. In this case, the part of the pipe running above is hidden behind the lower edge of the second level located above the work area, while the remaining ceiling space is located above. This ensures zoning of the room, and the externally unsightly ventilation pipe remains hidden under the plasterboard structure.
The use of a stretch ceiling for this purpose creates some problems: if problems arise in the operation of the exhaust duct, the ceiling sheet will have to be dismantled, and this is a very time-consuming and costly undertaking.
How to repair a breakdown yourself?
If the hood is faulty, you feel a lack of air in the room. A number of other signs indicate a system breakdown:
To cope with the problem, you need to have basic knowledge of the structure of the ventilation system. This information will help pinpoint the cause.
Its correct determination can be made using the operating instructions. Using it you can thoroughly lay out all the elements and understand how to gain access to the engine.
Since it is during operation that the motor most often breaks down. To repair it, you need to prepare a set of dismantling tools and wear gloves.
Why hide pipes?
Communications installed in plain sight have a negative impact on the interior of the room. For the same reason, during the repair process, they try to hide water and gas pipes, as well as air ducts. The difficulty lies in the fact that communications of the latter type are always located in the upper part of the room. You need to choose a method that will preserve the attractiveness of the interior, using auxiliary structures: boxes, decorative elements, etc.
In addition, a corrugated pipe is difficult to maintain, since dirt accumulates intensively on the ribs and between them. The presence of a decorative box in this case avoids the need for regular cleaning of this type of air duct. When installing corrugation, not all methods can be used, due to its ribbed surface.
Main causes of malfunction
Among the main reasons:
- Incorrect operation of the exhaust system. The engine may break due to improper handling of adjacent elements. For example, due to a clogged mesh filter that catches grease, the operation of the propulsion systems may be disrupted. The filter needs to be cleaned regularly, about once every three weeks.
New models have an indicator light. When it lights up, then it is time to replace the filters. The signal is given during proper operation no earlier than after two years of engine operation.
Summarizing
Anyone can create an original kitchen interior with a ventilation housing. There are many ideas, interesting developments that transform a disturbing box into a functional element.
If you want to disguise a small box, use a furniture set where the cabinet doors are the same shade.
The design of a kitchen with a ventilation duct requires taking into account the layout of the room.
Creating false windows will add a Scandinavian-style feel. An exclusive stained glass window is being created and glass with paintings is installed. By securing a pot with plants on top, you get the illusion of reality.
In many apartments there is a kitchen with a ledge in the corner. To hide it, place a hob here equipped with a powerful hood.
Disassembling the device: step-by-step instructions
Dismantling external ventilation parts
To remove the engine, it is necessary to disassemble the external parts of the kitchen ventilation. In this case, you can gain access to the engine system.
To do this you need to take the necessary tools and materials.
When the motor is removed from the device, the resistance of its windings is checked. To do this, prepare in advance a bundle of wires that go from the board to the electric motor. In this case, you can simultaneously diagnose faults in the motor and try to repair it without removing it from the hood. The method is less convenient, since a complex of additional work will first be required. It is better to dismantle the engine itself and not touch other parts in the ventilation housing.
Cleaning and checking
After cleaning all the grooves, dry the small parts well. Cleaning can be done with a soft cloth that does not leave streaks or scratch the surface. After cleaning, the serviceability of the engine is checked. The problem of its failure to work could be due to clogging of parts. After cleaning, the structure can become serviceable.
When the motor is installed in place, its performance is checked. If the problem also persists, the ventilation works very poorly, which means the engine needs to be replaced or some of its components are broken. The device is again removed from the fan and its performance is checked in detail.
Testing and assembly
The engine may gain speed when turned on when cranking it manually. This situation indicates a fault in the starting winding. It needs to be removed from the electric motor and replaced.
The converter adapter is also checked with a tester to ensure it matches the voltage required for operation. When using a standard 220 V LED lamp in the system, repairs only involve cleaning the contacts in the lamp base.
Preparing the ventilation shaft hole
Before all installation work, it is advisable to plaster the entry into the ventilation shaft itself and remove all sharp corners. This will give the entrance maximum aerodynamic qualities.
You should end up with approximately the same surface as a standard 90 degree round elbow.
It is recommended to add ceresit liquid (ceresit CT99) to the plaster solution.
This hole will be exposed to fat and moisture. And ceresite contains components that prevent the formation of mold.
However, do not use gypsum plaster under any circumstances. Its use in ventilation shafts is a direct path to the appearance of mold and fungi.
Attach sections of a standard air duct to the tee on both sides. From the side of the wall, 5-7 cm, wall it up in the ventilation duct. The exit itself is decorated with a square frame.
Wall mount
As mentioned above, models such as dome and wall-mounted ones are attached to the wall, although they differ significantly in appearance. Fastening is carried out through the holes provided by the manufacturer, located on the rear wall of the case. Some manufacturers complete such products with special templates. Having attached the template to the wall, the fastening points are marked, after which holes are drilled in the wall, dowels are hammered in and finally the product is secured with screws. Often the kit also includes fastening elements, which are represented by dowels and screws. If there is no template, you will have to work hard, carefully measuring the distance between the holes, after which these dimensions should be transferred to the wall.
The hood must be attached to the wall through the standard holes in the housing.
Of course, it’s quite difficult to do everything yourself, so it’s better to have an assistant. At this stage, it is very important to ensure that the hood is fixed strictly level.
It will be worse if there are pipes in the place where the hood should hang and it will not be possible to attach the hood directly to the wall. In this case, you will first have to attach wooden blocks to the wall, and then you will have to attach the hood to them. Unfortunately, this is not the best option, since the hood will be far from the wall and will not be located directly above the stove, and the space behind the hood is a comfortable place for cockroaches to live, for example.
How to install a hood on a wall if a gas pipe is in the way or the wall is uneven
Instead of wooden blocks, it is permissible to use special long pins, but again, this is not a very good option, since reliable fastening will not work. It is better to make sure that nothing interferes with the hood, although this is not always possible.
How to install a hood on an uneven wall