Often, amateur beekeepers who keep 2-3 families of bees are faced with the problem of “overpopulation”. After all, bees begin to swarm, which means the question of purchasing new hives arises. But what to do in this case? Not everyone can afford to buy new ones, but used ones are also dangerous. After all, it is unknown why they are sold and what diseases can be acquired along with the “home”. That’s when the thought arises - why not make a hive for bees with your own hands ?
Today we will try to figure out how difficult it is and what is required for this. Surely this information will be useful for those who are just thinking about beekeeping. Beekeeping for beginners: what to buy for an apiary (read more)
Here it is – the birth of delicious and sweet honey.
Beekeeping for beginners: where to start for an inexperienced beekeeper
The main thing is, of course, to understand whether a person can do this difficult work. After all, not everyone can do it due to physical indicators or health conditions. The first and most important requirement is that you are not allergic to bee stings. After all, some people cannot tolerate even isolated cases. If a novice beekeeper has such a strong reaction, then the path to the apiary is forbidden to him.
On a note! You should know that bee venom, when entering the body, contributes to a sharp increase in blood pressure. That is why people with heart disease and hypertension are strictly prohibited from engaging in such activities.
Now about the physical condition. Those who plan to take up beekeeping should understand that it is hard, everyday work. You will need to move hives, work on a honey extractor and much more. And you shouldn’t think that this is a very profitable business that will start generating income from the very first season. After all, at first large costs will be required for the bees themselves, hives, and additional buildings. And if there are no honey fields nearby, it will be necessary to transport the hives from place to place, negotiating with the owners of the meadows about the housing of the apiary, resolving issues with its protection. This means that for the first 2-3 years there is nothing to even think about the slightest profit.
Sometimes hives can even be like this.
But if you have already specifically decided to tackle this difficult task, then one of the primary expenses can be minimized - building hives for bees with your own hands. True, this will require some knowledge and experience in carpentry. But with desire, attentiveness and accuracy, this task is quite doable.
Bee family: general information about bees and the composition of the bee family (read more)
Features of manufacturing hive parts
Despite the variety of designs, the main elements of hives must meet uniform requirements and ensure the fulfillment of certain tasks. Below are the features of manufacturing the main elements of bee hives:
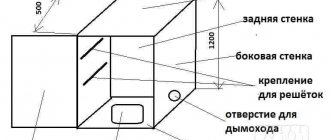
- Frame. This is the main part.
It looks like an ordinary four-walled box. As the family grows and its numbers increase, beekeepers stack the bodies one on top of the other. There are hives with 1, 2, 3 or more bodies. The optimal wall thickness for a hive is 3.5 cm. This option allows insects to safely overwinter. The body parts are fastened together with nails or PVA glue. A 1 x 4 cm slot is always made in front. There are recesses on the sides, at a distance of 7 mm from the top of the case - these will be carrying handles. Holes are drilled at the bottom of the housing with a drill to ensure the flow of fresh air. The outer part of the body is coated with a water-repellent composition and painted in a suitable color - white, yellow, blue. - Roof. It is usually made from boards 2 cm thick. The design is inlaid - in the form of a shield. For greater reliability, the roof is sheathed with metal sheets. Even tin is enough - the main thing is to protect the wood from excessive exposure to moisture and prevent rotting. Beekeepers often place mesh on the top of their hives for additional air exchange during transportation. The mesh also protects the swarm from external adverse factors.
- Bottom. In regions with harsh winters, it is made from two layers of boards at once. And be sure to arrange an insulating backfill. In the south of the country, insulation is not required; the bottom is made single. It is assembled from bars in the shape of the letter “P”. Grooves are made in the side bars and parts of the structure are inserted.
Bee hives are presented in a wide design range, allowing each beekeeper to choose the best option, taking into account the tasks and scale of honey production. With the desire and certain skills, every beekeeping enthusiast can not only make hives on his own, but also modernize them at his own discretion.
0
0
Copy link
Construction of a hive for bees: general information about what types they are
To understand how a hive works, you need to study all the information about them and figure out why this or that compartment is needed. Many beekeepers, sometimes even hereditary ones, do not even know what they are called. But this does not stop them from doing what they love. However, beginners will have to figure it out. After all, to build one, you need to be able to read drawings of bee hives, and sometimes draw them yourself. Now let’s look at some of the types and try to understand which one is easier to build to begin with. Those who subsequently engage in this business on a larger scale will eventually understand all types of bee houses. For now, let's start with the most common ones.
Note! There are various drawings of beehives for bees on the Internet, so it is not difficult to find a suitable option. But it must be emphasized that professionals and experienced beekeepers and experts prefer collapsible structures. Such structures are more convenient to use.
Construction of a hive for bees: standard design, features of popular modifications
The main elements of a classic “bee house” are shown in this picture
Below is the purpose and special characteristics of individual parts:
- The base (1) ensures the stability of the entire structure. It is made quite durable. Small holes in the side parts are needed for ventilation, which prevents rotting processes.
- The bottom (2) in this hive serves as a transition element and a “take-off and landing” platform at the same time. Some designs provide for the possibility of changing the size of the entrance taking into account the size of the bee colony, season, and weather conditions.
- The main part is the body (3). In this project, two identical elements are installed. This is where the queen lays eggs. To make it easier to maintain a comfortable temperature, the walls are made thicker, or an additional layer of porous materials is installed. Frames are placed inside so that there is sufficient space at the bottom for cleaning.
- In the separator (4), the dimensions of the slots are made such that only worker bees can penetrate upward. There is a store (5) with frames where honeycombs with honey are created during bribes. Sometimes this part of the hive is used to house layers during the winter.
- A hole is made in the ceiling (6). It is necessary for ventilation and free movement of bees. On this “floor” they install feeders and additional insulation elements during the cold season.
- The design is completed by a cover (7). It is covered with a metal sheet on top, which protects the wooden parts from moisture.
Hive frame
The special shape of the side parts with the expansion of the upper part (1) helps to create gaps of certain sizes when installing products in the hive. Strings (2) made of fishing line or steel wire stretched between them facilitate the construction of honeycombs. The elongated elements of the crossbar (3) rest on the walls of the housing during installation.
For your information! There are various drawings of bee hives on the Internet, so it is not difficult to find a suitable option. But it must be emphasized that professionals and experienced experts prefer collapsible structures. Such structures are more convenient to use. In particular, the repair of individual components is simplified.
Diaphragm
This element divides the hive into functional parts. For example, you can create favorable conditions for several bee families in one structure.
For your information! Instead of plywood, polyurethane foam, chipboard, and other materials are used that meet the above requirements for parts of the hive.
Reliable, durable stainless steel dividing grid
Similar inexpensive plastic product
Dadan-Blatt hive: simplicity and efficiency
Constructions of this type correspond to the description given in the previous section of the article
The clear advantage of this solution is modularity. If necessary, you can install a certain number of main buildings and stores. There will be no major difficulties during the manufacturing or repair process.
Design and main parameters of the structure
Here are the dimensions of the Dadan hive for 12 frames. The drawing is a working example that has been tested in practice. Some characteristics and details can be changed:
- The roof does not have to be flat. This option is suitable for organizing nomadic apiaries. If you make one or two slopes, raindrops are removed from the roof surface faster.
- The empty space between the bottom of the case and the base is created from 20 mm or more for effective ventilation.
- For the walls of the case/magazine, it is recommended to take wood with a thickness of 35/25 mm. But these standards must be adjusted taking into account the climatic conditions in the region of operation.
- For any number of frames, the following distances to the bottom/side walls/top ceiling are left from them: 20/7/10 mm.
Modernization of a standard product
This example makes clear the advantages of improving classic solutions:
- Instead of recesses in the walls, the lower heavy part is equipped with folding metal handles for carrying.
- Built-in latches ensure secure fastening of parts. But if necessary, they are separated without the use of special tools.
- To create the optimal dimensions of the “input block”, a metal strip with holes is used.
Important! Before changing the standard drawings of the Dadanovsky hive with your own hands, carefully study the recommendations of qualified beekeepers. This will help eliminate the mistakes that beginners make with a lack of practical experience.
Insulation and waterproofing of walls using modern materials
Langstroth-Ruth hive: how to keep many bees without unnecessary difficulties
These structures are made in 2-4 floors with 10 frames on each level
Drawing of a Ruth hive based on documentation from the Canadian Department of Agriculture
Like other vertical-type structures, this structure takes up little space on the land plot. If you use a minimal version, with one body and a half-magazine, it will not be difficult to organize the work correctly. However, experienced beekeepers advise not to start with installing a large hive. A large magazine will significantly increase the total volume, which will make it difficult to insulate the nest. Several floors allow you to occupy up to 40 frames, which implies great strength of the bee colony.
Using this drawing of a Langstroth hive with two magazines, you can study not only the dimensions, but also the assembly sequence
For your information! Professional beekeepers create hives of this type up to 7-8 floors. With their help, they collect more than 200 kg of honey in combs in one season.
Horned hive: minimum costs and simple production
Frame
Bottom
Lid
DIY drawings of a horned hive explain the main feature - the presence of pins in separate blocks.
These elements ensure the reliability of the vertical structure
Advantages:
- All parts can be made using simple carpentry tools.
- The design allows for some dimensional inaccuracy.
- Assembly and disassembly are carried out quickly and correctly.
- Inexpensive materials are suitable for production.
- Lightweight hives of this type move without much physical effort.
Alpine hive: space saving
Experts say that the model for this type of construction was the life of a bee colony in a hollow wooden trunk.
Be that as it may, in fact, all Alpine hives are distinguished by their great height
The following data will help clarify the important features of such structures:
- There are no ventilation holes or grilles dividing the total volume.
- The layer of air in the ceiling area moves, which prevents the accumulation of moisture and condensation.
- During the honey harvest period, the strength of the family increases. You can install additional housings to increase productivity and maintain an optimal microclimate.
- In winter, the reverse operation is performed. This makes it easier to create favorable temperature conditions.
- The cases are divided into volumes of 4-8 frames, taking into account the size of the bee colony.
- The bottom is installed only in the lower block.
- The upper element serves as a drinking bowl and feeder.
Lightweight polyurethane foam products have low thermal conductivity
Blueprints
Special frame for an Alpine hive: a “U” shaped metal element is attached to a wooden plank
Cassette hive: solving large-scale problems
Modular design
This structure ensures year-round maintenance of bees without seasonal movements. But with appropriate equipment, transformation into a mobile version is possible.
This drawing can be used to create a multi-body hive with your own hands for 10 frames
He explains the features of the invention in the field of beekeeping, which is confirmed by a domestic patent. The authors managed to reduce the complexity of maintenance while simultaneously improving temperature conditions during the cold season:
- Single body (1) provides integrity and high strength.
- The frames (3) are installed in cassettes, which are mounted on skids.
- The protective cover (6) is installed if protection against rodents is required.
- Bee families are separated by a special panel (4).
- “Pod-cassette” (7) sections ensure the passage of fresh air. They are taken out for routine maintenance.
- To improve the insulating properties, a layer of insulation (5) is installed.
Hive lounger: comfortable conditions for several bee families
The main difference is the horizontal design
This solution allows you to create favorable conditions for housing several families of bees.
Stationary partitions divide the common space into the required volumes
You can create a beehive lounger with your own hands using this drawing
A gable roof will protect from bad weather and make it easier to maintain temperature conditions.
It is better to install this part on door hinges. As shown in the figure, such equipment will facilitate the manipulation of a fairly heavy part during inspection, removal of finished products and other work operations.
Hive boa constrictor: description and important details
Features of the main parts of the structure
With the help of these drawings, it is not difficult to make a boa constrictor hive with your own hands. The following comments may also be helpful:
- Filling compact frames with honeycombs is not difficult for bees, so additional supports (metal strings, plastic threads) are not installed.
- To ensure sufficient thickness of the “air cushion”, the height of the lid walls is 25-30 mm, no less.
- Standard case dimensions (width x depth x height in cm): 37.5 x 36 x 13.5. This volume is enough to install a maximum of 10 frames. The diameter of the hole for the tap hole is 19 mm.
Work with such hives is organized according to a special algorithm:
- In the cold season, 4-5 buildings are used.
- When spring comes, 1-2 lower blocks are removed. This procedure is combined with replacement of the subframe and preventive inspection.
- After the first effective bribe, 1-2 cases (frames with foundation) are installed.
- If necessary, additional housings are mounted on top. As finished products accumulate, they are removed to pump out honey.
The above example is one option. Beekeepers like the ability to “flexibly” organize work processes and configure individual parameters for certain conditions. They note positively the following details:
- Compactness and low weight of individual parts reduce labor intensity. One person can remove and carry them, without an assistant.
- The absence of wire increases the reliability and strength of products.
- If you follow the given dimensions, a sheet of standard foundation will be enough for four frames without unnecessary waste.
- Small volumes of housings are useful for creating optimal space for each bee colony.
For an objective analysis, it is necessary to list the shortcomings:
- A small support area reduces the stability of the structure.
- It's easy to make one frame. However, given the total quantity required, more time and effort will have to be spent compared to similar products for a typical multi-body hive.
- In small sections there is a lot of empty space that is not used for its intended purpose (to create and fill cells).
Related article:
How to make a birdhouse with your own hands from wood. Drawings, materials, decor and installation, as well as many creative ideas on this topic are in our material.
Dadan-Blatt hive: its description, structure and some features of use in beekeeping
Initially, this hive bore the name of only one of its inventors - Charles Dadant. But its design, although quite successful, still required improvement. This is exactly what the Swiss beekeeper Blatt made, who added some innovations. But to this day, among beekeepers (perhaps for simplicity), the name “ Dadan hive ” is applied to this bee house.
This design is practically not used in industrial honey collection, but among amateurs it is practically the most popular. The dimensions of the Dadan hive with 12 frames, the drawing of which is shown in the image below, are 585x585x815 mm.
Note! It doesn't matter what the hive is. It is important to make as many stores as possible. After all, this is the most important thing for honey workers. But fanaticism in this matter is also useless.
In fact, such a house for bees is quite simple. In other words, building a Dadanovsky hive with your own hands, if you have the drawings before your eyes, will not pose any special problems.
What is a Langstroth-Ruth hive and how is it structured?
This design is also quite popular. And not only among amateurs, but also among industrial assemblers. It dates back to the beginning of the 19th century. At that time, beekeeper Lorenzo Langstroth invented its first version. However, it was somewhat inconvenient due to the fact that the bottom of the hive turned out to be non-removable. This made cleaning and maintenance much more difficult. However, already at the end of the same century, the industrial beekeeper Amos Root changed a little, and one might even say simplified the design. And even today, his descendants own a company for the production of various devices for apiaries, making similar hives.
The main difference between this bee house and the previous one is the absence of stores. In addition, the frames themselves are somewhat lower, although their width is completely identical. Drawings of Ruth's hive can be easily found on the Internet, therefore, there is no point in posting them all here. Of course, for the sake of a general concept, we will present some of them to the dear reader below.
The drawings of Langstroth's hives themselves differ slightly from Ruth's structure. But among beekeepers the name of this design stuck with only one surname. By analogy with Dadanovsky, they were simply called Rutovsky.
The Horned Hive of Mikhail Palivoda: the most budget option
Although many of those who have been involved in beekeeping for a long time and professionally speak about such a design with disdain, for a novice beekeeper it can truly be a godsend. In addition to the fact that it is much easier to make than the two previous options, it can also be done from almost any scrap boards.
Note! When we say “from any”, we do not mean oiled or rotten wood. A bee will not live where there is an extraneous smell, even the slightest one. It is for this reason that experienced beekeepers assemble hives using nails or screws and never use adhesives. And painting is used only on the outside of the bee house.
As for the ease of production, looking at the photos of the drawings of the horned hive we presented, even a schoolboy can probably make it with his own hands.
It is also good news that almost all breeds of bees can live in such a house. But Buckfast and Carpathian people especially like this structure. The famous Burzyan bee also feels quite good in it, but for some reason the beekeepers of Bashkiria have chosen other types of structures for themselves. Perhaps due to the fact that such hives are made quite small.
Beekeepers' tips for choosing hives
Beginners are advised to choose hives that are simple in design, lightweight and affordable. When planning to make a purchase, pay attention to the following points:
- Focus on the cost of effort and time for servicing and transporting hives.
- Duration of honey collection in the apiary area. If there is little honey, it does not make sense to buy multi-hull hives for stationary use. To transport hives to areas with rich honey production, lightweight multi-hull or cassette structures are needed.
- Breed of bees. It is she who mainly influences the development of the bee family.
It is recommended to buy hives equipped with the same parts and components. This will reduce the cost of maintaining the apiary.
Alpine hive or design according to the Roger Delon method
This is a rather convenient design due to the fact that as the number of bees in the family increases, there is no need to build a new hive. You just need to add inserts, raising it in height.
Roger Delon is a fairly famous French scientific beekeeper who keeps apiaries in the Alps. Moreover, thanks to the design of the hives, he does not have time to collect honey in the summer, and therefore does it already in the winter.
The design of the bee house itself is radically different from all those mentioned earlier, not only in structure, but also in size. It is for this reason that maintaining such hives is not very convenient. It is quite difficult to choose a suitable honey extractor for non-standard frames. But in terms of productivity, Alpine hives are ahead of any other, even in a non-melting year.
What types of honey are there: composition and classification (read more)
Cassette hive - a bee is offered to live in such a box.
It is also difficult to switch from ordinary bee houses to alpine ones - “it’s difficult for new residents to get used to a different structure. For this reason, if a novice beekeeper, having considered all the options, decided on the Alpine one, then you should not start with something simple with the idea that over time it will be possible to change the design. In this case, it is better to immediately build a hive according to the design of Roger Delon.
How are hives constructed?
The bee hive is a unique structure. Everything in it is created for comfortable living of the swarm. Beehives are primarily made of wood. Anyone who knows how to work with a plane and a hammer is able to build them on his own. But for this you need to thoroughly understand the design of the bee house.
The first step is to find quality material. The longevity of the hives will depend on it.
In production, boards made of high-density trees (oak, birch, etc.) are not used, since the structure should not be too heavy. The hives will have to be moved around the apiary or taken to the place where honey plants bloom.
General requirements for hives:
- simplicity and ease of use;
- reliable protection from temperature changes, rain, and other weather factors;
- good ventilation providing a favorable microclimate;
- the presence of insulation (protects from heat in summer, and from cold in winter);
- the possibility of increasing or decreasing the structure during operation;
- hive parameters corresponding to the size of the swarm, size and number of frames;
- bright, recognizable to bees, coloring of the “house”.
The basis of the hive is a body in the form of a parallelepiped. There is a nesting area inside it. The walls are single or double with insulation.
There are entrances on the front wall - through them the bees enter their home. Usually, two holes are made in the front - at the bottom (a long slit), and above it there is a round hole (it often plays the role of ventilation). The tapholes have valves.
Removable elements are attached to the main module of the hive:
- Bottom. Dead bees and waste fall here. The beekeeper removes them periodically. There is a stand at the bottom. It raises the hive above the surface of the earth. Sometimes the bottom is connected to the body, but then cleaning becomes more difficult.
- Framework. These are rectangular-shaped parts intended for the placement of foundations. The bases are hung in the housing so that the bees fill them with honey and beebread.
- Arrival boards. They are fixed under the entrance slots.
- Roof. Covers the hive from the sun and precipitation, protects from pests. Often under a waterproof roof there is an under-roof - this is a rectangular insert that improves the ventilation of the hive.
- Diaphragm. This is a thin board placed inside the housing. She shares frames with brood in the hive.
- Shop. Part of the body for storing commercial honey. Compared to the nest module, it has less weight, height and wall thickness. During active honey collection, several additional extensions are installed in the hive.
- Dividing grid. It prevents the queen from moving to the other half of the hive.
The dimensions of the structural elements are determined by the top of the hive and the materials used. It is important that all parts are tightly connected to each other, without gaps or cracks. If any are found, they are immediately sealed to prevent the bees from hypothermia.
Man created the first hives 4,000 years ago. In Palestine they were made from unfired clay and straw, in Europe they were hollowed out of wood to make logs. Designs similar to modern ones appeared in the 19th century. The first frame hive was created in 1814 by beekeeper Pyotr Prokopovich.
Cassette hive: why many do not recommend it
Such designs appeared relatively recently, but already now they have both supporters and opponents. Moreover, the latter are many times more numerous than the former. The essence of the design is to save space by narrowing the distance between the frames. This is where the main bone of contention lies.
Experienced beekeepers claim that this will lead to the appearance of layers of propolis between the frames. As a result, they will be inoperative. At the same time, there is no reason not to trust the opinion of experts.
Essentially, a cassette hive is a large dormitory.
It is also questionable what is recommended to be made from such material as fiberboard. Honestly, anyone who understands even a little about beekeeping will say that in such houses there can be no talk of any honey. Bees simply won't live there.
In order not to be unfounded, we will give one example of a review about a similar bee house:
Рchalyar:
In the early 90s, one of my relatives decided to become a beekeeper. I don’t remember where, maybe from Moscow, they sent him a brochure with drawings, descriptions and technology for keeping bees in a hive of an original design. The honey yield in this hive was promised to be simply unprecedented. Work was in full swing. I sawed boards, from somewhere I got posters “Give me…”, “Glory…”, “Long live…” from fiberboard and built about 8 of them. I also built a pavilion, although it was stationary, not on wheels. Why am I all this? It’s just that that hive and yours are the same. The height of the frame seems to be greater, or maybe not, I don’t remember exactly. I must say that he is a smart guy, everything was done well...
We are not presenting the review in full; if you are interested, you can read it in the source. For those who have no desire to visit the sites, we can say that in this review a person writes that now no one lives in those hives except mice. Well, sometimes stray bees appear, but not the ones that give honey, but those that periodically live on balconies and garages.
Hive lounger and how it differs from other bee houses
If you ask professional beekeepers this question, you will hear completely different answers. And the point is not that some are right and others are wrong. It's just that its design may be different.
The appearance of the lounger resembles a huge chest.
Looking at this hive, you can understand that it looks the same as the others, but at the same time it seems to be lying on its side. The lid also opens upward, but it is the top wall. Outwardly, it resembles a chest. This is why he was called a sunbed. The design of such a hive can be similar to any of the above. It can be either a Rutovsky or a Dadanovsky hive.
Let's also try to turn to the reviews of professionals - what do they think about the do-it-yourself beehive?
Danicek:
I can’t answer in the affirmative, because I have no experience driving bees, for example in multihulls, and therefore I can’t compare. Although, I remember that in his lectures Kashkovsky claims that in Siberia, it was with the help of beds that beekeepers achieved record honey yields both from one hive and from the apiary as a whole. In my opinion, the bed most of all allows us to create a strong honey cake (which is what we strive for), and to disturb the bees less with inspections (each inspection, whether the beekeeper wants it or not, introduces nervousness into the family, and for a couple of days the family is knocked out of its normal rhythm life)…
Hive boa constrictor: why it is so loved by amateur beekeepers
The secret to the popularity of such hives is their compactness and ease of installation and maintenance. Outwardly, it is somewhat reminiscent of the Alpine, but much smaller in size. Although those who have been involved in beekeeping for many years say that it will be difficult for a novice beekeeper to cope with such a hive. But, as you know, everything is learned by comparison, and for those who are close to such a design, nothing prevents them from starting with just such bee houses.
Making boa constrictor hives with your own hands according to the drawings is not difficult; we will present them to the dear reader for review below. If the information provided is not enough, you can always find additional information on the Internet.
Do-it-yourself hive: step-by-step instructions with photo examples
Let's look at the example of six steps on how to make a beehive with your own hands from boards:
| Photo example | Actions Performed |
| First of all, we align the pre-tenoned blanks to a width of 250 mm. | |
| Now you need to align them along the lengths of 439 mm and 434 mm. | |
| We cut out the folds - top, bottom and side. | |
| This is what the finished parts should look like. Now all that’s left to do is put everything together. | |
| This is roughly what the result should be. |
Of course, it is impossible to show everything in the instructions, but in fact this is not necessary. After all, any beekeeper learns all his life, trying something of his own, and therefore you will never find two beekeepers who make hives in exactly the same way. And yet, we suggest watching a video on how to make a beehive with your own hands using drawings and dimensions. We think that after this there will be no questions left.
How to make a beehive with your own hands: detailed instructions from “A” to “Z”
Before you begin to implement your plans, you need to carefully study the features of beekeeping, weather and natural conditions in the region, and other important factors. You should clarify how to make a hive with your own hands from different materials. An accurate assessment of financial capabilities, carpentry and other professional skills will be useful. It would be correct to apply a comprehensive analysis taking into account real initial parameters. It is necessary to take into account not only the main, but also associated costs and operating costs.
To properly make beehives with your own hands, dimensions, drawings, videos and other information materials in the articles are supplemented with professional comments and useful recommendations. This data will help minimize errors.
Checking different options and creating optimal hive drawings with your own hands
You can make notes on the drawings that describe the features of materials, assembly, and other important nuances
If the do-it-yourself drawings of bee hives found approximately correspond to the existing requirements, you need to add your own adjustments. Careful preparation of a complete set of design documentation will be useful:
- Check the dimensions of all parts.
- To correctly read the drawings, views from different sides and sections of complex components will be useful.
- It is necessary to write down what materials are suitable for the manufacture of individual elements, and whether there are alternative options.
- You should check the technologies for creating blanks and the assembly process step by step.
- Next, make a list of necessary purchases.
- This list is used for preliminary price checking. If necessary, make appropriate replacements.
For your information! If necessary, new professional skills are learned in advance. It will be useful to practice on samples so as not to spoil high-quality workpieces and consumables.
Construction in stages: algorithm of actions, useful tips
This table shows the process of making beehives with your own hands. For example, a relatively simple “Lounger” design was chosen.
| Photo | Basic and auxiliary operations with comments |
| To reduce the cost of the project, a 25 mm thick edged board is purchased. It is cut to the required size, the burrs are removed with a plane. After grinding using sandpaper, a smooth surface without defects is obtained. | |
| The blanks for the side walls are connected using wood glue. The ends are lubricated with it, after which the parts are pressed on a flat surface. For fixation, a vertical rib is installed on one side of the table. | |
| On the other hand, the building level is fixed in the right place (with clamps). | |
| You can put another blank on top to provide pressure from above and eliminate unevenness. | |
| The end walls and bottom of the box are glued together in the same way. If irregularities are found on the large surfaces formed, they are removed using a grinding machine. | |
| After checking the size match and eliminating minor defects, the box is assembled. The parts are secured with glue and self-tapping screws. | |
| The accuracy of the angles is checked. | |
| Next you will need wooden planks (10 x 10 mm). | |
| They are used to make supports for frames. These elements are fixed using glue and nails. It should be noted that the author of the project specifically uses simple solutions. With the help of such instructions, you can quickly understand how to make a hive yourself without chamfering and other complex operations. | |
| The check confirms the conformity of the dimensions of the parts. | |
| A 40 x 20 mm strip is used to create a frame on each side of the drawer. | |
| The tapholes are cut out in the side wall with an electric jigsaw (two at the bottom, one in the middle). During operation, they are opened as the bee colony grows. Attach the bottom. | |
| The internal dimensions (76 width x 46 depth x 32 cm height) are enough to install 20 frames. | |
| Install polystyrene foam (sheets 20 mm thick, density 25 kg per cubic meter). | |
| A clapboard is mounted on top. | |
| The multilayer construction is lightweight and has excellent insulating properties. This is better than using solid wood. | |
| To make the lid, the boards are cut into 100 mm lengths. A box is made from these blanks. Install a rail at the bottom and check that the dimensions match. | |
| The roof surface is created from lining. | |
| Ventilation holes are cut out in the lid. Fixed with galvanized sheet metal for weather protection. | |
| A stacked ceiling is made from boards. | |
| At the final stage, the landing board is installed and the external surfaces are painted. | |
| A special latch ensures the lid is secured during transportation. | |
| A flexible band is used to secure the top in the raised position. |
Video: how to make high-quality frames for hives
The design, dimensions and other parameters of these products are determined not only by the size of the free space. In some cases, a supporting frame of strings is not needed at all.
In this video, making a beehive frame with your own hands from wooden blanks is described in detail:
This material is easy to process and does not contain irritating or dangerous chemical compounds. But products made from it are damaged under the influence of temperature and humidity. They weigh a lot.
To eliminate the noted negative factors, frames made of plastic are used
Such products cannot be made at home. Therefore, when choosing this option, you will have to study the assortment of stores.
Related article:
DIY glass aquarium. The necessary information with useful practical tips about lighting, aeration, and other decorative and functional additions is collected in this article.
What you need to build a hive with your own hands according to the drawings
The main thing that is necessary for such work is to choose the material. Bees are quite finicky insects and if they don’t like the house, they can simply fly away to look for a new home.
It is also important to maintain the necessary microclimate in the house. That is why, when reading and analyzing drawings for a beehive with your own hands, think about insulation. After all, they should not be too hot or cold. It is worth paying close attention to the ventilation system. Do not forget that in different types of houses it is performed in its own way.
An interesting device - it pumps honey directly from the hive.
The building can be insulated with either regular polystyrene foam or penoplex (polyurethane foam). These materials are non-toxic and odorless.
Note! Under no circumstances should you insulate the hive from the inside. Otherwise, you will end up with a situation in which it will simply be impossible to remove the frames because of the wax.
If possible, try to avoid gluing. As a last resort, you need to choose a composition that is odorless. You can use hot melt glue - it is neutral, non-toxic and bees do not react to it.
These are very regular bees. And they make very proper honey.
The choice of wood is very important. The best option may be aspen or linden. Coniferous species are also suitable, but in this case you need to be prepared for the fact that in the first year the honey will have a slight but noticeable smell of resin.
Requirements for beehives
There are several types of bee houses, but they all must meet a number of requirements:
- Durability, which is very important when transporting an apiary in spring and autumn.
- Reliable protection of the family from sudden changes in temperature, drafts, and precipitation.
- High-quality ventilation is an important criterion for preventing the development of parasites and mold. In addition, ventilation holes help regulate the temperature inside the structure.
- The size of bee hives must meet the requirements for caring for a specific breed of bees.
- All houses should be built in such a way that it is possible to increase the free space. The expansion of hives is carried out, for example, when brood appears, with a pronounced increase in the size of the family.
The hive must have insulation on all surfaces, which reduces heat loss during the winter cold. During the summer season, thermal insulation prevents the family from overheating.
Traditional arrangement of the hive
All hives, regardless of variety, have several required parts:
- Frame. This part is a box without a bottom and a top lid. There are clamps on opposite sides to hold the frames. The frames are located either parallel to the tap hole or in a perpendicular direction. The latter option provides the hives with good ventilation, but is completely unsuitable for regions with harsh climates.
- The roof is a part that fits onto the body. Sometimes a special extension is used for this purpose. The cover is designed for maximum protection of the house from rain, snow, and other precipitation. In regions with an unstable climate, apiary owners additionally equip the roof with a layer of tin metal or roofing felt.
- The bottom is one of the removable parts. The mobility of the bottom plate is necessary for cleaning the hive from parasites and mold, for preventive measures. Sometimes beekeepers make a stationary bottom, securely connected to the body. On the front surface there is a lower entrance up to 2 cm high and up to 10 cm wide. For the convenience of the bees, a flight board is nailed to the lower entrance on the outer surface of the hive.
- Standard frames that can be seen in photos of bee hives. They are a rectangular plate made of 4 parallel bars. To install the frames in special clamps, one of the bars has hangers of the appropriate size. When building a hive yourself, it is important to correctly calculate the dimensions so that the frame fully matches the width of the body.
In some cases, the hive may require additional parts. Store extensions are additional housings that are used to enlarge the hive during honey collection.
To protect the houses from adverse weather conditions, a ceiling (frame, boards or beams) is used. To keep two families in one hive, you will definitely need a side diaphragm, which tightly divides the house in half.
Each building must have tap holes (at least 2 pieces) and ventilation holes. The upper entrance has a round shape with a diameter of up to 3 cm.
Types of Bee Hives
Based on the type of construction, the following types of hives are distinguished:
- Vertical buildings are one of the most popular options. If necessary, such a house can be enlarged by extending the structure upward. Also, vertical structures allow the beekeeper to prevent bees from swarming. Adequate ventilation prevents the development of mold fungi and helps fight dampness and rotting. In appearance, they strongly resemble a hollow in a tree, which brings the existence of bees closer to their natural habitat.
- Horizontal hives. This design is also very popular among beekeepers. The advantages include a large volume, making it much easier for the owner to care for the bees. Among the disadvantages, it should be noted the large weight of the structure, which makes transporting the apiary difficult. If the hive is shaped like a lounger, then it will not be possible to accommodate more than two families inside.
The choice of a beekeeper depends on the size of the honey farm, the breed of bees, the characteristics of the region and climatic conditions. Depending on the structural type of the house, the choice of trailer for beehives also depends.
Types of bee hives
Manufacturers of equipment for bee breeding offer a wide variety of types of hives, differing in a number of characteristics:
- Hive Dadan. The design involves two diaphragms located parallel to each other. Thus, a free area is formed between the nest and the hive itself.
- The Medyanka type hive includes several buildings that do not have dividing grids. There are ventilation holes, but only one entrance. The case is small in size, making it easy to transport. The use of this type of house is relevant for cold regions of the country. The presence of free space inside the structure allows the bees to fill all the available space with honey.
- Root type hive. One house consists of several buildings, reaching a total of 6. Each building has clamps for 10 frames. When leaving the winter quarters, another floor is built above the main buildings, filled with wax and dry material. The bees regard this move as an offer to expand the space of the hive, and move to new territory. This variety is ideal only for regions with warm climates.
Cassette hive. This design is presented in the form of a house, where each family lives in one “cassette”. The structure has thin walls, so the family itself controls the climate inside the hive.
A similar type of structure is used for regions with a high risk of parasitic and infectious diseases of bees. To assess the condition of the house and family, simply pull the cassette out. Any of the presented bee hives can be assembled with your own hands using drawings and step-by-step instructions.
Difficulties that may arise when building a house for bees
The main task in such work is the exact observance of all specified dimensions. And this is not just a whim of the one who invented this or that hive. This is a necessity that has been re-tested for years. Many people think that they can design and build a house for bees themselves according to their own invented dimensions, and then receive no less honey than others. Will not work! It has already been said that if the distance between the frames is smaller, the bees will accumulate propolis between them and they will become inoperative. But what happens if you make the distance larger?
Honey plants: description, the best annual honey plants (read more)
In this case, the bee decides that it is necessary to build intermediate honeycombs and as a result, the first option is obtained - everything sticks together tightly. As for height, there are practically no restrictions here. But you should remember that you will have to move the hives, which becomes problematic if they are heavy.
Beethorn honey is the healthiest, but it is difficult to get - the wild bee is not accustomed to humans.
Migratory, alien bees also pose a rather big problem. Often, various diseases come with them, and it is with such incidents that the degeneration of the breed begins. If we again take the Burzyan bee as an example, its degeneration in Bashkortostan has already become noticeable. And the reason for this is the frequent arrival of beekeepers from neighboring regions.
And of course, don’t forget about feeding insects with sugar syrup during wintering. After all, the bulk of the honey that they prepared for the cold period is taken away from them. It’s worth learning more about all this before you make a hive yourself and place the first guests there.
If you think about it, the process of making a hive with your own hands is a complex matter, but quite interesting and exciting.
Frames for a bee house: the nuances of their manufacture
Frames are the foundation of the hive. And a lot depends on the quality and their correct execution.
Note! Whatever material the bee house is built from, the frames should always be made of good wood - linden, aspen or apple tree. This will ensure the best taste of honey. The wire staple must be made of stainless wire if it is not made of wood.
The wood for frames must be perfect.
Everyone knows that honey is not only a sweet treat, but also an excellent medicine. And the quality of the final product depends on what the hives will be like and how they will be equipped. This means that all responsibility for this lies on the shoulders of the beekeeper. Don't forget about this. Well, what type of bee house to choose is up to you.
Honey collection from bees: secrets of obtaining large honey yields (read more)
If anyone has any questions, we will be happy to answer them in the discussion, and perhaps even argue. After all, as you know, truth is born in a dispute. If you find any inaccuracy in the information we have provided, we will be grateful if you point it out.
Types of hives and their classification
Hives are usually made of soft wood - spruce, willow, poplar, aspen, linden. They can be collapsible or non-dismountable - bulky and inconvenient to use. Based on their design, hives are also divided into horizontal and vertical.
Horizontal
The design allows you to place up to 14 frames in the hive. If necessary, you can install several additional modules with foundations. The modules are fenced off with bars separating the bee colonies.
Pros:
- convenient to care for bees;
- ease of maintenance;
- no need to lift magazines for inspection.
Minuses:
- very heavy weight;
- difficulty of transportation;
- To store spare honeycombs, you need special cabinets (this is not necessary in vertical hives, since they have a spare body).
Vertical
The design assumes the possibility of increasing the volume of the hive in the vertical plane by installing additional buildings on top of each other. A vertical hive looks like a real hollow. The bees have the impression that they are in their natural environment.
Pros:
- the ability to extract honey without opening the nest;
- ease of maintenance and operation;
- bees tolerate wintering well;
- there is no dampness;
- mold and harmful bacteria do not appear;
- bee colonies reproduce well - beekeepers do not have to make additional efforts;
- the structure of the hive allows the beekeeper to prevent swarming;
- Convenient to transport in a trailer or car body.
Minuses:
- a large food supply is required;
- impressive dimensions and weight - very difficult to carry;
- the presence of flanges complicates maintenance and manufacturing;
- It is impossible to install additional entrances - they cause drafts, as a result of which the microclimate in the hive is disturbed.
When operating vertical hives, you have to turn the bottom several times during the season to change the size of the vest. The procedure is difficult to perform without an assistant.