Many people their own various attachments that can be used in conjunction with garden equipment or snow removal vehicles.
They are forced to do this by the high cost of powerful snow removal equipment.
The second reason is that if you already have a universal power unit, why pay for it, but as part of a snowblower?
In this article we:
- we will talk about the general principles of manufacturing such devices;
- We will give practical examples , following which you can build the necessary unit yourself.
General principles for making a snow blower
Making any homemade device, including a snow blower, begins with understanding what you want to achieve.
All such homemade products can be
divided into three categories :
- snow blowers with external motor;
- snow blowers with their own engine;
- bulldozer blades .
Snow throwers with an external engine, which you can make yourself, come with various attachments for:
- walk-behind tractors:
- motor cultivators;
- mini tractors;
- ATVs.
An external motor rotates the drive shaft or pulley, through which its energy is supplied to the snow removal unit and ensures the operation of the auger or auger-rotor mechanism.
A gasoline or diesel engine from various agricultural machinery is most often used as an external motor for a homemade snow blower
To convert the high speeds and low torque of the motor into the low speeds and high torque required to operate the auger or auger-rotor mechanism of a homemade snow blower, various gearboxes .
The advantage of mounted snow removal equipment with an external motor is that in most cases the main unit is equipped with a self-propelled drive.
Thanks to this, this snow blower does not have to be pushed.
After all, due to the self-propelled drive, it moves independently .
Do-it-yourself snow blowers with their own engine are usually based on a gasoline or diesel engine.
Any motor of suitable power can be used as a motor.
For example, a power unit from a disassembled walk-behind tractor or chainsaw is quite suitable for making a homemade snow blower.
Such a motor is installed on a common frame to which a screw or screw-rotor mechanism is attached.
Install between the motor and the mechanism:
- gearbox;
- a system that provides connection and disconnection of the mechanism.
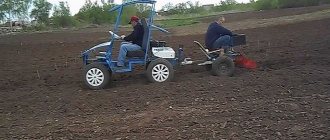
Bulldozer buckets are installed on self-propelled devices, thanks to which they successfully shovel snow from the trajectory of their movement. The size of the bucket depends on the size of the self-propelled device.
In such a combination, a lot depends on:
- condition of the wheels of the self-propelled device;
- its minimum speed .
Therefore, a bulldozer bucket on a walk-behind tractor and SUV equipped with a reduction gear is most effective
The lower part of the bucket is made of thick, hard rubber (including a conveyor belt of suitable thickness), so it does not damage the road surface.
Design features of the device
Snow shovels can be easily attached to any type of equipment and greatly speed up and simplify the snow clearing procedure. Any snow removal equipment for a multifunctional unit includes 3 basic parts: a snow shovel, a mechanism for adjusting the angle of rotation of the snow plow, and a fastening module that holds the snow plow to the frame of the unit.
There are a number of designs of factory shovels that are part of the attachments , however, you can build a similar device for a walk-behind tractor with your own hands, especially since there is a lot of different information and drawings on this problem on the global network.
This makes it possible not only to manufacture equipment with the required characteristics, but also to significantly save money.
A blade is an integral part of attachments used together with a motor cultivator. With its support, you can facilitate such routine work on your own plot of land as collecting garbage in summer, clearing snow in winter, in addition, leveling the surface layer of the earth and transporting it from one plot to another. Snow dumps come in various variations, but in general they are endowed with one principle of operation and design. Basically they have a number of standard work positions.
Parts and materials
If you decide to make mounted snow removal equipment yourself, we recommend that you find the nearest collection point for ferrous and non-ferrous scrap metal .
At such collection points you can find various units from decommissioned equipment that are suitable for a homemade snow blower.
The cost of these units will be hundreds of times less than new ones and tens of times less than used ones.
Although they may need repairs.
Therefore, we recommend checking all units before purchasing.
Here is a list of the main parts and materials for making a homemade snow blower with your own hands , which can be purchased at collection points:
- corners for creating a frame;
- metal for hull cladding;
- metal to create a bucket or snow receptacle;
- metal for the screw mechanism;
- snow blower rotor;
- pulleys of various sizes;
- gears of various sizes;
- gearboxes;
- chain or belt drives;
- fastening elements;
- bolts and nuts.
How to create a snow dump from a barrel?
Making a shovel on your own is easy when you have a welding machine, a grinder and an electric drill in your home. Here is one simple way. You will not need to search for the required material, since you can use a simple 200-liter iron barrel.
Carefully cut it into 3 pieces and you will have 3 curved pieces for the snow plow. By welding 2 of them along the contour line, we obtain an element with an iron thickness of 3 mm, which is fully enough to make the shovel rigid. The lower segment of the shovel is reinforced with a knife. To do this, you will need a metal strip 5 mm thick and the same length as the blade grip. Holes with a caliber of 5-6 mm are made in the knife at intervals of 10-12 cm for mounting a protective strip of rubber.
The mechanism for attaching a shovel to a motor cultivator is quite simple and can be done at home. To the shovel, assembled from two parts of the barrel, approximately in the middle of its height, a pipe with a cross-section in the form of a square measuring 40x40 millimeters is welded for reinforcement. Then, in the middle of the pipe, a semicircle of thick iron is welded, in which 3 holes are pre-drilled, required to stabilize the angles of rotation of the blade shovel.
Next, a bracket is welded from the same tube, outwardly similar to the letter “G” , one edge of which is placed in a hole in the semicircle, and the second is connected to the chassis of the unit using bolts.
To adjust the level of lift of the blade, bolts are used that are screwed into holes in a piece of tube welded to the tow hitch and placed on an L-shaped bracket.
Tools and equipment
Here is the minimum set of equipment and tools that will be required to independently create a mounted snow removal unit:
- drill with a set of metal drills;
- grinder with cleaning and cutting discs;
- metal brush - attachment for a drill or grinder;
- electric welding machine (preferably an inverter);
- powerful workbench with a vice;
- lathe (if you don’t have one, you can order all the necessary parts from a turner);
- roulette;
- square;
- protractor;
- compass;
- spanners;
- screwdrivers.
Frame construction
Before you begin building a snowmobile, you will first need to select a material. The easiest way is to make a homemade frame from wooden blocks. The result is a very light and fairly durable structure, which is considered the cheapest and easiest to manufacture. For this you will need:
- Wooden bars.
- Sheet iron.
- Metal scissors.
- Drill and drill bits.
- Hand saw.
- Bolts and nuts.
The advantages of building such a structure are undeniable. In the event of a breakdown, the wooden model will not be difficult to repair far from a populated area. In the forest it is easy to find scrap materials that can be used for repairs. But the main advantage is that this snowmobile rarely falls through the ice and does not sink in water.
Wooden structure
It is known that bars and boards made of wood do not have particular strength in their places
connections. Therefore, before starting construction, it is necessary to make additional metal corners. To do this, take sheet iron and cut square plates with scissors along the width of the bars. The places for the bolts are marked in them with a tape measure, and then four holes are drilled with a drill. After this, the plates are bent in half exactly 90 degrees. These will be excellent devices for firmly fastening wooden blocks in the corners of a homemade frame.
Usually they start construction after making a drawing with exact dimensions. And four bars are cut along them with a hacksaw, and holes for bolts are drilled in the corners with a drill. Then they are placed on a flat floor surface in the form of a regular rectangle. Metal corners are applied to the connection points, bolts are inserted and tightened tightly with nuts.
To mount the engine and track, two additional crossbars made of bars with holes for bolts at the ends are installed on the frame. But before that, the corners for fastening are first made. They are cut out of triangular shaped iron sheets and holes are drilled in the corners .
It’s better to make eight pieces at once and place them on top and bottom. Then the fastenings will be more durable and reliable in operation.
When they are ready, the crossbars are inserted inside the frame and the triangles are placed on top. Holes are drilled into them exactly to size using a drill through the bars. Then long bolts are inserted there and tightened tightly with nuts. At this point, a strong wooden frame will be ready, which will serve for a long time on a homemade device.
Metal frame for snowmobile
It is much more difficult to build homemade metal products. This requires special tools and devices that not everyone may have. Significant costs will be required to purchase or rent them. However, this building will be much stronger and more durable than a wooden structure . Here you will need:
- Welding machine.
- Electrodes.
- Mask.
- Bulgarian.
- Spanners.
- Pliers.
- Hammer.
In addition, to build a metal frame you will need more durable materials. You will definitely have to buy them in the store, since today they are not found anywhere else. And I don’t really want to build a new homemade snowmobile from old parts due to poor reliability. Therefore, only good materials will be used here:
- Metal pipes.
- Iron corner.
- Sheet steel.
- Channel.
As a rule, before you start building a frame, you need to make a simple drawing. Using a grinder, cut the pipes according to its parameters and use a welding machine to connect them into a rectangle. Inside the frame, insert a couple more partitions from the corner to install the engine and track. If you make them from channel bars, the structure will be much stronger and more reliable in operation.
After this, you just need to cut off two small bushings from the metal pipe.
And then weld them to the corners of the front part, where the swivel ski supports will be inserted. The metal frame is ready and you can begin construction, as well as installation of the main units and components.
Skills
If you are going to make your own mounted snow blower for various units, then at a minimum you must be able to work with :
- drill;
- welding machine.
In addition, you will need the ability to draw up and read various blueprints .
After all, without this you will not be able to correctly select the shape of the supporting structure (frame).
Mechanical skills are no less important , albeit at an amateur level. If you do not have these skills, we recommend that you do something simpler first. For example, make a metal staircase or a steel fence to “get your teeth into .
Only after obtaining at least minimal skills will you be able to begin independently manufacturing mounted snow removal equipment using ready-made diagrams and drawings.
To design and create a mounted snow blower yourself, you will need :
- high qualification ;
- great experience .
If you do not have experience in manufacturing mounted units, we recommend that you use only proven diagrams , which can be found on various forums. Within the framework of this article, we are limited in scope, but we will be happy to share below links to thematic forums, where they share in detail information on how to make a homemade snow blower with your own hands.
Are you tired of huge snowdrifts near your house? Read where to complain about snow removal. Have you decided to buy an electric snow blower? This article will help you. Want to consider gasoline options? All information here
Precautionary measures
The main danger is the puppy, which is capable of not only wrapping clothes around itself, but also hitting or even injuring an arm or leg. When clearing snow, a number of rules should be followed:
- Wear warm clothes and non-slip shoes.
- Wear ear protection, gloves and goggles.
- Do not direct the flow of snow towards people or cars.
- If the snow blower is electric, then do not forget about the cable.
You should also remember the dangers when refueling the unit, because mistakes made can lead to a fire or explosion of the fuel.
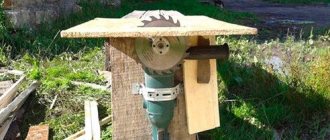
A snow blower can work not only in winter, but also in other seasons. The fan version (if placed with the opening facing up) can be used for threshing corn. Or supplement it with pipes and use it as a forced ventilation device.
Many residents of the northern regions are thinking about buying a snow blower. However, not everyone is able to buy equipment at a fairly high price. In this case, you can take a little of your time and assemble a snowblower from a motorized cultivator. To do this, you do not need to buy expensive materials and equipment, because every landowner has everything necessary for the work in the garage.
Homemade snow blowers made from cultivators are popular due to a very important advantage - the ability to throw the collected snow over fairly long distances. Very often this distance is 8–10 m.
To assemble the frame of a homemade snow blower from a cultivator, durable metal parts are used, and the device itself contains a minimum of plastic elements. This makes the structure resistant to impacts against hard objects.
Like the factory models, a homemade snow blower made from a motorized cultivator is equipped with an auger shaft. Rotating, it collects the fallen snow and pushes it into the gutter. Snow masses fly out of it in the direction desired by the operator.
The internal part of the structure is equipped with reliable belts and adapters. They are capable of providing strong shocks to hard packed snow and small pieces of ice. To activate the equipment, the cultivator motor shafts must be connected to a homemade snow blower using a belt drive.
Safety precautions
When starting to make snow removal equipment with your own hands, you should carefully read the safety requirements :
- When working with an angle grinder, be sure to wear safety glasses (mask) and headphones ;
- When working with a welding machine, be sure to wear a protective mask with black glass ;
- Carry out welding and painting work indoors with good ventilation or in the open air ;
- Do not use the welding machine in a wet/damp room or outdoors during rain ;
- When putting on your work clothes, make sure that nothing is hanging ;
- After finishing work, be sure to clean the work area and prevent the accumulation of chips and debris ;
- a stocked first aid kit near your work area .
Criterias of choice
Modern options for snow scrapers can be very diverse. For example, there are manual options and there are mechanical ones. Moreover, the former are much cheaper.
However, all dump models share certain properties:
- ease;
- strength;
- They have a high quality handle.
The latter should not slip in the hand and have poor thermal conductivity, which is justified by the need to keep the hands of the person using it warm.
It follows from this that the choice of the required scraper option for clearing snow should be based on the specified properties.
This is necessary to ensure that the device is lightweight, but at the same time durable. Due to this, the person who uses the scraper will be less tired, and the chance that the device will break is minimal.
Preparing for work
When planning to make snow removal attachments, you first need to do the following:
- choose a unit or equipment for which you will make a snow blower attachment;
- decide on the type of attachment;
- determine the available materials;
- carefully read all available information on this type of attachment and installation on the equipment you have chosen;
- determine what you can do yourself and what you will have to buy or order.
The choice of technical device for which you are going to make a snow blower directly affects the type of this equipment.
For example, only a bulldozer blade is well suited for installation on a passenger car.
This is due to the very high speed in first gear and medium engine speeds.
To effectively throw snow at such a speed, and even with an auger length equal to the width of the car, you will need a motor with a power of at least 50 horsepower (hp). Accordingly, the mass of the unit will be well over 400 kilograms.
It is impossible to make and set up such a device without solid experience . And the cost of its production will be comparable to the cost of a good self-propelled snow blower, which will be much more efficient.
For an SUV, the requirements are slightly lower if it has:
- four-wheel drive;
- reduction gear.
But the main problem is the same - the car is too fast and wide. After all, with such a width, the optimal speed for normal operation of the auger-rotor mechanism should not exceed 1–2 kilometers per hour for cleaning not too deep snow.
Therefore, the best choice for any car or any other vehicle is a bulldozer blade .
with walk-behind tractors and other self-propelled equipment . Indeed, in most cases, their minimum speed is 5–7 kilometers per hour.
If self-propelled equipment is equipped with a 7–15 hp engine. pp., then it is quite enough for clearing snow that is not too deep.
When clearing deep snow, you will either have to put up with the wheels sliding, or move the equipment forward in small jerks, allowing the auger-rotor mechanism to successfully grind and throw out the snow.
Having decided to install not a knife, but a snow thrower , you need to decide on its type.
The difference between an auger and a rotary auger homemade snow removal device is that in the first case the auger both crushes and disperses the snow, while in the second it only crushes it.
Therefore, with the same engine power, the efficiency of a screw-rotor device is at least 2 times higher than that of a screw device.
Therefore, for normal snow removal with an auger mechanism, it must be equipped with an engine at least 2 times more powerful .
Or put up with:
- shorter snow throwing range;
- a significant decrease in efficiency when removing compacted or wet snow.
If you decide to make a mounted auger snow blower with your own hands, then the main problem will be finding a gearbox. After all, a gearbox from a snow blower costs no less than 8 thousand rubles.
You can make such a homemade snow blower without a classic gearbox .
But in this case, you will have to find or make your own gear or belt transmission , in which the primary and secondary shafts are rotated 90 degrees relative to each other.
A gear transmission can be made from two planetary gears and their axles from the differential of any car.
These parts will be sold to you in places such as:
- scrap metal collection point ;
- any auto disassembly .
What it is?
This is a special type of equipment designed for effective cleaning of open areas during periods of heavy snowfall.
Scrapers are different. They differ in the material of manufacture, dimensions, method of fastening elements, etc. But they all have the same design - they consist of a handle and a working blade.
When making such a tool, in some cases the working blade is supplemented with high side walls so that the collected snow does not crumble. Some craftsmen make large scrapers with a spacious bucket.
But complicating the design does not always pay off, because the snow itself is quite heavy, and the heavier the scraper, the more difficult it is to work with.
According to their purpose, scrapers are:
- For cleaning roofs.
- For paths.
- For wide areas (playgrounds, courtyards, races).
The roof tool features an extended handle. It can be solid or folding (in the second case, it has a telescopic design so that it can be extended if necessary). The working blade is attached perpendicular to the handle.
Scrapers for yards and paths are made according to the same principle. They look like wide shovels. But for paths, scrapers are made with a certain width of the working blade, but for a yard, a wide grip is needed.
Here you need to take into account the physical capabilities of the person who will be doing the cleaning - with a wide shovel (1 meter or more) the work moves faster, but a strong man must manage it. Lighter and more compact instruments are suitable for women and teenagers.
When making a wide scraper, it is worth making a double handle. It may be U-shaped. Otherwise, the tool will be difficult to operate, and the handle may not withstand the load.
The working canvas can be made from the following materials:
- plywood;
- plastic;
- metal.
If there is a need to frequently remove large volumes of snow, you can make a tool of complex design:
- on wheels;
- on skids.
An overview of snow scrapers is presented in this article.
Where to find diagrams and drawings of snow removal machines
We suggest that you carefully read the forum threads , which describe the independent production of certain mounted snow blowers with your own hands.
Perhaps there you will find ready-made schemes suitable for your situation.
Or use
the experience of forum members to develop something of your own, for example:
- Manufacturing of an auger snow thrower with a hydraulic motor (mounted for a mini tractor).
- Another auger thrower (mounted for the MB-2S walk-behind tractor).
- Bulldozer blade (blade) for a car.
- Chainsaw snow blower.
- Various tips for building a snow blower yourself.
- Another thread with various tips on making a snow blower, including attachments.
- Mounted auger snow blower for mini tractor.
Using the Mole cultivator
Owners of vegetable gardens, small farms, and summer cottages who are planning to purchase a domestic motorized cultivator “Mole” (tested not only by time) are often interested in what attachments for this motor cultivator are sold on the domestic market.
Their interest is understandable and valid, because it is thanks to all kinds of trailed and mounted attachments that this unit becomes indispensable, one might say, a universal assistant on the site.
Wood scraper
To create scrapers with sides made of pine boards, it is necessary to prepare a rail from the same material.
Everyone makes the dimensions of the latter more convenient for themselves. You also need to take a sheet of galvanized iron so that its dimensions are 73 by 70 cm.
This version of the scraper is very simple to make. The sides made from boards need to be attached to the sheet of iron with screws (you can even use self-tapping screws). After this, the rail itself is attached, which will act as a handle.
Snow removal equipment
The structure of snow varies. The tool used should also be different. For example, loose snow requires a large scraper so that you can grab as much snow as possible. For hard snow, you need a more durable tool that can roll on the surface. Wet snow will slide off a plastic or metal surface more easily. In addition to scrapers or scrapers, dumps and pushers can also be used.
The simplest device is a piece of plywood . The height is selected according to the user’s height, but the sheet is placed not vertically, but at an angle of 60°. The width also depends on the person’s build. The wider the sheet, the stronger the plywood must be - therefore, the weight of the sheet increases. The advantages of such a device are its low cost, minimal preparation and a small number of tools for manufacturing - a hacksaw, ruler and pencil are enough. However, such a device looks unaesthetic and is inconvenient to use.
Another device is a pusher. It is a rectangular plate, perpendicular to which the handle is attached. This is a more convenient means for shoveling snow, and can also compact the path. In rural areas, this is done so that the crust and the path are at the same level - then the snow does not linger and the path remains almost clear.
This scraper is more convenient for work. To make it, you need to drill a hole for the handle in the middle of the wooden plate. For strength, you can fix the handle with additional stops, which will push it and the plate apart.
How to make a snow shovel on wheels from a washing machine
Many still have Soviet washing machines in their dacha sheds. Their body is made in the shape of a barrel. If you cut it, you get a good blank for a ladle. If you need a narrow shovel, you can find even better material for it. The tank is hidden inside the washing machine body. It is made of stainless steel or aluminum alloy. The tank is opened in the same way with a grinder, cutting out a segment of the required size.
The shape of the Soviet washing machine is identical to the barrel
The downside of the washing machine body is the thin tin. To prevent it from bending under the load, the ends of the semicircular bucket are sewn up with metal. You can install two wheels on the frame, and two on the shovel itself. The front wheels use a smaller diameter. Additionally, they will act as a limiter that prevents the edge of the bucket from cutting into the ground.
The stability of the snow removal tool will be given by a load of bricks placed between the frame and the bucket.
Description
Mole cultivators are multifunctional equipment; with connected additional implements, they are capable of effectively performing agricultural work in a dacha or garden plot. In addition, cultivators can do some household and transportation work.
When combined with attachments, the Mole motor cultivator is capable of:
- cultivation and plowing of soil
- weeding between rows to remove weeds
- preparing beds and furrows for planting seedlings and sowing various crops
- hilling of plants
- pumping water and watering plantings
- mowing wild and cultivated grasses
- transportation of harvested crops and other cargo
- clearing the area of snow.
In order to expand the capabilities of the cultivator, depending on the type of attachment, the design of the cultivator provides various options for attaching attachments. Additional implements are not included in the package of the Mole motor-cultivator; they are purchased separately depending on the needs of the owner.
How to make a snow shovel on a bicycle wheel
It is impossible to clean narrow winding paths with a wide two-wheeled shovel. For such purposes, it is optimal to consider another device. It is made from one large diameter bicycle wheel.
A single-wheeled shovel is convenient for clearing snow from narrow paths
First, they create the shovel itself. You can take a ready-made factory-made plastic scoop. It is mounted on a long handle made of an aluminum tube. A T-shaped handle is attached to the other end for a two-handed grip. A hinge mechanism with a bicycle wheel is attached to the handle. The lever should rotate freely on the axis so that it is convenient to lift the shovel and throw away snow. The location of the hinge on the handle is determined individually, which depends on the diameter of the wheel.