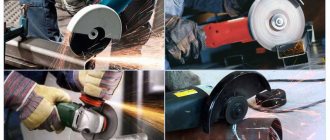
Hello dear reader! The topic of today's conversation will be plastic pipes. They have already become widespread and home craftsmen often face the question: how to cut into a plastic water pipe? In this article you will learn the most accessible and effective insertion methods, its step-by-step algorithm, nuances, and professional advice on how to avoid mistakes during this operation.
Purpose of the procedure
The purpose of the procedure is to connect the branch to the main pipe or main.
New wiring needs to be done inside the house.
Connection to a common pipeline occurs during the construction of an individual house or other capital construction project, or when organizing a diversion to another direction. At the same time, water intake is calculated, the diameter and material of secondary pipes are selected. Outlet pipes are selected based on the pressure values in the main line.
Reasons for the need for
- Insertion is necessary when it is impossible to completely stop the supply of gas or water. For example, in hospitals and industrial enterprises, the lack of water is unacceptable.
- In a situation where connection to a common pipeline is required. In any residential premises, it may be necessary to make an additional outlet from the general water supply or gas network without blocking the central line.
- Replacing communications.
- Connecting new plumbing.
- Installation of a water meter.
The essence of the process
To connect the outlet to the main pipe, you need to drill a hole in it and attach the outlet pipe using soldering or various types of fittings.
If it is impossible to turn off the water supply, the hole and connection are made using special clamps.
During the operation, two general conditions must be met:
- the diameter of the drill and the diameter inside the outlet pipe must match;
- The additional pipe is smaller in diameter than the main one.
If you liked the article, please share it
Previously on the topic:
Share
What documents are required for tapping into the main water supply?
It is forbidden to make a connection to a common water supply main without the permission of local authorities. This will entail penalties and administrative liability.
- To connect to a common main water supply, the owner of the household must obtain permission from the department in charge of the pipeline.
- An application is submitted to the local water utility authority, accompanied by documents confirming the rights to the land plot and house, as well as a cadastral plan of the site.
- Vodokanal specialists will prepare technical specifications indicating the volume of water intake permitted for the applicant and the location of connection.
- After this, it is necessary to obtain a conclusion from the regional SES for connection to the water supply network.
- A topographic survey in the form of a drawing with all the necessary information about the site, the objects built on it, including underground ones, indicating the location of the water intake well, will be done by cadastral engineers.
- A water supply project for a house is ordered from the design department of the water utility.
- The utility services issue a warrant for excavation work.
Only representatives of the water utility have the right to make connections into a common plastic, steel or cast iron pipeline.
After connecting to the main line, the SES takes samples and checks the quality of the water, draws up a certificate of washing and disinfection.
The water management service accepts the work and issues a certificate of compliance with technical conditions. Concludes an agreement with the owner of the property on the operation of the water supply pipeline.
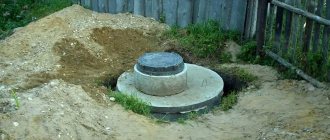
Construction of a well for the construction of a site
To simplify the installation into an existing water supply system, it is convenient to use an inspection well. The diameter of the structure should be about 70 cm. This space is enough to place shut-off fittings (in the form of a valve or gate valve), as well as perform all the necessary manipulations for insertion.
In the future, during the period of operation, the presence of such a structure will facilitate the work of repairing the home water supply system.
The water pipe tie-in unit, used to disconnect the input for the period of repair work, will be placed immediately inside the shaft near the connection point with the external water pipeline
To construct a well, a new pit of the appropriate size is dug. The bottom of the pit is covered with a gravel “pillow”, forming a layer 10 cm high.
To make a reliable foundation, sections of roofing material are spread over the leveled gravel fill and a concrete screed 10 cm thick is poured. When creating the fill, concrete grades M150 and M200 are used.
After three to four weeks, when the concrete has acquired the necessary strength, a shaft is erected above the slab. To do this, the walls of the pit are lined with bricks, cement blocks or reinforced concrete rings. The neck of the structure must reach zero level.
If the well is to be installed in an area where the groundwater level rises to one meter during the flood period, it is necessary to construct a waterproof structure.
It is most convenient to purchase a ready-made plastic container for this purpose. From below it is anchored to a concrete slab, from above this structure is covered with a cast slab equipped with a hole for installing a hatch.
Inset options
According to their technology, methods of inserting into plastic pipelines are divided into two conditional groups.
- Attaching a tightening lining to the pipe in the form of a clamp with an outlet hole for the outlet.
- Cutting out a section of pipe and connecting its ends at the cut site with a tee.
The first method is to secure the crimping lining to the pipe with bolts or welding with heating elements built into the lining.
In the second option, connections are made using welding using a special apparatus or using fittings of various types.
Let's look at existing methods for connecting branches.
Using a crimp clamp
Such a clamp consists of upper and lower linings that match the dimensions of the pipeline.
A rubber sealing part with a hole is placed on the pipe. Its function is to prevent leakage. Next, the linings are installed on the gasket at the top and bottom of the pipe, tightened with bolts and nuts.
The pipe is drilled through the hole in the outlet pipe located in the top cover. Then a tap is connected to it.
Connecting a tee or manifold
Tee insertion is considered a classic insertion option. The essence of the operation is that a part of the pipeline is cut out, and a tee or manifold is installed in its place. An outlet pipe is connected to them (if the collector has several outlets at once).
Connections to the pipeline are made by welding using a special apparatus or using fittings of various types.
Electric welded saddle
A regular saddle pad is a crimp clamp pad that we have already discussed.
Unlike inserting a tee, it does not involve cutting the pipe product, thereby not violating its integrity. To create a branch, it is enough to drill a hole of the proper size in the main pipe.
The design principle of an electric welded saddle is no different from a conventional one, but it is equipped with heating coils built into its body. When connected to the electrical network, these elements heat the plastic, the parts of which are welded and form an inextricable connection.
Electric welding saddles equipped with a cutter allow you to perform a plunge operation without shutting off the water in the pipeline.
The working process is to install the upper and lower parts of the cover on the pipe. Electrical power is supplied to the saddle, causing parts of the lining to be glued to the pipe. After the material has hardened, drill a hole of the required size by turning the built-in cutter. Then all that remains is to connect the outlet.
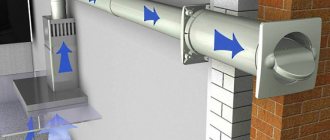
Insertion using a pipe
Tapping using a branch pipe is used in secondary areas, in low-pressure pipes, for example, a sewerage pipeline. This method is good because it does not require cutting the pipeline and can be done without welding.
The pipe should be in the form of a clamp with a girth that would be enough for the entire diameter of the riser.
- Mark the location for the pipe.
- Drill a hole with a crown, the size corresponding to the diameter of the pipe.
- Secure the pipe by tightening the ends of the clamp with a screw and nut.
- A rubber seal is inserted into the pipe, and an outlet pipe is inserted through it.
You can use an adapter for pipes that are significantly smaller in diameter than the main one.
Considering that there is no high pressure in the sewerage system, such a connection will last a long time and reliably.
General rules for recusal
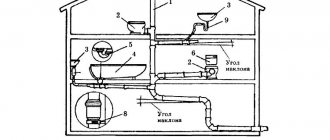
The insertion is made using one of the described methods. In this case, the front end of the pipe is connected directly to the embedded element, and the second - through a water flow meter - to the distribution of the internal water supply.
Thus, the installation location of the meter is the gap between the valve/valve of the insert and the valve connecting to the internal water supply network. When installing the device, it is also necessary to use a reverse valve to prevent the formation of reverse flow of liquid.
For cases where the introduction of water supply into a house involves crossing a wall or foundation, the hole in them should be larger than the diameter of the pipe itself, approximately 200 millimeters.
Once installation and necessary testing have been completed, it must be sealed using resin strands or a waterproof seal. The finishing of the surface is done with cement mortar.
Which way is better
Inserting a tee using welding with a special apparatus is considered the classic and most reliable method. Another thing is that it is not always physically accessible due to lack of space for work. Therefore, various types of crimp pads are used.
Electric-welded saddles with built-in heating elements and a cutter for drilling have proven to be easy to install and simple in technology. They can be successfully used by people who do not have repair skills.
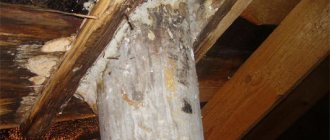
How to repair a fistula in a pipe
How to repair a fistula in a pipe. Sometimes a situation occurs that a fistula appears in an iron pipe of a water supply or heating riser. This is especially common in hot water risers. The first signs that a pipe will soon burst is when a red growth appears on it, but it may not appear.
In scientific terms it is called pitting corrosion, but in simple terms it is “Pipe” to a pipe. Fistulas appear on the pipe, either due to wear or due to stray currents.
In principle, when you get a fistula, you won’t care why it appeared, you will have a question: how to fix it quickly? I'll try to describe a couple of options on how to do this.
Do it yourself or call a professional
If the work is carried out inside the house, with domestic water supply, then there is little point in inviting a specialist. If difficulties arise with the welding machine, you can use an electric welding saddle equipped with a cutter.
But when connecting a water supply to a public main, you cannot do without professionals who have the appropriate clearance.
Approximate cost of work
Connecting a private household to the main water supply network is the most labor-intensive and financially expensive process. The cost of work depends on the distance to the well, the volume of excavation work, and the price level for services in the region.
The approximate figures are as follows:
- obtaining technical specifications and other documents, approval – 22 thousand rubles;
- costs for pipes and other network elements – 9-10 thousand;
- fee for connection to the central network and work on inserting into the highway - from 20 to 50 thousand;
- earthworks – up to 10 thousand;
- complex work on laying a network - 2-2.5 thousand per 1 meter.
Thus, the total cost can range from 80 to 115 thousand rubles.
We draw up project documentation
The project is ordered from a water supply service or an accredited company. The customer will be required to:
- technical specifications;
- situational plan;
- housing drawings - all floors, basement, sectional images;
- list of used plumbing fixtures.
Project documentation.
The design organization must develop and provide the customer with a document containing:
- site plan with water supply diagram;
- internal wiring in the house;
- specification of pipes and shut-off and control valves;
- the need for metering devices and a pump to increase pressure.
The finished project will have to be agreed upon with the gas service and electricity supplier, whose communications run through the site. It is registered with the SES, which issued permission to use the centralized water supply. The document is finally approved by the architectural committee.
Work progress
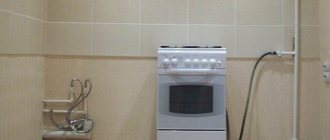
It is necessary to embed the tee into the plastic riser.
As a rule, risers are located close to the wall. Therefore, for ease of installation, the embedded unit is assembled in advance. It consists of a tee, an outlet and a shut-off valve installed on it - a valve.
The assembled assembly is applied to the pipeline, the cutout area is measured, and the cut locations are marked.
Turn off the water, open the water tap and completely drain the remaining water from the system.
Using pipe cutters, cut out the intended area.
The assembly is installed using an electric soldering iron for plastic. For PVC pipes, you can use glue.
Pipes are often located close to walls. There may be problems using the soldering iron. In this case, push-in fittings or press couplings are used.
Characteristics of saddles
The use of a saddle for HDPE channels is the most optimal option if a hermetically sealed insertion is required, for example, into a buried stationary pipeline.
A polymer saddle is a practical, reliable way to insert into a part of a pipeline that has limited access
The option of cutting the product and connecting it using a tee is erroneous, since plastic elements of large diameters can be deformed or difficult to fit into it due to lack of flexibility. In addition, dirt that gets into the parts of the compression coupling disrupts the tightness of the connection and connection with the HDPE pipe.
The dimensional characteristics of some saddles for inserting into HDPE pipes are given in Table No. 1.
Table 1
| Channel diameter, mm | Branch thread, inches |
| 20 | ½ |
| 25 | ¾ |
| 32 | 1 |
| 32 | ¾ |
| 40 | 1 |
| 40 | ¾ |
| 50 | ¾ |
| 50 | 1 |
| 63 | ¾ |
| 63 | 1 |
| 110 | ½ |
| 110 | 1 |
| 110 | 1 ¼ |
| 110 | 2 |
The material used to manufacture such fittings is polypropylene copolymer PP-B. The operating pressure for elements with diameters of 20-63 millimeters inclusive is set at 1.6 MPa at an ambient temperature of 20 degrees, with a diameter of 75-110 mm - 1.25 MPa.
The nuances of tapping into a water supply system under pressure
To cut into the pressure pipeline, clamps-plates or electric welding saddles equipped with a cutter built inside the lining are used. It is located in a hermetically sealed housing and when drilling, splashes of water do not interfere with the process.
The cover is welded to the pipe, and shut-off valves are installed. A hex wrench is used for drilling. After the process is completed, the cutter is removed and the pipe in the plate is closed with a threaded cap.
Liners with an internal cutter can be used in any water supply system, including those under pressure. However, their cost is higher than that of conventional overlays.
When can you do without soldering?
Craftsmen have to look for an answer to the question of how to cut into a polypropylene pipe without soldering in several cases. Firstly, not everyone has such a device “lying around” in their household. But you are either reluctant to search through friends, rent or buy welding equipment, or don’t have the time/opportunity. Sometimes tapping into a PP pipe without a special device can be considered the optimal way, which is why even experienced craftsmen do this. This decision is consciously made in several cases:
- when installing temporary pipelines;
- when there are only a couple of joints to be connected;
- after purchasing meters or additional plumbing fixtures;
- if you need to quickly replace a section of the pipeline where a defect has appeared;
- when work with polypropylene pipes is carried out on a system where the hydraulic load is low, the first example is sewerage.
An alternative installation method may be required in one more case: when it becomes necessary to make the connection detachable, so that there is a chance to disassemble the area from time to time for maintenance.