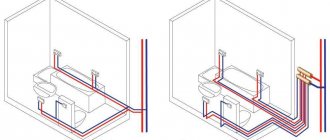
When installing a hood in the kitchen, not everyone knows how to properly combine the hood and natural ventilation in the apartment. Especially if there is only one ventilation duct.
Many people do not pay enough attention to this issue. But in vain! After all, if you completely occupy the ventilation duct with the air duct from the hood, then you risk being left without natural ventilation when the hood does not work.
When combining a kitchen hood and natural ventilation in an apartment kitchen, the main task is to ensure that the flow from the hood is not squeezed back into the room through the ventilation grille.
1
Why do you need a hood in the kitchen: main functions
The design of kitchen hoods is quite complex, but its use, as it turns out, is elementary. By installing such a device in your kitchen, you become a happy owner of cleanliness and freshness not only in the place where you prepare food, but throughout the whole house.
If you run the hood after cooking, it is advisable to open the doors to the living rooms to eliminate harmful odors from there too.
Kitchen cleaners help to instantly get rid of carbon deposits, odors and smoke accumulated under the ceiling after intensive use of a gas stove. You probably know that all the grease and soot accumulates in the air and on the furniture. If the house has a hood, then it will save you from unnecessary worries regarding washing grease from the facades of the kitchen unit.
How hoods differ according to operating modes
Sometimes the ventilation mode is one of the main criteria that the user takes into account when choosing. Therefore, before purchasing, it is necessary to decide what types of kitchen ventilation structures are usually divided into.
- Circulating . These devices operate on the principle of an air conditioner, only instead of a cooler, cleaning carbon filters are installed inside. The air passes through them and returns to the room already clean and fresh. These devices are easy to install (just hang them in the right place and plug them into an outlet), but they are ineffective in cleaning.
- Flow-through . This is an improved analogue of the previous device. It requires a mandatory air duct to the street, as it absorbs all the polluted air and sends it outside the house. The devices are recognized as more productive than the previous type and, accordingly, durable.
When choosing a device based on its operating principle, you must clearly understand what kind of performance you need. If you purchase devices with a carbon filter, they are subject to regular maintenance, as they quickly lose their ability to circulate contaminated air.
Remember not only about mounting the device, but also about the electrical supply to it.
Flow type kitchen hoods have a complex installation system, but this does not mean that you need to involve a professional. If you carefully study the instructions, you will definitely be able to do it on your own.
Hoods and accessories: where to buy?
When using a hood in recirculation mode, it is very important to promptly replace the carbon filters. Different brands use different types of these components. Knowing the brand and model of your air purifier, you can easily order carbon filters for home delivery. It is most profitable to purchase replacement parts in online stores, since they can offer the most affordable prices.
Those who are accustomed to fast delivery and affordable prices can turn to the Falmec online hood store, which contains the most popular models of air purifiers.
Accessories and replacement parts are collected in a separate section to make it easier for visitors to find the necessary components. Leave your tips and comments below. Subscribe to our newsletter. Good luck to you and good luck to your family!
How to choose the right hood for your kitchen so that it lives up to your expectations
Sometimes, even a well-designed ventilation system in the kitchen requires additional installation of equipment to clean the air in the room. This is exactly what a kitchen hood plays. But it is also important to be able to choose a household appliance so that it serves faithfully.
The correct operation of an electric exhaust system depends not only on careful selection, but also on correct installation.
We decide on the type of installation: wall, island, corner
Wall-mounted air purification devices in the kitchen are suitable for rooms with low ceilings. This technique, in turn, is divided into telescopic, built-in, and wall-mounted hoods. You need to choose from these variations solely at your own discretion, because in one kitchen the hood will fit perfectly, but in another there will be a significant flaw.
There is no need to narrow the diameter of the air duct unless necessary. This will reduce the efficiency and performance properties.
Island-type structures are suitable for large rooms, but here it is necessary to consider the design and performance of the device. Corner hoods are more suitable for rooms that require the placement of gas equipment strictly in the corner. That is, if you do not have the opportunity to move the gas stove, then corner exhaust systems will be an ideal option.
A few words about the dimensions of the device
First of all, you need to focus on the dimensions of the room and the ventilation system diagram itself.
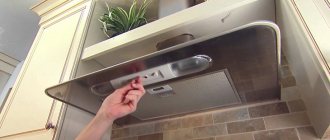
If the hood does not remove odors well, its filters may be clogged.
Remember that the size of the gas stove or hob itself plays a direct role in determining the dimensions of the kitchen hood. If these parameters coincide with each other or the hood exceeds the hob, then the absorption of unpleasant odors and fat will be carried out in full.
What material would be better for the hood?
There are traditional materials that perform best in this “incarnation.”
During installation, pipe elbows can be used instead of angle adapters.
If you pay attention to the aluminum or stainless steel construction, you can be confident in their quality and reliability. Such devices will last for decades, and they do not require special care. A big plus is the ability to wash some equipment parts in the dishwasher.
Is it necessary to know performance?
Performance is a parameter that is responsible for the ability of the hood to efficiently process rooms. The higher this value, the more efficiently the device will perform its work. However, you won’t be able to buy a device at random.
When ventilation fails, it is better to open windows and doors to relieve the load on the appliance.
To do this, it is necessary to calculate at least approximate productivity. To do this, you need to multiply the total area of the room by 12, then round the value up.
Please note that the standard capacity of exhaust systems varies from 702 to 1020 m³/h. Accordingly, the higher this indicator, the more such a ventilation system will consume electricity.
Standards and requirements for kitchen exhaust systems and installation
Exhaust systems, like any other equipment, are subject to installation requirements and technical characteristics:
- Match the size of the exhaust system and the gas stove underneath for maximum efficiency in removing odors.
- The hood must be installed no less than 50-60 cm from the stove. This is done for ease of use. In addition, if the hood is lowered too low, there is a high probability that the fat accumulated on it will ignite.
- The capacity of the hood should replace air at least 10 times per hour. To calculate how much volume the exhaust system should process, you need to take into account the area and height of the ceilings in the kitchen. Calculate using the formula: V = S * h * 10 * 1.3, where S and h are the area and height of the room, respectively, 12 is the minimum air treatment rate in 60 minutes, 1.3 is the correction factor.
- If there is no veterinary duct in the kitchen, then it is better to install the hood with the ability to adjust the performance and recirculation. If you connect a flow hood to natural ventilation, this will lead to disruption of the latter. Also, you should not turn on such devices for a long time.
- Craftsmen must strictly follow the instructions in the equipment passport.
- The hood is leveled.
- Turns at an obtuse angle are not allowed; any turns should be as few as possible.
- If the length of the route exceeds 300 cm, then a second exhaust fan is required.
- There is no need to choose equipment with high power, it makes a lot of noise, and it is not intended for residential premises.
At what height from the gas stove should the hood be installed?
Knowing which fasteners to install a kitchen hood on is not enough. It is important to correctly measure the distance for hanging equipment above the gas stove. There are special standards that must be followed if the kitchen is standard.
Also, the installation height of the hood can be changed if provided by the manufacturer.
Traditionally, the system is installed at a height of 65-90 cm above the hob. If you try to place the device a little lower, this may affect performance, because high temperatures may cause some parts to become deformed.
It is advisable to install a hood higher only when a tall person in the family prepares food, and the device has sufficient power and is capable of extracting smoked air even from the bottom of the room.
Combination of ventilation with recirculation
Recirculation is called SW, when the air removed from the room is returned back through the influx with an admixture of fresh air. The disadvantage is that its use is limited by SNiP, and in regions with cold climates it does not work very effectively. Its action is limited to one room.
Recirculation allows you to save on energy consumption due to the fact that power is spent only on heating a small volume of air mass taken from the street
The recirculation system circuit can be converted into ordinary supply and exhaust ventilation by closing the recirculation valve and fully opening the supply and exhaust. If you do the opposite, the system begins to circulate air in a circle.
When the supply and exhaust valves are only partially opened, fresh outside air will begin to be mixed in. By adjusting the degree of opening, they optimize the flow of elements that ensure comfortable life.
How to install a hood in the kitchen with your own hands: from preparation to connecting to electricity
Finally, we have sorted out all the nuances of the choice, decided on the appearance and type of construction, and now we will proceed directly to the installation of the purchased device. Of course, independent fastening takes a lot of time and maximum effort, because you want to do everything reliably, no worse than a professional. Therefore, we recommend that you study each item in this section to avoid mistakes in connecting ventilation equipment.
Do not clutter the exhaust structures with decorative elements, especially metal ones: they can damage the motor.
Preparatory stage before installation
The sequence of actions directly affects the final result. Remember that you must pay attention not only to reliable fastening, but also to the place where your structure will be placed.
Before installing the device to the surface, be sure to make sure that the equipment is complete. Make sure that all bolts and operating mechanism parts are in place.
When installing the hood, it is advisable to remove all disassembled parts so as not to damage them during the work.
Here's what you need to consider at this stage:
- accurately determine the height (for gas stoves - at least 0.75 m, and for electric stoves - from 0.65 m). Also read the instructions for the device: it is possible that something else is stated there;
- free the wall or ceiling (in a word - space for fastening) from unnecessary objects;
- make a mark where the air duct will go (if there is one), and where the mounting bolts will be installed;
- make sure that all the necessary tools are at hand (you will need a drill, hammer, drill bits, screwdriver, level and other small equipment).
How to install kitchen hoods depending on the type of installation
All ventilation systems powered by electricity differ in the installation method. If for wall-mounted devices you can limit yourself to a small algorithm of actions, then for ceiling-mounted devices the situation is much more complicated. We offer to understand the installation of equipment with individual design features.
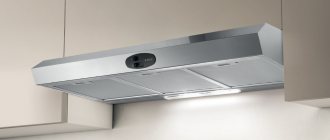
Method of installing a wall-mounted or hanging kitchen hood
Unpack the device and read the entire manual. Be sure to review the installation requirements to make it easier to mount the unit to the wall. Then just follow our instructions.
| Illustration | Description of action |
| Find the mounting holes, measure the length between them from the center of the hole and transfer it to the wall using a simple pencil. You can also simply bring the structure itself to the installation site and make marks. This is convenient to do if you have an assistant. Don't forget about the height (0.75 m). | |
| We add our height, plus to this we add the height of the connectors for fastening so that the lowest point rises above the slab by exactly 0.75 m. | |
| After we have made holes in the walls, we place the body of our hood against them and secure them with self-tapping screws or dowels using a screwdriver. |
Of course, some installation details may vary depending on the model of hood purchased.
Wall-mounted kitchen hoods are mounted exactly as shown in the mini-instructions. Only the overall height of the mounting holes may vary, but see below for further connection features.
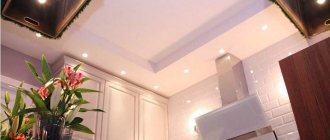
How to install a built-in hood in the kitchen
If the space in your kitchen does not allow you to install a large hood and you have to make do with narrow models, then it is better to buy a built-in design. This one is also famous for its elementary installation method.
If the kitchen is small, then it is quite possible to get by with an appliance with a side of no more than 50 cm, which in the vast majority fit into cabinets without unnecessary restorations.
All you need to attach this type of ventilation is to carefully place the device in the closet (if you need to deform the set, that is, remove the bottom wall from it and make a hole in the top).
The convenience of such a configuration is that it can be installed in a cabinet directly on the floor, and after all the work, hung on the wall and closed with a front door. In appearance, such a design will be no different from a stationary piece of furniture.
Master class on installing an inclined hood in the kitchen
The inclined type of hoods usually does not cause problems either in operation or in the installation method. To install such a device, you only need to make reliable fasteners and carry out the markings correctly.
The hood can be connected in different ways, it all depends on the type of device.
It is advisable to first make a diagram, and then simply implement it. For clarity, we offer you video instructions for installing the popular kitchen ventilation KRONA from specialists.
You can use this guide for other models of inclined ventilation systems.
Installation of a corner hood in the kitchen: main features
To attach a kind of corner hood you will need a little skill, since the device itself is quite heavy. You won’t be able to cope alone, so we strongly recommend that you get help.
Do not leave the device turned on if you leave the house for a long time.
To perform the installation correctly, you need to consider several rules:
- If you suspect that the walls are unreliable, be sure to take care of additional strengthening of the device. It is advisable to make it end-to-end, if possible;
- For such devices, adjacent kitchen cabinets are not provided. Getting to them will not always be convenient;
- such a device should be mounted in the corner where the ventilation hole is closer, respectively, above the gas stove;
- The performance indicator of the equipment is affected by the installation method: if it is not hung above the hob, then it will be more difficult for it to take in polluted air.
Remember these simple rules, because corner hood designs are considered one of the most stylish and expensive, and their mechanical damage is not included in the list of causes of breakdowns under warranty.
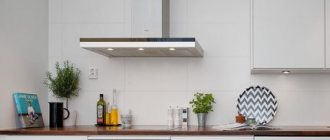
With a hood, the kitchen acquires an attractive appearance and always remains fresh.
We connect the fixed hood in the kitchen to the ventilation
During the installation of the hood, we want to ensure the correct operation of the device, and at the same time not disturb the natural ventilation of the room. In this section, we recommend that you carefully consider each item to avoid problems.
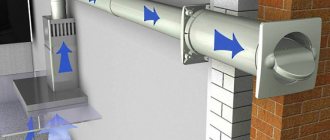
How to choose a pipe for a kitchen hood: analysis of the advantages and disadvantages
The main attribute for connecting the air duct is a special grille with a round hole.
It is this device that will help maintain natural ventilation.
Today, three types of air ducts can be found on sale. Which are connected to the ventilation shaft. Let's talk about them in more detail.
If during installation you notice that the adapters are loose, strengthen these connections with FUM tape.[
An aluminum corrugated pipe is one of the common devices that is used to connect ventilation systems to the air duct. Such a device is quickly connected to the outlet flanges of the equipment and inserted into the ventilation shaft using a special adapter. The main advantage is the ease of installation, but the disadvantage of such an air duct is the increased noise that is created when air masses pass through the pipe.
When using plastic ducts, you must take care to seal all joints. You can use silicone for this.
Rectangular plastic air ducts are suitable for hood outlets with a diameter of 125 mm. They are installed using special adapters and connectors. Rectangular pipes have good throughput and can be placed discreetly on top of kitchen furniture, or easily attached to the wall.
A huge role in the ventilation system is played not only by the throughput of the air duct, but also by the shaft itself.
Round plastic air ducts are considered heavier, since most of them have a built-in metal plate for strength. At the same time, such devices last longer, do not yellow (over time) and do an excellent job of removing polluted air and unpleasant odors.
Necessary preliminary calculations
The initial parameter for the calculation is the volume of air removed and supplied to the room. There is more than one method, but the most used ones take sanitary standards and room area as a basis.
According to the requirement of the former, it is necessary to start from the fact that the air requirement is in m3/h. for one person spending most of the time in the house, it depends on the purpose of the room:
- living room - 40;
- bedroom - 20;
- kitchen - 60;
- bathroom - 25.
Based on the second criterion, we proceed from the following regulatory requirement: per 1 m² of living space there must be 3 m3 of replaced air. When calculating the cross-section of air ducts, they are guided by the fact that the optimal air speed in the central channel is 5 m/sec, and in the side channel - a maximum of 3 m/sec.
You can independently determine the pipe diameter using the formula:
S = L/3600/v,
where L is the productivity measured in m3/h, v is the air speed in m/sec.
Data on air consumption depending on the cross-section of the air duct are summarized in the table.
The aerodynamic resistance of an air duct with a circular cross-section is less than with a square one. The square shape is more compact, fits organically into the interior of the room, and has a large range of sizes
Air ducts are made of metal, plastic, aluminum foil, polyester. The last two are flexible systems. Their noise and heat insulation characteristics are good and they are ideally suited for a private home.