Despite the simplicity of the design, building a frame house requires skills in working with tools and knowledge of the intricacies of handling wood, insulation and cladding materials. Basic knowledge of geometry is also very desirable - calculation and installation of roofing, wall frames, window and door openings require an understanding of the interaction of elements and load distribution.
It’s easier to build a house with your own hands if you use a set of factory-made elements, for example, buy a ready-made house kit made from SIP panels. This is the simplest option in terms of labor and time, but more expensive in terms of financial costs. You can take on the construction of a frame house yourself if, in addition to a sufficient level of skill, you have a set of necessary tools. If you buy them specifically for building a house, the costs will be even higher than when ordering a ready-made set of parts for construction.
Where to begin
Frame construction technology was chosen for the following reasons:
- rapid erection;
- low cost;
- ease of construction;
- environmental friendliness;
- good “warmability” and ability to retain heat;
- "flexibility" of the design.
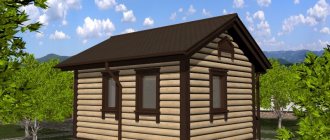
Based on the size of the building material (pine boards), the dimensions of the building were determined: it should be a 6x6 frame house with a terrace. The layout of the first floor included three rooms. Instead of the second floor there is an attic.
layout of a frame house 6 by 6 house diagram
Formations in 6 on 6 football: pros and cons
Tactic 3-2
The 3-2 scheme can be successfully used by both novice teams and more experienced teams. This formation includes three defenders and two attacking players. (Fig. 1)
Rice. 1. Diagram 3-2
Let's look at the advantages and disadvantages of this tactical model.
Advantages of the 3-2 scheme
Easy to understand
Each player knows what position he should take. The defenders divide the central, right and left zones of defense among themselves. One striker is to the left, the other is to the right.
Reliability in defense
This advantage partly follows from the previous one. When everything is clear to players, fewer errors occur. If all the players are behind the ball line, then it is very difficult to break into such a defense. The flanks are closed, and so is the center of the field.
This formation is good when you need to maintain an advantage.
Your team can easily adapt to a 2-3 formation.
Disadvantages of the 3-2 scheme
Vulnerability of the center of the field
In this scheme, there is no clearly defined support zone player who would be the designer of your attacks and the destroyer of the opponent’s attacks.
Tactics 3-1-1
The 3-1-1 formation has 3 lines: defense, midfield and attack. This allows the team to develop attacks more smoothly. There is a distinct midfield player who functions as a playmaker. (Fig. 2)
Rice. 2. 3-1-1 formation
Pros of the 3-1-1 scheme
More options for breaking out of defense through passing
With the help of the center player, triangles appear, which help the team to control the ball well from the bottom.
The threat from the flanks is blocked
The formation of 3 defenders allows you to cover all zones in defense.
Playing on counterattacks
This formation has good ground for creating dangerous counterattacks. Your team can take the striker one-on-one with the opposing goalkeeper in two passes. (Fig. 3. Black arrows show gear directions, orange arrows show opening directions)
Rice. 3. Counterattack pattern in 3-1-1 formation
Disadvantages of the 3-1-1 scheme
High class performers
Have you noticed that there is only one player each in the midfield and attack lines. It is possible that they will have to act against two opposing players. The skill level of such players must be quite high.
Threat from midfield
If the opponent plays with two central midfielders, then in the center of the field a 2-on-1 situation will often arise that is not in your favor. This can lead to dangerous shots from the central zone. (Fig. 4)
Rice. 4. Opponent's advantage in the center of the field
Tactics 2-2-1
2-2-1 in 6v6 football is the same as 4-4-2 in 11v11 football. This is why this formation is popular among amateur teams. (Fig. 5)
Rice. 5. Tactics 2-2-1
Pros of the 2-2-1 scheme
Balance
This model provides a balance between defense and attack. Two midfielders manage to help the defense and attack without any problems.
Ability to defend compactly
A 2-2 defensive formation provides good density in front of your goal.
Playing on counterattacks
The 4 players on your team behind the ball have a great chance of winning the ball and quickly delivering it to the attacker.
Disadvantages of the 2-2-1 scheme
Risk of failure in the center of the field
A failure in the center of the field is possible when both midfielders of your team are delayed in attack. The opponent can take advantage of this and “fall out” 3 on 2 on your goal. Very often such outings end with a goal being scored.
Tactics 2-1-2
The 2-1-2 formation can be classified as counter-attacking. If your team has fast players, then it makes sense to try it. (Fig. 6)
Rice. 6. 2-1-2 formation
Pros of the 2-1-2 scheme
Good counterattack potential
After the tackle, the ball is delivered to the central midfielder, who then chooses the most promising option to continue the attack. There is a good chance of catching your opponent by surprise. (Fig. 7. Black arrows - gears, orange - openings)
Rice. 7. Counterattack with 2-1-2 formation
Allows for good attack width
Two attacking players can operate on the flanks, creating the necessary width.
There is a distinct midfield player
Constantly having a player in the middle will allow you to develop attacks through passing.
Disadvantages of the 2-1-2 scheme
Great workload for the central midfielder
The central midfielder needs to be able to keep up both in attack and defense. This is a very difficult task. In this case, it would be good to have a replacement player who is capable of playing equally well in this position.
The defensive line consists of two people. If two attackers act against the defenders, this can lead to dangerous moments at your goal. It is better not to create a 2v2 situation in defense, especially if the opposing attackers are stronger individually.
Foundation
Based on the publications studied, the calculation of the weight of the structure and operational loads was determined to be 36 tons.
The bearing capacity of the foundation is determined based on the total weight of the structural elements: roof, frame, plinth, operating load. For calculations, you should use SNiP “Loads and Impacts”, choosing the appropriate building material and its quantity. The snow load must be taken into account.
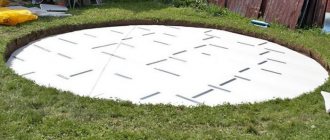
Screw piles were chosen to construct the foundation. During one working day, 16 piles with a diameter of 89 mm and a length of 3 meters were installed. The depth of embedding of the piles was 2.5 m. The bearing capacity of such a foundation is designed for 48 tons.
For the strapping, 50x200 hardwood boards were chosen, which were combined in threes to imitate 150x200 timber. The wood was treated with Senezh Ultra antiseptic in two layers. The boards were attached to the heads using 250 mm studs and wide nuts on both sides. The strapping boards were fastened together with M12 180 mm screws in increments of 1 meter. Additional consolidation was carried out with 100 mm nails. The body of the house was subsequently secured to the frame with steel tape.
screwing in the pile
screw piles twisted pile caps are put on tying with boards
scheme for tying a screw foundation with boards, lining made of moisture-resistant plywood, studs for the screed, fastening the piping with a head
Recommendations
To reduce construction time, work is not carried out in very rainy weather: the wood may get wet and drying of the material will cause slight cracking. When installing the frame, it is necessary to make a roof or temporary covering in case of rain.
If you have chosen a two-story frame house, the construction design can be anything, it is better to use the frame option. The building is assembled directly on the site: the “skeleton” is made of wood, the gaps are filled with brick, stone or adobe material. This option is cheaper than frame-panel construction.
When using SIP panels, their main drawback is taken into account - it is impossible to replace the insulating layer during operation. For a frame house, natural ventilation of the walls is of great importance.
If the frame is assembled from boards, then they are impregnated with an antiseptic before assembly begins. In this case, the wood will better absorb the solution. In sunny weather, the material dries for 24 hours.
Frame houses are suitable for seasonal and permanent residence. An alternative to these structures can be buildings made of glued or profiled timber, or rounded logs. But these options increase construction costs.
Selection of lumber
The choice was limited to a meager supply of dry, but not sawn, or sawn, but damp wood. After deliberation and calculations, pine boards 50x150 were chosen for tightening the rafters, forcing walls and gables, 50x200 for laying floors and rafters, 25x150 for jibs and sheathing.
A careful examination showed the presence of knots, unevenness in thickness and width, so one had to be careful when choosing boards for constructing the frame: defects in the wood could lead to a decrease in the reliability of the structure. To calculate the strength of the structure and design of openings, the book Advanced Wall Framing was used.
Floor installation
The logs were pre-cut to size and then laid taking into account the irregular geometry of the lumber. Next, the logs were secured with spacers. When laying the joists and struts, defects made during the installation of the piles appeared. Izospan D insulation to block soil evaporation was laid on the ground and pressed with a layer of crushed stone.
aligned the joists on one side
on the other side we measured the length
installed lag
the logs made spacers to stiffen the platform
Walling
The main techniques that guaranteed the energy efficiency of a 6 by 6 house without compromising its strength are:
- compliance with the location of frame elements relative to each other: joists, rafters and racks;
- arrangement of ties of the top boards with a metal plate;
- use of spaced beams of openings;
- arrangement of openings without beams in non-load-bearing walls;
- due to the fastening of beams with metal plates, there are no double posts in the openings.
High-quality material was selected for the racks, and the pitch between them was calculated taking into account the sizes of insulation sheets and drywall - 2.45 m and 0.625 m, respectively.
The position of windows and doors was determined by the step between the posts. The beams in the openings were fastened with metal plates, the window sills with 40x40x40 corners.
When knocking down the boards of the wall frame, as elsewhere later, the nails were not immediately driven into the head, leaving the opportunity to evaluate the completed part of the work and make corrections.
To lift the wall, it was necessary to connect the upper edge and the foundation with a rope of limited length to prevent tipping, and the lower edge had to be connected to the floor with tape to prevent slipping. The raised walls were fastened with nails to the base and additionally with jibs.
nails until the window opening without double mullions is completely nailed in
crossbar at the corners (controversial decision) temporary jibs
so that the wall does not move away when rising, the restrictive tape, the frame of the first floor
Common mistakes during construction
The most common errors that occur during the construction process:
- Poor frame reinforcement;
- Use of poor quality wood;
- Insufficient vapor and waterproofing;
- Incorrect step when installing vertical supports;
- Weak fastening of vertical supports.
Tree care mistakes
When building a frame dwelling on your own, you should not make mistakes.
Often, poorly dried wood is used to construct a structure. This is a serious flaw. When wood dries, its shape changes. As a result, the building may lean, nails or screws may be uprooted. The house, insulation, and finishing will be destroyed.
Wood requires careful care to avoid defects and early damage caused by mechanical stress, as well as the influence of natural factors.
Ceiling installation and rafter installation
When installing the ceiling, the relative positions of the racks and joists should be strictly observed: the spread should not exceed 5 cm. A stretched cord was used to align the ends. So that during the laying of the board connecting all the logs it was possible to adjust the accuracy, a pin was placed under the end of the board, which made it possible to easily move the board over short distances. The laid logs were fixed with spacers installed in three lines with a step of 1.5 m. The length of the spacers was slightly longer than required so that the drying boards did not weaken the structure. It is planned to make the ceiling suspended, like here: https://potolkilider.ru/informatsiya/natyazhnye_potolki_murino/
we throw the logs onto the second floor; the floor joists of the second floor are installed; they are crossed for the rigidity of the floor
After determining the snow load (240 kg/m2) and the weight of the roof (40 kg/m2), a high-quality 50x200 board was selected for the rafters. Since the ridge was not provided, the legs were assembled in pairs into a triangle and connected with a nail plate on one side, and on the other with a plywood triangle. The width of the supporting cut was determined using a measuring board, the length of which was equal to the width of the ceiling. To provide rigidity, each pair of rafters was additionally fixed with a screed at a level of 2.5 m from the floor and a special jumper at an angle of 30 degrees. From the inside, the rafters received additional insurance in the form of a metal tape attached to the joists and stretched diagonally in a cross. To make lifting the structure easier, a cord was used.
OSB for flooring with lock
coat the logs with liquid nails lifting osb sheets to the second floor
fastening steel tape
additional fastening of rafters to the ceiling
sealed the technological gaps with sealant
A “staircase” had to be put together to accommodate the excessive roof overhangs, since the removal of the beams had not been thought out. The pediment with a pitch of 40 cm corresponded to the location of the racks on the roof.
The large roof created significant windage, so for insurance it was necessary to run a metal tape from the rafters along the racks to the trim before installing the OSB boards. This was not done; the rafters had to be attached to the racks from the inside. I did the same with the lags, which I fixed with the strapping. It is better to use metal perforated tape.
The canopy for the veranda and the roof of the house formed a single whole. The posts and beams are made of 100x150 timber. The pitch between the pillars was 2 m, the beam had a protrusion of 60 cm to form the roof overhang. To prevent the structure from moving, 37x37 window corners were used to add rigidity.
The time spent on installing the rafters is 10 man-days.
rafter joint
rafter legs rafter system
checking verticality
roof extension
gables
Frame assembly
Frame house construction is based on the norms of SNiP 31-105-2002, compiled on the basis of foreign regulations.
A strapping beam is placed on top of the foundation and secured strictly to the level. The frame is assembled traditionally, installing the racks alternately in a vertical position, or using the “Canadian platform” method. In this case, the assembly is carried out horizontally on the finished subfloor, followed by installation of the sectors in the design position.
Racks made of planed boards measuring 150x50 or 200x50 mm are installed in increments of 600 mm, attached to the lower trim beam, starting from the corner. The frame is fastened along the top with a strong beam - the top trim.
Window and door lintels are reinforced with boards laid on edge. The thickness of such an element depends on the size of the opening. If it is wider than 800 mm, the crossbar should be no thinner than 150 mm.
The frame is reinforced with board jibs, cutting them into the upper and lower chords, or with a perforated steel strip. If rigid sheets are used for cladding - multi-layer plywood, OSB - no additional elements are installed.
The outer cladding sheets are placed in a checkerboard pattern with the seams staggered, with the long side parallel to the foundation. This installation rigidly binds the frame in the horizontal direction.
Wall cladding
The 6x6 frame house was sheathed with 2.8 m OSB boards produced by Egger, and fastened with 60 mm screw nails, which were driven in at intervals of 15 cm along the perimeter and 30 cm along the middle post. The position of the stand on the sheet was marked before installation. The strapping was covered with a sheet using a 25 cm guide board.
The joints of the slabs should be nailed staggered, and the nails should be directed at a slight angle.
Labor costs – 3 man-days.
jagged nails technological gap using a nail slab wall cladding
Gable.
Vertical frame posts. Step 0.5m 6m (side) x2=12m.p - 1.2m.(window opening width) x2 (on each side)=9.6m.p 9.6/0.5=20pcs (19.2) Height racks (board 100mmx50mm) changes with each step proportionally to the middle: 0.5m+1m+1.5m+2m+2.5m=7.5m window opening 2.5m+2m+1.5m+1m+0.5m= 7.5m
Central post 3m (ridge height) - 1.2m (window height) = 1.6m . Total (7.5+7.5+1.6)x2(pediment)=33.2m.p
cross beams (board 100mmx50mm) are fastened in two strips 4m.p. (lower) and 1.6m.p. (upper) (4+1.6) x 2 (gable) = 11.2m.p. 33.2+11 ,2= 44.4 m.p. Or 44.4 x 0.1 x 0.05 = 0.222 cubic meters. The pediment in this example of a frame house is sheathed only on the outside with boards (150mmx25mm) and is not insulated.
The area of two triangular gables is a multiple of one rectangle 6x3 and is equal to 18 square meters - 1.68x2 (window openings) = 14.64 square meters + 10% (trimming) = 16.1 square meters. Or 16.1 x 0.025 = 0.4 cubic meters. (boards)
Waterproofing and wind protection are carried out with glassine paper before covering the frame with boards, taking into account an overlap of 16.1 square meters.
Roof covering and platform decking
Before laying the roof, a layer of vapor barrier was laid on the rafters - a Tyvek membrane film, and on top of it - lathing. The material chosen was “Puretan” metal tiles with a slightly thicker galvanization and durable coating compared to others. During the laying of the tiles, ventilation ducts were made for the bathroom and room, as well as a stove exit.
25mm OSB with 4-sided tongue and groove was chosen as the decking. The installation took 1 day.
Tyvek membrane film
installation of metal tiles
finished roof
metal tiles
Projects
The frame structure is usually constructed as one-story or two-story. A building with one floor is a standard layout; due to limited space, there is no variety of options.
A two-story frame house has various ideas for construction. The project often includes a kitchen-dining room, living room, small bedroom, bathroom - first floor. On the second tier there are two more rooms: a children's room and a bedroom or one large room. The total area of the house, depending on the layout and the presence of a veranda, is from 54 to 70 square meters.
A two-story frame house with an attic, a kind of attic space with a sloping ceiling, is also in demand. The roof of the structure is often made of different heights with large angles of inclination. The attic can be either with windows or without openings.
Insulation
Insulation was chosen based on the optimal price-quality ratio. Most of all, Rockwool Light Butts Scandic (60x80 cm), Scandic XL (60x120 cm) for interior spaces and Technolight for external insulation met this criterion. The thickness of the slabs was chosen to be 100 and 50 mm in order to maximally close all openings in the walls and ceilings. The most suitable pitch between frame elements for laying Rockwool is 57-58 cm. To keep the insulation in the ceiling opening, plywood sheets were used. The sheathing for external insulation was made in increments of 59 cm. After laying Technolight, a Tyvek membrane was stretched over it. Foam plastic was used to insulate the windows.
insulation Rockwool Light Butts Scandic floor insulation
internal insulation
external insulation
windproof membrane
Window
Before installing Veka Softline 5-chamber windows, the opening was thoroughly waterproofed with Niconband roofing tape and pieces of membrane film. After cladding, flashing, slopes and platbands were installed. The cracks are sealed with sealant to match the painted trim.
roofing tape Niconband
gluing the window opening with roofing
taped the entire opening
gap at the bottom
gap at the bottom
gap at the bottom
low tide metal mesh
Facade
The decision to use imitation larch timber as cladding for a 6x6 frame house was made due to environmental friendliness, relatively low cost and the ability to change color. A ventilation gap should be provided under such cladding and a sheathing with protection from insects and mice made of mounting mesh should be installed. Galvanized nails of 50 mm were chosen as fasteners.
Tikkurila products were chosen for the finishing because the primer and paint preserve the wood structure and have significant durability. A total of 10 man-days were spent on cladding and painting.
metal mesh to prevent rodents, lathing to imitate timber
installation of imitation timber from imitation timber scaffolding, coating the joints, bypassing the window, cladding, painting of the facade is completed
final view of the 6 by 6 house
Fasteners
The following elements are used as fasteners for the components of a frame wooden house:
- Fastening plates (angles or flat plates with or without holes). Plates and angles are attached to beams or supports using wood screws.
- Staples (straight and angular) are wire fasteners of a certain diameter. Their edges are bent and inserted into the ends or side surfaces of the beams.
- Bolts - used to tighten adjacent beams and rafters, inserted into through holes and secured in them with nuts.
- Nails.
All connecting, fixing and fastening elements for frame buildings are made of metal. To fasten load-bearing elements, reinforced corners made of hardened steel or increased thickness, 3-4 mm, are used. To fasten the supporting elements, angles made of ordinary steel with a thickness of 2-3 mm are used.
Variety of fastening elements.
In order to protect against corrosion, galvanized steel is used for the manufacture of corners and plates. Rust protection is especially important in outdoor construction, when metal fasteners in walls can become a point of moisture condensation, causing a section of the wall to become wet. Therefore, galvanized fasteners are in great demand in various components of a frame house.
Node connection errors
A drawing of components requires the presence of sketches and descriptions. However, despite this, novice builders often make offensive mistakes. Let's list the main and most frequently repeated erroneous actions that novice individual builders make when assembling a frame:
Not all jibs are installed. This is not true. The jibs ensure the wall's resistance to wind loads. In addition to the jibs, to withstand the wind it is necessary to use rigid slabs in the outer cladding.
- Use solid timber or boards placed tightly next to each other as corner posts. This corner will be cold. Moisture will condense and mold will develop.
- Use “black” screws for fastening. They are not strong enough, especially if the wood purchased for construction is not dry enough. When drying and warping, the “black” screws can be simply “torn off”. A more durable option is golden and silver-colored self-tapping screws, galvanized or coated with a layer of chromating and phosphating.
- They use wood that is not dry enough, which causes severe shrinkage and “breaks” existing nodes and connections.
- And another mistake is not to use nails. These proven fasteners are often stronger than any self-tapping screws.
Frame construction is a new technology in which, despite its apparent simplicity, there are many nuances and features.
Bottom line
After calculating all the costs, the cost of the house was obtained, which turned out to be more than 800,000 rubles without taking into account communications.
Apart from laying the foundation, laying the roof and installing windows, all other work was carried out, with rare exceptions, by two hands. The main difficulty was moving lumber around the construction site. As GrauRu’s experience shows, building a 6x6 frame house on your own is a completely solvable task that allows you to save, if not time, then money, and enjoy the work done.
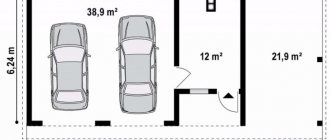
Layout of a frame house
Regarding planning issues, it is also best to turn to standard projects, for example KD-17. This is an attic house with a total area of 72 m2. Its construction without communications will cost you approximately 10 - 12,000 rubles m2. But taking into account price changes, the cost should be calculated based on the cost of building materials on the day construction begins.
Photo of the KD-17 project
With an area of about 70 m2, a family of 3 to 4 people can comfortably live in such a house, without lacking either comfort or living space.
When building a country house on one floor, the living space will be slightly smaller, but even in this case the desired comfort can be achieved. A porch, a terrace, and several rooms inside are quite enough for a comfortable stay, both in summer and in winter. When built correctly, frame houses are quite warm and protect from bad weather no worse than stone ones.
The option of a two-story house measuring 6x6 is ideal for small plots; such a house can fit even on 4 acres.