More and more people, when thinking about what to build their house from, prefer to choose modern materials so that their construction is reliable, beautiful, meets today's standards and lasts for many years. As a building material, cellular concrete is gaining popularity at an unprecedented rate. It can be divided into aerated concrete and foam concrete. Despite the fact that they have the same density, the heat treatment that aerated concrete undergoes makes it much stronger. It is able to withstand heavy loads. A representative of aerated concrete is sibit - a material that is made in an autoclave through hardening. Since it is porous, the weight of sibit blocks is small. This is how it differs from traditional brick and concrete. Moreover, sibit can accumulate heat and “breathe” due to its porous structure. It is these and other characteristics, which we will discuss later, that helped the new material gain great popularity. But how to build a house from sibit with your own hands? Let's find out further.
Sibit - pros and cons
Features of Sibit
Why is Sibit gaining more and more popularity? The answer is quite simple: because of its positive properties, which make it ideal for building houses. Let's look at the main ones:
- The most important advantage is that Sibit has amazing thermal insulation properties. The house will be cool in summer and warm in winter. Based on practice, owners of houses from Sibit save up to 30% on heating their homes, and this, you see, is quite a lot.
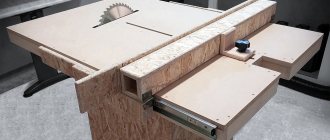
- The material is easy to process. If the blocks need to be adjusted or rounded, you can easily do this with a regular saw with large teeth. It is easy to cut and drill even by hand.
- Sibit blocks are lightweight, so you can save on both the construction of the foundation and special heavy equipment for conveying the blocks to the top.
- The porous structure allows the material to “breathe”, so the air in the house will always be fresh.
- Building a house from sibit will be easier and faster, since the blocks are much larger than simple bricks. Wall masonry can be done not only using regular mortar, but also using special glue.
- Sibit does not burn and is an environmentally friendly material.
Disadvantages of sibit: its fragility and strong moisture-absorbing properties. But this is not a big problem, since during masonry the walls are reinforced, which will further strengthen them. And the moisture-absorbing block itself, in turn, will be covered with finishing material so that moisture does not get into it.
So, we've sorted out the positive and negative sides. If you still decide to use sibit as a building material, let's take a closer look at where construction begins and how to build a house from sibit.
It is recommended to build a house from sibit in spring or summer, at temperatures from 5 to 25ºC. If the temperature is above this limit, the blocks will need to be moistened when laying the walls.
Why foam block
First of all, let us remind you: do not confuse foam concrete with aerated concrete. One of the articles on our website discusses in detail the fundamental differences between these two materials. It is worth noting that the price of foam concrete is more favorable.
What he really is
A foam block is a small “block” made by mixing a concrete mixture with special foaming components. It is the foam that forms cavities in the concrete, which reduce its weight and increase its thermal insulation parameters.
Specific structure of foam concrete
Its standard size is 200*300*600 mm. For clarity, look at the photo below and imagine how much time you can save on laying foam blocks.
Due to its size, the foam block will allow you to complete the masonry in the shortest possible time
Houses made of this material cost significantly less than houses of the same size made of brick or, for example, timber. And if you are not lazy and build everything yourself, then the savings will exceed even your wildest expectations.
Having an attractive price, foam block houses or cottages are in no way inferior in their parameters to stone or wooden ones. Another attractive feature of the material is its environmental friendliness.
Advantages of the material
No additives that negatively affect human health are used in production, which makes it possible to build children’s or health complexes from it
With such a construction, considerable attention is paid to sound insulation - and foam concrete has no equal in this regard.
The structure of the material itself is favorable for further processing. With the help of simple tools you can give the block any desired shape.
The porous structure does not interfere with gas exchange and the house “breathes” no worse than a wooden one.
From the previous point it logically follows that such a house is not characterized by excessive humidity and dampness
With foam concrete you will forget about mold and drips.
Not only the size, but also the principle of laying will help save time and mortar. After all, the gap between the blocks should not exceed 3 mm.
Both exterior and interior decoration will also not cause you unnecessary trouble, because the layer of plaster does not have to be thick.
Foam concrete has excellent fire resistance. At high temperatures, the material does not crumble or crack and protects the reinforcement from heating. In the event of force majeure, such a house will not let you down.
The fire resistance of the material is simply amazing
Disadvantages of the material
There are few of them, but they are still present:
- Low weight with a large volume, of course, leads to a loss of strength. For this reason, foam block has not received and will not receive widespread use in multi-story construction. Although, after all, you are building a private house, and this is unlikely to be a problem, because cottages are rarely higher than 3 floors.
- The need to monitor the correctness of the masonry. If the solution layer exceeds 3-4 mm, then you risk losing both heat and sound insulating properties.
Preparatory work
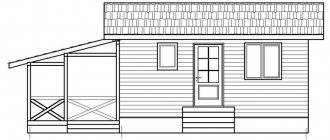
Drawing of a house made of aerated blocks
As always, you need to start building your own house with paper work. You must make a project for the future building, decide on the size, number of floors, shape, etc. In this case, you need to take into account many additional factors: the type of soil at the construction site, climate and at what depth the groundwater is located. If you don't take all this into account, don't expect your home to last long.
Not everyone can professionally draw up drawings of a future home, so you can seek help from a special bureau, where you can order a house design by paying money for the service.
Based on your wishes, specialists will quickly and efficiently design your future home. Moreover, they can calculate how much materials are needed for construction and approximate prices.
Conclusion
Thus, the total cost of such a house consists of the cost of the building materials itself and the cost of carrying out a whole range of work. Knowing the approximate prices for all stages of construction, as well as calculating the required number of blocks, you can find out approximately how much this pleasure will cost you.
To obtain more accurate information, it is necessary to draw up an estimate, and only a person specialized in this field can cope with this task. In the video presented in this article you will find additional information on the topic we discussed.
The basis of the basics is the foundation
Foundation
The foundation is a load-bearing structure that takes on the entire load of the building, distributing it along the base. How long your house will stand depends on the foundation, so its construction is one of the important stages of construction. Since sibit is not a heavy material, a strip foundation can be used to build a house. What depth and width to make depends on the number of floors, soil density and groundwater level. These indicators are different for everyone, so the depth can vary from 0.7 m to 2 m. The width of the tape is on average 0.4 m.
To make a strip foundation, you need:
- Prepare the site. Clean the selected area; if it is overgrown with large grass, it needs to be mowed.
- Make markings for the trench. It is made from a rope or cord, which is stretched around the perimeter of the entire building, repeating its contour. It must be tied to pegs or rods that are driven into the ground at the corners of the building. You should strictly adhere to the dimensions and width that are in the drawings. After the rope is tensioned, check all dimensions again. Then draw a diagonal from one corner to the other - if the dimensions agree, you can begin excavation work.
- Based on the markings, you need to dig a trench under the foundation with the selected depth. The work is not easy, but doable. Make sure the walls are level. You can use a plumb line for orientation. The bottom of the trench should also be horizontally level. To prevent moisture from penetrating into the foundation, lay waterproofing material on the bottom.
- When the trench is ready, make a sand bed. Pour a 10 cm layer of sand onto the bottom and compact it. Then add crushed stone on top and compact it again.
- Now it's time to knock down the formwork. It must be made from wooden boards, connecting them together with screws or nails. The height of the formwork depends on the climate in your region. If winters are snowy, we recommend making a base 50 cm high. When the climate is warm, the height may be less.
- At this stage, we recommend laying communications: sewerage and water supply. After all, if this is not done before pouring the foundation, you will then have to make holes in it.
- Next, take the Ø14 mm reinforcement and make a frame out of it, which will need to be placed in the trench. To do this, the reinforcement is connected to one another with flexible wire.
- Now it's time to pour the concrete. To determine how much concrete is needed for pouring, the total length of the tape must be multiplied by its height and width. You will receive a number that will indicate how many cubes of concrete are needed. You can either order this amount of concrete or make it yourself. The choice is yours. After which the concrete is poured in layers of 20–30 cm. Each layer should be compacted and the air should be expelled from it.
- Once the foundation is poured, its surface must be leveled with a trowel.
How to build a house?
The construction of a sibit house includes several stages. Let's look at each of them in more detail.
Foundation
Russian builders prefer to install sibit houses on a strip foundation. In this case, the correct choice of cement mortar brand is critically important. If you make a mistake, the probability of destruction of the building or loss of valuable qualities will be very high. For relatively light buildings, M200 concrete is sufficient; It is more correct to build two-story houses using M300 or even M400. A qualified engineer will help you select the mixture and other materials more accurately.
On soils where swelling is likely, you should immediately stop using a solution lower than M300. The prefabricated foundations themselves are often made of rubble concrete, brick or slabs. FBS, reinforced concrete and FL blocks are much better than brick and rubble concrete, since they are much less susceptible to cracking. It is quite possible to erect a sibit house on screw piles. But it’s worth clarifying right away that this solution has a controversial reputation.
It is worth considering, however, that this all applies specifically to suburban and low-rise construction. Urban apartment buildings are such a special area that only professional engineers and architects can understand them; in turn, references to SNiP and GOST as justification for choosing piles for a country house are rarely appropriate.
Their use is advisable primarily on permafrost, and we are not talking about screw structures, but about driven or bored structures. In addition, a house on stilts in any case requires enhanced floor insulation. Otherwise, condensing moisture will accumulate below, which will gradually destroy any materials.
The final cost of constructing a pile foundation is determined after inspecting the territory and carefully studying the situation. But let us repeat: it is better to consult with several engineers at once to ensure that errors are eliminated.
Walls
Making it yourself is not difficult. It is necessary to understand that sibit masonry needs strengthening (reinforcement). The initial row is always placed strictly on a cement-sand mortar. By laying up to 10 mm of mortar on the base, you can cover all possible visual flaws in the structure. The first row is made as even as possible; It is advisable to check it not only using the cord, but also using a building level.
Construction is carried out from the corners. At each new tier, verification of geometric parameters is mandatory! It is recommended to treat the surface of the blocks with planes to give them maximum roughness. Reinforcement is done in increments of 3-4 rows. Starting from the second tier of blocks, you can connect them with glue - this solution is much more practical than using a cement-sand mixture.
In reinforced areas, fines are prepared for laying out reinforcement. Parallel grooves are cleaned using stiff brushes. Recommended reinforcement cross-section is 10 mm; however, builders can increase it if necessary. Joining reinforcement at corners and when connecting pieces of blocks is not allowed. The areas under and above the windows also need to be reinforced, regardless of the specific tier.
Floor installation
The slabs that make up the floor must be supported by a reinforcing belt. For its manufacture, blocks are used, cut to a thickness of 100 mm. These blanks are placed parallel to each other along the entire perimeter. Steel reinforcement is placed in the inner part. All together they are poured with concrete of a high strength category; overlapping made of aerated concrete is allowed in cases where the gap between the walls does not exceed 6 m.
Roof
The choice in favor of a gable roof is in most cases most justified. It is better in the Russian climate than single-pitched or even flatter models. The typical workflow is as follows:
- waterproofing with roofing felt or more modern materials;
- installation of the Mauerlat (aka support beam);
- preparing the rafter system and strengthening it;
- production of waterproofing, vapor barrier, insulation works (mineral wool and polystyrene foam are preferred);
- preparing the sheathing for subsequent installation of rolled or block finishing material;
- gable trim;
- laying out the selected finishing material.
Interior decoration
It is most practical to plaster the inside of the sibit with gypsum and cement plasters. The second option is for wet rooms. Typically, walls and ceilings are covered with vinyl or non-woven wallpaper. Dry rooms can be covered with MDF. Drywall is also increasingly used.
How to build a house from Sibit with your own hands in a short time and without special expenses, watch the video.
Construction of walls from sibit
Laying walls from sibit is much easier than from brick, since the blocks are larger and, accordingly, their number will be less. The only difference is that sibit masonry must be reinforced with reinforcement. So, in order to build walls, you will need:
- manual or electric wall chaser;
- Master OK;
- notched trowel or trowel;
- rubber mallet;
- special plane for gas blocks;
- a brush to remove dust from the grooves;
- hand saw;
- metal corner;
- lace or fishing line;
- building level;
- reinforcement bars Ø10 mm.
Before you start laying the first row, it is important to take care of waterproofing. Therefore, the base can be covered with bitumen or several layers of roofing material can be laid.
The first row must be laid using cement-sand mortar. To make it, stick to a 1:3 ratio - cement and sand. Add water until the solution reaches the desired consistency. The layer of mortar on the base can reach 1 cm, which will hide all the unevenness.
The main task when laying the first row is to make it perfectly level. A rope, a building level and a mallet will help you cope with the task. So, you need to start laying walls from the corners. Install corner blocks and level them strictly. To adjust the blocks, use a rubber mallet. Then, a fishing line or string should be stretched between the blocks, which will serve as a guide for laying the remaining blocks. Its horizontalness also needs to be checked with a level. Make sure there is no sagging. If the wall is more than 10 m long, install an additional block in the middle. The string should be stretched across the top of the block. Now proceed to install other blocks. The length of the walls will not always be equal to the number of whole blocks, so some of them will have to be adjusted to fit. You can cut them with a saw, checking the correct cutting with a corner. In this way you need to lay the first row around the entire perimeter. After you have done this, you need to wait a few hours for the solution to set.
Laying a wall from sibit along a fishing line
The remaining rows are done in exactly the same way: the corners are set, the cord is pulled and the process is repeated. Only there are some differences. The surface of the sibit can be treated with a special plane, giving it roughness. Then the binding material will lie much more evenly. Also, do not forget about the connection; the blocks of the second row should be laid with an offset of 8 cm. Another point - now you can use special glue to connect the blocks. It is applied in an even layer with a trowel or notched trowel. Then the gap between the blocks will be the same, which will simplify the laying process. Another advantage of the glue is that it dries much faster, so you don’t have to wait long.
Let's move on to the main question
So, our main task is to calculate the cost of building a house from foam blocks. It cannot be done separately from clarifying the stages of construction. After all, only by analyzing the entire process in parts can you take into account every detail.
Count
The calculation of foam blocks for building a house should be based on the area of the walls. Foam blocks are sold in cubic meters and to find out the quantity you need, simply multiply the thickness of the block by the area of the walls.
Cubic meter of foam concrete: standard packaging
The full cost calculation for building a house made of foam blocks is as follows:
- Let us immediately stipulate that our sample has a width of 8 m, a length of 10 m and a height of 3 m. Main and external walls are taken into account.
- the cost of the roof, foundation and other work can be calculated using separate calculators on our website.
- So, let’s calculate the perimeter of the building: 10*2+7.4*2=34.8 m (rounded to 35). A reasonable question arises: how much is 7.4 meters and not 8? The answer is simple: you stacked 2 walls of 10 meters each, and from eight you need to subtract the width of the block, that is, 30 cm.
- Now we find out the area of the walls: 35*3=105 sq.m. Everything is clear here: perimeter multiplied by height.
- From the resulting area, subtract the area of windows and doors. This is purely individual for each project, so for convenience, let’s assume that they occupy 10 sq.m. 95 sq.m. left.
- We find out the area of the foam block: 0.6*0.2=0.12 sq.m. It turns out that for 1 sq.m. accounts for 1/0.12 = 8.3 foam blocks.
- So, we complete the calculation: 95 * 8.3 = 788.5 blocks are needed for the external walls.
- It would seem that the calculation of materials for building a house made of foam blocks is complete, but no! We did not take into account the main wall.
- Its length in our sample will be 9.4 meters. Multiply by height - we get an area of 28.2 square meters. Again, let’s assume that the windows and doors will take up 5 square meters. We get 23.2 sq.m. 23.2*8.3= 192.5 blocks.
- We add up the resulting numbers: 788.5+192.5=981 blocks are needed for such a construction.
So, calculations for building a house from foam blocks showed that we need 981 blocks. There are 27.7 blocks in one cubic meter. With a simple calculation we find out that we need 35 cubic meters.
The cost of 1 cubic meter is about 3,000 rubles. As you can see, a house of a given size will cost a very modest amount. Of course, this is just the frame of the building, but you must admit that the same brick would cost 2-3 times more.
It is worth noting that these instructions are approximate and accurate calculations are only possible with a thorough knowledge of the project.
Construction progress
First of all, the foundation for the house is built from foam blocks. Since the foam block is lightweight, there is no need to spend money on an expensive monolithic foundation. An excellent replacement for it can be a belt one, which uses much less crushed stone, sand, concrete, and even uses reinforcement of a smaller diameter.
Shallow strip foundation and first row of masonry
After the base has gained the required strength, it is time for laying. It starts with laying roofing felt between the base and the first row as waterproofing. corner blocks are laid first
Moreover, special attention is paid to the corner, which according to the plan will be the highest. The corner is leveled and proceed to the next one. then a cord is pulled over the corners and the space between them is filled
If a whole block does not fit in one of the rows, then the excess part is cut off and the resulting piece is placed in the gap. Each next row is installed according to the same principle: from the corners. Verticals and horizontals are checked by level and cord.
Laying rows “along the cord”
Creating grooves with a manual wall cutter
Particular attention is paid to door and window openings. All cut grooves are lined flush with a metal corner
Solid masonry without windows and doors
Floor installation
Installation of the floor slab
The masonry continues until you have reached the desired level before the floor. Please note that the floor slabs must rest on the reinforced belt. To make it, you need to cut the blocks so that they are 10 cm thick and lay them parallel to each other around the perimeter, making a kind of formwork. It is necessary to place reinforcement inside and fill everything with concrete.
Slabs are installed on such a reinforced belt. They can be concrete, aerated concrete or similar analogues. The resulting joints between the plates must be filled with mortar. And the ends from the outside are covered with ax blocks.
If you decide to cover your house with aerated concrete slabs, then it is acceptable to do this when the distance from one load-bearing wall to another does not exceed 6 meters. Aerated concrete floors have high load-bearing capacity, low thermal conductivity and high fire resistance. In order to install such heavy slabs, you will have to hire a crane to lift them to the desired height.
Installation of floor beams has been completed.
But slabs are not the only option for flooring a house; you can make it from wooden beams, concrete or metal beams.
When your house has several floors, after covering, you need to continue the masonry, building a second floor. If the house is one-story, the final stage is the installation of the roof.
Dimensions
And now about the size of the sibit . Dimensions depend on the type of product:
- Wall blocks. They are divided into four different types: B2 has a ratio of 600/200/250, B3 is slightly wider - 300 millimeters, and B4 is already 400 millimeters.
- Blocks for interior walls. There are also three categories here. The smallest sizes are: 625/100/250, the largest are 150 wide, other parameters are unchanged.
- Floors. The length here will vary - from 2 to 6 meters. At the same time, the width is 60 cm, the height is 24 cm. They are very strong, they are not afraid of heavy loads, the maximum load weight is 800 kilograms.
- Jumpers. The longest are 3 places of 10 cm. As for the maximum width and height, these are 30 and 60 cm, respectively.
From 20 to 50 standard blocks are placed on one pallet.
Roof construction
Before you start building a roof, you need to choose what it will be like:
- flat;
- single slope;
- gable;
- attic.
The order of work is as follows:
- Perform waterproofing with roofing felt.
- Install the mauerlat (support beam) to which the rafters will be attached.
- Install the rafter system and strengthen it.
- Waterproof the roof, vapor barrier and insulate it with mineral wool or polystyrene foam.
- Make a sheathing on which you later need to lay roofing material.
- Sheathe the pediment.
- Lay the roofing material of your choice.
Now the house has been built from sibit. You have already completed the main task, but there is still a lot to do. The house needs to be additionally insulated, floors poured, partitions made, finishing done, communications installed, doors and windows installed, plastered, and so on. But these are separate topics, since you can’t write everything at once. You can find them all on our website and continue building your dream home.
Our advantages
Very often, people buy a house for life and pass it on as an inheritance to their children or grandchildren. We understand that purchasing future housing is a responsible step, so we provide free tours of our finished properties so that you can see for yourself and get an impression of the quality of work of Zoton Group. During excursions, the company also pays for daily accommodation in an apartment with all amenities and transfer from the railway station or airport.
To order a study tour, just leave a request in the form on the website or contact us by phone.
Photo
Sibit building project
Construction of a house from sibit
The box is covered with a roof
House is built
Insulation of the house Exterior decoration of the building
Blueprints
Drawing of a house made of aerated concrete 1178×1478 Project of a one-story house 1294×1224
House project 10330×10450 Project 1292×1222
Project 1194×1734
Plan of a one-story house made of aerated concrete Layout of the premises of a one-story house made of aerated concrete
Did the article help you?