Since ancient times, the plow. used for plowing the area. Today, this device has become much more modern. In addition, mounting it on a walk-behind tractor has become much easier. This type of equipment would be advisable to use on small plots of land intended for plowing. It can replace the owner of a tractor, which makes no sense to use on small areas. Such attachments can easily cope with the ground, which has a resistance of 0.5 kg/cm2.
Plowing with a Power Plow: Adjustment Options and Step-by-Step Instructions
Mechanical cultivators can be used to perform various agricultural tasks. Depending on the size of the cultivated land and the need for equipment in different areas, light, medium and heavy class machines are purchased.
Light
This type of mini-equipment is often called a motor cultivator. Its power does not exceed 4 and a half horsepower, which makes it cheaper than medium and large units. The cost of a light model is from 12 to 22 thousand rubles. The advantages include the low weight of the monoblock and the availability of processing hard-to-reach places thanks to the small handle of the cultivator.
The downside is that the low-power motor overheats quickly, meaning it will only run for a short time. In addition, the digging depth is less than when using a powerful cultivator. Light models do not have additional equipment.
Average
This vehicle has rear-wheel drive. Engine power ranges from 5 to 12 horsepower. The device is capable of processing an area of half a hectare. The cultivator weighs from 50 to 70 kilograms, its cost is 30-40 thousand rubles. Most machines in this category can be equipped with a plow and other equipment.
Such cars have 2 gears and are equipped with a front headlight. Compared to a heavy cultivator, a medium one is more maneuverable, but its plowing depth does not exceed 12 cm. This is unacceptable when planting certain crops.
Heavy
These machines can plow large areas, well in excess of half a hectare. The engine power is 12-30 horsepower, and the price is 70-100 thousand rubles. The heavy duty rototiller can be equipped with a plow, trailer, boom, potato digger and other equipment. Working with such equipment is easier and several times faster than with light and medium equipment. It is equipped with an adjustable steering wheel and wheels.
Disadvantages include the large weight of the model and lack of access to non-standard surface areas. Additionally, effort must be made to enable such technology. As for the types of plows for the cultivator, they can be reversible with two bodies, which plow the soil using a separator, or rotary, plowing the soil thanks to rotating discs.
Attaching the implement is a simple process where the hitch is positioned on the implement and secured with a bolt. From this moment the procedure for attaching the plow to the cultivator begins.
Homemade options
The concept of the plow itself is extremely simple and has not changed since ancient times. Only with a slight difference, previously horses and a wooden plow were used, but now a walk-behind tractor and an iron plow.
They differ, in fact, only in the material. Now every man should be able to work with iron and welding.
Therefore, on various forums you can find drawings of plows that were manufactured. There is a discussion of the concept and any shortcomings or amendments that may affect the final result. And, in the end, people achieve their goal, and the result is very good.
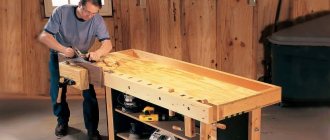
And the most patient people make step-by-step video instructions on how to make a plow with your own hands at home.
As a result, they manage to assemble structures that are absolutely in no way inferior to an industrially produced plow. And often they are superior, because what you make with your own hands is always better than what you bought.
Read also: Motoblock Havert S-70: reviews, attachments, technical characteristics, advantages
Attaching the plow to the implement using a hitch
Many people think that attaching additional equipment to a rototiller will speed up the work. But they are wrong. When plowing, a force perpendicular to the level of the ploughshare acts on the plow, creating resistance that pulls the implement sideways. If the device is very rigid, then working force is required to drive it into the soil. Therefore, when fastening, it is recommended to leave up to 6 degrees of horizontal clearance.
Couplings are devices that connect the cultivator to the plow. There are two types: universal and stationary. The former are more suitable for this type of operation, as they allow proper adjustment.
To make installation of the plow easier, install the plow with an electric motor on supports: bricks or stones.
Attaching an implement is a simple process where the hitch is positioned at a suitable location on the equipment and secured with a bolt. From this moment the procedure for attaching the plow to the cultivator begins.
Tilt of index plate
This process is otherwise called the angle of attack. It represents the degree of inclination of the plow relative to the plane. Adjustment is carried out using a spiral handle.
- Place the mechanical cultivator with the mounted plow on the stand. Unscrew the adjustment knob until the plow sits firmly on the ground without any gaps.
- Screw the handle back until the back end is a few inches above the ground. If you do something wrong at this stage, unpleasant consequences may arise. If the slope is steep, the device is difficult to move. Otherwise, it will not be able to remove the settled part of the soil.
- The correct setting can be checked during plowing; The cultivator should work moderately: not too light and not too hard.
Initial furrow and blade angle
Now is the time for final adjustments so that initial plowing is easy. Place the cultivator at the edge of the plot, drive the plow into the ground and begin plowing. If you try to make a straight furrow, the next furrows will also be straight. A taut rope will help.
At this stage, it is best to observe the degree of plowing by placing a measuring device in the soil. If necessary, the plowing depth can be adjusted. Insert one of the cultivator wheels into the ground and position the plow perpendicular to the ground. To do this, position the machine in a straight line, placing a support under the wheels with a depth equal to the depth of the furrow.
Third: An error that causes the tiller to yaw to the left or right. If you look at the tool from above, the hook should be perpendicular to the axis of the machine. It's easy to understand: imagine you are sailing a boat - how do you steer it? You guessed it - the same principle applies here. Schematically indicated by lines in the photo:
Milling cutters for the Neva walk-behind tractor
Milling cutters for the Neva walk-behind tractor. Let's look at how to assemble a cutter. The Neva walk-behind tractor includes 8 cutters with a diameter of 36 cm, which allows them to loosen soil up to 1.2 m wide and 20 cm deep.
Mills for the Neva cultivator come in the following types:
- With saber-shaped legs designed for virgin soil (active cutter). The most popular and in demand cutter for the Neva walk-behind tractor, aimed at processing virgin soil or viscous soils.
- A crow's foot cutter for the Neva walk-behind tractor, which will allow you to process harder soil, since it has a solid structure.
To increase the cultivated soil in one pass with a walk-behind tractor, and accordingly reduce the time for cultivating the entire area, you can purchase additional cutters.
Flat cutter for walk-behind tractor Neva MB. This type of attachment is designed to control weeds while simultaneously loosening the soil. The flat cutter has several holes for adjusting it to work at a certain depth.
How to properly install a plow on a cultivator? Plowing is simple, quick and easy.
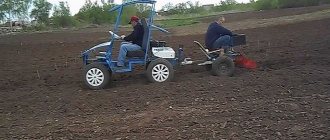
When we become the happy owners of a walk-behind tractor of one brand or another, we are faced with the problem of choosing a plow and related components for plowing gardens and fields. Spring is a busy time for everyone who cares about the earth, the topic of environmentally friendly products, roof owners and gardeners. How can we make work easier, more enjoyable and more rewarding? In this article we will talk about setting up the plow correctly, choosing the right hitch and working on mistakes. Firstly:
As a person living in a rural area, I have watched tractors working in the fields since childhood. The plow is such a surprise, I thought when I went to buy this hitch for my Agat with a 6.5 hp engine. In the dealer's store, I found out that everything is not so simple. There are many types of plows, depending on the power of the walking tractor. The choice was made on the advice of the seller; I didn't argue because it was pointless. Then came the purchase of a coupling device (at that time I imagined it to be one-piece).
After installing this device on my cultivator, I started making adjustments with a wrench in my hands. I plowed for the first time in my life - an experimental run. Of course, I consulted with neighbors and friends. Tips like “put the tiller on a brick, two fingers under the heel, angle of attack.” “All this advice seemed simple, and that’s what was scary. I watched the work of walk-behind tractors while plowing - everyone was sweating, pushing the walk-behind tractor, then running after it - without strength, arms or legs. At first I thought this was what plowing with an electric plow looked like. However, all this happened due to poor plow settings.
I will try to simply explain and share my experience on how to properly install the hitch and plow so that you can easily perform any amount of plowing on any brand of mechanical plow. This was clear after one season - there was no hurry.
First: the plow is installed strictly perpendicular to the ground, this correction is made after the first and subsequent passes, when the wheel enters the rut. It's as simple as shown in the picture:
Second: What is the angle of attack? This is the depth to which the plow sinks into the ground before its heel - the bottom - becomes parallel to the line of travel. The greater the angle of attack, the deeper the rut; the larger the board, the higher the stock))) This is the most common mistake - too high an angle of attack on a light and weak tiller - the result is sore hands and back of the one who controlled it. You can use additional weights, but this increases the load on the axle and engine - do not overdo it, everything is within reasonable limits. I schematically marked the lines in the photo:
Third: An error in which the tiller tends to move left and then right. If you look at the tiller from above, the hook should be in a position strictly perpendicular to the axis of the tiller. This is easy to understand: imagine that you are steering a boat - how do you steer it? You guessed it - the same principle applies here. Schematically indicated by lines in the figure:
If you follow all these rules for adjusting the plow, working with it will be a pleasure, and the cultivator will help you, and not be a burden.
But all these adjustments are meaningless if the coupling device is of poor quality. And this is the biggest mistake of all! Choose a high quality, reliable and durable hitch so that adjustments are quick and easy and the reliability of the attachment is assured while the plow is in use.
The black hitch shown in the photo has been checked - the metal thickness is decent, there are no backlashes in the fastenings, the screws do not come off?
The red coupling in the photo is of satisfactory quality - it bends, sticks, the thread on the adjusting pin is knocked out?
The inclination of the plow plane, or, as it is also called, the angle of attack, is the inclination of the plow plane in relation to the surface. It is adjustable using a screw knob.
Application
Depending on the model and equipment with additional attachments, Neva MB2 walk-behind tractors are used for:
- plowing the soil;
- loosening;
- soil cultivation;
- furrowing the soil before planting;
- hilling;
- digging up potatoes;
- clearing weeds and snow.
The Neva MB2 walk-behind tractor is considered a classic for domestic buyers.
Run-in
Running in the engine is an important stage in the operation of the unit, which must be carried out after a long period of inactivity or after purchasing equipment. Reliable operation of the Neva MB2 walk-behind tractor directly depends on proper running-in. Such a test is necessary to extend the life of the walk-behind tractor. Before running in, you should check all connections and ensure that all parts are in good working order.
Cultivation
Due to their versatility, the Neva MB2 walk-behind tractors can also be used as a cultivator.
Thanks to this unit, you can perform several types of complex excavation work:
- Plow the ground overgrown with grass. This means that the Neva MB2 walk-behind tractor is perfect for cultivating a plot of land whose territory is overgrown with weeds and grass. If the weeds are overgrown with thick grass, the grass will need to be mowed before cultivation.
- Plowing a constantly cultivated plot of land. In this case, the soil is first fertilized, and then, with the help of a cultivator, furrows are formed for planting the crop.
- Digging up the culture. A potato digger is great for digging up root vegetables. During operation of the walk-behind tractor, the length of the digging stand is adjusted, and in order not to damage the potato tubers, they are dug out through the row.
Several types of complex excavation work can be performed thanks to this unit.
Installing the share
There is nothing complicated about the installation. To do this you need:
- Attach the plow to the hitch without overtightening the nuts. This allows the plow to be adjusted later;
- Attach the hitch and plow to the hitch using two locking pins.
At this point, the installation is complete, and you can move on to the next step - configuration.
Adjustment is a very important step as it affects both the quality of plowing and the adjustment is a very important step of adjustment as it affects both the quality of plowing and the force required. If the adjustment is not done correctly, the cultivator will not be able to do its job and a lot of time will be wasted on simple, simple tasks.
The design of the plow is simple and straightforward - the main thing is to pay attention to the machine itself and approach its connection wisely. Remember that the machine must be maintained in the same way as a mechanical cultivator. Clean the machine after plowing, avoid rocky soils and carry out assistant maintenance in a timely manner.
Installation
The quality of its work with the walk-behind tractor depends on how correctly the plow is assembled.
- • To begin with, a ploughshare is welded to the metal plate that will become the blade.
- • Next, the side pillar shield is attached.
- • Then the spacer bar, base and stop corners are attached to it.
It is important that all parts fit together, otherwise the plow for the walk-behind tractor will not cope with its purpose.
In order to clearly see how various plows for walk-behind tractors work, it is worth finding a thematic video on the Internet. In this case, it will become clear how different plows function, and this will help you choose the optimal design for yourself. Only by using high-quality equipment can you count on good results.
Attaching the plow to the cultivator using a hitch
Before installing the device, place a beam under the left wheel of the cultivator to repeat the plowing process. Plows vary in design, so it is important to know the plowing depth in advance. The recommended depth is usually indicated in the machine's operating instructions. The plowing depth on plots and personal plots is set within 10-20 cm.
The device is installed on a single-point hitch and secured with two bolts. If the cultivator is not equipped with a single-point system, then a hitch is attached to which the plow is suspended. When installing the machine through the coupling device, the most important thing is to ensure a slight play in the horizontal plane, no more than 5 degrees, since if you tighten the bolts to the maximum, you will have to apply force to till the soil.
When the machine is ready for plowing and the plow is in place, you can begin to adjust the unit.
Those who have at least a little experience in plowing do not need to explain such details, they are intuitive. However, many people make mistakes at the very beginning.
Principles of self-adjustment of inventory
The next problem that land owners face is how to set up a plow on a walk-behind tractor? The efficiency of the equipment and the speed of tillage depend on the correct adjustment.
After you finish installing the plow, start making adjustments. In this case, take into account such factors as the coincidence of the longitudinal axis of the garden equipment and the regulator, as well as the vertical position of the machine bed.
In order to increase the efficiency of tillage, you can use an axle extension and metal wheels with weights. The walk-behind tractor itself should not have a thin stand, a short blade, or a thin body sheet made of low-quality steel. A technique that does not have such flaws and has sufficient horsepower will be a good assistant for cultivating the soil with a plow.
How to install and adjust a plow for a mechanical cultivator: basic information
One of the most common types of work performed with a cultivator is plowing. On the Russian market you can purchase a plow for almost any model. In theory, this seems elementary - just connect and that's it. However, in reality, everything is not so simple - it is not only a matter of hanging the plow, but also its correct installation. This is where our tips and advice come in handy.
Connecting a motor cultivator and a plow
Let's start with what is furthest from the plow, namely the hitch and cultivator attachment. The hitch should be secured with one hinge and have 5-6 degrees of horizontal play. If you double-pivot your hitch or remove all play, you will end up with a stiff hitch - this is one of the most common mistakes.
Does the engine of a rotovator or cultivator need to be broken in? Consultations, expert advice
When the plow is pulled forward, it encounters resistance from the soil. Under the influence of this force, the plow deviates to the side. If there is no play in the hitch, then not only the plow and hitch will tilt, but the entire machine will tilt. This means that the operator will have to constantly apply force to the handles to balance this pressure. However, if play is possible, then only the plow coupling is deflected, and the pressure on the plow compensates for the pressure of unplowed soil on the side of the ploughshare. Simply put, when the hitch is loose, it's much easier to work with. And if you think that a rigid connection between the hitch and the cultivator will provide you with a straight furrow, you are very mistaken.
An example of incorrect assembly of the coupling device - on two hinges
And the correct option is on one hinge with the ability to play at a slight angle
The screw in the front is used to adjust the maximum rotation angle of the hitch. There is a similar one on the other side of the hinge.
There can be many options. The photo shows one of them. You will have difficulty working with this plow - in fact, it will be impossible to adjust it because one of the main parts - the share - is not made correctly. It usually looks like a corner: it has not only a lower supporting surface that slides along the ground, but also a side surface. The side surface helps to equalize the pressure on the plowed soil - when the clutch is tilted to one side, the plow rests on the edge of the furrow. There is practically nothing to fasten - the manufacturer of this plow clearly did not know all the features.
What does a “bad” plow look like?
A bad plow - there is a field board, but the vertical part is missing. With this plow, you will have to constantly monitor the cultivator so that it does not turn, since the hitch is mounted on two hinges.
A properly made plow at work. The soil pressure on the moldboard (1), which causes the plow to move sideways, is balanced by the vertical moldboard flange (2).
Setting the plowing depth
The next step is to set the desired plowing depth. This is done by changing the position of the plow arm in relation to the lock. To do this, the stand must have several holes, and fastening is carried out using a screw connection. If there is only one hole, then the obvious conclusion is that there is no plowing depth adjustment.
The depth itself should not be too great - 5-7 cm. In this case, when turning the layer over, you will get the effect of plowing with a shovel. It is not necessary to go deeper - firstly, you can mix clay or sand with the fertile layer, and secondly, with a large plowing depth, the roots will be upside down, but securely covered on top with a thick layer of soil and will safely survive the winter. And we must freeze them, otherwise the weeds will grow vigorously in the spring.
A number of holes in the plow arm are necessary to adjust the plowing depth
Setting the plowing plane level
The angle between the “point” of the plow and the ground, i.e. the angle of attack can be changed using an adjusting screw or by changing the position of the screw connections. The screw is, of course, more convenient, since it is also much faster, and the adjustment is smooth and not stepped. The diagram for setting the correct angle is as follows:
Adjusting the screw angle
- Place the cultivator with mounted plow on a level surface;
- Loosen the adjusting screw until the entire bottom surface of the plow touches the ground;
- Turn the screw back so that the rear of the plow is raised about an inch off the ground.
If the angle of attack is too high, the machine slips - the plow does not plow, but serves as an anchor. If the angle of attack is too low, the plowing depth is too shallow - the machine seems to move forward effortlessly and plows too easily.
Those who have at least a little experience in plowing do not need to explain such subtleties, they are intuitive. But many people make mistakes at the very beginning.
Second and subsequent furrows
Try to make the first furrow as straight as possible. A reference point at the end of the furrow (at the edge of the field) can help with this. Then turn one wheel towards the furrow - this will tilt the plow. The plow tilts accordingly, which is not necessary. To compensate for this tilt, the hitch can be tilted at a slight angle. In fact, the plow is tilted in such a way that when the cultivator is tilted, it is in a vertical position.
The plow is already tilted at a slight angle - now you can make the second furrow and the next plowing.
Examples of proper soil cultivation with a Husqvarna machine
Useful tips
Choosing the right tire size for your trailer is also very important. Don't go after the diameter, otherwise the linear speed will be too high. The optimal diameter is 460-500 mm.
The size of the plow depends on the weight of the cultivator - this parameter should also be taken into account. The largest plows, with a working width of 23 cm, are mounted on tractors weighing about 100 kg. For machines weighing up to 75 kg, a plow with a working width of 18 cm is recommended. For lighter cultivators, a plow with a working width of 13 cm is suitable. Again, people sometimes make the mistake of buying a relatively light cultivator and then installing a larger plow on it. If they try to use this “tandem” on “oak” soil, the result will be absolutely predictable - “you can’t plow.” It's not the quality of the plow, it's the wrong choice of plow iDon't go after the diameter, otherwise the linear speed will be too high. The optimal diameter is 460-500 mm.
The size of the plow depends on the weight of the cultivator - this parameter should also be taken into account. The largest plows, with a working width of 23 cm, are mounted on tractors weighing about 100 kg. For machines weighing up to 75 kg, a plow with a working width of 18 cm is recommended. For lighter cultivators, a plow with a working width of 13 cm is suitable. Here, too, the mistake is sometimes made of buying a relatively light cultivator and then installing a larger plow on it. If they try to use this “tandem” on “oak” soil, the result will be absolutely predictable - “you can’t plow.” The problem is not the quality of the plow, but its incorrect selection and/or setting.
Tips on what to look for when choosing a cultivator and cultivator
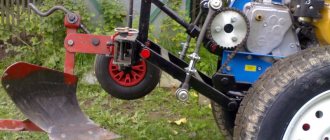
Towbar
The same principles apply to the action bar. And the angle of attack - here, too, there are often two adjustments, coarse and fine using screws. From the work it is clear whether the depth is sufficient or not. If it is too deep, it is better to reduce it.
The rear disc also needs to be installed on the same bolt.
The soil is always heterogeneous, somewhere more dense, somewhere less. If one side of the control lever is tighter, the tiller will turn slightly to compensate for the uneven pressure on the control lever. If the fastening is carried out through one kingpin, this force is not transmitted to the fastenings, since the coupling device allows it to be restored. In this case, the rear end itself wobbles slightly to the right and left, but the tiller goes straight. A correctly selected and adjusted plow is the key to successful plowing
⇒
Making a unit with your own hands - a detailed algorithm to the “I”
A homemade plow is a unit that will help you effectively cultivate your garden, plant and harvest a rich harvest. Often, caring owners think about making equipment with their own hands, especially since it is not as difficult to do as it seems.
Before making the equipment, you will need to buy several sheets of steel, 3 to 5 mm thick. You need to make a ploughshare in advance - a circular saw blade is suitable for creating it. The cutting element of the plowshare will need to be sharpened at an angle of 45°.
The next step is to manufacture the blade. A pipe with a diameter of 50 cm and a wall thickness of 5 mm is suitable for this. Before manufacturing the unit, the pipe must be placed on a level place and the workpiece must be cut out.
All made elements must be assembled into one whole. To do this you will need another steel sheet, 2 mm thick. You need to put a plowshare on it and grab it to the metal on each side using spot welding. The same must be done for the side shield of the rack, which is welded to the plowshare vertically.
The adjusted flap's edge should extend onto the ploughshare by 5–6 mm. It should be raised above the ploughshare blade by approximately 5 mm.
Then attach the blade to the share. As a result, the surfaces of the elements must form one whole. The angle between the top edge and the ploughshare blade should be 5–8°.
Ready-made accessories are used as a hitch for the walk-behind tractor, which can be purchased in specialized stores.
Popular models
When the user chooses the type of plow that he is going to use, he should take into account not only the type of land, but also take into account the characteristics of the problem that needs to be solved. The power of the walk-behind tractor and its dimensions also matter. The model, which received the name in Honor of the underground animal, “Mole”, refers to the plows of the single-hull version. The total weight of the structure is 8.5 kg, the depth of soil treatment is 200 mm.
Such suspended equipment can be used with the following types of walk-behind tractors:
- "Neva";
- "Agate";
- "Cascade";
- "Plowman";
- "MB-2";
- "Oka", etc..
On average, the Single-hull “P1-20/2” can sink into the ground to the same depth. The weight of the structure is the same, but more. Suitable for most of those walk-behind tractors that are listed above.
“P1–20/3” achieves a cost of 1,500 rubles. Its weight is greater than that of previous models and is 13 kg, the greatest depth of immersion in the soil is 250 mm.
It is best to use it with the Belarus and Agros walk-behind tractors.
The Salyut single-hull plow has a very light weight; for a similar product it weighs 8 kg and can penetrate 200 mm into the ground, but despite this its price is on average 1.5 thousand rubles.
The Zykov plow weighs slightly more, generally per kilogram; it has a penetration rate into the ground of up to 25 cm. It is used on the Salyut, Oka and similar vehicles.
The weight of a reverse plow for walk-behind tractors GS 81, 101 is 12–18 kg, with all this, the maximum that it can penetrate into the ground is 25 cm. It will cost the consumer more than a double-turn plow: it is estimated by manufacturers from 4 thousand rubles, with a weight of 15 kg and plowing depth of 20 cm.
The heaviest and most expensive is the rotary plow. It is quite difficult to lift and install for one person, since its weight is 40 kg, but these inconveniences are compensated by the increased immersion depth, which is 300 mm. The price of such a product is from 70 thousand rubles.
All the described plows are made of metal, the horse plow can be partly made of wood, it only has an iron coulter. It is used more often, from time to time it is hung on a walk-behind tractor either with a changeover or with a skimmer.
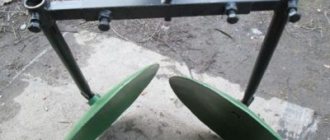
Disk
The disc-type plow is used for hilling and cultivating moist soil. It is distinguished by a small depth of processing.