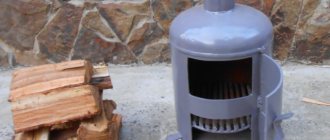
A furnace is an effective way to heat your home. At the same time, it not only heats, but also creates a special comfort that cannot be compared with what an electric heater provides. In addition, this structure does not have to be large. The traditional Russian stove is certainly good, but the mini-stove also has many benefits.
The fuel for such a structure can be either firewood or other solid fuel, such as coal. A Russian mini-oven will create a comfortable temperature throughout the entire house, using fuel economically.
While developing a rational design for the “Housekeeper” stove without a stove bench, we modified its base. The result was a different version of the structure from the previous one: both fireboxes were arranged in a new way - the main one and the additional one. The use of a cooking chamber, which is closed with a damper when necessary, remains commonplace.
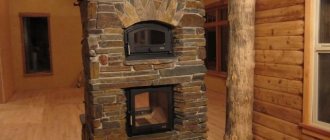
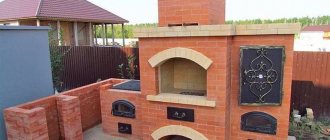
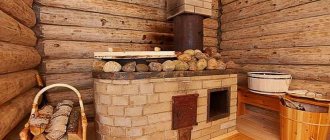
Heating and cooking stove 1020x770 Ya.G. Porfiryeva
Heating and cooking stove 1020x770 Ya.G.
Porfiryeva has a heat output of 3.5 kW (3000 kcal/h) with a one-time firebox per day and 4.1 kW (3500 kcal/h) with a two-time firebox. The stove allows you to heat a room up to 25 m2. Like all the stoves of this author, the stove has two gas ducts - lower and upper. These flues work in exactly the same way as the hoods in a two-bell heating and cooking stove. The difference is that the base of the lower flue is located below the ash chamber. This allows you to best warm up the lower part of the stove and prevent the formation of a “hole” of cold air near the floor in the heated room.
This oven is lined with refractory bricks from rows 9 to 13. The use of this type of masonry involves using not only firewood as fuel, but also other types of fuel, such as peat, coal, etc. In the absence of refractory bricks, masonry can be done with ordinary ceramic bricks, but careful selection should be made. In this case, the stove must be heated only with wood.
In order to familiarize yourself with the order of the oven, click on the link below in the text.
More complete information can be obtained by watching the training video presented in the article.
Basic information containing a detailed description of each row of this furnace is in the project.
To display the project in full screen mode, click on the icon located in the upper right corner of the project. In the window that opens, you can familiarize yourself with the project and download it in PDF format.
Using the link below, you can download the project in the form of a ZIP archive containing PDF and DOC versions of the project.
In the process of communicating with site visitors, the need was identified to have this project also in a mirror version, which was done by me.
If there are broken links, please report this in the comments.
Advantages of the model
Each project option is created to perform specific tasks. It is pointless to compare all models with each other, since under some conditions those characteristics that are not considered fundamental under other conditions may be important. Therefore, it is customary to highlight the advantages of the presented model. Our little brick oven is not without such a list.
- In order to install a Russian stove, you will need to sacrifice a significant part of the usable area. The very purpose of the baby suggests that high performance is not expected from her. But the compactness is appreciated by the owners of small country houses.
- The absence of elements made of heat-resistant materials is noted as a positive point. But in this matter, the choice remains with the master, since some professional builders still advise covering the firebox area with fireclay bricks.
- The simplicity of the construction scheme makes it possible to obtain a finished device at relatively low costs within a short period of time.
- Even when the stove operates in normal mode, fuel savings are noted, which will eliminate the need to stock up huge volumes of firewood.
- Some experts claim that this model does not require a foundation. Theoretically, a durable floor covering can withstand the load from the weight of the structure, but if you care about reliability not for one year, but for decades, then you should think about the foundation. In non-residential premises, the baby can be erected on a foundation using a concrete slab.
Examples of simple stoves
Russian stove Ya.G. Porfiryeva 8.2 kW
On our website we have published many orders of Russian stoves with different operating principles, but all of them have the location of the second firebox to the right of the stove, but often the location of the room allows for a design where the firebox is located to the left of the firebox. I will describe one of them with a bottom heating system authored by Porfiryev in detail in this article. In general, the stove has dimensions of 5.5x5.5 bricks, 8.2 kW of heat capacity with double combustion and is designed to heat a room of up to 70 square meters, has a cast-iron stove 400x700 mm.
The laying of the stove is most often carried out under plaster with further whitewashing for fire control. To lay a furnace without taking into account the foundation and pipes, you will need the following materials:
- Red brick - 1100 pcs;
- fireproof brick (fireclay) - 60 pcs;
- combustion door 250x250 mm - 1 piece;
- blower door 140x250 mm - 1 piece;
- smoke valve 250x250 mm - 4 pcs;
- grate 250x180-1 piece;
- cleaning doors 130x140 mm - 8 pcs. (can be replaced with brick if necessary)
- cast iron plate 400x700 mm - 1 piece;
- steel corner 5x50x950 mm - 2 pcs.
The order of the Russian Porfiryev stove with the left firebox.
The masonry of the presented stove is quite complex and changing the size of the smoke channels on your own is highly undesirable, it is better to ask a question in the comments to be sure.
When performing work, use the presented order with clear bandaging of the seams; it is better to attach the stove fittings to galvanized wire.
Let me remind you that the seam thickness for ceramic bricks should be 5-8 mm, for refractory bricks 3-5 mm.
If you do not have 8 cleaning doors, they can be replaced with brick halves laid with a protrusion from the wall of 5-10 mm; if necessary, they can be cut out with a knife and the smoke channels can be cleaned, usually this is done once a year in the fall.
One Comment
Alexander, did you install such a stove? Is it even a workable option? I want to build a one-story log house of 80 square meters for heating myself, do you think it’s possible?
Design features
The area of the future structure is 40 square cm. Brick will be used in production, laying will be done flat or “on edge”. Despite its small dimensions, a small stove will effectively retain and release thermal energy. Typically, in this case there is no need to build a foundation at all, since the weight of the device will be insignificant. All you need is a floor made of thick boards, securely fixed with joists.
Note! The design described in the article can easily replace a traditional potbelly stove, but its functionality will be many times higher.
The baby can also have a cooking function (if there is a cast iron stove) or a heating function (there must be a chimney pipe). Moreover, such a stove can be used as a fireplace, since it also has a smoke tooth.
You should also pay attention to the high speed of masonry: for example, if you start construction work in the morning, then by the evening, most likely, you will already be doing test heating. At first, it is recommended to use paper and wood chips for kindling, since due to a strong temperature difference, cracks may form in the freshly hardened masonry mortar, which, in turn, can lead not only to smoke, but also to additional air suction. In short, to load regular logs into the oven, you must first wait until the solution is completely dry (often this takes no more than seven days, although much depends on the climate and humidity in the room).
Small Russian stove, Porfiryev order
You are using an outdated browser. This and other sites may not display correctly. You need to update your browser or try using a different one.
Used for gluing decorative elements made of ceramics, stone or other mineral materials to heated surfaces. Recommended for masonry, cladding, putty, grouting and repairing stoves, boilers, fireplaces and sealing cracks in chimneys. The mastic is resistant to water and temperatures up to +1300°C. Excellent adhesion, high elasticity, ease of use, low consumption.
Foundation arrangement
By building a foundation, you will provide your future structure with a reliable foundation. If you use any unprepared floor covering, then over time you cannot avoid its deformation. This will lead to damage to the integrity of the masonry, which may require complete disassembly of the stove to restore. However, the small mass of the device cannot but affect the requirements for the foundation; they are much less stringent than for traditional models.
Good to know: How to build a muffle furnace for your home yourself
A pit is necessary, but its depth can reach only 45 cm. The pillow is made of sand, which must be compacted tightly. You can use water for these purposes, only then you will have to dry it. The foundation volume is reinforced with metal wire and filled with cement mortar. To prevent cracks from forming during the long period of cement hardening, its surface is covered with porous material and gradually wetted over the first few days.
Small Russian stove, Porfiryev order
You are using an outdated browser. This and other sites may not display correctly. You need to update your browser or try using a different one.
Used for gluing decorative elements made of ceramics, stone or other mineral materials to heated surfaces. Recommended for masonry, cladding, putty, grouting and repairing stoves, boilers, fireplaces and sealing cracks in chimneys. The mastic is resistant to water and temperatures up to +1300°C. Excellent adhesion, high elasticity, ease of use, low consumption.
Possible difficulties and problems
When building stove walls, inexperienced craftsmen do not use a frame made of wooden beams and a plumb line, which leads to the walls deviating from the vertical .
If during the construction process a distortion of the walls , the masonry should be dismantled and repositioned.
After finishing the work and natural drying, the mini-oven begins to be heated with small portions of firewood.
In this case, the stove walls become covered with cracks due to the fact that shrinkage processes are taking place in the heating structure. To eliminate cracks, dilute the solution and cover the seams.
Small Russian stove, Porfiryev order
You are using an outdated browser. This and other sites may not display correctly. You need to update your browser or try using a different one.
Used for gluing decorative elements made of ceramics, stone or other mineral materials to heated surfaces. Recommended for masonry, cladding, putty, grouting and repairing stoves, boilers, fireplaces and sealing cracks in chimneys. The mastic is resistant to water and temperatures up to +1300°C. Excellent adhesion, high elasticity, ease of use, low consumption.
About the safe location of the structure
To check the corners of the structure during work, use plumb lines made using nails nailed to the ceiling. This way you will be able to determine as accurately as possible how to position the pipe. after that, proceed to create an opening in the ceiling. It is important that the fire cutting parameter be taken into account. If you follow this safety parameter, the distance between the chimney and the wooden components will be at least 250 millimeters. Otherwise - if for some reason this is impossible to do - create a partition using several layers of burlap (the thickness should be 10-20 millimeters). Pre-soak the burlap with a clay-based solution. Place metal sheets on top of the material.
Note! You should never, under any circumstances, ignore fire safety requirements! Before starting the oven for the first time, make sure that its operation will not lead to unauthorized ignition. If you doubt your abilities, it is better to entrust the work to experienced specialists.
For added safety, securely fasten a sheet of steel below, in front of the combustion chamber. According to many years of experience, a small stove can heat the temperature in a room with a volume of 30 cubic meters to 20 degrees (if the temperature outside is about minus twenty), using only 11-12 kilograms of dry wood. Of course, the fact that the ceilings in this building are double, as well as the window frames, is also taken into account, and the walls are properly insulated. However, the results are truly impressive and they only apply to the first heating. In the future, to achieve a similar result, only 5 kilograms of the same fuel will be required.
Video - Firing a small stove
Now - directly to production!
Brick stove for home
Previously, we talked about how to build a brick stove for your home yourself; in addition to this article, we advise you to read this information and read about it here
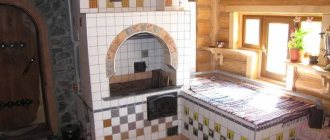
How to fold a Russian stove with a stove bench
An old Russian stove is a very effective source of heat, used to heat country houses, prepare delicious dishes and baked goods. The efficiency of using the energy of burned wood is at least 60%, thanks to which the brick structure is of interest to private developers and homeowners.
This material will be useful for novice stove makers and home craftsmen who want to organize home heating with their own hands. We propose to study the structure of a classic design with a stove bench, then consider the designs and arrangements of modern versions of the Russian stove.
Construction of a traditional oven
We will not describe the history of the Russian stove and its role in a village house - the topic is widely covered in fiction and technical literature. Let's get straight to the point - let's briefly analyze the traditional design shown in the figure below:
- The lower part of the structure - the guardianship - was built of stone or wood - cedar, larch. The walls of the base form a niche - a stove where firewood was dried and household utensils were stored.
- On top of the guardianship, the first arched vault and a large firebox of the furnace - the crucible - were built. Under and the second arched vault was made with a slope towards the brow - the front part of the structure.
- A roof was placed over the furnace, where the bed was located. The cavity between the second arch of the firebox and the ceiling was filled with sand to increase the heat capacity.
- In front of the mouth of the furnace, a special niche was provided - a bend, ending at the top with a hail (smoke collector) and the chimney itself. The horizontal shelf at the bottom of the opening—the shelf—has a semicircular window facing outward.
- Stoves were installed in the side walls of the brick heater - small niches for drying clothes and other things. The chimney was equipped with a valve and a view located above the heil.
Reference. The history of the evolution of the Russian classic stove is described in great detail in the popular book of the same name, author - Gennady Fedotov, published in 2003.
A real Russian stove is fundamentally different from other brick heating structures in the following ways:
- deep vaulted firebox made with a forward slope;
- the chimney is located in the front - in the center or in the corner of the building;
- An indispensable attribute is a bench located above the fuel chamber.
Now let’s look at the operating principle of the stove, shown in the diagram:
- The firewood is placed closer to the back wall of the furnace and lit. The combustion air enters through the outer window of the hearth and the mouth of the firebox, and moves above the bottom of the chamber.
- The heat generated during combustion heats the body of the furnace - the side walls, sand backfill and bench.
- Light combustion products rise to the roof of the firebox. The slope does not allow gases to immediately leave the chamber - first they give off heat to the ceiling, then they become heavier and are forced out by a new hot flow.
- Having passed under the arch of the furnace, the combustion products exit through the upper zone of the mouth, rise into the smoke collector and leave the stove through the chimney.
Note. During the combustion process, bread is not baked or food is cooked. When the oven is well heated, the coals are first raked out from the firebox, then the food is loaded into metal dishes - cast iron pots - using a grab handle. The outlet is closed by a damper.
Brick heater with access to 2 rooms of a wooden house
Despite its many advantages, a Russian stove with a stove bench is rarely built in a traditional design. Useful space in a modern interior is worth its weight in gold, and a classic heater takes up a lot of space, while poorly warming the lower zone of the room. For construction, it is better to consider projects of modernized structures, where this problem has been solved.
Improved heater options
Many Russian masters were involved in the modernization of the classic stove - I. Kuznetsov, I. Podgorodnikov, A Emshanov, A. Batsulin. The essence of the changes is as follows: the details of the old design were taken as a basis - the vaulted furnace, the bend and the high above the mouth. New functional elements were added to them:
- Instead of a hearth, a hob is placed, and a small flood is arranged below. A parallel summer passage shaft is laid out, connected at the top with the main smoke collector.
- Hot gases from the additional firebox are directed through smoke circulations made in the lower part - the stove. Then the combustion products are discharged into a common pipe.
Note. The changes made allow the stove to be heated in two ways: in Russian (the smoke comes out through the mouth and high) and in the heating and cooking mode (gases move around the channels).
We tried to clearly describe common concepts; there are many more existing options. The purpose of the changes is to improve heat transfer and functionality of the basic design. If desired, a water circuit register or an oven is mounted inside the flues (the cabinet is placed next to the firebox).
Now we will analyze the updated options in detail using specific examples - with drawings and procedures.
Mini-oven project with stove
The Russian heating and cooking stove “Teplushka” with an additional combustion chamber has a power of 3.5 kW. The structure is designed for heating a small house or cottage with an area of 30-40 m², as well as cooking in winter and summer. The device of a small heater is shown in the drawing.
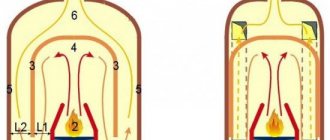
The mini-oven can operate in 3 modes:
- Summer move. We open valves 1, 2 and 3 (see the picture), load the firewood with firewood. The gases immediately escape through the main channel into the pipe, and the stove heats up. Damper No. 3 plays the role of a hood.
- Firebox for winter. We use the lower chamber again and close valve No. 1. Then the combustion products move through the furnace and flue ducts into the oven, exit through the channel to the front side and then into the main chimney. The entire body of the furnace is heated, from bottom to top.
- Firebox in Russian. We light firewood in the furnace, open the sealed mouth door and valve No. 3, valves 1 and 2 are closed. The smoke goes into the hailo and the main chimney, only the stove bench is heated. For full heating, close the door, open damper No. 2 - the gases will flow through the lower channels of the stove.
Note. The diagram of gas movement under different operating modes is shown in the figure.
Thanks to its efficiency and relatively low cost of materials, a mini-stove can easily be called a housekeeper. One minus is the small size of the bed. The maximum height of the building is 2.1 m, in the area of the ceiling - 147 cm.
Building materials and stove fittings
To make a Russian mini-oven with your own hands, you need to buy components and materials:
- solid ceramic bricks – 670 pieces (the chimney is counted separately);
- fireclay bricks for the firebox – 25 pcs. (brand ША-8);
- fireclay block brand ШБ-94 or similar in size – 1 pc.;
- door of the main chamber mouth 25 x 28 cm, possible with fireproof glass;
- loading door 21 x 25 cm;
- ash pan door 14 x 25 cm;
- two grates measuring 300 x 250 and 220 x 325 mm;
- wooden template - circle - radius 460 mm, length - 65 cm;
- cast iron hob with 2 burners 71 x 41 cm;
- 3 valves: 13 x 25 cm - 2 pcs., 260 x 240 x 455 mm - 1 pc. (brand ZV-5);
- equal angle corner 40 x 4 mm – 3 meters;
- steel sheet 1 mm thick for a shelf in a stove;
- galvanized mesh for reinforcement, cell 3 x 3 cm - 2.1 lm;
- kaolin wool, corrugated cardboard.
Red brick laying is done using sand-clay mortar. When constructing a chimney, it is allowed to add M400 cement. Fireproof stones are placed on another solution - fireclay clay, mortar and the like.
Advice. For beginners, we recommend making solutions from ready-made building mixtures sold in stores.
Laying progress - step-by-step instructions
A reinforced concrete or rubble concrete foundation is cast under the furnace, the dimensions of which are 10 cm greater than the dimensions of the structure. Start construction when the concrete reaches 75% strength; under normal conditions, the hardening process will take about 2 weeks. This assumes an average daily air temperature of +20 °C and proper care of the monolith.
Having installed waterproofing from 2 layers of roofing material, make the first row continuous (40 bricks will be needed). How to fold the stove according to the order, read on:
Recommendation. Create a gap between the ceramic and refractory masonry using regular packing cardboard. Subsequently, the paper will burn out, but the gap will remain. Horizontal seams between red and fireclay bricks are not filled with mortar, only with kaolin wool.
To understand the construction down to the smallest detail, we suggest watching a video with a detailed demonstration of the masonry of each row and explanations from the master:
Russian "teplushka" with a couch 127 x 166 cm
The design and principle of operation of this stove are similar to the previous heat source. The difference is in size, power and some design features. There are also 3 modes available here - winter, summer and Russian fire. The heat output is 4.5 kW, the heated area is 45-50 m².
In winter mode, firewood can be burned on the grate of the furnace or in the firebox - the gases will still flow through the lower passages and warm up the entire stove
The size of the stove in plan is 1270 x 1660 mm plus 10 cm for the projection of the foundation. The height of the front part is 210 cm, the height of the bed is 147 cm. Set of materials for construction:
- refractory bricks ША-8 – 26 pcs.;
- red solid brick – 995 pcs. (the chimney is not included in the specified quantity);
- fireclay block type ШБ-94 – 1 pc.;
- main door installed at the mouth - 41 x 25 cm;
- ash pan door 14 x 25 cm, firebox door – 21 x 25 cm;
- 2 grates with dimensions 240 x 415 and 220 x 325 mm;
- stove 71 x 41 cm (2 burners);
- chimney damper type ZV-5, size 260 x 240 x 455 mm;
- 2 valves 130 x 250 mm;
- sheet steel 2 mm thick;
- galvanized reinforcing mesh – 1.5 lm (mesh 30 x 30, wire 1 mm in diameter);
- template for forming an arch, radius – 322.5, length – 645 mm;
- circled under the arch of the main firebox with a radius of 60 and a length of 77 cm;
- corrugated packaging cardboard, kaolin wool.
Preparatory work - establishing a reliable foundation. Keep in mind that after pouring the foundation, the formwork can be removed after 3-4 days (during the warm period), and the stove can be built only after 2 weeks. The base area is covered with waterproofing - roofing felt folded in half.
How to properly lay out a full-size “Teplushka”:
- Row No. 1 is continuous, consisting of 65 ceramic bricks. On the second tier, we begin to form the walls of the furnace and support columns, and install the door of the ash chamber. We install 8 stones on a poke without mortar and cut them to the height of the 3rd row. We do not connect it with the rest of the masonry - these will be cleaning hatches.
- We place the third tier according to the diagram, on the 4th we cover the ash pan. On the 5th row, we begin to build the walls of the firebox from refractory, insert a grate 415 x 240 mm.
- Rows 6 and 7 continue to be laid according to the pattern, fireclay stones are placed on the edge. After the formation of the 7th tier, we install the firebox door and the summer valve installed vertically. Rows 8-9 are built according to the order.
- On the 10th tier we cover the floodplain and cover the upper ends of the refractory bricks with kaolin wool. The front part of the chamber must be covered with fireclay block ШБ-94 or similar. We begin to reinforce the walls of the furnace with galvanized wire mesh, then we arrange a re-covering of red bricks (row 11).
- On the finished 11th tier we insert the stove and grate bars of the main chamber - the furnace. We make level No. 12 according to the order and install a large door. Then we lay out the 13th tier and arch using a circle.
- We build rows 14-17 according to the drawings, raising the outer walls of the furnace, the smoke channel and the front partition of the furnace. Next we lay an arched vault R = 60 cm made of wedge bricks. We continue to build tiers 18 and 19 according to the diagrams.
- In the twentieth row we block the front arch and raise the outer walls higher. We fill the void above the vault with a solution of clay and sand. After drying, we build tier 21 - the plane of the bed.
- Tiers 22-32 make up the front section of the stove, where the chimney is combined with the side flue. We line up the rows according to the diagrams, on the 24th level we install 2 valves, on the 29th level we place a sheet of metal covering the stove.
The expert will give step-by-step instructions for building a Russian multifunctional stove in his video:
Construction Technology Tips
The construction of a Russian heating stove is a serious matter. It will be very difficult for a homeowner without experience in the stove business, so we recommend stocking up on time and patience. We published detailed instructions for preparing the mortar and laying it in an article about building a fireplace; we advise beginners to familiarize themselves with the specified material.
Here we will give general recommendations regarding the Russian home stove:
- Even the mini version of the heater weighs over 2 tons. The foundation slab must be supported on a stable soil horizon; the depth can be determined by the occurrence of the existing foundation of the dwelling.
- In the finished building, the “sole” must be arranged separately from the foundation of the house, retreating at least 10 cm. At the stage of construction of the cottage, the foundations, on the contrary, are combined - a common formwork is set up and concrete is poured.
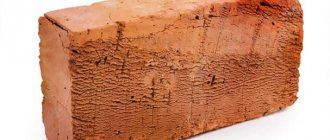
- You need quality bricks and mortar, not a gully clay mixture. The correct geometry of the stones will make your work much easier - uneven bricks will have to be filed down.
- Soak the red brick in the bucket for 2-3 minutes, as shown in the photo. Do not immerse the refractory in water, just rinse it to remove dust.
- It is allowed to lay the furnace and firebox from ceramic bricks, as our ancestors did. But remember: such cameras are afraid of accidental overheating; the material begins to crumble and crumble.
- A bed built on a loose base is also afraid of temperature fluctuations. This is why it is recommended to fill the void above the vault with clay mortar. If you fill the cavity with sand, small cracks may appear on the roof. No sooner had the stove been built than repairs needed to be done.
- The refractory masonry is not tied to the ceramic; cardboard is inserted to provide a gap between the two walls. Horizontal seams are laid with kaolin non-combustible wool.
- The pipe does not have to be made of brick all the way to the top. Lighten the structure - after cutting, install a sandwich - a chimney that goes out onto the roof, as shown in the photo.
Reference. Often, stove makers strengthen the arch and walls with an iron frame welded from corners.
Finally, a few words about how to properly heat a new stove. After drying the stove for 2-3 days (in summer), first build a small fire on the top damper. When the pipe warms up, start heating the furnace little by little, then the lower chamber. Increase the amount of firewood slowly, do not rush. The task is to uniformly heat the furnace body for final drying.
Conclusion
Even with every desire, it is unrealistic to describe in detail the construction of a Russian stove - craftsmen devote decades of their lives to studying and improving the technology. Hence the last recommendation: talk to an experienced stove maker in person - he can tell you about pitfalls and secrets that you won’t find on the Internet.
Improved heater options
Many Russian masters were involved in the modernization of the classic stove - I. Kuznetsov, I. Podgorodnikov, A Emshanov, A. Batsulin. The essence of the changes is as follows: the details of the old design were taken as a basis - the vaulted furnace, the bend and the high above the mouth. New functional elements were added to them:
- Instead of a hearth, a hob is placed, and a small flood is arranged below. A parallel summer passage shaft is laid out, connected at the top with the main smoke collector.
- Hot gases from the additional firebox are directed through smoke circulations made in the lower part - the stove. Then the combustion products are discharged into a common pipe.
An example of modernization - in winter mode, gases from the furnace and furnace heat the lower part of the structure - At the end or on the sides of the furnace, vertical channels are installed, again leading to the lower zone under the firebox, then into the chimney.
- The channels from the firebox go into the attached heating panel and out through a combined pipe.
- The firebox is made from the bottom of the furnace and communicates with it through a grate installed in the hearth (bottom) of the main firebox. Gas ducts from the furnace penetrate the furnace and converge into a vertical shaft leading into the chimney.
Note. The changes made allow the stove to be heated in two ways: in Russian (the smoke comes out through the mouth and high) and in the heating and cooking mode (gases move around the channels).
Another example - there are vertical passages in the side wall that form a heating shield.
We tried to clearly describe common concepts; there are many more existing options. The purpose of the changes is to improve heat transfer and functionality of the basic design. If desired, a water circuit register or an oven is mounted inside the flues (the cabinet is placed next to the firebox).
Now we will analyze the updated options in detail using specific examples - with drawings and procedures.
Heating and cooking stove 1020x1020 Ya.G. Porfiryeva
In this article I again return to the stoves developed by Ya.G. Porfiryev. This oven has dimensions of 4x4 bricks at the base. This is exactly the size that allows you to easily heat a room with an area of 35-40 m2, and if there is good insulation in this room, its area can be larger.
Four by four bricks - the size at the base is 1020x1020 mm. The height of the stove is 2 m 10 cm. Its heat output with a two-time firebox is no less than 4480.
The basis of this stove, as mentioned above, is the Ya.G. heating and cooking stove. Porfiryev with dimensions 1020x1020 mm. At the same time, some changes were made to the design of the furnace.
Firstly, the stove became four rows (28 cm) lower. Agree, not everyone has the opportunity to build a stove of such height. Limitations are imposed by the height of the existing ceilings. If they are not protected from fire, then their height should be at least 2 m 75 cm. With the new height of the stove, the ceilings can be 2 m 45 cm, which is, in principle, normal for a living space. If necessary, you can increase the height of the oven to the desired size by repeating additional rows 23-24 once or twice. There is no need to change the layout of bricks in other rows.
Secondly, the hob is raised one row higher. In the original version, it was located in the 9th row of the design, which, I think, is somewhat low and inconvenient when using it. The cooking chamber of the oven is made without a door. However, the door can always be installed without any problems.
The stove has a straight stroke, which allows for easy lighting of the stove in bad weather or when the stove is not used for a long time. To call this move “summer” would not be correct. It has a size of only 130x130 mm and with the valve fully open, the oven will still continue to heat up, albeit not significantly. If the forward stroke is doubled and a 130x250 mm valve is installed, this will be a normal “summer” stroke.
To learn more about this oven, watch the instructional video provided here.
You can get more detailed information on this furnace, with a detailed description of each row, from the project.
To display the project in full screen mode, click on the icon located in the upper right corner of the project. In the window that opens, you can familiarize yourself with the project and download it in PDF format.
Using the link below, you can download the project in the form of a ZIP archive containing PDF and DOC versions of the project.
If there are broken links, please report this in the comments.
Recommendations for use
The stove does not require maintenance. To avoid undesirable consequences, you must follow the rules for using a mini-oven :
- You cannot fire two fireboxes at the same time. In this case, the ash and combustion doors of the unused firebox must be tightly closed;
- Do not use flammable liquids such as gasoline or kerosene for kindling;
- keep the heater damper closed. If there is a need to open it, then first you need to open the ventilation duct valve;
- monitor the amount of ash. Remove it in a timely manner, otherwise there will be no fuel savings, because it will absorb heat and the heating of the rooms will deteriorate. It is better to do this procedure at least twice a week;
- you need to let the fuel warm up well for ten minutes, and only then start cooking food in the oven;
- It is not very practical to use paper for kindling - it burns quickly. It’s better to put wood chips or birch bark in the oven;
- Check periodically for any cracks in your stove. If any are found, they need to be repaired. If the damage is significant, then major repairs will have to be made. A clear indicator of a problem is a decrease in the heating temperature produced by the stove. The house has become colder - inspect the stove;
- It is preferable to carry out repairs in the warm season, when the stove is not used for heating;
- Before burning fuel, you need to close the doors of the ash pit and fireboxes;
- you need to clean the chimney in a timely manner;
- It’s better to start heating the stove during the day, then by the evening the whole room will warm up;
- It is preferable that the fuel be dry. And to ensure that it is not exposed to moisture and water and does not become damp, store it in a specially designated place. It should be dry and closed;
- It is desirable that the logs are approximately the same thickness and length. This is necessary because thin ones burn too quickly, and thick ones, on the contrary. The house will not be heated well enough in this way;
- stack the logs not randomly, but in a certain order. First, rake the coals with a poker closer to the door. Place a log across it. Then thinner firewood is laid obliquely, and thicker firewood is laid on top of it.
Heating stove Porfiryev Ya.G. size 4x3.5 bricks.
Heating stove Porfiryev Ya.G. 4 x 3.5 bricks in size for heating a room up to 40 m2.
The entry was published on January 13, 2011 by Alexander Zalutsky in the heading heating, Furnace arrangements.
Comments:
VKontakte (X)
Hello. Please tell us about the disadvantages of the Porfiryev 4x3.5 brick stove. In my opinion she is perfect.
Add a comment Cancel reply
Search
Blog Sections
- (10) (25) (3) (9) (8) (10) (18) (12) (5) (14) (48) (9) (70) (8) (51)
- (12) (2) (5) (2) (15) (13)