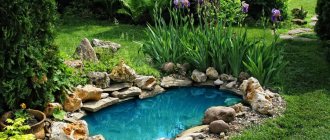
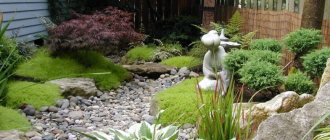
A pond is a natural decoration for a summer cottage. It can be built on any area and combined with different styles of landscape design. The coastal area is decorated with pebbles, gravel, plants, an alpine slide and other elements.
What could a pond be like?
First, it is necessary to determine the primary purpose of such a structure, and only then begin the construction of the structure and its further design.
So, according to functionality, an artificial reservoir can be divided into the following types:
Small ponds. They relate more to the landscape composition, complementing the overall picture. It won’t be difficult to create such a reservoir, but it won’t be possible to have active recreation nearby.
Decorative ponds. They have a slightly greater depth, and, as a rule, are subject to decoration with additional elements. These can be bridges, fountains, and much more.
For breeding fish. This pond will appeal to avid fishermen and will definitely please children, who will be able to watch colorful fish.
Swimming pools. An artificially created body of water that performs many functions, especially if its dimensions allow for swimming.
If you have already decided which option to choose, then it’s time to move on to the next stage.
Fish pond
Beautiful, bright fish will add variety to your life. Small aquariums have long been out of fashion. Nowadays, reservoirs that contain various living inhabitants are gaining popularity.
These can be decorative fish species. They will help you relax and are sure to attract children and pets. Or you can set up an artificial pond with fish or crayfish suitable for fishing and further consumption.
Deciding on the installation location
The pond needs to be installed in a place where you can admire it, and not hide it behind seven seals.
Accordingly, when creating such a masterpiece, it is worth considering several points: area, light, relief, presence of groundwater, soil composition, reflection, landscaping, visibility, power supply (if necessary), the ability to further expand your creation.
The list of work on the construction of an artificial pond should begin in the spring. This is necessary so that the latter can “take root.”
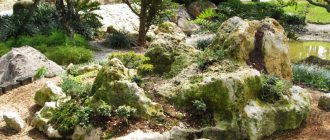
Landscape
The depth at which groundwater flows. If they leak close to the surface, you will have to additionally strengthen the pond.
Opportunity for further growth. You or your children will likely want to change the design or make some adjustments to the size of the pool. Or add some entertainment elements nearby. Therefore, when considering the location of the reservoir, take into account the possibility of further redevelopment.
Availability of electricity. Lighting and fountains are powered by electricity, which must be taken into account when choosing a location. There are several options. You can place a recreation area next to the house.
If you want to make a pond in a remote area, you will have to bury the electrical cable in the ground. Appreciable depth is required to comply with safety regulations. But, if there are joints on the wires, then you will have to arrange the necessary access to them.
Selecting materials
No repair can be done without building materials and tools that meet the requirements.
Construction companies offer a wide range of similar consumables in stores and markets, but you shouldn’t chase the cheap.
Give preference only to trusted intermediaries, and if necessary, check quality certificates.
In order to make a pond, you may need materials such as:
Concrete. An expensive but high-quality solution that extends the life of the pond for several decades to come.
Plastic. In specialized stores you can purchase a ready-made bowl, which will become the future pond if properly organized.
This option can also last for a long time, which largely depends on the quality of the element’s manufacturing.
Polyethylene film, PVC. This is the most affordable option in terms of finance, but the worst in terms of service life.
How to make a mini pond with your own hands: the initial stage of construction
Let's move on to the most important thing - how to do all the work correctly with your own hands? This article is accompanied by photos in which you can see many design options.
As you can see, ponds with a natural look look best, as if they were created by nature. And it will never occur to any of your guests that you could make such beauty with your own hands from seemingly ordinary materials.
So where to start? To build a mini-pond on a site, you will need to clear the construction site - all the plants that grow in the location of the future pond will have to be removed. After this, along the contour of the mini-pond, remove all the turf (top layer of soil). You should try to get as smooth a surface as possible. To do this, make several control measurements with the level.
Now comes the hardest part. By the way, she is also the most responsible. It will be necessary to dig a pit. Start digging a hole, moving from the edge of the marked area to its middle. Be careful not to cut yourself, as there can often be sharp pieces of brick, glass, metal and other debris in the ground. You do not need the excavated soil; it must be immediately removed from the work site.
Important: at the design stage of the pond, it is better to provide in advance all the terraces, which should be located no closer than 0.3 meters from its boundaries. Try to make sure that all the banks of the reservoir are as flat as possible.
After completing all the excavation work, it is necessary to inspect how the pit turned out: the banks should be at the same level, so they may need to be adjusted a little. The fact is that a piece of shore may be higher than the water surface, and this will affect the appearance of the artificial reservoir. But the most important thing is that the plastic film, which is the basis of a homemade pond, will not be visible.
Butyl rubber as insulation
Undoubtedly, this is one of the most optimal options for organizing and strengthening a pond.
If the chosen option involves a rocky bottom and greater depth, then experts recommend using a membrane made of this material.
The service life of the structure in this case can reach over fifty years. In addition, an indisputable advantage is the fact that the material can withstand sudden temperature changes.
Cleaning
An artificial swimming pond, like other bodies of water, tends to become dirty over time. This could be some kind of mechanical waste or particles of clay, algae, or fallen leaves that were not removed in a timely manner. To combat the negative impact of debris, use a sand-gravel bed or non-woven synthetic filter materials. Naturally, the filtration system and water pumps make their contribution to the cleaning of the swimming pond.
To keep the bath clean, it is important to maintain the correct oxygen content in the water, for which aeration is used. Sometimes a fountain can be built for such a purpose, the issue is finances. However, this method also solves a decorative issue.
Options from the people
If all the ideas listed above do not suit you, then you can use other solutions. For example, you can take an old bathtub and turn it into something that will be the envy of all the neighbors around.
Everything here is extremely simple, since the bathtub was originally designed to retain liquid, so in this regard, when organizing a pond with your own hands.
If you are still interested in how to make a pond, then it is worth learning more about other landscape ideas.
Laying film: how to do it right?
After the water container is ready, you need to compact all the side surfaces as much as possible. Don't forget about compacting the bottom.
That's all, now you need to take an accurate measurement. To do this, use a simple tape measure to measure the length and width of the almost finished pond. It is worth considering that you need to add approximately 0.3 meters on each side. The resulting dimensions are the width and length of a piece of plastic film, which is enough to build a pond.
It is also possible to use butyl rubber, although a reservoir made from it will cost more. The prepared hole must be filled with sand. It is advisable to use river water. The layer thickness should be 3-5 centimeters.
Please note: the thickness of the sand layer directly depends on the type of film used. The thinner the film, the thicker the sand layer. And vice versa. However, provided that perennial plants or trees grow nearby, the possibility of damage to the film by roots should be taken into account. To avoid this, it is necessary to use special bedding that will not allow the roots to break holes in the film.
The film on the bottom of the pond is spread without any problems, but it is most favorable to carry out this procedure on warm days. The fact is that when heated in the sun, polyvinyl chloride becomes as flexible as possible, which makes working with it many times easier. Consequently, you can spread it as tightly as possible along the walls and bottom of the pit.
There is just one minus - small folds will still be present on the film. It will be difficult, and sometimes simply impossible, to get rid of all of them. Then follow the following rule: “a few huge folds will be less noticeable than a hundred smaller ones.” To give a natural look to the bottom and walls of the reservoir, glue the resulting folds, then the plants on the surface will cover all these “defects”.
Please note: the film should not be stretched too much; it should be positioned freely. The main factor for success in this work is sunny weather, since rain can greatly damage the prepared pit.
When the film is laid, check its position - along the entire outline of the coast it is necessary that it protrudes no more than 30 cm. Subsequently, small gravel will be poured onto it, or a layer of soil will be laid on which plants can be planted. They will give the pond an original appearance; take a look at the photo to see what wonderful design options people come up with.
Tires on the move
Tires are a very affordable material that our people have learned to use in different ways, and the home pond is no exception.
True, in this case it will be more of a pond, but still. The creation principle is simple, and looks like this:
- We cut the wheel on one side;
- We cultivate the ground to remove weeds and debris, compact the soil;
- Place the film tightly;
- We decorate;
- Fill with water;
- We enjoy our work.
Decorating a pond at the dacha is a painstaking task, but worth all the effort and money. You can aim for a massive project or be content with a mini-copy of a pond; here everything depends solely on the mood of the owners.
In any case, you can be sure that the result will be an incredibly beautiful decor, near which you can gather for a picnic on a summer day, or just relax looking at the pond.
Water and stones
The most labor-intensive part of the work is finished. If you have a large amount of cobblestones at your disposal, you can use them to line the entire shore of the pond and even the bottom. If the stones are to be laid starting from a step at a depth of 30 cm, then water can be immediately poured to this mark, periodically straightening and tightening the resulting folds of the film. To avoid damaging the film, select stones carefully and do not use those that have sharp edges and corners.
For the bottom row of stones, the largest ones with a flat bottom surface are selected. They must lie stable, since all the overlying stones will rest on them. Flat stones do not hold well on an inclined surface and slide down; for a slope it is better to use a rounded large cobblestone. The basic laying rule is that the top stone should rest on the two bottom ones. Take your time when laying stones, select them according to size and quality, place the most beautiful ones in the top rows - they will decorate the coastline. When the last two rows of stones remain to be laid, the pond must be completely filled with water to ensure that all parts of the bank are in the same horizontal plane. If this is not the case, add sand or soil under the film.
You need to pour water using a hose with a weak stream. As the pond fills, do not forget to adjust the film from time to time, later this will be much more difficult. After filling the pond with water and finishing the work, you may be disappointed when the water turns green. Get ready for this! Adding 1-2 buckets of water from any old pond or even a ditch will solve this problem. Cloudy water in a new pond is a normal process that will last no more than two to three weeks, during which biological balance is established and the water becomes clear and clean. You just need to survive this moment.
An excellent way to keep water clean and clear are tadpoles, which filter the water and feed on algae, so enjoy the appearance of frog spawn in your pond in the spring. It is more difficult to get rid of filamentous algae, which multiply abundantly, if a lot of organic matter from fallen leaves accumulates in the pond. Regular collection of all plant debris that has fallen into the water with a net will help to cope with this, as well as planting aquatic and coastal plants with which the “thread” cannot compete: nymphs, cattails, etc. Snails contribute to the purity of the water in the pond.
After filling the pit with water, cut the edges of the film with a margin of 20-30 cm and slightly deepen them so that they do not tear up, nail them to the ground with large nails and sprinkle with gravel or soil.
Mistakes when constructing a reservoir
When building your own swimming pond, the following mistakes are sometimes made:
- The location for the pond was chosen incorrectly (in this situation, the easiest way is to fill in the pond and make it in another place).
- Inappropriate time (if you build a bathhouse at random in any season, then there is a high risk that in other seasons the level of groundwater will change, which will cause harm in the future, which means that it is correct to first track how groundwater behaves at different times or redo all work upon their discovery).
- Oversized (difficulties are solved by selecting unpretentious plants, installing powerful and strong pumps and filters).
- Saving on materials (the decision comes down to the principle “the miser pays twice”, that is, you will have to carry out restoration work and purchase a quality product for repairs)
- Failure to comply with safety (if the banks are too steep, they can be cut off, for example, with a shovel; install fences for children, strengthen decorative stones)
- Lack of water drainage (you will have to dig an additional trench or install a special pump)
- Ugly or overloaded decor (you should seek help from specialists)
- Selecting the wrong plants for the pond (remove all fast-growing plants that take up too much space, replace with unpretentious types of oxygen-generating plants).
- Inappropriate equipment (if the equipment that is installed does not cope with its tasks, then it should be replaced with a more powerful one).