Any owner of a site first of all faces the problem of fencing the site. The fence is subject to requirements for safety, aesthetics, durability, strength, and ease of maintenance.
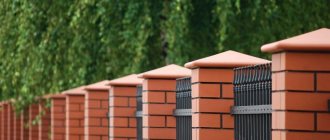
One of the most popular and affordable options for a stylish fence is a fence made of corrugated board. This article talks about how to make a fence from corrugated board with your own hands.
What is corrugated sheeting
Corrugated sheeting is a profiled galvanized steel sheet, a modern facing material used for the construction of walls, fences and roofs. It has a wavy and trapezoidal shape; for fences, a corrugated trapezoidal sheet with a low wave height of up to 20 mm is used.
In private homes, they usually use profiled sheets with a plastic coating over galvanization - this increases the service life of the fence for many years.
Thickness, height, coating
It is extremely important to take into account the dimensions of the corrugated fence. The thickness of the profiled sheet is 0.4-0.8 mm. The ideal thickness is 0.5 mm.
Such sheets will be a suitable option for fences up to 2.5 m high. When installing a higher fence, you should take at least 0.6 mm corrugated sheet.
The height of the profiled sheet, as a rule, ranges from 2-2.5 m. The width can be different - from 45 cm to 12 m.
The corrugated sheet can be galvanized and painted. The first option is considered more stable, but such a profiled sheet is significantly more expensive.
It is worth noting that support pipes and guides are usually first primed and then painted.
Advantages of corrugated sheets
Profiled sheets as a fencing material have many advantages:
- durability - with proper installation, a profiled sheet coated with a polymer coating will last more than 30 years. In European countries there are fences whose service life has already reached 50 years;
- corrosion resistance – the combination of a galvanized layer and a polymer reliably protects the steel from air access and rusting
- strength. Despite its small thickness, thanks to its wave-like shape, the sheet acquires additional rigidity, withstands pressure well and does not bend under wind load;
- resistance to mold, fungi and pests;
- functionality: the fence is opaque, it is almost impossible to get over the fence made of corrugated sheets - the upper sharp edge cuts your hands;
- low cost;
- aesthetics. The plastic covering has a very wide range of colors and patterns, which allows you to choose the fence to match any color of the house and estate buildings; Fences with patterns imitating stone and brick are very popular now, but there are more original designs - flowers, greenery, landscapes, paintings, photos;
- simple installation - this work can be easily done with your own hands;
- low weight allows you to build a lighter columnar foundation; the sheets are easier to transport, carry and install.
Disadvantages of corrugated sheets
There are few disadvantages of corrugated sheets, but they still exist:
- the corrugated sheet is not resistant to vandalism - the steel under the scratched coating begins to rust (but you can paint over the scratches with special compounds);
- This is not the most burglar-resistant type of fence: a thin sheet can be cut with tin snips and penetrate the yard. But with preparation, you can overcome any fence, and such a fence will reliably protect you from yard thieves and hooligans;
- A sheet fence does not go well with forging, polycarbonate, or wood - it is good on its own.
Read here Do-it-yourself insulation of a loggia: step-by-step instructions on how to properly insulate a loggia or balcony (135 photos)
Sequence of work
Do-it-yourself installation of a fence from corrugated sheets - step-by-step instructions:
- Clearing the perimeter of the site from the old fence, bushes, trees.
- Marking the locations of foundation columns. Drilling holes.
- Preparing the “pillow” for pouring the foundation.
- Preparation of supports.
- Installation of pillars and pouring the foundation.
- Maturing of concrete.
- Installation of crossbars.
- Installation of corrugated sheets.
Marking and drilling
It is more convenient to drill using a garden auger. Depth - 30 cm more than the depth of the foundation. To accurately place the drilling centers on the line of the future fence, pull a rope or cable.
Preparing the “pillow” for pouring the foundation
Why is the hole deeper than the foundation? A pillow is placed under the foundation. First, sand 100 mm thick is poured, compacted, and spilled with water. Then gravel or small crushed stone is poured in a layer of 200 mm and compacted.
Preparation of supports
Cut to the size of the workpiece from the corrugated pipe. The top and bottom are welded with a steel plate. The bottom of the pillar is painted with bitumen mastic 2-3 times - the entire foundation part +100 mm in height.
Foundation
It is advisable to cover the pits around the perimeter with plastic film, membrane remnants, and roofing felt. This is done to retain water during curing and increase the strength of the concrete. The posts are installed and secured with braces. Concrete is poured.
To release air, the concrete is pierced with a piece of reinforcement or a crowbar. The surface is covered with polyethylene or roofing felt. In hot weather, it is advisable to moisten the surface.
Maturing of concrete
Corrugated sheeting is a relatively lightweight material for fencing. But nevertheless, it should be installed when the concrete has matured and gained considerable strength. In hot weather, installation of the fence can begin in a week, at a temperature of 10-15 ° C - in two weeks.
Installation of crossbars
The pipes for the crossbars are cut to the required length and welded to the posts. For a fence with a height of 1800-2000 mm, it is enough to use 2 crossbars; for a higher one, it is better to use three. Then the entire frame of the fence must be coated twice with paint.
Preparing to install a corrugated fence
Installation of a fence made of corrugated sheets is quite simple and accessible to every home craftsman. Any work begins with measuring the site and drawing an accurate drawing or diagram. Then they decide what height of the fence is needed. Most often, the fence is 2 m high. You can look through a lower fence, a higher one is heavier and requires a reinforced foundation.
Then the placement of the pillars is marked on the plan and the required amount of materials is calculated. They purchase and deliver in advance.
The consumption of sheet and metal can be calculated in advance; cement, sand and crushed stone must be purchased approximately 20% more than the calculated quantity - it is impossible to perfectly drill holes for the foundation, and a little more materials are usually required.
If we make a fence from corrugated sheets with our own hands, the resulting savings will be approximately equal to the cost of materials.
Mounting horizontal joists
The support pillars are installed, the concrete mixture is finally fixed and dried (it is necessary to allow time for the concrete mixture to harden according to the instructions, this will ensure that the fence will not move). Now you can mount the horizontal logs to the frame.
Transverse logs are placed parallel to each other, usually in two tiers. If the fence height is planned to be more than two meters, then you will need to install a third guide, which is attached exactly in the center. The boundaries of the upper and lower tier vary within 25-30 cm from the expected edge of the corrugated sheet.
The strength of the structure directly depends on the chosen method of fastening. The ideal option is to weld the logs to metal poles using a welding machine. This is a fairly reliable method, but it will require certain welding skills.
There is another way - you can attach the logs using bolts and nuts. Perhaps less reliable, but easier to implement. You need to start fastening from the top tier. The most commonly used profile is with a cross section of 25*50 mm. It is worth noting that if the upper veins are aligned evenly, then the process of aligning the lower rows will proceed easily along the entire perimeter of our fence.
It is recommended to clean all surfaces of metal structural elements, prime them well, and then paint them to match the profiled sheet with two layers of enamel.
Frame structure
The fence is mounted on transverse joists. They are usually made from a thinner pipe - 60x60 mm. For a low fence, two crossbars are enough; for a fence height of more than 2 m, 3 or 4 are needed. The logs are cut to size and welded to the supports.
- Pool finishing: description of all types and features of modern finishing
- How an independent examination of construction work is carried out: an overview of all stages
- Fasteners for the construction of frame houses: features of the right choice
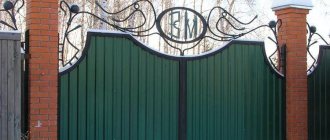
Manufacturing and installation of gates
The gate for the fence is made on a frame base. The supporting frame is welded from a profiled pipe 30x40 or 60x30 mm. The frame is assembled on a flat surface. The pipe sections are laid out according to the shape of the frame and welded with a few touches of the electrode.
After checking the corners and diagonals, the frame is finally welded.
In order to connect all the parts, you do not need to be a qualified welder; you just need to carefully study the drawings of the gate and calculate the dimensions. It is recommended to fasten the gate to the support using ready-made overhead canopies. It is better to make a lock, latch or other types of locks before installing the profiled sheet.
Gate fastening diagram
You can decorate a fence with a beautiful gate using overlay forged elements, metal patterns or ornaments. Already painted elements are fastened using bolts or self-tapping screws.
Fastening corrugated sheets
Sheets are cut to height (if necessary). The outermost sheet often has to be cut to width. The cut edges must be painted over with special paint with anti-corrosion properties.
The sheets are screwed to the crossbars in that part of the wave that fits tightly to the crossbar. The sheets are overlapped. The distance from the sheets to the ground should be at least 5 cm, and preferably 10 cm. Roofing screws and rubber washers are used.
Pouring technology
It is recommended to use standard technology, when a double-folded roofing material is placed in the hole, a pipe is placed deep into it, filled with concrete and installed in a vertical position. The level should be controlled with a plumb line.
As soon as the concrete has set, removable formwork should be made from boards with which to fill the base.