Photo: 2gis.ru A good and reliable fence around the site requires the same gate. Of all the variety of materials, it is easiest to work with corrugated sheeting, because besides it you only need a few pipes, fittings and fasteners. Moreover, you can definitely do it with your own hands. Let's tell you more!
Advantages of gates made of corrugated sheets
Installing gates made of corrugated sheets has a number of positive qualities:
- The fence turns out to be durable. It is able to withstand any load, including strong gusts of wind;
- The fence is not subject to corrosion when exposed to moisture. Modern production methods make it possible to coat the metal with a special composition, which protects it from rust;
- Installing the gate will not be difficult because the material is lightweight;
- At a relatively low price compared to other types of materials, profiled sheets also have a decent appearance. In addition, the expanded color range allows you to choose the color to suit your taste.
Color variety
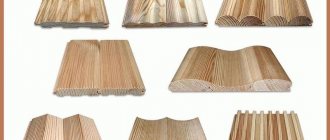
According to the method of applying the paint layer, sheets are divided into those painted on one side only, painted on both sides in the same shade, and multi-colored on both sides. The color scheme used is regulated by regulatory documents, among which the following standards are the most common:
- European (RAL);
- Finnish (RR);
- English (HPS);
- Swedish (PRELA).
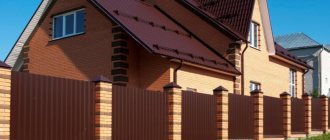
For the construction of a fence, the most acceptable is corrugated sheeting that has double-sided painting. When choosing a suitable color, pay attention to its compliance with the overall design of the site and the house. Most often, preference is given to a green tint. It fits well into almost any landscape design and looks great against the backdrop of natural green spaces.
Brown, blue, and gray tones are also in demand. They are compatible with most building materials used for fences and building facades. It is not advisable to choose red and yellow colors. The worst solution would be to use unpainted galvanized corrugated sheet. It is not only unattractive in appearance, but also less durable and practical.
Types of structures
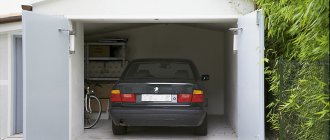
There are two types of gates you can make from corrugated sheets yourself: swing gates and sliding gates.
Swing gates consist of two doors that swing open in different directions from each other. With this type of gate, the load on the supports remains minimal. With this type of construction, the gate is mounted separately or located in one of the parts of the gate.
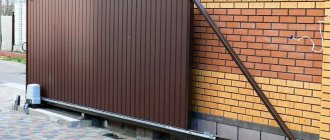
Sliding gates made of corrugated sheets are a single sheet that opens by rolling to one side. You can make either an automatic mechanism that will roll back the gate, or leave a manual opening method.
Sliding gates, unlike swing gates, require much less space. There is no need to leave it in order to open the doors of the structure.
But with sliding gates, it is worth strengthening the strength of the support, because the load in this system is distributed unevenly.
Advantages of the material
Types of corrugated sheets used for cladding structures
It is easy to sheathe gate leaves from corrugated sheets even on your own, since this work does not require any special skills or special tools. Sheathing the frame of a structure on a private property with corrugated sheeting is done without any extra effort, and the result looks no worse than if it had been done by professionals.
Gates lined with this material have a large margin of safety and are quite durable. It doesn’t matter whether they are made by hand or made to order by specialists, this is a reliable option for a private home or even a sensitive facility. Usually the color of the material is selected so that it matches well with the roofs of the buildings in the fenced area, as well as with the appearance of the fence itself.
Covering the gate with corrugated sheets will only require a few days and skillful hands. The structures are made hinged or sliding (sliding).
Gate size
Usually swing gates are made in such a way that a car can pass through them freely. Usually they take the width of the car and add a meter and a half to it, so that you can leave the site not only straight, but also turn.
It is also worth considering the size of the material itself in order to reduce the number of residues as much as possible.
Typically, the optimal gate width is from 4 to 4.5 meters, this distance also includes the width of the support. For a person to pass, you can leave 1-1.2 meters. This is quite enough to easily fit into the opening.
The standard length of corrugated sheeting is 2 meters; the height of the gate is determined from this indicator. The distance that remains from the ground level to the sash is also added to 2 meters.
It turns out that the height of such a fence is usually 2.1 meters. The space from the ground to the gate must be left at least 10 centimeters, because in winter, due to precipitation and the formation of ice, the gate may stop opening.
Right choice
Metal profile sizes used for fencing cladding
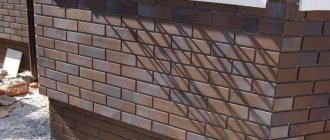
Corrugated sheets usually differ in thickness, height of steel ribs and strength. There are types of profile steel sheets intended for wall cladding, which have a fairly small thickness and a relatively small rib size. It is this wall corrugated sheeting that should be used for cladding gates with your own hands, since it is a reliable and durable option.
However, it is permissible to use thicker sheets of corrugated sheets, as well as sheets with a high wave. This choice will significantly increase the safety factor of the material, but will also affect the weight, respectively. Such heavy and massive sheets are rarely used for gate cladding, since it is impractical. They are most often used in the construction of garages and hangars, as well as when covering the roofs of buildings.
To get a neat cut and sheets adjusted exactly to the required dimensions, it is better to immediately specify the dimensions when ordering from the factory. This will simplify the work when installing the material on the gate, ensuring beauty and correct dimensions.
Difficulties in manufacturing sliding gates
Before you begin construction, you need to make a drawing of the gate. Particular attention should be paid to the drawings of sliding structures, because they are quite complex in execution.
You will face the following difficulties:
- Incorrect calculation of the counterweight can lead to the gate stopping opening;
- The foundation for the pillars must be strong, otherwise they may not withstand the weight of the structure;
- Welding elements of such gates will require certain skills and abilities. Without preparation it will be difficult to do this;
- If you plan to install an automatic mechanism for opening the structure, you will also have to tinker with it.
Briefly about the main thing
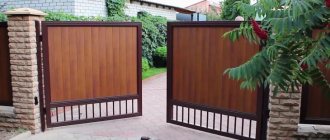
Forged gates are evidence of the artistic taste of the owners and the impeccably elegant appearance of the entrance area. The combination of forging and corrugated sheet allows you to save your budget while maintaining an attractive appearance and performance characteristics.
Forged elements increase the strength and reliability of the structure. They can be produced by cold or hot forging. The decor is prepared separately, welded into a composition, painted, covered with patina, and mounted on a frame or canvas. The cost of the finished product depends on the dimensions and design features of the gate, as well as the complexity of the forged patterns.
Swing gate design
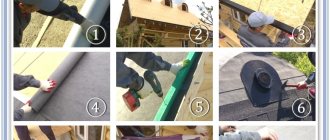
If you have decided how to make a gate and have chosen a swing type, then the following description can serve as instructions for action:
- First you need to draw up a drawing, indicating on it all the necessary dimensions. The simpler it is, the faster you can make the gate. Horizontal and vertical ribs are not needed for such a design, because the material itself is already quite rigid;
- The photo of a gate made of corrugated sheets shows that the frame is initially made. Corrugated sheeting can be attached directly to the frame, selecting rivets to match the material;
- The frame is made from a profile pipe. The section is selected individually. You can take either 60*40 mm or 40*20 mm;
- If the corrugated sheeting needs to be trimmed, you will need a grinder for this. Be sure to place the sheet with the front surface facing you, otherwise the edge will be uneven.
Unusual design for a gate
Wickets made of corrugated sheets with forging elements look very unusual, but at the same time chic.
Supplemented with forged parts, it acquires a unique look and immediately declares the high aesthetic taste of the owner.
An unprepared person will not be able to forge openwork elements on his own. They will have to be purchased at specialized stores. But it is quite possible to weld parts to the gate, turning the entrance door to the site into a real work of art.
Gate installation
In order to install a gate made of corrugated sheets, you will first need to make a frame.
- To do this, the pipe is cut at an angle of 45 degrees and welded with another pipe cut at exactly the same angle. The end result should be a frame rectangle.
- If you do not plan to attach the sheets directly to the frame, then you need to weld an additional strip onto the frame. You can leave it without it, then the fastening will be carried out directly to the frame.
- Next comes the installation of posts and hinges on the gate posts. There should not be too much of a gap between the post and the gate, maximum 3 mm.
- Now the frame needs to be fitted to the pillars. There is no need to rush to secure the structure; you should first check its correctness and the ease of opening and closing the doors.
- After this, a lock is placed on the frame, and the final stage will be painting the frame.
- This must be done, otherwise the iron will quickly rust. Before painting, be sure to clean the metal in the weld areas and sand the surface, if necessary.
- After the paint has completely dried, you can begin attaching the corrugated sheeting to the frame.
Swing gates are simpler and easier to install. Sliding ones are more difficult to make and it is best to contact specialists so that you do not have to redo the work.
Frame material and corner reinforcement
The process of attaching gate leaves
Gate frames are made of the following material:
- profile pipe 60x40x2 mm;
- profile pipe 40x20x2 mm to strengthen rigidity;
- metal sheets (for mortgages).
The frame can also be made from wooden blocks. It is important to assemble the frame structure on an absolutely flat surface so that there are no distortions. Things to remember:
- You can check the correctness of right angles with a construction square. On a flat area, a base line is drawn along the cord, and a perpendicular is laid off from it. The right angle is checked using the Egyptian triangle, for example, 3 dm: 4 dm: 5 dm.
- The materials for creating the frame are cut into pieces of the required sizes, so that then you can easily create a rectangular frame from ready-made pieces exactly to the size of the gate.
- To create a frame from metal sections, a welding machine is used, and additional triangular steel plates are installed on the straight corners of the structure, which provide the required rigidity.
- Marks are made on the sides of the frame, dividing each side into three equal parts. The marks are connected with metal or wooden jumpers to make the gate structure more durable and reliable. It is at the level of the same marks that the gate hinges are welded.
- When covering the gate with corrugated sheets, you can choose fairly small hinges, since this material is light in weight. But here you should take into account the total weight of the gate leaves, so as not to later encounter the problem of insufficient rigidity of the leaf fastening. It should be remembered when attaching the hinges that their pins should be directed upward.
When the frames are already installed on the hinges, and the work on their creation has already been completed, you can begin covering the gate leaves with corrugated sheets. This option is not suitable for cases where only one person is doing the cladding. Otherwise, you can sheathe the frame of the gate leaves in a horizontal position, there is not much difference in this.
Photo of gates made of corrugated sheets
Exclusive option
If the owners want their gates to be special and unique, and also to attract with their aesthetic appearance, then you can opt for forged structures. However, such products are not cheap, which should also be taken into account when purchasing.
Using forging, you can decorate metal structures with all sorts of patterns and designs, through which the surrounding area will be visible. Also, if necessary, you can make tight forging, through which nothing will be visible.
It is important not to lose sight of the fact that the house located behind the wrought-iron gates must match in style and dimensions. The wrought-iron gate looks ridiculous, behind which there is a squat house with a small adjoining area. The advantages of this type of design include:
- Unique design.
- Creation of patterns of any complexity.
- Long service life.
- Good compatibility with other materials.
True, we should not forget about some disadvantages, such as the high price of products and the need to adhere to production technology.
A clearly thought-out design and the use of quality materials will guarantee the beauty and durability of the structure. Such a product will delight owners, guests and passers-by with its attractive appearance for many years.
What else to consider
You definitely need to think about the safety of the finished structure and process it accordingly. A special film with a pattern is produced for corrugated sheeting, which protects it from damage. You need to choose a medium thickness of the sheet: a thin one can easily come off the fastenings, and a thick one will put unnecessary stress on the hinges.
Scheme for manufacturing
Step-by-step installation technology
A swing gate made of corrugated sheets is the smallest and simplest fencing design; you can make it yourself, even if you are a beginner with little welding experience.
Foundation arrangement
Before pouring the foundation for the posts, you need to mark the centers of future holes in line with the fence using a cord. Then you need to dig or drill holes for the posts. The depth of the concrete foundation must be no less than the freezing depth of the soil, which in the middle zone is 1200 mm. Sand is poured into the bottom of the hole and compacted. The thickness of the sand cushion in the compacted state is 100 mm of sand, 200 mm of fine crushed stone or gravel is poured on top and also compacted. In total, the depth of the pit should be at least 1200 +100+200=1500 mm.
The recessed part of the racks is 1200 mm, so the workpieces are cut 1200 mm longer than the required height.
For stability, it is advisable to weld a square of steel sheet with a thickness of at least 4 mm and 1-2 jumpers from a corner or pipe to the bottom of the metal supports at a distance of 300 and 800 mm from the bottom edge of the supports. The lower part of the racks must be treated with bitumen mastic to a height of 1300 mm. Before pouring, the edges of the pit are covered with a layer of roofing felt - this allows you to separate the concrete from the ground, retain moisture in it during the maturation process and ensure the necessary strength of the finished concrete.
Installation of pillars
The pillars are installed in a well or hole at a distance equal to the width of the gate plus 5-10 mm (these are the gaps between the gate and the pillars), filled with concrete, carefully leveled in the vertical plane and in the plane of the fence and maintaining the exact distance between the doors using a building level and secured in this position using spacers. If the drill hole is narrow, you can wedge the posts in the hole using large stones. Sometimes temporary reinforcement struts and a crossbar at the top are welded, which are cut off after the concrete has set and the welding areas are cleaned. The finished concrete is carefully pierced with a crowbar or reinforcement so that air bubbles do not form inside the concrete. It is advisable to fill the inner surface of the pipe with concrete.
Pouring concrete will gain strength in 10-15 days, depending on the ambient temperature. Before the end of this period, work on installing the gate door should not be carried out - otherwise the gate will be damaged in the future. During the first days, the concrete surface must be moistened.
Concrete for the foundation is used grades M150 (B10) or M200 (B15). The composition of concrete is shown in the table:
| Name of material | Unit | Concrete grade M150(B10) | Concrete grade M200 (B15). |
| Cement grade 400 | kg | 22,4 | 27,5 |
| Gravel (crushed stone) of medium fraction | l | 77 | 76 |
| Sand | l | 53 | 50 |
| Water | l | 20 | 20 |
| Concrete yield | l | 100 | 100 |
When replacing cement grade 400 with 300, its quantity should be increased by a third; when replacing with grade 500, the amount of cement can be reduced slightly and take into account the fact that the concrete will harden somewhat faster.
Wicket frame
Installation of the fence and gate can be carried out simultaneously with the installation of the gate or at another time. When installing all fencing elements at the same time, it is easier to align them on the same line.
When cutting metal and welding, you can get injured, so you can’t start working without special clothing and protective equipment: a suit (a canvas suit is required for welding work), special gloves and canvas mittens, safety glasses (dark ones for welding work), boots.
Before welding, cut off the required pieces of pipe for the frame. The length of the main pipes along the perimeter of the frame is equal to the length and width of the gate; cuts are made at an angle of 45°. The frame jumper pipes are cut at an angle of 90°. Burrs on cuts should be cleaned, rust should be sanded off. This will improve the quality of the seam.
Welding work is performed on a flat horizontal surface. If there is no suitable table, then the work can be done by placing the pipes on a flat area (near the house there is usually a tiled or concreted area of suitable size). Identical supports, for example, made of timber, must be placed under the pipes. Then level the surface so that the frame parts located on them lie strictly horizontally. Ideally, you should cut an OSB sheet with dimensions 50 mm greater than the length and width of the gate frame, and secure the pipes to it with clamps. If there is no OSB sheet at hand, then the frame parts are connected to each other with clamps. Then you should check the correctness of the angles and location of the parts, and only then start welding. First, the frame is pinched at the corners, then the corners and diagonals are checked - they must be the same. This means that the pipes are positioned correctly relative to each other. Then the joints are welded with a continuous seam on one side.
When welding, the metal experiences strong thermal expansion, so after each operation it is necessary to control the correctness of the angles, the linear dimensions of the parts, and the location of the parts relative to each other. It is advisable to carry out welding intermittently so that the seams have time to cool and the frame does not “lead”.
After welding one side of the frame, allow the seams to cool, turn the frame over, remove the clamps and weld the second side of the frame. Allow the seams to cool and sand off the protruding part. The seams after painting should, if possible, be invisible. Then the cross members are installed - the so-called stiffeners. They can be positioned horizontally, obliquely, or crossed - it all depends on the size of the gate and the preferences of the master. The procedure for welding the crossbars is similar to the procedure for welding the frame: cut off pieces of pipe of the required length, cut off the corners if necessary, clean them, secure them with clamps, spot weld them, weld them, clean the seams. It is easier to weld pipes of greater thickness, so it is recommended to buy pipes with a wall thickness of at least 3 mm.
Video
Frame installation
The frame is installed using cylindrical steel hinges. The weight of a gate made of corrugated sheets is small, and for its installation it is enough to use two or three hinges with a diameter of 30 mm; for larger and heavier gates, reinforced hinges with support platforms made of sheets at least 4 mm thick are used. The distance between the outer hinges should be approximately 400- 500 mm is less than the height of the gate (i.e. the distance from the top and bottom of the gate to the hinge will be 200-250 mm). The hinges on the poles can be welded before and after installation.
To weld the hinges, we adjust the doors to the posts, position them using wedges and a spacer-support made of timber at the bottom of the gate. The gap between the frame and the posts is 2.5-5 mm on both sides. First, the upper loop is applied and spot welded to the supports, then it is boiled. Then they grab the top loop to the gate frame. Then, in the same order, they grab the bottom hinge, check that the frame is hung correctly, weld the hinges, let them cool, and remove the stand and wedges. Check the height on the supports, trim them if necessary, and weld the hole on top of the pipe with a sheet of metal of the required size.
You can install a latch or a lock with a key on the gate. A mortise lock is preferable - it is more reliable when opening the gate outwards. Before inserting the lock, its dimensions are measured. Then they determine the location on the gate, mark the place where the slot needs to be made on the side surface of the pipe, and use a grinder with a small disk to cut a hole for the lock on both sides of the pipe. To protect the lock from precipitation and from breaking, the casing is welded and welded to the frame pipe. Then a lock is inserted into the hole in the pipe, points for attaching self-tapping screws, the locking cylinder mechanism, the handle axis are marked (if a lock with a handle is selected), and holes are drilled through in the casing. Then the door is closed, a place is marked for the lock bar on the support, and holes are drilled for the screws. Then the lock is removed.
Before covering with corrugated sheeting, the frame is sanded, treated with an anti-corrosion primer, and covered with two layers of weather-resistant paint for exterior use.
Sheathing with corrugated sheets is carried out second to last. The corrugated sheet is applied to the frame so that the deepened part of the wave lies on the frame from the side of the lock, the dimensions of the sheet and the dimensions of the cutouts for the hinges are determined. Then the sheet is cut using a grinder, places for the hinges are cut out, and a place is drilled for the cylinder and the axis of the lock handle.
The edge of the sheet must be processed with a file so that there are no burrs, treated with an anti-corrosion compound and coated with paint. Otherwise, it is from these places that corrosion of the sheet will begin.
The sheet is screwed with colored roofing screws with rubber washers into the lower part of the wave to the frame pipes; before screwing in the screws, it is advisable to drill holes with a drill. Lastly, the lock and lock plate are installed, and, if desired, a handle or a latch. That's it - the gate is ready
Using the step-by-step instructions outlined in this article, even an inexperienced home craftsman can make and install a popular and stylish gate from corrugated sheets with his own hands. Don’t be afraid to take on the work yourself - the one who walks will master the road. Good luck to you in your endeavors!