Strip foundation is the main and most common type of supporting structure.
It is universal and resistant to most adverse influences, and has an optimal ratio of load-bearing capacity to its own weight.
Simplicity and reliability make the tape suitable for construction on almost any soil, capable of supporting buildings of large and small sizes and heights.
The design of the base is worked out to the smallest detail, but difficult or changing operating conditions significantly increase the degree of belt wear.
If there are signs of destruction or damage to the foundation, immediate repairs are required.
Service life of strip foundation
The service life of the belt depends on its size, type of construction, operating conditions and other factors.
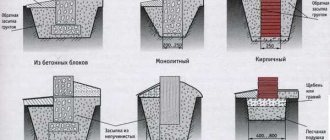
But first of all, the duration of operation is affected by the material from which the foundation is composed:
- Monolithic concrete - up to 150 years.
- Prefabricated foundations made of piece materials (brick, etc.) - 30-50 years.
- Prefabricated foundations made of FBS (reinforced concrete foundation blocks) - 50-75 years.
The advantage of concrete strips is due to the monolithic structure , the absence of seams, joints and other weak points.
Crystallization of concrete continues for approximately half of its service life, after which a long stage of destruction of the material begins.
Prefabricated types of tape have a shorter service life due to the destruction of the material and the large number of joints.
Ground movements widen the cracks into which moisture penetrates. It freezes, expands and begins to tear the tape from the inside.
Despite all the effectiveness of modern waterproofing materials, it is impossible to ensure that all elements remain motionless relative to each other and that there are no cracks.
Reinforcement or connecting blocks to each other in this case also does not provide sufficient effect, which significantly reduces service life .
IMPORTANT!
Competent design and adherence to construction technology allows you to increase the service life of the foundation to maximum values.
Main types of deformation
Subsidence is one of the common causes of foundation failure.
Before thinking about the question of how to repair the foundation, you need to analyze what exactly could have caused the destruction and determine the nature of the defects at the moment.
There is a wide range of different options for deformation of the base, which can affect the life of the building as a whole. Here are the main ones:
- Violation of the integrity of a timber house. The upper element of the support is constantly exposed to more severe conditions, so it collapses and rots in a short time.
- Column support distortion. This situation happens on turbulent, heaving soils when exposed to temperature changes.
- Subsidence of the base. The base sag due to violated technological requirements related to the method of its installation.
- Exposure to atmospheric factors: wind, sun, rain, snow and sudden changes in ambient temperature negatively affect the integrity of the foundation, destroying it.
- Destruction of FBS structures. Improper installation often causes destruction of the base. Blocks crack and fall out of the structure.
- Extruding piles. This happens due to improper installation without taking into account the characteristics of the soil susceptible to heaving. This often happens in the first winter after construction.
- Deformation of the foundation walls. Occurs under the influence of winter soil movement or heavy loading of the surface around the building.
The rubble foundation can delaminate after overload and excess moisture in the soil - Base deformation. Causes may include insufficient support area of the sole, excessive moisture in the soil, heavy load on the foundation, or construction on highly compressible soil.
- Buta delamination. Occurs after overload of the support system, prolonged use and abundant moisture in the soil, as well as due to improper laying method.
- Cracks on the side surfaces occur under the influence of an aggressive environment or as a result of the absence (improper installation) of waterproofing material.
- Horizontal cracking occurs due to severe heaving of the soil.
- The formation of cracks in the slab part occurs due to overloads of the base or the use of metal of inadequate quality and cross-section for reinforcement.
To accurately determine the cause of the destruction of foundations and foundations, it may be necessary to perform a number of research works.
How do you know if repairs are needed?
The need to repair the foundation is quite easy to detect visually . For an experienced person, this is not difficult, since all evidence of a problem appears quite clearly and is visible to the naked eye.
Signs of deformation or destruction of the tape:
- Subsidence of the entire house or individual sections, expressed in immersion in the ground or tilting of the building.
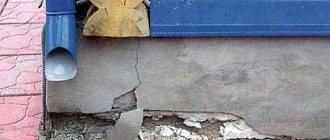
- The appearance of obvious cracks in the walls or visible part of the foundation (basement).
- Peeling of plaster, paint, distortion of facade panels.
- Window and door openings are skewed, causing the sashes to close poorly.
If the house has a basement , you can go down there and carefully examine the surface of the walls to detect emerging problems. The underground part of the house structure suffers first and traces of deformation are most noticeable here.
If there is no basement, you should walk around the perimeter of the house and assess the condition of the basement. If the house is finished with siding , you should try to detect distortions or convex places on the panels, indicating a violation of the geometry of the planes.
Repair work
We return to the already damaged buildings and analyze how they can be restored. Foundation repairs are complex engineering activities that must be performed by specialists. If you take on them yourself, you must be aware of the possible consequences, including the destruction of the house.
The house was raised with jacks before the work
Types of destruction
We begin restoration by assessing the extent and type of damage. Here's what they are like:
- The basement finish has peeled off and no cracks have been observed in the concrete or blocks. There is no talk yet about the destruction of the foundation. This happens mainly due to moisture getting inside. The problem is easily resolved - waterproofing is done, re-finishing is done.
Crack in monolithic tape
- A small crack appeared in the concrete. This occurs as a result of displacement and subsidence. The master is required to determine whether the process is still ongoing and in which direction the foundation is subsiding. The measures taken will depend on the rate of drawdown.
New columnar foundation
- Significant damage, when the foundation is literally crumbling, the walls are warped, large gaps have appeared between the crowns of the wooden house. Then the only possible solution would be a complete replacement of the base with a new one or its major restoration. How this happens will be described further.
- Catastrophic and irreparable consequences. Well, everything is clear here - demolition of the building and construction of a new one.
Of course, under no circumstances should the foundation be completely destroyed. Prompt repairs and restoration will significantly extend the life of your wooden house.
Strip foundation repair
Let's start with the most popular strip foundation, which is made in the form of a monolithic strip of reinforced concrete or made up of foundation blocks. Very often, in order to reduce material consumption, such foundations are made shallow, which is not acceptable in all regions of our country.
Read more about this in our article about shallow foundations for a home.
The red brick foundation was badly damaged as a result of the house subsidence
- We start with an inspection. We find all the cracks in the base - it is recommended to partially remove the section around them in order to accurately check the extent of the damage.
- We install beacons along the cracks - the easiest way is to use a sheet of paper, as shown in the photo below. You need to write the installation date directly on it to accurately determine the rate of expansion of the crack.
Lighthouse on a brick base
- Lighthouses can also be made from putty or cement mortar. Professionals use special devices for these purposes.
Advice! If the direction of the crack changes along the way, install several beacons on it at once, oriented in different directions.
- If the crack has stopped expanding, it means that the foundation has found reliable support points; repairs will not take much effort and time. In this case, the cracks are slightly expanded and filled with concrete mortar. The installation of reinforcing brackets and the use of special injection compounds that fill the crack from the inside are encouraged.
Technology for repairing the strip foundation of a wooden house using the injection method
- If the process continues, and its consequences can become destructive, you need to take care of taking drastic measures to repair the foundation.
- A reliable and affordable way is to erect a new reinforced concrete strip on top of the old base. The elements are connected to each other using reinforcement rods. Grooves are also made in the old foundation.
Pouring new tape under the house box
- The essence of such events is not only to strengthen the old foundation. Since the structure receives a larger support area, the load is redistributed and the subsidence process stops, although there are cases when this measure does not help.
Let's look at how to repair a foundation strip that is sagging evenly.
If the building has sagged, it needs to be raised - fortunately, the weight of the wooden structure is not so large. For these purposes, jacks are used, which are slipped under the frame of the house from different sides. The lifting is carried out gradually and evenly so as not to cause new distortions. This maneuver will allow you to replace the rotted lower rims of the log masonry, as well as lay fresh layers of horizontal waterproofing.
To install the jacks, it is necessary to provide niches - you will have to partially break the concrete and trim the lower logs. If it is possible to slide a steel angle under the box, the jacks can be placed outside the perimeter of the building, which will facilitate access to the base. Powerful hydraulic jacks designed for 10-25 tons are used.
Jacking a wooden house
When the required position of the box is achieved, rigid supports are installed to reduce the load on the jacks.
Repairing the strip foundation of a wooden house - digging a trench
- A trench is dug along the entire length of the area to be repaired (it is better to cover the entire perimeter of the house at once) - you need to get to the depth at which the new foundation will lie.
- The width of the trench is made such that it is convenient to work in it - setting up formwork, installing reinforcement cages, and more.
Important! If a building sags as a result of miscalculations at the construction stage, the reasons must be eliminated at the repair stage, otherwise a repeat accident will happen very soon. For example, the foundation suffered from high-flowing groundwater - it was not buried below the soil freezing level. This means that the trench is being dug to the required level, the new foundation will be deeper.
- Old concrete needs to be cleaned of soil residues, you can even wash it with a hose. All damaged and fragile parts are also removed: plaster, rubble masonry, bricks.
Removing weak parts of the old base
- The bottom of the new pit must be properly compacted. In theory, the soil in this place will have a natural density, but it may be slightly disturbed during excavation work.
- The bottom of the pit is filled with sand, gravel or crushed stone. The layer of such a cushion should be 15-20 cm, taking into account that the remaining depth will be below the freezing level of the soil.
- At the bottom of the trench, it is recommended to lay a layer of waterproofing material – the same roofing material – on top of the cushion.
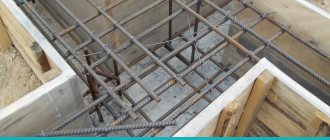
- Then the reinforcing frame is installed. Steel corrugated rods with a diameter of 10-12 mm are used. For the ligament, holes are drilled in the old foundation to a depth of 10-15 cm, into which pieces of reinforcement are driven. The holes need to be made smaller by 1 step in diameter so that the metal does not dangle in them.
- In a checkerboard pattern, individual screws (rods) need to be chipped - a groove is made with a hammer drill or cutting tool, in the depth of which an anchor made of reinforcement is also placed. When pouring concrete, it will fill these voids, which will increase the quality and strength of the adhesion.
- An external reinforcement frame is attached to the rods protruding outward, as shown in the photo below. The frame must have vertical and horizontal jumpers. Everything is connected using welding or tying wire - the second option is preferable, since internal stress will not be created in the concrete.
Installation of reinforcement cage with rigid connection to the old foundation
- Formwork is installed along the entire length of the pour. The foundation will be monolithic, and it must be poured without interruption in work. It is recommended to wrap the inner walls of the formwork with polyethylene or coat it with mining. This will reduce the loss of cement laitance - if it flows freely, the strength of the concrete will suffer.
Formwork for a new foundation
- Then the new foundation is poured. For work, it is best to hire a concrete pump or mixer to quickly and evenly fill the entire volume of the structure. There should be no vertical breaks in the foundation - cracks will definitely appear again in these places. So if you decide to work manually, pour concrete in layers, 15-20 cm each.
- In order for the concrete to be strong and fill all the grooves well, its mass after pouring must be passed through a submersible vibrator. If there is no such tool, then you can make something similar from a hammer drill.
Working with a submersible vibrator
Tip! Before pouring fresh concrete, it is recommended to treat the old foundation with primer or a penetrating compound to give it waterproofing properties. Add similar substances when mixing the solution. All this will not cost much, but the new foundation will serve for decades.
The resulting structure is left to harden for 28 days (the time to gain full strength, after which the foundation can be loaded). After just a week, the formwork can be dismantled.
While the concrete dries, you need to take care of it - moisten it generously several times a day with water and cover it from direct sunlight with a dark film. Lack of moisture in hardening concrete can cause cracks to appear.
When the specified time is up, vertical and horizontal waterproofing is carried out, then the structure is lowered onto the finished base using the same jacks.
Complete replacement of strip foundation
If it becomes clear that the old foundation cannot bear the load and its complete destruction is estimated to take a little time, it must be completely dismantled and replaced with a new one.
Replacement of strip foundation
In the previous case, the house was raised slightly above the foundation. When completely replacing it, you need to raise it all and to a greater height. Depending on the size and weight of the structure, different lifting equipment may be required. Such work should involve technical specialists who, according to the specific density of wood, will calculate the total mass of the structure and decide on the load-carrying capacity of the mechanisms involved.
- Before lifting, some preparation is done. First you need to lighten the weight of the structure as much as possible - remove furniture and other heavy objects. Sometimes they even dismantle stoves and tear down wooden flooring.
- If there are concerns about the safety of the masonry of the structure during lifting, then a perpendicular bundle of the crowns is made with a thick beam, as shown in the following photo.
Repairing the foundation under a wooden house - safety bandaging of wooden masonry - It is also worth spreading the window and door openings so that they do not warp.
- Then you need to slide powerful metal channels, angles and I-beams under the structure, creating a strong frame that will hold the structure suspended. For this purpose, excavations, cuts in the foundation and other measures are made. You can do without a frame, provided that the lower crowns of the structure have not rotted over time and can cope with the load, but at a minimum, high-quality timber supports will be needed.
- The house, raised to a height, rests on reliable temporary supports.
- The old foundation is completely broken and removed from the ground. Then a decision is made on the type of new foundation.
The new foundation can be anything - the same tape, piles or pillars. When installing turned supports, all technical requirements are observed. All of them are brought to one level, then a lower frame made of a metal channel or thick beam is installed. Be sure to lay waterproofing material.
Interesting to know! Dismantling the old foundation may lead to a violation of the density of the soil, so pillars and piles must be immersed to a greater depth.
Repair of columnar and pile foundations
Pile and column foundations can confront their owners with the following problems:
- Destruction of pillars by moisture, which causes them to lose their strength, crack, and the structure sags unevenly.
- The tilt of individual supports due to the effects of soil heaving - the house will tilt along with it.
- Subsidence of individual supports as a result of changes in the density of the soil underneath them.
Repairing the foundation of a wooden house with your own hands
Repairing the columnar foundation of a wooden house is much easier to do. Since only individual supports have to be replaced, there is normal access under the building.
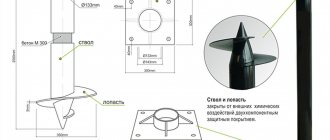
A quick and reliable method of repair is to install bored piles.
Structure of a bored pile - TISE foundation
The procedure is performed like this:
- The house is raised according to the principle already described above. It is worth noting that for structures on a columnar foundation, the lower crowns rarely rot, since they are constantly ventilated, which means the foundation will be strong.
- The old column is being dismantled. The hole around it expands and deepens by 20-30 cm. It is given such a shape so that it is possible to start a new pile. The drill must be inserted obliquely so that an expanding cavity is formed at the bottom.
- A drainage cushion is made.
- At the bottom of the pit, a foundation is created for the pile - concrete is poured. As soon as it hardens, a hollow asbestos-cement or metal pipe is placed under the building, inside which the fittings are placed.
- Concrete solution is poured inside the pillar. The pipes are filled with previously excavated soil, which must be compacted layer by layer.
Causes of destruction
There can be many reasons for deformation or damage to the tape:
- The presence of defects or errors in the project.
- Changes in groundwater levels, errors in geological exploration data or the consequences of man-made intervention.
- Frost heaving loads that are uneven and sharply changing in nature.
- Use of unsuitable or low-quality building materials.
- Construction of additional building elements that increase the load on the foundation.
- Formation of voids or gullies under the tape.
In most cases, problems arise in complex ways because they are closely related to each other.
The main source of damage is groundwater that changes its level, suddenly rises or disappears due to complex seasonal processes in the soil layers.
An increase in the weight of the house or the addition of additional rooms, which changes the balance of loads and redistributes the forces applied to the belt, also has a significant impact.
Diagnosis of the problem
Diagnostic measures are carried out using complex devices or tools; long-term and detailed studies of the condition of the belt , its movement or displacement relative to the longitudinal or transverse axis are performed.
You can determine the condition yourself by visual inspection of the visible surface of the tape. If it is necessary to conduct a study in dynamics, then the following actions are performed:
Installation of beacons. A gypsum solution is used, a layer of which is applied to the surface of the tape in problematic or questionable areas . Usually the cracks that have arisen are examined. The dimensions of the beacon are in the range of 100-120 mm in length and 39-50 mm in width, with a thickness of 3-5 mm.
Several beacons are installed on the extreme sides of the cracks so that it is possible to track their development.
A line is drawn on the surface of the beacons using the edge of a trowel. After 3 weeks of exposure, the beacons are inspected and conclusions are drawn about the condition of the tape , whether further propagation of the crack occurs and at what speed.
If serious problems or noticeable changes in the size of cracks are detected, a drilling test is performed. In problem areas of the belt, soil is removed to a width of about 1 meter .
The exposed surface of the foundation will allow us to obtain the most complete information about the size and possible causes of the problem, and will make it possible to assume the further course of events.
Usually they dig several holes in order to study the condition of concrete, waterproofing, sand cushion, etc. as fully as possible.
NOTE!
The more information about the presence and degree of development of undesirable processes is collected, the more effective the measures to eliminate the problems that have arisen will be.
Repair methods
Restoration of the tape can be carried out under various technological conditions. The choice of the most suitable option depends on the nature of the damage, the size and dynamic state of the crack .
The main requirement for the measures taken is efficiency and high quality results. All work should be carried out as carefully as possible, carefully monitoring compliance with the technology, not allowing any deviations and not skipping any stages of work.
Repairing the tape is a labor-intensive, responsible and complex task, which should be solved under the guidance of an experienced specialist, or you can entrust the repair to a team of professional builders.
Crack repair
Before starting work, you should determine the cause of the cracks.
Experts distinguish several types:
- Hairy . The vast majority of such cracks form when the plaster dries unevenly and does not create any problems for the tape.
- Horizontal . Such cracks appear during the operation of the tape. They are considered not dangerous.
- Shrinkage . These cracks indicate weak bearing capacity of the soil, poor compaction of the sand cushion or other problems. If they are found, it is necessary to inspect and take urgent measures to repair the foundation.
It must be taken into account that any cracks, even those that do not pose a danger to the foundation, must be carefully sealed. Sooner or later, water will penetrate into them and destroy the material from the inside, so measures should be taken in any case.
To correct minor flaws, two methods are used:
- Sealing cracks with cement mortar . You can use ready-made mixtures that are purchased in the store. The solution is applied to the surface and rubbed in for maximum penetration inside. If the crack size is too small, you can widen it with a trowel or chisel.
- Pouring with epoxy resin . This method is good because the resin has high fluidity and is capable of filling large cracks. Before filling the crack, you should prepare it and be sure to dry it with a construction or household hair dryer. The resin will not stick to a wet surface, so before applying you need to wait about half an hour to check the quality of drying.
Shrinkage cracks cannot be repaired by simple sealing, since there will be no effect in this case.
More radical methods must be used.
Video
Video about partial foundation replacement.
If the foundation of a wooden house is significantly damaged , that is, it requires a complete replacement, then you will have to not only raise the house, but also dismantle the old foundation structure and pour a new one in its place.
There is another option for repairing such a foundation. To do this, holes are made along the entire perimeter of the house, close to the old foundation, every 1 - 1.5 m. Essentially, these are columnar structures that will support the ribbon structure. In them, as in the construction of ordinary pillars, sand and gravel bedding is made. Next, steel reinforcement is inserted in the form of a frame and concrete mortar is poured.
After that, a beam or metal profiles (channel or I-beam) are mounted on every two oppositely installed supports. The wooden structure will mainly rest on them.
How to raise a subsiding foundation
Lifting the subsiding tape will stop the development of cracks and prevent the destruction of the walls of the house. To carry out the work, it is necessary to dig out the entire problematic section of the belt (usually a corner or half of the foundation is cleared) from the ground and secure the trench slope with shields.
Then you can apply two methods:
- Create overstressed concrete clips that take the load on themselves and lift the old tape relative to its previous position.
- Use special chemical reagents that increase their volume and lift the tape. Injections are made into the underlying sand layer, after which the cushion is compacted and expanded as much as possible, raising the tape.
The first method is considered simpler and more reliable, while the second option is complex and requires accurate calculations, the participation of special equipment and a team of professionals.
In any case, the decision must be made only after consultation with representatives of construction companies.
How to build up
The extension has two directions - width or height. To repair the tape, an increase in width is usually used, which fills cracks and strengthens the base.
The work is carried out in stages:
- The problem area of the tape is cleared from the soil.
- The surface is thoroughly cleaned of the waterproofing layer, dried, and notches are applied.
- In the outer area, holes are drilled into which reinforcing bars are inserted. A reinforcement cage is welded to them for an additional layer of concrete.
- Formwork is installed and concrete is poured.
- After hardening, the surface is carefully waterproofed and finishing work is carried out.
Useful tips
Partial restoration to restore the foundation is carried out when defects and damage are characterized as minor. In such a situation, they make several tunnels under the house from the outside of the wall, or a solid trench. The rot and old sand are removed, the ditches are reinforced and filled with concrete.
It will not be possible to lift it onto the foundation with your own hands without outside help. In order for the log house to be installed and secured without distortions, several people are needed.
When partially restoring a brick base, craftsmen advise carrying out the work as follows:
- remove the remains of destroyed masonry;
- the ditch is filled with liquid concrete up to half, making sure that the mixture penetrates into the soil and cracks, seams between bricks;
- after the first layer has begun to harden, the formwork is installed;
- reinforcement is installed on the bottom layer of concrete;
- A concrete mixture of normal consistency is mixed and the trench is filled to the brim.
After the concrete has completely matured, the frame is installed on the foundation. This restoration method allows you to increase the wear resistance and strength of the old base. The method does not require large expenses or the presence of special construction equipment.
The foundation under any wooden frame deteriorates over time. If it is not replaced in a timely manner, the building may collapse. The difficulty is that during the renovation and construction work the family must move to another home. It will not be possible to live in the house for the entire period from the beginning to the end of the restoration of the base and lower part of the base.
How to replace a pile foundation with a strip foundation
Most often, the tape is replaced or supplemented with piles.
If there is a need for reverse actions ( for example, the piles are destroyed or it is necessary to increase the load-bearing capacity of the foundation ), then a complex set of works will have to be carried out to install the house on temporary load-bearing structures, create formwork and armored belts and fill the tape.
Metal beams that can support its weight are placed under the lower frame of the house . Using powerful jacks, the building is lifted and hung horizontally.
Then formwork and an armored belt are installed under the load-bearing walls, which must be mechanically connected to the piles.
If you no longer intend to use them, you can skip this step. Then concrete is poured into the formwork, evenly distributing it along the entire length .
IMPORTANT!
After hardening (no earlier than 10 days), the formwork is removed, but the resulting tape must be kept for up to 1 month before it becomes possible to release the jacks and load the foundation.
As a preface
Replacing the foundation can rightfully be considered a radical measure caused by the need to restore the reliability and safety of the house, as well as to increase its service life. It is advisable to carry out such a solution for wooden buildings, the structure of which, if the base is replaced, can last for many more decades. Of course, you can implement your plans on your own, but if you are not confident in your own abilities, it will be in your best interests to pay money to qualified specialists. In this case, the information presented below will allow you to navigate the issue and control the situation. If you decide to do everything yourself, then this article will serve as good instructions for carrying out repair work.