Terraces and verandas attached to the house have not only an aesthetic, but also a practical function, transforming the appearance and increasing the usable space of your country house. With proper design, a terrace or veranda quickly becomes a favorite vacation spot for the whole family. According to statistics, it is here, in a cozy circle of friends and relatives, that household members spend most of their free time. However, despite the similarity, with identical role functionality, these two buildings have certain differences.
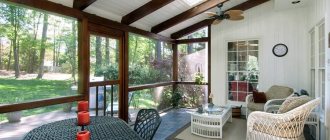
An open chalet-style terrace harmoniously attached to the house
General principles for planning
A little protection of the front door from precipitation should be present, even if it is planned to equip a completely open veranda. To do this, the design is supplemented with an element called a “visor”. The veranda itself is often attached to the front side of the house. The only exceptions are situations when the house has two exits from the very beginning.
The parameters of verandas are determined by several factors:
- Exterior of the main building.
The veranda must fit organically into the existing structures so that their appearance is maintained or improved. It is unlikely that a small veranda will decorate the area if it is attached to a two-story house. Another thing is when a one-story house is connected to the structure along its entire length.
- Opportunities of owners from a financial point of view.
- Functional purpose of the veranda.
Usually the buildings are used for summer recreation, or serve as a kind of vestibule. Some owners add small closets where personal items are stored.
- The size of the area available for the extension. This will help you understand how to attach a veranda to your house.
Polycarbonate
Verandas made of polycarbonate have an aesthetic appearance, but in a number of other characteristics they are inferior to brick and even wooden structures.
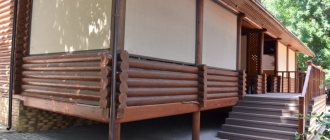
The big advantage of such a beautiful veranda is the enormous view of the area, since the walls are completely transparent. This eliminates the need to glaze the structure. The roof is also made of transparent material, which creates a unique atmosphere inside the veranda.
The building is suitable exclusively for summer pastime, as a way to protect from rain, dust and wind. When cold weather sets in, it will also be cold inside; it is impossible to further insulate the building due to the transparency of the materials.
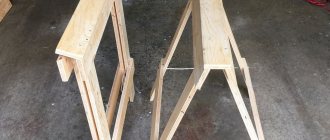
Initial stage of construction
It must be remembered that the weight of the main house is always greater compared to the extensions. Therefore, the shrinkage of structures is different. The veranda will need a separate foundation so that during operation it will not have such an impact on what is nearby.
Most owners prefer a columnar foundation. Its depth should be the same as that of the main building. Another approach is used for buildings made of heavier materials - brick or concrete. Then choose a strip base. This choice contributes to the uniform distribution of loads over the entire area. Then the owners will have a veranda attached to the house with their own hands for a long time.
Options in landscape design
Landscape design directly resonates with the design of the house; it is especially important to choose the right combination if the veranda is open or fully glazed. After all, then it looks like part of the external environment and should be in harmony with it. The choice of style depends primarily on your preferences:
- Colonial. The main features of this direction are wicker garden furniture, dark wood trim, and a fireplace. Best used for spacious verandas.
- Provence. If the first style was English, then this one is French. It is distinguished by light and pastel colors, love for fresh flowers and floral patterns, delicate decor, textiles, forged parts: railings, furniture. The finished interior is light, suitable for small spaces.
Main stages
After the foundation is erected, the main stage of construction begins. First, subfloors are created. Insulation and laminate or bars are laid on top of them, only after these layers come decorative coatings on top. Step-by-step instructions will not cause problems when studying.
Even at the initial stages of construction, it is necessary to think about how the veranda will be insulated. Nowadays many materials are produced, each with its own characteristics.
Roll or tile materials are best suited for such buildings. They perfectly remove moisture and cold air. This property is especially important for a wooden floor, which will be protected from rotting for a long time. Then the open veranda itself, attached to the house, pleases the owners with its appearance for a long time.
Examples of interior decoration
The choice of materials for renovation depends on the type of building: in an open area, important attention should be paid to the floor. The flooring must withstand high humidity, rain, snow - decking boards are most often chosen.
The main purpose of roofing material is to protect from rain, but if there is a lot of snow in winter, the roof must be strong enough. The inside of the ceiling is left “bare” or lined with clapboard.
The external wall of the house will be internal to the veranda; it can be left as is if it looks neat and beautiful (for example, wooden, brick or decorated with siding). Or cover it with the same siding, panels, decorative stone, clapboard.
Important! Before installing wooden panels, treat them and the wall with a product against mold, mildew, and insects.
The arrangement of a closed extension is more difficult, but less serious requirements are imposed on the finishing itself. Suitable coatings intended for interior use.
Frame arrangement
Insulation is then laid on the frame along with other types of materials. When installing the roof in this case, the same procedure is followed as in the case of ordinary houses. Then it will be easier to ensure that the buildings are similar to each other, they will harmoniously complement the elements.
Sloping to one side is the most common option when installing a closed veranda attached to the house.
Note!
Do-it-yourself porch to the house - the best projects and construction ideas (125 photos of new products)
- DIY brick barbecue: diagrams, drawings, photos, dimensions. Review of simple and complex structures on a summer cottage!
- House with a bay window - 150 photos of the best planning and design ideas. Overview of all features of an architectural element
Combined designs
This option is even more popular than products made from only one building material. The most common:
- capital base (blocks, brick, monolith) with a light metal top;
- solid foundation with wooden frame;
- cantilever canopy over a permanent base.
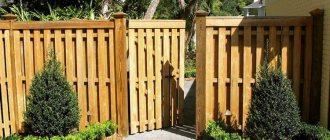
The models presented above in the photo can rather be called canopies, although when organizing fences (except for the last photo) and constructing the foundation of the site separately from the foundation of the house, such structures can also be considered verandas.
Important: verandas with a solid foundation and a light frame can be glazed with no less success than completely brick or block structures.
Further work on the formation
After the initial installation, the frame is sheathed with basic materials. For internal cladding, you can choose any modern material that meets the requirements.
Insulation at this stage is the most important aspect. Waterproofing films cannot be used if metal is present. When condensation forms, such structures simply begin to rust.
The insulation must be placed between the outer cladding and the inner layer. The waterproofing film goes on both sides of the insulation. This rule is mandatory for everyone who is interested in learning how to attach a veranda to their house with their own hands.
Walling
To assemble the frame, you need to take support pillars from timber, the cross-section of which is 120 * 80 millimeters. The pillars need to be placed at the corners of the veranda, and then between them in half a meter increments. On the lower trim, the supports are secured with steel angles. The supports near the wall of the house must be higher to create a difference in the height of the walls, which will result in a lean-to roof structure. You can increase the rigidity of the structure by connecting the pillars with horizontal beams, which will later serve as a support for the windows.
About the final stages
Typically, in this case, windows and doors are installed.
The entrance door to the veranda cannot be located opposite the entrance door to the house. Otherwise, drafts appear. It is better to choose the option with end mounting. In a small space, this also adds free space.
There are a large number of photos in which the doors of the verandas are located in this way. This solution is considered the most convenient, regardless of how the building is arranged from the very beginning. The roof of the veranda attached to the house also benefits from this.
Note!
Do-it-yourself tandoor made of brick: ready-made drawings, dimensions, step-by-step instructions + 100 photo ideas
- How to make a gate with a wicket with your own hands: step-by-step instructions, drawings, design dimensions, design, assembly and installation
- Do-it-yourself greenhouse - a review of the best ideas on how to build a good greenhouse on a summer cottage (80 photo ideas)
Choosing flooring material
Much attention must be paid to the material that will be used to create the flooring. It will need to be additionally painted to make it more resistant to moisture.
Before installation, all wood that will be used for the construction of the building must be impregnated with special compounds that protect it from pests and weather conditions.
It is worth paying attention that the impregnation must be without a coloring component, otherwise the wood will be painted in an unnecessary color, after which it will take a lot of effort to paint the entire veranda in a uniform shade.
Additional Tips
At the initial stage, it is better to take care of permits and issues from a legal point of view. Then the construction itself will take much less time. After receiving all the documents, they usually purchase materials and tools and begin implementing the project.
The veranda will have to be legalized in any case, regardless of the original dimensions of the building. It is better to do this before the actual construction, so as not to receive penalties later. In this case, a wooden veranda as an extension to the house will only please you.
Many people think that for any construction it is enough that the site is owned. But there are certain requirements, without which the work cannot be continued. It is necessary to take into account some nuances.
- The location of buildings is chosen in a certain way to preserve the rights of all interested parties, including in neighboring areas.
- The design of the general structure and its area change when using any buildings, this is also a general rule.
- Not only the legal side of the issue is taken into account, but also the safety, including that of the residents of the house itself. After all, during construction, the distribution of loads can seriously change. Additional load on the house appears even when creating light varieties of verandas.
- Without legalization, it will not be possible to officially sell or exchange the house.
A light veranda belongs to the group of non-permanent extensions. Everyone can figure out how to build this building with their own hands.
Foundation load calculation
Although the veranda is considered a lightweight building, it has a certain weight. In addition, it is influenced by various natural factors: freezing of soil water in winter, shifting and heaving of the soil, and moisture penetrating into the structure. Therefore, the presence of a foundation, even the simplest one, is mandatory.
The need for a separate foundation arises when the veranda was not provided for in the house design.
Any type of foundation can be selected. It is only undesirable for it to differ from the base of the house. Monolithic and tape options are considered the most reliable. For an extension, an excellent solution would be either a columnar (for weighty buildings) or a strip foundation. Slab is also suitable, but it costs more.
The location of the foundation below the freezing level of soil water allows you to avoid its vertical displacement during winter heaving of the soil.
When glazing, it is important to accurately calculate the load on the load-bearing element. The durability of the extension depends on this.
Constant (useful) and temporary (snow) loads should be taken into account. Based on the possible pressure on the roof and the size of the building, the number of supports, the distance between them, and the total amount of materials are calculated.
It is important to leave a gap of 40 mm between the extension and the home. Such a gap will protect the veranda from distortion, which can occur due to the difference in weight and settlement of the buildings. Another requirement is the same depth for the main and additional foundations. The protrusion of the base beyond the walls in width is at least 10 cm (with the exception of the side adjacent to the dwelling). Taking these points into account, markings are made for the future veranda. The area is cleared of vegetation, the soil is leveled, and the outer corners of the site are marked with pegs.
Of great importance is the same depth of laying the foundation supports and a uniform load on them.
Compliance with foundation construction technology is the key to reliable operation of the premises. Here, arbitrary calculations, ignoring terrain features, and using inappropriate materials during construction are unacceptable. This leads to uneven shrinkage of the foundation and the appearance of cracks on the adjacent wall.
Self-taught craftsmen often make mistakes in their work. But you don’t have to do the calculation yourself. Ready-made drawings of verandas are available on the Internet. A drawing that meets all the rules can be ordered from the company. Of course, the services of specialists involve additional costs, but it pays off.
Windows for a terrace should weigh little, because such a platform is usually built on a light foundation. Aluminum systems meet this requirement. If the foundation is strong, the choice of glazing expands. These can be PVC frames or portal structures.
Photo of the veranda attached to the house
Legalization and design
Before construction, you need to make calculations and make a drawing.
Any building on a site, even your own, must be legalized and entered into a unified real estate register. The covered terrace to the house made of timber is no exception.
The package of necessary documents is small, collecting it is not difficult:
- site diagram indicating all buildings;
- design of a gazebo indicating communications;
- application requesting construction.
You will need to coordinate your plans with the architecture department, BTI, fire supervision and SES. Variations of this procedure depend on the conditions established in a particular region. In one case, you will have to do this yourself, in another, the management company will do everything.
There are no legal regulations regarding the parameters of the gazebo. When designing, you should take into account the criteria that will make the future structure as convenient, efficient and beautiful as possible.
It is recommended to adhere to the following sizes:
- area - 3-4 m² per person;
- depth - at least 2.5 m;
- height - from 220 cm;
- width - from half to full size of the facade.
You should choose an extension that will be in harmony with the house in all respects. This applies to the dimensions, shape, color and configuration of the roof. After making the final decision, you need to make a project thought out to the smallest detail.
The document includes the following data:
- foundation;
- entrance group (steps, stairs, door, canopy);
- platform;
- walls;
- handrails;
- ceiling;
- window;
- rafter system;
- roofing material;
- electric wires;
- switches, sockets, lamps.
The entrance to the room can be from the side or from the facade. One option is the absence of a door to the street, when the extension is a spacious analogue of a loggia.
Care and instructions for use
A wooden veranda requires regular maintenance and careful use. This is justified by the characteristics of the natural material, which is susceptible to dampness, flammable, and attractive to insects.
The recommendations are as follows:
- regularly treat wood with an antiseptic and fire retardant;
- avoid using open fire indoors;
- periodically cover the frame and floor with decorative paint or varnish.
The rules are simple, but following them will save the veranda from destruction and ensure its long service life.