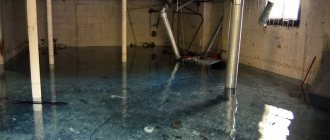
Cellar flooding is a very pressing problem for places with high groundwater levels. If the cellar was built quite a long time ago, then most likely without following certain rules for waterproofing.
The construction of cellars at high groundwater levels is, of course, permitted, but it is necessary to follow some rules and recommendations that will ensure trouble-free operation of the storage facility for many years.
How to choose a place
Choosing the right location for a building is key and the following factors must be taken into account when inspecting the site:
The greatest elevation and dryness, so that the cellar does not flood or is exposed to water as little as possible.
A slight spring rise in groundwater is normal, but it should not come to the surface from above the area of the proposed cellar.
Convenience of approach, because in winter, in order to get the harvest, you will have to dig a path to it or wander through at least waist-deep snow.
The pliability of the soil so that it is soft enough for digging, because if during excavations you unexpectedly stumble upon a rock close to the surface, all the work will go down the drain, but at the same time it will not look like swamp slurry.
The fourth factor is, of course, aesthetic. The appearance of the cellar should not disturb the overall harmony, so it is necessary to either install it in the right place or resort to design.
Determining the groundwater level
If in swampy or low-lying areas the close passage of groundwater does not surprise anyone, then flooding of the cellar in dry areas can be an unpleasant surprise for the gardener.
Groundwater is a rather unpredictable thing: it can not only accumulate in lowlands, but also flow down from the mountains or rise to the surface when the snow cover melts.
Therefore, so that the funds and effort spent on construction are not in vain, it is necessary to check their availability in advance.
Finding out the level of groundwater is not at all difficult, and the verification operation must be carried out during the flood period, when they come as close to the surface as possible in order to protect against unexpected spring flooding.
To work, you only need an ordinary drill no shorter than two meters (the average depth of a standard cellar) or, as it is popularly called, a brace and a rod made of any material of the same length.
With this drill, a simple hole is drilled to the maximum depth, which is left for a day, after which it will be necessary to determine the result.
After the required time, a rod is immersed in the hole, the moisture content of which at a certain length from the ground will indicate the depth of the flooding.
If the rod remains completely dry, this is a great success, meaning that the site is completely dry and ideal for construction, however, more often than not, water is present at some level.
When assessing the result, it is necessary to remember that also in a day, like a test well, the pit dug for the cellar will be filled with groundwater to the same depth.
We recommend watching a video on the topic:
Therefore, in order to avoid diving during construction when the water level is too high, you must either choose another location or purchase a special drainage pump (not to be confused with a regular water pump) for the duration of the entire construction.
Which material to choose
If the gardener nevertheless decides to build a cellar on an area with close groundwater. He needs to remember that moisture, one way or another, destroys all materials faster, just some more, and others less.
Under no circumstances should you use wood or brick for construction, as the wood will instantly rot and will not keep moisture from penetrating inside.
And brick, despite its apparent strength, crumbles very easily and is destroyed by moisture, and due to its porous structure it allows dampness to enter. For obvious reasons, the option of building an earthen cellar should not even be considered.
It is better to use modern materials specifically designed for such cases, for example, waterproof cement brands that can harden even under water.
Such cement will cost twice as much and will probably have to be ordered, but it will simplify construction as much as possible and prolong operation, but simple cement or concrete blocks will also be suitable, although they will deteriorate over time.
Stone is the strongest material, but its use is not considered, since few people can find so many natural stones of the desired shape and size near their site, and the very construction of walls from it requires certain construction skills.
Wiring
Due to constant humidity, the cellar is classified as a high-risk area, so the electrical wiring is installed according to strict rules:
- sockets are located outside the basement in a dry room;
- cables are laid only openly in corrugated channels or boxes; metal pipes cannot be used;
- luminaires must be sealed to avoid condensation.
It is recommended that you consult a professional electrician before installing wiring.
Cellar design
For the construction of a cellar, there are several options for its design, but if the groundwater is located close to the surface.
The ideal option would be a semi-buried cellar, which will not be completely covered with water, is better ventilated, and is easier to build.
Since the depth of the flooded pit is much smaller, and in the summer it is easier to warm it up and dry it both inside and out.
The design of a semi-buried cellar is a building submerged only half below ground level, and well insulated on top and covered with the same soil.
How to prepare a place
After checking the level of flooding in an area, many people think hard about how to make a cellar if there is groundwater nearby and whether this can even be done.
Theoretically, it is possible to build a cellar even under water, the main thing is to carry out the construction process correctly and choose the right waterproof materials.
When building a cellar in an area with high groundwater levels, it is necessary, first of all, to arrange good drainage, which is especially important if the future building is not a monolithic concrete sarcophagus.
Before drainage begins, the area that will go under the cellar is marked out and a pit is dug.
If the water level in it is too high or it rises too quickly, it is necessary to pump out the water using a special drainage pump.
At the same time, keeping an eye on the walls and bottom of the pit, since draining too quickly can lead to swimming and erosion of the walls and the bottom itself.
Next, the process of arranging drainage begins, which can be done both externally and internally.
Measures to prevent flooding
Of course, not everyone will decide to build a cellar on high groundwater, knowing about possible problems. But even where they lie deep, and it would seem that nothing threatens your basement, flooding is not at all uncommon. This is due to surface (atmospheric) waters, which, when they get into the backfill sinuses, stagnate there.
- In this case, the bulk soil is eroded, and water, finding no other way out, seeps through the base and walls into the cellar. Most often this happens when construction is carried out on clay soils. This category includes loams and sandy loams: plastic and dry clays, quicksand, as well as marls containing clay.
The red color of the soil indicates the presence of clay.
Attention! Those who have exactly these types of soil on their site need to be on alert and take measures that will ensure timely drainage of water. The whole problem is that the high density of the clay gives them water-resistant properties: surface water seeps through it very slowly - so it finds its way into the cellar.
- Precipitation also has a great influence on groundwater levels. During the season of melting snow and prolonged rains, it generally directly depends on the amount of precipitation. It may well happen that when the foundation pit was being built, the soil was dry, without even a hint of groundwater, and in the spring or autumn - a surprise: the basement was flooded.
- Therefore, it is necessary not only to find out what type of soil you will have to deal with, but also to measure the depth of groundwater in it. This must be done in the spring to find out the highest level.
We have detailed instructions on our website explaining how to measure the water level yourself - we recommend reading it. Although, sometimes even without reconnaissance it becomes clear that water is close. In such areas, the grass is thicker, and the plants grow mainly in swamps, and there are a lot of midges, since they swarm where it is humid.
Drainage as the most reliable method of protection
A very important preventive measure that can save a basement from flooding is a specially equipped drainage system, which is commonly called a drainage system (see Drainage systems for draining groundwater: types and applications). It does not have to be a ring drainage with a storage tank and pumping equipment.
Laying drainage: building a cellar - high groundwater
So:
- Even a network of drainage trenches will help drain backwater and eliminate the need for multi-layer waterproofing - at least if the problem is only in surface water. If a cellar is being built when groundwater is high, then the drainage system can be considered the most reliable protector of a buried structure.
- At the same time, drainage pipes (drains) are laid in trenches dug around the perimeter of the basement. The pipe does not come into contact with the ground: there is a layer of gravel and geotextile between them - which is what we see in the photo below. Entering the drains through perforations, water moves by gravity towards the slope, into the common pipeline, and then into the storage well. From there it is removed by means of a drainage pump (see Pumps for pumping out groundwater: which is better), which is automatically triggered by a signal from a level sensor.
Multi-layer filter around the drainage pipe
- Retaining water can also be discharged into a ditch or ravine - this depends on the area. And only when constructing a basement in sandy soil there is no need for additional drainage at all, since sand itself perfectly drains moisture. It should be said that in situations where water is close to each other, the ring drainage system also does not provide a 100% guarantee, so you should not relax.
- The most important thing in this situation is to correctly decide on the design of the cellar, as well as choose its location. In order to avoid wetting the pit and disturbing the structure of the soil around it, the construction time for the basement should be as short as possible - otherwise the cost of construction may be too high.
External drainage
Along the entire perimeter of the future structure, it is necessary to dig drainage trenches about 40 cm wide, preferably 20-30 cm below the proposed base.
It is necessary to dig trenches at a slight slope so that the water drains faster, and to make digging easier and the bottom does not wash away, you need to dig so that the shovel goes towards the flow of water.
Then, at the bottom of the trench, a compacted sand cushion is created, which is covered with geotextile to prevent mixing of layers.
It is important to remember that some inexpensive types of geotextiles conduct water in only one direction, which must coincide with the direction of water flow in the trenches.
Larger drainage material in the form of pebbles, expanded clay or crushed stone is laid on top of the geotextile.
Special drainage pipes made of asbestos or polymers, equipped with holes on top or on all sides, are laid in prepared trenches and connected into a single system.
The number of trenches and the size of the pipes must correspond to the amount of water in direct proportion. Pipes with one-sided perforation are laid with the holes down.
If there is too much groundwater, then it is likely that at the place of its main exit from the drainage pipe system it is necessary to dig a special reservoir into which it will flow during a flood or after rains, and then seep out of it back into the ground.
The storage tank will also have to be protected from the soil sliding with geotextiles, concrete walls or a large plastic container.
When filling drainage trenches with pipes, the operation is repeated: first sand, then geotextiles, then gravel.
The area under the bottom of the cellar is leveled with gravel. The advantage of external drainage is that it removes water before it reaches the structure, but requires a little more excavation.
Internal drainage
Internal drainage is a worse option, which does not allow moisture to rise above a certain level and is carried out along with the installation of the base.
Drainage channels are laid in the floor of the base, increasing its thickness, while they are arranged in exactly the same way as in the first case, observing the drainage layers and arranging the storage tank.
If flood waters rise too high in an area, then a combination of two methods would be the best choice.
External drainage will drain water under normal conditions, and internal drainage will save you if the situation gets out of control during a flood.
In order for water to flow better from the groundwater storage tank, you can install a pump with an automatic float sensor that discharges water to the sewer or outside the site.
Ventilation device
High-quality ventilation will prevent the formation of mold, rotting of root crops and ensure optimal humidity in the cellar. Otherwise, only souvenir photos will be left of the harvest.
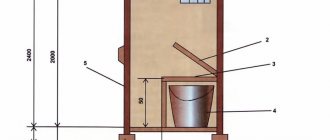
You will need two plastic or galvanized pipes with a diameter of 15 cm. One pipe will provide air flow, and the second will provide exhaust. Exhaust occurs naturally when there is a difference in air temperature between the cellar and the street. The pipes are located in different corners of the cellar.
Cellar ventilation
The exhaust pipe is installed under the ceiling of the cellar, the upper end is located 50 cm above the roof level. The supply pipe is mounted 10 - 15 cm above the floor level, the upper end is located 30 cm above the ground level. Valves are installed in the pipes to regulate air flow and meshes to prevent rodents from entering the room from the street.
For large cellars, the cross-section of the pipes is calculated using the formula; it is possible that forced ventilation will even be required.
Making the bottom
The bottom is a very important element, representing both the floor and the foundation of the future cellar. A lot will depend on the correctness of its construction.
Whatever the method of drainage and the level of groundwater (even if there is none at all), the base is prepared in exactly the same way as for drainage pipes: compacted sand, geotextiles, and then a coarse fraction.
Then the formwork is assembled for the future concrete slab, the bottom and walls of which are lined with roofing felt or film, which will not allow water to escape from the cement into the ground during pouring until it hardens.
The thickness of the lining should be about 20 cm, and it must be reinforced, otherwise the floor will crack due to ground movements, especially characteristic of flooded areas.
Pouring also needs to be done at the same time, if possible, so that the concrete sets all at once, otherwise the slab will not be monolithic, will quickly collapse, and will also be able to allow moisture to pass through.
Cement for the floor must be taken of the highest quality possible, for example, M300, and when pouring it, use special additives that provide a water-repellent effect.
The floor in the basement pit will take much longer to dry, so it will be possible to erect walls no earlier than after 28 days.
DIY installation of shelves in the cellar: photos and instructions
Shelves and racks are integral elements of any cellar and basement. There are several types of cellar racks, which can be bought in specialized stores, but it is much easier and more economical to make them yourself. The most popular options are the following:
- Wooden shelving is one of the most common answers to the question of what to make a shelf from in the cellar. The material is environmentally friendly and easy to use, and for shelving it is best to use timber with a cross-section of 100x100 mm and boards 3-4 cm thick. The installation scheme is very simple - racks are made from timber, in which sockets are cut to secure the shelves. In order for wooden shelves to last longer, they are impregnated with special compounds;
Installation dimensions of a wooden rack for a cellar.
- Concrete shelving is a good option if you want to know how to make your cellar shelves as durable and moisture-resistant as possible. To create concrete shelves, you can use reinforced concrete slabs or niches in the walls that are filled with concrete screed;
- shelves made of steel angle – used in rooms with low humidity levels, otherwise the structures can very quickly begin to rust. In order to make a shelf in a cellar for cans, as a rule, a welding machine is used, but you can get by with simple self-tapping screws. First, frames are made from metal slats, then shelves are attached to them;
- plastic shelving is one of the most economical and simple options, which is distinguished by its attractive appearance and resistance to moisture. However, plastic does not tolerate low temperatures quite well, so it cannot boast of durability.
Helpful advice! When wondering how to make a shelf in the cellar with your own hands, and what material to choose for this, consider the level of humidity in the room, as well as the average weight of the cans and boxes that will be stored on the racks. Concrete can easily withstand even very heavy loads, but plastic cannot boast of this.
There are wooden shelves along the walls of the cellar.
From the same materials you can make boxes for potatoes in the cellar. As a rule, they are equipped with removable covers, which are installed if necessary. Regardless of what material you choose, in the warm season it is recommended to take shelves and drawers outside to dry. This will prevent the occurrence of mold and the proliferation of pathogens. When the construction and interior arrangement of the cellar is completed, you can think about the exterior decoration of the above-ground structure. Its option depends solely on your preferences - you can simply pour an earthen mound, or you can decorate it with turf or ornamental grass, turning it into an element of landscape design. During the process of building a cellar with your own hands, use video and photo instructions that will help you take into account all the nuances and arrange a practical and functional room.
Walling
Building walls is one of the simplest tasks: they are simply built to the required height from the selected material.
If the walls are assembled from individual bricks or blocks, then a water-repellent additive must be added to the cement mortar for the joints, prepared from the same cement, that was used to fill the bottom.
Monolithic walls should be filled with the same composition as the bottom.
However, for better waterproofing, it is much more convenient to build walls from blocks, since they can be coated on the outside with special liquid rubber, which causes the material to absorb water and collapse.
It also wouldn’t hurt to cover the finished walls with a layer of waterproofing.
Ceiling
The roof for a cellar is usually made of less durable materials, since it is not constantly in water, unlike the walls and floor.
To equip it, you can use at least a slab, and at a maximum, timber, which will be treated with an antiseptic against fungus (copper sulfate is also suitable).
A layer of clay is compacted on top, which in turn is covered with waterproofing material, which can be ordinary roofing felt, and filled with soil taken from the foundation pit during construction.
If winters in the region have little snow or the snow cover is blown away by the winds, you can additionally insulate the roof with a layer of dry leaves or sawdust.
Backfilling of the roof must be done after installing the ventilation pipes.
Insulation
During severe frosts, the cold penetrates into the room through the weakest points - hatches, doors, insufficiently insulated walls and ceilings. If frost is periodically detected somewhere inside the cellar, then the thermal insulation is not coping with its function.
In underground basements, the entrance area and ceiling most often freeze. For insulation, you can use polystyrene foam, polystyrene foam, polyurethane foam, securing them to the surface using dowel bends or glue and filling the joints with polyurethane foam.
Polymer materials have very low thermal conductivity and are not afraid of moisture. Their only enemy is rodents. To protect the insulation from mice and rats, it is recommended to cover the materials with a fine-mesh metal mesh.