Today we will find out what influences the choice of location of the stove in the house.
Where to place the stove in your home
- 1 Things to know before choosing a location. General provisions
- 2 Where to place a brick oven. Basic recommendations
- 3 How to place the stove for maximum heat transfer?
- 4 Methods for installing brick kilns according to the layout 4.1 Option one. How to choose a place to heat several rooms at the same time
- 4.2 Option two. How to choose a place for the stove if only one room will be heated
- 4.3 Video - Laying a brick oven
- 4.4 Option three. How to choose a place for a metal wood-burning stove
- 4.5 Video – Secrets of the furnace business
Types of furnaces
In our country, many types of furnace equipment are built and operated; we list some:
- Swede
- Dutch
- Baby
- Heating and cooking
- Fireplace
- Stove with fireplace.
Types of stoves
Despite the difference in design, all stoves are characterized by the following parameters:
- Purpose.
- Maximum oven heating temperature.
- Duration of fuel combustion.
- The time required for the structure to warm up and begin full heat transfer.
- Smoke exhaust device.
- Scheme of the movement of warm gases through channels arranged in the furnace body.
- Oven shape.
- Options for finishing external walls.
- Material used in the construction of the furnace.
Stoves installed in homes have ancient traditions. Our distant ancestors cooked food on it, heated their homes with it, and used it as a sleeping place.
Fire safety requirements (FPR)
The PPB requirements stipulate the conditions under which correct installation of any type of furnace equipment is possible. To a greater extent, they relate to the protection of the floor and walls of the building from accidental fire (due to contact of wood with hot surfaces).
The following protective measures will ensure the safety of housing and people:
- The use of special fire-resistant materials that protect the walls and ceiling in the area where the stove and chimney are located (if the house is two-story, the ceiling between floors should also be protected);
- Impregnation of elements of wooden structures bordering the hot parts of the furnace with special compounds.
Compliance with all fire safety requirements and proper use of fire protection equipment is the main condition for the safe operation of home heating equipment.
Russian brick stove
The Russian brick stove has the following specific advantages:
- maintaining heat in the home due to long cooling;
- the ability to maintain heat in a room of any size;
- fire resistance.
Meanwhile, these devices also have a set of certain disadvantages:
- To build a furnace, you must have certain skills and knowledge, which is why it is advisable to invite specialists to construct it.
- To build a furnace, it is necessary to first build a separate, buried foundation.
- The oven is quite large in size and can take up quite a lot of space.
- This circumstance must be taken into account when determining the location where the stove will be installed.
Russian brick stove
For the manufacture of stoves, two materials are used - metal and brick (plain red, and fireproof, also called fireclay).
A stove for a house made of wood, for the manufacture of which I use steel or cast iron, the thickness of which is from 3 to 5 mm.
The wall of this design consists of two layers of metal. There is an air gap between them. This layer is designed to protect the room from so-called thermal shock.
How to cover the walls and ceiling when installing an iron stove
Stone panel
How to protect wooden walls from a stove in a house is determined by the style of the room, purpose and budget. Finishing does not exclude the construction of a protective screen. But if the stove is located far enough - 100 cm, it is allowed not to install thermal insulation, but to select a finishing material.
- The most obvious solution is to treat this part of the wall with fire retardants. This does not provide a 100% guarantee, but it reduces the potential for fire.
- A panel made of natural or artificial stone looks beautiful.
- In a room in a loft, techno or rustic style, facing with brick - textured or facing - is quite suitable.
- A sheet of plasterboard provides sufficient protection.
It is prohibited to use flammable coatings for finishing, such as oil impregnation, varnishes, or oil wax.
Metal oven
Metal stoves have the following advantages:
The homeowner has the opportunity to purchase a finished stove, which includes a chimney, equipped with a temperature control system.
Advantages of a metal stove:
- Furnaces made of metal can have an interesting appearance.
- Fast heating, which allows you to warm up the air in the room to the specified parameters in an extremely short time.
- High thermal output.
- Long service life.
- To perform its functions, the stove can use any existing fuel.
Metal stove
But stoves made of metal also have some disadvantages, among them the following:
They are not suitable for use in large areas due to high fuel consumption.
Fast heating means fast cooling.
Metal stoves are classified as fire hazardous objects and the operation of the stove must be constantly supervised, and a fire extinguisher and other fire extinguishing means must be within reach.
If low-quality metal was used to make the stove, then after the first heating it may become deformed.
Advice from professionals
If the stove is mounted in a wall, it is sealed with brick.
Steel and especially cast iron stoves can have a very beautiful design. Such products should not be covered with bricks or protected with a screen. You need to worry about their successful placement in advance.
- A structure for heating several rooms can be placed directly in a wall or partition. This installation is more complicated and requires bricking.
- When installing the stove and chimney, carefully ensure that all structural components are freely accessible. There should be no difficulty in cleaning and inspecting the elements.
Heating a wooden building with a metal stove is a completely rational solution for a country house or cottage. The structures are light, compact, and very effective, but during installation a number of rules must be followed.
Construction of a classic fireplace
Fireplaces installed in modern homes have combined all the best from those that were used in the Middle Ages and Russian stoves, which release heat into the home with high efficiency.
Fireplaces can be used not only as a source of heat, they can decorate the interior of the room where it is installed.
Construction of a classic fireplace
Fireplaces installed in modern homes have the following number of properties:
Cain can be installed directly into the wall, and those that are installed next to the wall. There is another way to install it in the form of an island.
Fuel port type. Fireplaces can be open or closed. The first option is a classic design with an open firebox; in the second version, this hole is closed with doors.
The type of fuel used is coal, gas, electricity.
The design of the fireplace directly affects the efficiency. Thus, the efficiency of an open fireplace is 15%, the closed type shows an efficiency of 70 - 80%. A closed fireplace can act as the only source of heat in the house.
Every homeowner can build such a structure in his home; this requires certain knowledge, a set of tools and the ability to work with them.
Some details need to be paid special attention:
- design and construction of the base (foundation), the larger the size of the fireplace, the larger the base should be;
- chimney design;
- volume of construction and finishing materials
- appearance of the structure as a whole;
- fire safety, fire safety measures must be provided at the design stage;
- Tools that will be necessary when performing construction work.
- trowel for working with mortar;
- hammer-pick for cutting bricks;
- jointing used to seal the seam;
- building level and plumb line, square;
- container for preparing a solution and soaking clay.
Video description
This video clearly shows an example of violation of the rules for installing a sandwich chimney:
- The position of the pipe is not observed. It is installed strictly vertically. When insulating main walls with foam plastic or mineral wool, long dowels are used to secure the chimney.
- There is no ebb on the side roof slope. In this case, precipitation can get on the insulation and impair its functions.
- Insufficient overall vertical height. This error leads to poor traction.
Problems arise when using low-quality insulating material. Cheap insulation shrinks over time, so there is a possibility of local overheating of some parts of the chimney.
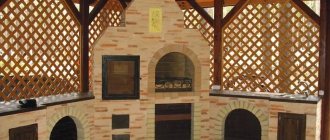
Where is the best place to put a stove in a wooden house?
As a rule, the location for installing the stove must be determined at the design stage of the house. This is necessary in order to ensure efficient heating of the house and make it as safe as possible. What criteria should a homeowner be guided by when planning where to install a future furnace?
Where is the best place to put a stove in a wooden house?
The heat source can be installed in rooms whose area is at least 16 sq.m. the installation must be carried out in such a way that there are no floor beams under the stove intended for installing floors. And at the place where the chimney exits there should be no ceiling beams or rafters.
To reduce the size of the chimney pipe, it makes sense to locate it in the center of the house. In this case, the chimney will exit onto the roof near the ridge of the roof. Construction of a stove in close proximity to the wall is impractical, since a significant part of the heat will be directed to heating the street. In addition, placing the stove near wall structures increases the fire hazard. Based on the above, we can conclude that placing the stove in the center of the room would be optimal.
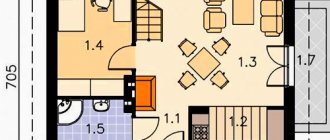
A wood-burning stove will be at its most efficient if heat is transferred from all its surfaces. This design can easily cope with heating one or several adjacent rooms. This can be taken into account when placing rooms at the planning stage.
To provide heat to adjacent rooms, the stove is installed between rooms in a partition. In order to keep it warm in a four-room house, it is best to install it at the junction of the partitions so that one of the walls of the stove opens into the room. With this arrangement, it is possible to organize the exit of the firebox to the kitchen.
Wood processing
The most common protective agents include special impregnations (fire retardants) and transparent mastics. The following elements of wooden structures are usually processed by them:
- ceiling beams;
- floorboards in the area where the stove is installed;
- walls adjacent to it.
Additional Information! When choosing products, you must keep in mind that mastic has a higher fire protection rating than colorless impregnation.
Fire retardant treatment of wood elements can be carried out not only by representatives of the Ministry of Emergency Situations, but also by the owners of the house themselves. In the second case, they will need to obtain a special certificate confirming the correct installation of the stove.
Foundation for the stove
If you want to build a fireplace in your home, then first of all you need to think about arranging a foundation for it. A properly executed foundation will ensure its long-term and safe operation. In case of negligence or mistakes made, it will undoubtedly lead to deformations, subsidence of the fireplace, and the appearance of cracks.
The main requirements for the foundation can be defined as follows: reliability and lack of connection with the foundation of the entire building.
The optimal solution would be to build a capital foundation, and it can be built simultaneously with the construction of the foundation for the main building. At the same time, creating a single foundation is unacceptable. The thing is that each foundation is designed for a certain load and as a result they have different shrinkage.
There must be a gap of at least 50 mm between them; it must be filled with sand or other bulk material and compacted thoroughly.
The dimensions of the foundation in plan should be larger than the size of the base of the fireplace. That is, it should protrude from the fireplace by 100 - 150 mm. The depth of occurrence depends entirely on the properties of the soil. Practice shows that for a one-story house it is enough to deepen the fireplace foundation by 0.5 - 0.6 m; if the house is higher, then the depth should accordingly be greater - up to 1 m.
Video description
Video example of professional installation of a metal fireplace in a finished wooden house:
All work can be divided into main stages:
- Construction of the foundation. It is isolated from the foundation of the house, but is poured simultaneously with the latter even before the construction of housing begins. If it is necessary to introduce a fireplace into an already completed structure, craftsmen remove the floor covering and dismantle part of the ceilings. The depth of the pit should reach the freezing line of the soil; a layer of crushed stone and broken brick is formed at the bottom. The finished height of the formwork should exceed the floor level by 10 cm. When pouring the solution, reinforcing ligaments are used, leveled, and waterproofed after hardening.
- Preparing the walls. They are sheathed with insulating materials, often in multilayer form. The sheets are fixed on metal guides, the joints are sealed using adhesive foil tape. An alternative solution for insulation could be additional brickwork laid flush against the wall.
- Fireplace assembly. The masonry is carried out according to the project, starting from the base, using a special heat-resistant mortar. The internal surfaces are formed from refractory bricks, the rest from solid bricks. The components that form the firebox and door are gradually introduced.
Assembling a fireplace in a wooden houseSource et.aviarydecor.com
Formation of the chimney. It can be internal, passing through the ceiling up to the roof, or external, removing combustion products from the fireplace. In the first case, a combination of two pipes inserted into one another is used
At this stage, special attention is paid to sealing.
Floor finishing. The space around the fireplace with a radius of up to 150 cm is protected using non-combustible materials - marble, porcelain stoneware, facing tiles.
A budget finishing solution is metal sheets. But over time they become uneven and give the room a utilitarian look.
Channel and ductless furnaces
Channel and ductless furnaces
The peculiarity of channel furnaces is that their design includes channels made in horizontal and vertical planes. Heat moves through them, which in direct-flow structures simply goes up. It should be understood that the movement of heat through the channels may be difficult. Therefore, the design of the furnace provides for the presence of elbows. To prevent stagnation of warm air, certain devices are installed that regulate combustion modes. There is a summer mode, during which the stove warms up and after that you can switch to full heating.
Briefly about the main thing...
Chimneys can be single- or double-walled. Based on the material of manufacture, metal, brick structures and structures made of sandwich pipes are distinguished. The last option is optimal for private houses. When installing a chimney, the rules for its placement in the room are observed. Its functionality, as well as the presence of draft in the heating equipment, depends on the correct determination of the diameter and height of the structure.
The installation technology through a wooden and brick wall is the same, but there are some nuances: wood is more susceptible to ignition and requires maximum protection.
During installation, you must comply with fire regulations, and also take into account possible errors. Date: September 25, 2022
How to properly heat the second floor
Supplying heat to the second floor of a house is a rather difficult task. As an option, you can consider installing a fireplace equipped with additional equipment. The fireplace has a number of advantages. Among them are the following:
- ease of operation;
- small sizes;
- use of almost any fuel.
How to properly heat the second floor
In fairness, it should be noted that most of our people consider it a luxury item, but this design is capable of combining democracy, aesthetic properties, and excellent performance of its main task - heating the room.
Heat supply to the second floor due to air convection. That is, passing by a heated fireplace wall, the air receives thermal energy and continues to move upward through a special box. Warm air is supplied to rooms located on the second floor through air ducts, which must be covered with thermal insulation. This is necessary to minimize heat losses and ensure fire safety.
Service life of the external chimney
The service life of the structure depends on the material of its manufacture and correct installation. When used correctly, ceramic pipes will perform their function for up to 40 years. A brick chimney can be used for more than 50 years. Stainless steel will have to be replaced after 15-20 years, but it all depends on the thickness of the metal. Galvanization has the shortest service life: up to 10 years.
The durability of the structure is affected by the heating temperature of the exhaust gases. A high-quality sandwich system will last up to 20 years. Structures last longer if heating equipment runs on gas or pellets.
Self-installation of a Russian stove
To build a classic Russian stove, you will need about 1,650 bricks, a valve with dimensions of 260 by 240 mm and a certain volume of clay and sand, which is enough for 80 buckets of mortar.
Self-installation of a Russian stove
To carry out the work, it is necessary to use red bricks; fire-resistant (fireclay) bricks are used to lay out the firebox. When doing masonry, you must remember that the seams that are formed during masonry should be small. no more than 5 - 7 millimeters.
Each level must be laid using a building level and a plumb line. This determines how well the oven will be installed as a whole.
The construction of the stove must be carried out in accordance with the requirements of the order. This is the name of the diagram, which indicates the placement of bricks in each individual row. Such orders exist for almost all types of Russian stoves.
It should be noted that laying a stove is a rather complex construction process and requires a highly qualified mason. It’s not for nothing that there is a separate specialty for stove makers. And to build a stove at home, it is better to invite just such a specialist.
Manufacturing recommendations
The easiest way is to make a small portable stove with your own hands - the Robinson rocket, whose drawing is presented below. You will need cutting profile pipes, metal for legs and stands, as well as welding skills. Moreover, compliance with the exact dimensions indicated in the drawing is not necessary. You can take pipes of a different section, but you just need to reduce or increase them proportionally so that the parts fit together.
Drawing of an improved “Robinson” camping stove with nozzles made of a profile pipe, cut lengthwise into 2 parts
The most common versions of large rocket stoves are made from a gas cylinder or a two-hundred-liter metal barrel. You must understand that these ready-made elements are used as an outer hood, and the internal parts of the stove must be made from pipes of smaller diameter or laid out from fireclay bricks. Moreover, from a cylinder you can make both a stationary heater with a small bench, and a unit that can be moved.
Please note that calculating the thermal power of a rocket-type furnace is quite difficult; there is no single calculation method. It’s easier to rely on ready-made drawings of already working samples and assemble according to them. You just need to compare the dimensions of the future stove with the dimensions of the heated room. For example, to heat a small room, the size of a cylinder is enough; in other cases, it is better to take a large barrel. The selection of internal parts for them is shown in the diagram:
2 options for potbelly stoves - from a gas cylinder and a standard iron barrel
Stove rocket from a cylinder
In addition to the gas cylinder itself, to assemble the stove you will need:
- profile pipe 150 x 150 mm for the firebox and loading hopper;
- steel pipes with a diameter of 70 and 150 mm will go to the internal vertical channel;
- the same with a diameter of 100 mm for the chimney;
- insulation (basalt fiber with a density of at least 100 kg/m³);
- sheet metal 3 mm thick.
For a master skilled in welding, this work will not be particularly difficult. The top of the cylinder should be cut off along the seam, after first unscrewing the valve and filling it to the top with water. Openings are cut on both sides for installing a firebox and inserting a chimney. A profile pipe is inserted and connected to a vertical channel, which is discharged through the bottom of the cylinder. Further work on the manufacture of the rocket furnace is carried out in accordance with the drawing:
At the end, the upper part must be welded into place, then carefully check all seams for permeability so that air does not flow uncontrollably into the oven. After this, you can attach a chimney with a water jacket (if available) and begin testing.
Masonry of a rocket-type heater made of bricks
This stove option will require the purchase of fireclay bricks; ordinary ceramic bricks will not work for a rocket stove. The masonry is done using fireclay clay mortar; it is also sold as a ready-made building mixture. How to make a stationary rocket stove:
- First you need to dig a hole, compact the bottom and pour a foundation measuring 1200 x 400 mm and 100 mm high, as shown in the photo.
- After hardening, the foundation is covered with a sheet of basalt cardboard and the combustion chamber, a bunker for loading firewood and a vertical channel are laid. A door is installed at the end of the combustion chamber to clean the ash pan.
- After the clay has dried, the pit is filled up, and a pre-selected pipe or small barrel with a diameter of 450 mm is placed on the vertical channel. The gap between the brickwork and the pipe walls is filled with fire-resistant insulation, for example, basalt wool, expanded clay, vermiculite.
- At the last stage, a cap made of a large metal barrel with a diameter of 600 mm is put on the structure. First, a cutout is made in its upper part and a pipe is installed to connect the chimney. When the barrel turns over, he will be at the bottom.
Then it’s a matter of technology; you can take the chimney directly outside or build another bench with smoke circulation. For this purpose, ordinary ceramic bricks and clay-sand mortar will do. The order of the brickwork of a rocket stove with a small bench is shown in detail in the video:
Based
Let’s say it’s impossible to place the stove directly on the floor. There is nothing to do, we need to lay the foundation for it. Typical diagrams of foundations for furnaces are shown in Fig. Don’t let the base for a brick stove go to the side: suddenly you will have to install a stove with an external firebox in a partition; its portal will take about the same amount of bricks as a Dutch stove of 3.5 bricks, and the requirements for uniform shrinkage of the base at the half-brick-thick portal are even stricter.
Typical foundation diagrams for furnaces
Both of these foundations have a common drawback: they require an opening in the floor. Meanwhile, installing a stove in a house, and even more so in non-residential premises, is possible without disturbing the supporting structure of the floor - if the stove is made of steel. Its requirements for uniform subsidence of the base are much more modest, and such a furnace can be installed on a pile foundation laid through the flooring. Brick cladding is not a hindrance here, because... An L- or U-shaped low structure will withstand the same tilt.
A diagram of the pile foundation of the furnace, which you can build with your own hands through the floor, is given above in the following. rice. The soil under the building should not be subsident, waterlogged, excessively heaving or peaty/silty. The first thing you pay attention to is the depth of the piles. It was chosen not only according to the standard freezing depth of the soil, but also to ensure the most uniform subsidence of the piles individually. Under a brick stove, the piles would have to be buried 2.3-2.5 m, which is unrealistic through the floor, but a metal stove on this foundation will stand securely.
Diagram of the device and procedure for constructing a pile foundation for a furnace through the floor
The second is cellulose (from the so-called ecowool) insulation. In this case, it prevents not only the floor from becoming damp, but also from ignition from sparks or coals. Ecowool is a non-flammable material. Moreover, when heated, it releases a large amount of vapor of latent water of crystallization, which is not unnecessary if there is a cavity under the furnace. Step by step, a pile foundation for a stove in an existing house is installed, as shown in pos. 1-10 fig.
Step 1
We prepare a steel supporting frame (grillage) according to pos. 1. It is better to take option B for planting it on the pile anchors: this way the piles will have to be positioned with a slight offset, but there will be no need to drill thick pieces of iron. Dimensions in plan – along the contour of the stove together with the brick lining/cladding + (7-10) cm around the perimeter.
Step 2
If the building does not have detailed and reliable construction drawings, it will be necessary to remove part of the finished flooring and, possibly, the subfloor to accurately determine the location of the joists and floor joists, pos. 2. A tedious task, but still better than excavating a room.
Step 3
We mark the places for the piles so that they are no closer than 70-80 mm to the joists and beams, and drill pioneer holes through both floor coverings, pos. 3.
Step 4
In the clean floor, use a compass drill to drill holes for the piles, pos. 4.
Step 5
We remove the clean floor and drill holes for the piles in the subfloor, pos. 5. If the subfloor for insulation is covered with expanded clay, etc., rake it to the sides and insert temporary shells made of rolled galvanized sheets into the holes. At the same step, we drill holes for the piles with a garden drill. If the house is on weak and/or loose soil (bearing capacity less than 0.7 kgf/sq. cm), you can use a TISE drill and lay a TISE pile foundation.
Step 6
We lay the pile foundation (item 6) using standard technology:
- We fill the wells with a sand and crushed stone cushion of 20 cm each. In layers of 10 cm, with a tamper, as expected.
- We insert clips made of rolled roofing material into pipes into the wells, align them vertically and cut them at the top at a level of +100 mm from the level of the finished floor. “For coolness” you can put asbestos-cement pipes on the clips, but you will have to cut them with a grinder with a squeal and a lot of dust. Piles made of steel pipes without concreting are unsuitable in this case, because too light to shrink sufficiently evenly on their own.
- We insert reinforcement cages into the well cages.
- We fill the pile cages with concrete (in layers of 15 cm with hydraulic compaction) and immediately wall up anchors made of 10-16 mm steel rod into their heads. If the rods are smooth, their lower ends must be bent in a U-shape and walled up to a depth of 15 cm. We do not bend anchors made of corrugated reinforcement bars, but wall them up to a depth of 30 cm. The upper ends of the anchors must protrude no less than the height of the grillage channel.
Step 7
Once the concrete has completely hardened (there is no need to wait for strength gain yet), we cut off the clips from the piles to the level of the subfloor and lay soaked ecowool around the piles 15-25 cm to the sides, or to the nearest joist, pos. 7. The layer of raw ecowool should protrude 6-8 cm above the joists.
Step 8
Using wet and still soft ecowool we restore the clean floor, pos. 8. Cut off the squeezed out excess insulation when dry.
Step 9
We arrange fire-fighting cutting; Coat the seams between the ceiling sheet and the piles with a solution of fatty clay and sand 1:1 or the like. fire-resistant composition. Next, we place a grillage on the anchors and weld them. We cut off the protrusions of the anchors. Then we place a steel sheet on the grillage (item 9) and weld it along the contour with clamps. From under the bottom to the corner you don’t have to cook it, it’s very inconvenient and won’t add strength to the structure. I would like to secure the steel flooring “for reliability” - you can use metal screws with conical heads on top.
Step 10
Using basalt cardboard, we lay a backing on the steel flooring for the brick furnace pad, as described above (item 10; see also below).
Furnace pillow
The brick pad of a metal furnace experiences a “thermal swing” greater than that of a brick furnace. Therefore, it needs to be laid in 2-3 rows with complete symmetrical bandaging of the seams in the row and between the rows, on the left in Fig. Bandaging a stove cushion of complex configuration in this way, especially with a portal, is far from easy. In this case, up to 2 untied seams are allowed, located symmetrically on both sides of the longitudinal axis of the pillow as close to its middle as possible; shown by green arrows in the center in Fig. An untied stove cushion (on the right in the figure) is a gross hack. After 2-3-5 years, the bricks of such a cushion can crawl out from under the stove, and cracks in it - a source of fire hazard - are guaranteed even earlier.
Correct and incorrect bandaging of masonry seams in a brick furnace pad
Waterproofing of 2 layers of roofing felt is applied to the stove cushion and again a backing for the brickwork made of basalt cardboard. The traditional option - waterproofing between the foundation and the cushion without a basalt backing - is designed for an entirely brick oven, because The cushion bricks in it begin to crumble later than the stove bricks. For a cushion under an adjustable metal stove, for safety reasons, it is necessary on the contrary, so that the pillow deteriorates faster than the stove body burns out.
Duration of combustion, heat retention
The duration of entry into operating mode depends on the frequency of operation of the furnace and its condition.
Freshly installed, new , very cool or “crying” wood stoves are heated in different ways, the scheme of actions changes depending on the situation.
Dry and constantly operated stoves, with proper preparation and ignition, enter operating mode in 13-15 minutes. After this, in order to save firewood, the air supply is reduced; the installed portion of firewood burns for about 40-60 minutes. Next, a decision is made on whether to add them (re-heat) or stop the furnace.
In the first case, the firebox door is carefully opened 30-40 minutes after the start of the active combustion process, loose and spreading wood stacks are straightened with a poker or an oblique log and covered with new rows of firewood (with the same gaps and free upper space). For the first 5-10 minutes after firing, the oven needs supervision and a possible increase in air flow, after which its operation is returned to optimal mode.
in adding a small portion (2-3 logs); if the house is sufficiently warmed up, in order to preserve heat, it is better to turn the stove off. In this case, the remaining unburnt coals are raked with a poker, and with the help of a damper and a blower, a minimum draft and a maximum flow of oxygen are established in the firebox.
After 10-15 minutes, the coals burn out completely and are left in the firebox until cleaned or raked with a scoop and extinguished in a bucket of water outside the house.
There is no point in keeping smoldering coals in the stove after the combustion process is completed; when the stove is open, heat escapes from the house due to excess draft; when it is closed, carbon monoxide can accumulate inside. At the very end, all oven dampers are closed.
Neoclassical
Even popular music has echoes of ancient motifs. The same can be said about the design, in which classic details are framed in a fashionable design.
This style is characterized by symmetrical lines, framed mirrors, arched openings, and antique accents. All this is complemented by fashionable finishing materials and accessories. Neoclassicism combines sleek modern details with traditional combinations.
Selecting the optimal heating scheme
First, let's determine what type of heating system we need - with natural or forced circulation. If you have a large two-story cottage, then you definitely need to choose a system with a pump. But if you have a small dacha in an area remote from central highways, a gravity-flow system that can operate without electricity may be suitable for you.
When making a final decision, it is important to remember that most homeowners prefer a two-pipe scheme with a forced operating principle
Design features
Stoves—fireplaces. The transparent window performs 2 functions. Through it you can observe the flame and control the degree of combustion of the wood. In this case, the fire does not reach the glass, and it does not get dirty.
With heat exchanger. Such a metal stove is installed in a country house if there are several rooms. The equipment is connected to a water circuit that covers the entire room.
Pyrolysis. Another name is gas generators. Their fuel is wood. The main drawback - rapid fuel combustion - is eliminated here. With a weak air supply, the tree smolders. The resulting pyrolysis gas enters the next chamber. Air is also supplied here. Mixing with it, a secondary combustion occurs and additional heat is released. The smoldering of fuel can be extended over time without reducing efficiency. The operating time of the heating furnace reaches 12 hours.
Convection. These are pyrolysis structures, additionally equipped with large-diameter pipes. They are open at both ends and pass through the firebox. During heating, convection currents arise in them.
Brick cladding
To get rid of the harsh radiation of the metal, the stove can be lined with brick. The work is carried out in the following order:
- A power calculation of the floor is required. The weight of the structure reaches 0.5 tons.
- The distance between the metal wall and the brickwork is up to 8 cm.
- If the floor is wooden, an iron sheet 4 mm thick and asbestos are laid on it.
- Concrete floors do not require additional preparation.
- The wall thickness is half a brick. It is placed on a mixture of cement and sand.
- In each row, holes are left at the height of the brick for air exchange.
Natural circulation scheme
To understand the principle of operation of the gravity system, study the typical diagram used in two-story private houses. Combined wiring is implemented here: the supply and return of coolant occurs through two horizontal lines, connected by single-pipe vertical risers with radiators.
How gravity heating of a two-story house works:
- The specific gravity of the water heated by the boiler becomes smaller. The colder and heavier coolant begins to displace hot water upward and take its place in the heat exchanger.
- The heated coolant moves along a vertical collector and is distributed along horizontal lines laid with a slope towards the radiators. The current speed is low - about 0.1-0.2 m/s.
- Dividing through the risers, the water enters the radiators, where it successfully releases heat and cools. Under the influence of gravity, it returns to the boiler through a return manifold, which collects coolant from the remaining risers.
- The increase in water volume is compensated by an expansion tank installed at the highest point. Typically, the insulated container is located in the attic of the building.
Schematic diagram of gravity distribution with a circulation pump
In modern designs, gravity systems are equipped with pumps that accelerate circulation and heating of rooms. The pumping unit is placed on a bypass parallel to the supply line and operates when electricity is available. When the light is turned off, the pump is inactive, and the coolant circulates due to gravity.
Scope of application and disadvantages of gravity feeding
The purpose of the gravity circuit is to supply heat to homes without connection to electricity, which is important in remote regions with frequent power outages. The network of gravity pipelines and batteries can work together with any energy-independent boiler or stove (previously they said steam) heating.
Let's look at the negative aspects of using gravity:
- due to the low flow rate, it is necessary to increase the coolant flow by using large-diameter pipes, otherwise the radiators will not warm up;
- in order to “spur” natural circulation, horizontal sections are laid with a slope of 2-3 mm per 1 m of the highway;
- healthy pipes running under the ceiling of the second floor and above the floor of the first floor spoil the appearance of the rooms, which is noticeable in the photo;
- automatic control of air temperature is difficult - for batteries you need to buy only full-bore thermostatic valves that do not interfere with the convective circulation of the coolant;
- the scheme is unable to work with heated floors in a 3-story building;
- An increased volume of water in the heating network implies prolonged heating and high fuel consumption.
To fulfill requirement No. 1 (see the first section) in conditions of unreliable power supply, the owner of a two-story private house will have to bear the costs of materials - pipes of increased diameter and cladding for the manufacture of decorative boxes. The remaining disadvantages are not critical - slow heating is eliminated by installing a circulation pump, lack of efficiency - by installing special thermal heads on radiators and insulating pipes.
Design Tips
If you have taken the development of a gravity heating scheme into your own hands, be sure to consider the following recommendations:
- The minimum diameter of the vertical section coming from the boiler is 50 mm (meaning the internal size of the nominal diameter of the pipe).
- The horizontal distributing and collecting manifold can be reduced to 40 mm, before the last batteries - to 32 mm.
- A slope of 2-3 mm per 1 linear line of the pipeline is made towards the radiators on the supply and the boiler on the return.
- The inlet pipe of the heat generator should be located below the radiators on the first floor, taking into account the slope of the return line. It may be necessary to make a small pit in the boiler room to install a heat source.
- On the connections to heating devices on the second floor, it is better to install a direct bypass of small diameter (15 mm).
- Try to place the upper distribution manifold in the attic so as not to run under the ceilings of the rooms.
- Use an open-type expansion tank with an overflow pipe leading outside and not into the sewer. This makes it easier to monitor when the container is overfilled. The system will not work with a membrane tank.
The calculation and design of gravity heating in a cottage with a complex layout should be entrusted to specialists. And lastly: lines Ø50 mm or more will have to be made of steel pipes, copper or cross-linked polyethylene. The maximum size of metal-plastic is 40 mm, and the diameter of polypropylene will be simply menacing due to the thickness of the walls.