You can remodel the stove with your own hands, however, to do this you need to understand the features of dismantling the old structure, the stages of constructing a new fireplace and its finishing.
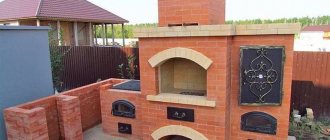
Sectional view of the oven
A stove inherited from your grandmother can be converted into a fireplace with your own hands. Practice has shown that a fireplace built from a previous stove has practically no different in operational characteristics - it also copes well with heating the room. From the article you will learn how you can redesign a Russian stove into a modern fireplace.
Stove base and fireplace masonry
The necessary material that will be needed in order to build a fireplace is a ready-made mixture of stove mortar. If you prefer to make it yourself rather than buy it, then you will need:
- clay, as the main binding material when laying a fireplace;
- sand is a substance that is a filler; it should not contain foreign impurities;
- cement is added to the clay-sand mortar; it is especially necessary when working on an external chimney located above the roof. It is recommended to use high quality 400 grade cement;
- heat-resistant adhesive used when laying fireclay bricks.
Each folded row is carefully measured with a level. The firebox is made of refractory brick. The walls of the fireplace are not tied to the firebox, since fireclay and red bricks react differently to increased heat. They have different coefficients of expansion when exposed to high temperatures, so if you tie the firebox to the walls of the fireplace, the stove may simply fall apart. Therefore, there must be an air pocket between the outer walls of the fireplace and the firebox. A fireplace with a wood burning chamber in the form of / is the most efficient. Before making a fireplace from a stove, you need to select a sample portal and form the portal when laying the firebox.
Of course, the ideal, or rather, real fireplace is a stove with an open portal, however, some owners prefer to install a glass door on the fireplace, space for it is left on the second row, and joints in the masonry are made in the middle of the brick row, but in no case with edge.
Air pockets can be filled with broken bricks; they, like stones in a heater, will retain heat for a long time. A magnesium glass sheet is installed on top, which can withstand temperatures of thousands of degrees.
On the back of the firebox, on top of the glass-magnesium sheet, three bricks are laid in such a way that there is space on the front side for smoke removal. Immediately behind the front part, on the front side, a metal corner is laid along which the row is tied, into which the upper stove strips coming from the door are hidden.
The depth of the firebox is related to the height of the portal in a ratio of one to two or two to three. A shallower depth will cause smoke, a larger depth will reduce heat transfer. And the fireplace itself should not exceed 1/50 of the volume of the room.
You need to know this
Before you start sealing the seams, you need to prepare them: remove residual clay, rinse thoroughly with water using a brush, then prime with heat-resistant glue (50% solution is suitable). When grouting joints, you need to ensure that the repair mixture fills the joints completely, leaving no voids. If a gap is too large in the masonry, in addition to the mixture, you also need to place a ceramic cord into it. Due to its physical properties, it not only withstands open fire, but also very high temperatures - over 1000 degrees.
Ceramic cord is often counterfeited, so before purchasing it, you need to hold a lit match or lighter to it to evaluate the heat resistance of the product. The cord is placed in the masonry seams around the perimeter of the cast iron slab, using heat-resistant glue for fixation.
To protect stove parts that do not need repair, they must be covered with masking tape.
How to convert a stove into a fireplace
You'll need
: plain brick, fire brick, sand, cement, shelf boards, facing material.
Instructions:
- The easiest way to convert a stove into a fireplace is to install a Finnish glass door instead of a cast iron one. In this case, the heating properties of the stove will remain at the same level, plus the functions of a fireplace will appear. This option can be called the most economical, both financially and in terms of labor intensity. After reinstalling the door, you can also decorate the stove beautifully in folklore style.
- If you plan to radically disassemble the stove and only then make a fireplace in this place, then you will have to do more labor-intensive work.
- First, we disassemble the old stove to the ground. At the same time, you can build a fireplace podium from old bricks on which fuel will be burned. During construction, only cement-sand mortar should be used. We create a niche for firewood in the body of the podium. First, we cover them with three rows of ordinary bricks, then with fireproof bricks placed on edge.
- We set up a portal on the podium where the combustion process will take place. We determine the portal based on the overall dimensions of the room itself. For example, in cases with a small room, it should not take up too much space. We also calculate the dimensions of the combustion window. At the same time, it should also be remembered that if its size turns out to be significantly larger than provided, then you can get constant drafts, and therefore hypothermia of the room itself. There will be such a fireplace and a lot of smoke.
- We calculate the smoke opening of the fireplace. Compared to the area of the combustion chamber opening, it should be 10–15 times smaller. It is possible that you will even have to narrow the chimney a little.
- The depth of the firebox of the fireplace is carried out in relation to the height of the portal, as 1 to 2 - 2 to 3. The consequence of a smaller depth can be smoke, and a larger depth can result in a decrease in heat transfer.
- We cover the portal opening of the fireplace with brick lintels, which we arrange using a special formwork (circle). We start work by laying the heels. We support the circle with temporary supports. After the support heels, we install the central brick on the circle and continue the laying on both sides simultaneously. The overlap at curved vaults and the smoke collector should be no more than 6 cm.
- The cladding can be done in the style and materials that will be included in the overall design of the room. But for the mantelpiece, it is best to use treated oak boards.
Today, in country houses, you can no longer find conventional stoves as often as before, since there are more modern heating and cooking systems. First place comes to fireplaces, which can perform almost the same functions, but their appearance is more decorative. The fireplace can be placed in any room: bedrooms, living rooms, halls. Such a hearth gives more coziness, provides soft warmth, which quickly warms up a small house.
How to make a fireplace durable and comfortable? It is worth immediately noting that the work is not only complex, but also significant financial costs. It is required to invite a professional master. You can save a lot if you buy a ready-made metal fireplace that requires only external decorative finishing, but this option cannot be called the best.
Sometimes, when buying a country house, it happens that it already has an ordinary Russian stove, which is not used for its intended purpose. In this case, based on this stove, you can make a fireplace with your own hands. Such an alteration consists of assessing the condition of the furnace and determining a plan of work that may be needed. As a rule, most often it is necessary to expand the firebox, install a door and a new chimney pipe.
Recommendations from experts
The main task of the paint is to create an attractive appearance for the brick and protect the surface. No matter how high-quality the product is, over time cracks appear on the painted layers. This is a common decomposition reaction of the substance, but the period can be increased if the painting is carried out correctly and you take into account the advice of experts:
The correct choice of what paint to paint the brick stove in the house is the main point that will eliminate minor nuances in the future. You should not buy cheap products. Such savings will require double costs in the future.
One of the ways to dilute paint in a separate containerSource sdelalremont.ru
If the paint is too thick, then it must be diluted only with a solvent. The density of the fresh substance should be kefir mass. This composition will not require dilution and will not spread during application. To increase the strength of the mixture at home, it is recommended to add 40-50 g of table salt per jar.
It is important to first dilute it in warm liquid. If there are old layers of paint or lime on the stove, they should be removed. The limescale composition can be easily removed with water, and soft sandpaper can be used to remove paint. When purchasing brushes, you should not save money on them.
It is better to buy a wide tool with natural bristles. When purchasing them, you should check them and touch the fibers. They should be soft but elastic. If you decide to use a roller, it should be made of foam rubber or short-pile fur. Many paint manufacturers write on the packaging that it is enough to apply one coat of paint, but experts advise working in three stages. First, a “rough” layer is applied, then the main one, and only after that the finishing layer.
Applying the first layerSource gidpokraske.ru
- Do not mix several types of enamels. It is prohibited to apply paint and varnish without first preparing the surface.
- Before buying paint, it is better to calculate the oven area to find out how much dye to purchase. This will save money.
After completing the work, it is better to close the room for a day and, if possible, not enter there. After 24 hours, you can already go into the room to check the condition of the stove and open the windows for ventilation.
When choosing what to coat a brick oven with and with what tools, pay attention to all types of paints in cans or bottles, except those in aerosol cans. The composition sprayed with their help lies unevenly on the surface of the oven, and additional layers will lead to differences in shade.
Result of painting after applying the third layerSource centr-terrasnoi-doski.ru
Options for converting a stove into a fireplace
How is a fireplace made from a stove? There are several options here, much depends on the initial state of the structure. The simplest option for making a fireplace from an old stove is to simply update the firebox, expand it slightly to an acceptable size, and then install a special glass door, also called Finnish.
This option is the simplest, there is no need to make changes to the design, it remains the same, but the oven itself must be cleaned. The new door will make the structure as similar as possible to a fireplace, and if you also perform decorative cladding, for example, using tiles or marble tiles, then the resemblance to the fireplace will be maximum.
There are still options on how to make a fireplace from a regular stove. The most expensive and difficult is dismantling the old structure and assembling a new one. First, the stove is dismantled, after which it is necessary to inspect the base; it may be necessary to add new sand. After this, a layer of roofing felt waterproofing is laid on the surface, and new masonry is made according to the chosen scheme.
The work process in this case looks like this:
- The old stove is dismantled and the base is inspected for damage.
- The brickwork of the podium is being carried out, which is necessary to protect the base from high temperatures when burning wood.
- According to the prepared diagram, the fireplace is laid, which is no different from the usual one. For this, special oven and refractory bricks are used. The firebox itself can have different sizes; it is recommended to install a glass door, which will not only increase heat transfer, but also make using the fireplace safer. The floor around such a structure must be laid out using a fire-resistant material, such as ceramic or stone tiles. The surface of the fireplace is decorated with different finishing materials; the most stylish are tiles, which are ideal for any interior.
Facing
When the structure is completely dry, you can move on to decoration. There are different methods for cladding a fireplace; the material must be resistant to high heat.
Brick finish
Old brick can be given a more fresh, decorative look if treated correctly.
First, excess cement-clay mixture is removed from the seams and bricks with abrasive paper. It is necessary to treat the seams, for example, with a colored mixture, to give them a convex shape.
The bricks must be coated with heat-resistant paint. The final coating is a varnish that can withstand high heat.
Plaster coating
A simple finishing option is plaster. To perform the cladding, complex installation work is not required, as, for example, with tiles.
It is necessary to make the solution more durable; you can use salt or crushed fiberglass. To give the coating a tint, add lime paint.
Before you start plastering, the fireplace is heated until the outer surface becomes warm. The plaster is applied in layers, the first layer eliminates minor irregularities, the second is decorative.
Stone covering
An impressive finish can be made with artificial or natural stone. In both cases, environmentally friendly material will be used, the difference is in weight and density of raw materials.
Artificial material is much cheaper, you can make it yourself. The natural analogue is better due to its natural properties.
Natural raw materials are characterized by increased resistance to any changes in temperature, humidity, and mechanical damage, in contrast to artificially created materials.
The cladding is complex, and it is difficult to attach natural raw materials to ordinary mortar. It is recommended to consult a mason.
Tile surface
Not all tile models are suitable for decorating the outside of stoves and fireplace devices: clinker, porcelain stoneware, terracotta, majolica.
Clinker tiles have become widespread due to their stability. There are many colors, imitation of natural stone. Models are produced with the addition of stone chips, which enhances performance characteristics.
The tiles will require adhesive that will not dry out when exposed to high temperatures.
Making a fireplace from scratch, or remaking an old stove is not very difficult, the main thing is to work out the diagram and prepare the materials. You cannot replace the material with a similar one; the structure will become very hot.
Step-by-step algorithm for remodeling the furnace:
The procedure for arranging a fireplace stove with your own hands
The following materials will be required for fireplaces and stoves of this design solution:
- solid and fire-resistant bricks;
- steel strips;
- clay mortar;
- oven;
- hob;
- steel doors.
Next, installing a fireplace stove with your own hands is done in the following sequence:
- The 1st and 2nd rows of bricks serve to level the structure being constructed, since as a result of pouring the foundation, unevenness will still form on its surface. After completing the second row, the building level must show an absolutely flat surface, otherwise the life of the structure will be short.
- On different sides of the fireplace stove there is one ash pan and two cleaning windows.
- A steel door is installed on each window. An additional steel strip is placed above the blower door. A fireplace compartment is installed on the front side of the structure, preferably with a side so that combustion products do not fall out of it.
- The doors are covered with brick, and a portal is opened on the side of the fireplace.
- A grate is placed above the ash pit. The long narrow compartment is covered with a steel strip.
- The side channels are divided in half by bricks. Open the combustion window.
- Install the combustion door.
- The firebox door is covered with a steel strip and covered with brick.
- Also, a strip of steel covers the fireplace.
- The channel above the firebox is connected to the nearest well. The front side of the fireplace is covered with brick and a smoke intake is formed.
- The hob is located above the firebox. The remaining space above the passage and well is covered with steel strips.
- The channel above the fireplace is narrowed and a cooking compartment is formed.
- The 14th and 15th rows are performed similarly to the 13th.
- An exhaust hood is installed between the nearest well and the cooking chamber.
- A metal cleaning door is installed in the hood.
- The rear well, located above the hood, is divided in half. The one that will go outside is covered with a summer curtain. The well above the hearth takes on the size of 1 brick. Steel strips cover the cooking chamber over the entire area.
- The cooking chamber is closed.
- The 20th row is similar to the previous one.
- The 2nd rear channel is expanded to its maximum size and a cleaning window is removed from it. A damper is installed above the well with the fireplace.
- Install the cleaning door.
- A metal oven is placed in the cavity. On the far side there remains a vertical smoke well.
- On one side of the oven, smoke flows into the central pipe.
- The actions are repeated.
- They make a transition from the cavity to the pipe because the oven has run out.
- The cavity and well are covered with steel strips.
- On top of the strips, the area is covered with bricks. A winter valve is installed in the last unused well.
- All wells are connected to the fireplace using horizontal passages. Install the cleaning door.
- The 30th and 31st rows are similar.
- The area is covered. Install a common damper.
- The 33rd row and further - the structure is narrowed - it goes into a pipe.
Today, in country houses, you can no longer find conventional stoves as often as before, since there are more modern heating and cooking systems. First place comes to fireplaces, which can perform almost the same functions, but their appearance is more decorative. The fireplace can be placed in any room: bedrooms, living rooms, halls. Such a hearth gives more coziness, provides soft warmth, which quickly warms up a small house.
How to make a fireplace durable and comfortable? It is worth immediately noting that the work is not only complex, but also significant financial costs. It is required to invite a professional master. You can save a lot if you buy a ready-made metal fireplace that requires only external decorative finishing, but this option cannot be called the best.
Sometimes, when buying a country house, it happens that it already has an ordinary Russian stove, which is not used for its intended purpose. In this case, based on this stove, you can make a fireplace with your own hands. Such an alteration consists of assessing the condition of the furnace and determining a plan of work that may be needed. As a rule, most often it is necessary to expand the firebox, install a door and a new chimney pipe.
Installing a foundation for a fireplace stove
To make a foundation for a stove, you need to prepare the following tools and building materials:
- roulette;
- shovel and crowbar;
- burner;
- Bulgarian;
- welding machine;
- roofing felt;
- sand;
- 10 mm reinforcing rod;
- concrete solution grade M300.
The dimensions of the future foundation are marked on the floor with chalk - 110x100 centimeters. These parameters are greater than a standard oven, which is explained by the presence of an observation window (portal). The depth of the hole to be dug should be 35 centimeters. Its bottom is leveled with a sand cushion 5 centimeters thick. The walls are also made as smooth as possible using a shovel.
Where can you see a Russian stove?
We will answer all your questions step by step. In our country, a huge part of the population lives far from civilization. In the 90s, there was a tendency for villages to die out. Young people left their parents' homes and went to the city in search of a better life. Many buildings remained simply abandoned.
Most village houses were equipped with stove heating. In order to dismantle the stove, it is necessary to re-lay the floor covering and seal the hole in the roof under the chimney. Not everyone had the desire and opportunity for this, so the symbols of warmth and comfort in the home, sung in Russian fairy tales, still stand to this day.
Massive brick building
Gasification made it possible to install a burner in the stove and give the structure a second life. But the modern approach to reconstruction implies that it will be converted into a functional, stylish fireplace.
Remodeling options
The simplest method of remodeling is considered to be the method of expanding the structure. Its peculiarity is that the old stove will have to be thoroughly cleaned, and the equipment itself will have to be made more modern - the outdated finishing material will have to be replaced with a new one.
The biggest difficulties arise with the redevelopment of the firebox of the previous furnace. Experts advise using cast iron plates or fire-resistant bricks to cover the firebox.
Remodeling the oven completely is the most difficult task. Work begins with the complete dismantling of the entire structure. After which the foundation is considered. If its quality meets modern requirements, then it does not need to be dismantled. The old and cracked foundation will have to be redone.
It is worth noting that complete dismantling of the building must also be carried out correctly:
- The superstructure is completely dismantled from ceiling to floor;
- Whole and good bricks are set aside (they can be used during the construction of a new structure);
- Dismantling the old stove should not be accompanied by severe destruction of nearby walls and interior items;
- Keep a close eye on the old firebox. During the dismantling process, try not to damage its doors or chambers. Damaged equipment will have to be thrown away and new equipment made.
Safety precautions: how not to get burned by the stove
The main dangers of stove heating are toxic carbon monoxide, the risk of fire and burns. To avoid this, it is important to follow a few tips:
- Check the condition of the stove and chimney ducts before starting the fire.
- Do not use gasoline or other flammable mixtures for kindling.
- Try to always finish heating a few hours before bedtime.
- Do not accelerate the oven above the permissible temperature.
- When installing the stove, adhere to fire safety.
- Keep children away from the stove equipment. Do not leave them alone with a hot oven.
- Do not place furniture or interior items near the stove that can quickly catch fire.
By adhering to basic safety rules when operating the stove, you can avoid irreversible consequences and not put the health of loved ones at risk.
How does a stove differ from a fireplace?
Now let’s dive into the realities of the upcoming work and note their labor intensity and complexity of implementation in technical and theoretical terms. To understand how to make a fireplace from a stove, you need to determine all the types of work required. Only a real professional can do this, so hiring a professional will most likely become a prerequisite. But for the sake of information, we will explain how to analyze the reconstruction.
A stove is fundamentally no different from a fireplace. Both devices operate by burning fuel and both participate in heating the room. But still, one of them is called a stove, and the other is a fireplace.
- The functions of the stove are not designed to provide the opportunity to observe the flame, so all technological nuances are aimed at high-quality and efficient use of heat. The firebox door is made of metal and hides the combustion process from the observer's eyes.
- The gases formed after combustion have a high temperature. I don’t really want to give such energy to nature, so the chimney in the stove body is made in the form of a labyrinth. When moving, heated gases give off their heat to the bricks of the stove.
- The firebox of a Russian stove is somewhat smaller than, according to calculations, a fireplace for such a room should have.
Ready-to-use brick building
Otherwise, the differences concern only the external elements, which can also be used in the converted structure.
What to do if cravings worsen?
Good stable draft is necessary to maintain the correct combustion mode, which requires the supply of the required amount of oxygen to the firebox and the unhindered removal of combustion products - smoke, soot, soot, as well as gases formed during the combustion of fuel.
During the construction of the furnace, gas ducts (chimneys) of the required size are installed, capable of passing the amount of smoke that is generated during the combustion of fuel. But, over time, a thick layer of soot accumulates on the walls of the flues, which reduces the cross-section of the chimney and prevents the free passage of exhaust flue gases, creating additional resistance to their movement.
As a rule, the appearance of a large amount of soot is associated with the use of firewood containing a large amount of resinous substances, which do not have time to burn completely and fall out on the walls in the form of layers of soot. Damp firewood also produces a large amount of soot.
To improve draft in this case, cleaning the pipe that removes smoke from the firebox will help. You can read how to do this in the article “How to clean a bathhouse chimney.” Also, the draft may be disrupted due to leaks in the stove lining, cracks in the walls and in the masonry of the chimney. Moreover, destruction of the masonry can occur not only within the heated room, but also outside the building - if the pipe masonry on the roof cracks and collapses, the draft will also be disrupted. How to eliminate cracks that appear, read below.
Step-by-step instructions for remodeling
You need to draw up a diagram, which is better to order from a specialist. The specialist will carry out calculations to avoid errors and rework. It will be immediately established what materials and tools are needed for the work.
You will need fire-resistant bricks for the firebox and heat-resistant blocks. The material can be found in a hardware store, on the market, or ordered delivery through a reliable company.
For masonry you will need dry cement mortar, clay, a construction mixer, and a drill attachment.
The solution requires a large container and clean water. The mixture is applied with a trowel.
Rework
In order for the fireplace to be level, it is necessary to constantly monitor the installation using a building level, usually a plumb line.
The first fireplace row is placed on waterproofing with markings applied, applying the mortar downwards. After laying out, according to the rules of order, you need to lay the second tier with a shift of half, a third, a quarter of the brick. To make the rows even, the blocks must be cut evenly with a grinder.
The order of brickwork involves placing the bricks of each next row above the joint of the blocks of the previous tier.
Clay in the solution prevents the destruction of the structure; a mixture of sand and cement does not tolerate such loads. In combination with clay, a heat-resistant effect can be achieved.
To form a combustion chamber, you will need a dense sheet of refractory metal on which subsequent rows will be laid.
A frame is immediately installed under the future door, which is fixed with fire-resistant wire.
Video description
Oven for frying. How to put terracotta on glue.
On a note! In order not to make a mistake with the choice of grout, it is better to use ordinary clay, but first it should be checked for fat content. They do it this way: take five parts of clay and mix each of them with sand in different proportions, diluting with water. Then they make a bun from each mixture and throw it on the ground. The one that crashed is the fattest. Accordingly, the composition is ideal for sealing furnaces.
What to look for when remodeling a stove
When remodeling the furnace, it is necessary to perform the following preparatory steps:
- Checking and assessing the condition of the stove and chimney structure. This is done necessarily, since further safety of use depends on the quality. The chimney must have good permeability, since the fireplace simply will not work without draft. The cross-section must be no less than the size of one brick. Otherwise, the thrust will be very small, completely insufficient. Usually the chimney is immediately dismantled, after which a new one is installed in its place.
- The stove has a small firebox, which is not enough for a fireplace. This means that when carrying out reconstruction, the size of the firebox must be increased to the required size. You can install a glass door that will cover the firebox, ensuring the safety of using the structure. But this door is not mandatory; it does not need to be specially mounted.
- It is necessary to carefully inspect the body of the structure. If it is intact, there are no cracks, signs of deformation, or numerous falling bricks, then there is no need to disassemble it. It is better to decorate the surface of the case after all the work, making it more attractive.
Detection of knockout bricks
Quite often, before repairing a brick kiln, it is necessary to determine whether there are knock-out bricks that can cause a malfunction of the entire structure. To find them, you need to do the following:
- first you need to carefully inspect all smoke ducts of the structure;
- usually the knockout bricks protrude a couple of millimeters and are easy to see;
- After this place has been found, you should carefully remove all the mortar around it, and then remove the brick. If there is open access to the channel, then the bricks can be easily removed. If not, then only a professional master can help;
- if the removed element is intact and has no cracks or other defects, then it is necessary to prepare fresh mortar and install the brick in its place.
Why are fallen bricks so dangerous? This is the first sign of destruction of the chimney and the stove itself, so it is not enough to simply put all the elements in place, you need to additionally carefully inspect the structure, and then plan a major repair. If this is not done, then the structure may simply not survive the next heating season. In addition, such a stove, which is already collapsing, is very dangerous and is not recommended to be used.
Rework
Before drawing up a project for a future fireplace, check the condition of the chimney. The smoke exhaust system bears most of the responsibility for safety.
Check the condition of the stove and foundation. If violations are detected, it will be necessary to redo it from scratch, especially if the foundation was damaged.
It is easier to convert the structure into a decorative device.
The chimney pipe must meet basic requirements. For example, the height of the pipe used can be at least 7 m. The cross-section of the material is 13 - 25 cm, the depth of the firebox is from 0.5 m.
The combustion chamber is lined with fireproof, fireclay bricks, which will not deteriorate from direct contact with fire.
During laying, channels are created that allow air to pass along the door, which will prevent the accumulation of soot.
After all the rough work has been completed, you can begin finishing.
An example of converting a stove into a fireplace design with a heat shield:
Converting a stove into a fireplace
The very first thing you need to do before installing a new fireplace is to prepare a future drawing. All sizes must fit the old foundation.
Converting a stove into a fireplace takes place in several stages:
- The foundation of the furnace is strengthened with waterproofing. Roofing felt is used as a waterproofing material. Several layers of material are laid on a clay-cement mortar.
- The next step is to install the base under the fireplace. You can build a new foundation or install a stove if it is in excellent condition.
- The firebox is made according to new drawings, since the stove combustion hole is not suitable for the fireplace. To create a base for the firebox, the structure is lined with brickwork around the circumference.
- The firebox itself is being built. The walls must be made vertical. It is advisable to check the clarity of the lines of the future side walls of the firebox using a building level.
- Correct calculations are also important at the chimney construction stage. It is laid out using brickwork. Every few rows you need to remove excess solution from the inside of the chimney, as soot may subsequently remain on them. Because of this, the chimney will have to be cleaned frequently.
The air duct can be made not only from brick. You can consider the option of a sandwich pipe, the streamlined shape and smooth walls of which do not prevent smoke from escaping from the fireplace.
Conversion instructions
Converting a stove into a fireplace is not required so often; usually such work is planned when there is already a stove in the house, but it is used extremely rarely. Without spending a lot of time and money, you can use such a stove to make a beautiful and stylish fireplace that will not only warm the house, but will also become a real decoration for any interior. Stoves are not that difficult to convert into a decorative structure.
Often such stoves are located in kitchens, in central rooms; they do not take up much space, but their appearance is not always aesthetically pleasing. Therefore, you can safely take on the renovation and use the fireplace as an additional source for heating the room.
To convert the stove into a comfortable and beautiful fireplace, you need to prepare the following tools and materials:
- kiln and fire-resistant brick, its volume depends on how much the furnace will have to be rebuilt;
- building level;
- Bulgarian;
- cement;
- clay masonry mortar;
- finished chimney pipe (if the old one has to be completely removed);
- Master OK;
- putty knife;
- tiles for facing;
- glass door for fireplace.
Before you start converting the stove into a fireplace, you need to take into account that the fireplace is heated differently. Only special wood briquettes or dry firewood are suitable. Therefore, it is recommended to immediately ensure that there is always a certain supply of fuel.
You should prepare all the specified materials and tools, and draw up an individual drawing of the future fireplace. Its appearance depends on the original stove. You should definitely inspect the stove, find out how well the body is made, and what condition the foundation is in. If everything is in perfect order, then there is no need to disassemble an already standing structure; the work is carried out on the material that is available. There should be a gap of 25 cm between the general foundation of the floor of the house and the base for the stove; it is completely covered with sand.
The depth of the firebox must be 50 cm, and the body inside the stove must be lined with refractory bricks.
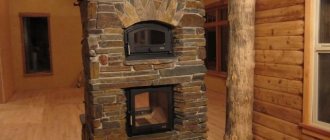
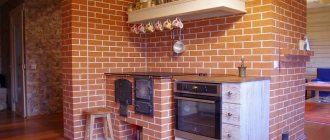
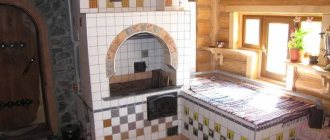
If all the conditions meet the required ones, then you need to move on to inspecting the chimney pipe, since it may have to be rebuilt. For fireplaces, the requirements for chimneys differ from those for stoves; the height should be from 7 m, the cross-section should be at least 13 * 25 cm. It is necessary to have special channels that inside the structure will control the air flow along the doors. This will prevent soot from constantly settling on the door glass. A version of the converted stove design can be seen in the figure. IMAGE 1.
No matter how strange it may sound, quite often the question arises of how to convert a stove into a fireplace. There are several alarming facts that require additional clarification. Where did the stove come from in the 21st century? Why does it need to be remade? Is this possible, since the stove and fireplace are different devices?
Home
Serious problems
Sometimes the damage to the brickwork is so serious that in order to restore the functionality of the heating system, individual parts will have to be completely replaced. Most often, craftsmen have to change the lining of the firebox, which consists of fireclay bricks.
If there are serious faults, you should entrust the repair to specialists
If the damage is not global in nature, then you can cope with the task directly through the firebox window. For restoration you need to use a fireproof mixture. All defective areas are carefully covered with it.
In case of serious damage, some of the bricks will have to be replaced. This must be done in the following sequence:
- Prepare the repair mixture in advance.
- Soak and remove the old mortar in the area where the brick will be replaced.
- Remove damaged lining elements.
- Thoroughly clean the vacated areas, moisten them with water and lubricate them with the repair mixture.
- Install new fireclay bricks and carefully seal the seams with refractory mortar.
When replacing individual lining elements, you need to ensure that the new brick is homogeneous with the old one. Otherwise, due to the difference in thermal expansion, the destruction of the furnace protection will continue.
It is possible to completely replace fireclay bricks in a firebox only by completely disassembling the wall. This is a difficult job that should not be performed without experience, as there is a risk of serious damage to the underlying masonry.
Serious repairs also include repairing the chimney and switching the brick stove to a different type of fuel. In the first case, you will have to go through the masonry and re-plaster it. In the second, you will need to completely redo the firebox.
Preparation of building material
Of course, it is possible to convert the stove into a fireplace, leaving the old bricks behind. To do this, it is enough to replace the fireplace door, but this will not be a fireplace that will bring into the house the comfort and warmth that is expected to be received from it and, therefore, we will consider the option when the old stove will have to be completely dismantled. The fireplace will have to be stacked on the foundation of the stove. You need to purchase all the material at once, exactly how much is needed to build a fireplace, and since the stove is being built by a non-professional, even with a small order.
In order to install a fireplace, you will have to buy
- a little more than 500 bricks, grade M-150;
- for laying a fireplace insert you need 55 pieces of fireclay, fire-resistant bricks;
- You can buy 6 bags of a special mixture of stove solution.
There is an opportunity to save money by preparing a clay solution, but the preparation process will take a lot of time and require a lot of labor.
- you also need to buy a fireplace door;
- chimney sandwich panels;
- eight 50 mm metal corners;
- chimney view.
- In order to secure the stove fittings you will need construction stove tape.
All the material will cost about 10,000 rubles.
Features of the rework procedure
This process will require much less financial investment compared to completely removing the stove and installing a new expensive fireplace. As a result of this work, you can significantly improve the appearance of any room, as well as choose a design that will fit perfectly into the existing interior.
The very first steps that can be implemented with your own hands are those that involve the preparation of building materials and tools. You can use old stove bricks while working, and here they are usually replaced with a standard fireplace stove. This solution is not considered optimal, since the stove still does not look like a fireplace. Therefore, it is best to almost completely dismantle the stove structure, in the place of which a full-fledged fireplace is erected. It is quite difficult to do such work with your own hands, but it is possible if you follow the instructions exactly.
To remodel the structures, you need to purchase bricks and masonry mixture, as well as a special door for the fireplace and some other special elements that will be used in the process. These include:
- sandwich panels designed to decorate the chimney;
- metal corners;
- chimney view;
- oven tape.
Cracks
Before you start filling up the cracks, you need to understand the reasons for their appearance. The cobwebs that appear on the surface of the brick, which are shallow but spoil the appearance, will require a new coating. Cracks in cast elements may indicate the need for restoration work. Large and deep cracks inside and outside are a reason to think about possible flaws in the design and pouring of the foundation. Consultation with a specialist will be warranted.
Individual gaps between slabs, doors and masonry can be easily eliminated using basalt cardboard. Lubricated with heat-resistant mastic, it perfectly covers cracks.
Reasons for appearance
The appearance of cracks in the stove mass is often attributed to the cold in the room and infrequent heating, which is not entirely true. In fact, the main reason is the coefficient of thermal expansion. Each material has its own, and large differences in values lead to deformation of brick, mortar, and masonry.
It is easy to prevent such defects by choosing the right masonry mixture. For red brick, use a mortar based on red clay; for fireclay stone, use fire-resistant mixtures with it.
The second common case is the natural shrinkage of the clay mixture, which usually appears in the first year of operation. Whatever additives are added to the solution, volume fluctuations after the fastening composition has dried cannot be reduced to zero. The minimum value is 6%, the figure is small, but such a difference between the original sizes is enough to cause cracking.
How to seal cracks (choice of mixture)
To reconstruct individual areas, choose a mixture based on the clay that was used to make the bricks. This can be a ready-made packaged product or prepared independently. The purchased option saves time on completing the work; the main thing is to carefully follow the instructions on the packaging.
If you decide to make the restoration composition with your own hands, keep in mind that the thickening agent for fireclay mortar will be fireclay grain, while for clay mortar it will be sand. To improve the adhesion of the mixture, add regular salt; 1 kg per 12 liter bucket will be enough. The viscosity of the mixture should be medium so that the drying surface does not crack again.
Introducing reinforcing components into the coating will give the future patch strength; use a mixture of soaked asbestos for this. It is prepared simply; a sheet of material is soaked in water for about 15 minutes, turning into a liquid substance. Add no more than 2 liters per bucket of putty.
If you are not afraid of experiments, try making a restoration composition using the old method:
- crushed clay and wood ash in equal proportions;
- a quarter of table salt;
- water.
The doughy putty hardens quickly when the oven heats up. The composition is unusual in the absence of a sand component, but the resulting strength is good.
How to cover up
If you need to patch small cracks, then dismantling the masonry is not required. The stove should be heated, then the seams between the bricks will expand. We get rid of the old solution and apply the patch to a previously dust-free and moistened area. The composition is laid into the seam with a trowel and compacted with the edge of the tool.
If new cracks appear during the drying process, grease until the surface hardens without the appearance of cracks.