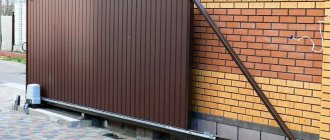
Sectional doors are used today for insulation and sealing of various (including garage) premises. Such structures consist of a spring that absorbs vibration of the canvas, other fittings and guides. The canvas itself is equipped with special mechanisms designed for remote opening/closing using the remote control included in the kit.
Sectional doors
Sectional doors are found mainly in rooms where free space is limited. When opened, the canvas rises up, which significantly saves free space.
Sectional garage door design
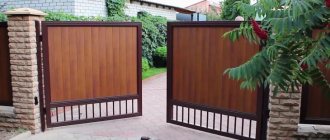
Attention! Gate panels, which are made in any color, are coated with a special polymer coating during manufacturing, which protects the structure from corrosion and ensures a long service life.
If desired, a durable acrylic window can be built into the canvas to illuminate the garage, and thanks to insulating sandwich panels, the structure can operate in a fairly wide temperature range (from -50ᵒС to +70ᵒС).
Gate design
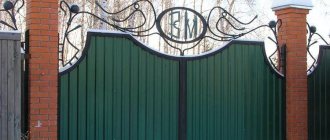
It is also worth highlighting the safety of such a design, because closing is ensured by a special locking system, which makes it possible to automatically lock the panel immediately after lifting. With proper operation and strict adherence to the manufacturer's instructions, the structure will last about ten years without repair or replacement of individual elements. Now let’s find out how to assemble sectional doors with your own hands.
Gate diagram
Varieties of design
Modern sectional doors are suitable for all types of premises.
Attention! Garages built earlier often do not meet current building standards, as a result of which the gates are produced in various modifications.
Gate options
Vertical lift structures
Designed for garages with high lift heights. They are sold exclusively in construction hypermarkets and are distinguished by the fact that they take up minimal space during installation.
High lift structures
Such gates are more expensive and are used where the small height does not allow for vertical lifting of the door leaf. The high price is explained by the use of hanging brackets, special guides and a large number of consumables.
Find out a master class from a subscriber on how to increase the height of your garage from our new article.
Standard lift designs
They are used in rooms that are completely ready for installation, with a minimum ceiling height of at least 18 cm. All elements are made of stainless steel. The simplest and most convenient option, and therefore the most popular.
Low rise structures
Low-lift gates are suitable in conditions of limited opening height (lintel). Control elements and torsion springs are attached to the ceiling, and if it is low, then the entire apparatus is fixed on the back of the guides. More specifically, such a device consists of:
- torsion shaft;
- winding pulleys;
- balancing springs.
After choosing a suitable design, you can begin preparatory work.
Prices for sectional doors
Sectional doors
Material selection
It is necessary to purchase garage door elements according to specifications. For sections, metal or sandwich panels are often chosen, less often - wooden slats.
Due to the fact that the panels are held together with special elements that are flexible, the easiest option is to purchase a ready-made canvas from sections of a suitable size.
The sectional fabric should be covered with a profile from below. It is covered on the sides with overlays that add rigidity and protect the end of the gate from the influence of the outside world. Metal channels are used in the form of a guide profile, and corners are used in the form of angular vertical profiles.
The brackets are also made from metal profiles. To make a lifting mechanism, you need to purchase the following parts: shaft, cable, spring and spring tips, drum, suspension, coupling.
Stage 1. Equipment preparation
Tools
Before you begin, you should prepare all the necessary tools.
- A laser level is especially necessary if the gate width exceeds 5 m. The fact is that ordinary water levels give a certain error (from 1.5 cm to 3 cm), which is unacceptable when installing sectional doors.
- Electric drill for fastening individual elements at height.
- 1.5 kW hammer drill for making holes in concrete.
- Other tools: screwdriver, wire cutters, pliers.
Attention! The given list of tools is incomplete; it all depends on the individual characteristics of the gate and the quality of preparation of the opening.
Various fastening elements will also be required, regardless of whether the walls are made of concrete or loose sandstone.
Accessories
Features of connecting sections
Special hinges serve as fastenings for individual panels. Gaskets are installed at the joints to prevent cold air from penetrating inside. I can also use other auxiliary materials to achieve maximum tightness.
There are cavities between the sections; rubber inserts are placed in them to protect against unfavorable climatic conditions. This creates an effective barrier that prevents wind and cold from entering the room. Sandwich panels can significantly reduce the percentage of heat leakage, which leads to savings on heating.
Stage 2. Measurements
Scheme for measurements
Before ordering a sectional structure, you need to take careful measurements of the opening and the room as a whole.
Step 1. First, the value H is measured - the height of the opening. In this case, it is not the specific height that is indicated, but the place for the vehicle to enter. Let's assume the height is 200 cm. In this case, you must specify 30 cm more when ordering, because after installation the clear passage will be 180 cm.
Step 2. Next, the ceiling (h) is measured. The type of design chosen depends on this indicator.
Step 3. The width of the opening (B) is determined. The resulting figure increases by 2 cm on each side, taking into account the future design.
Step 4. The technical gap (b1, b2) is determined, at least 8 cm on each side. This will provide free access to the fastening elements during service.
Step 5. Finally, measure the depth of the garage (L). A special feature of sectional doors is that the door leaf rises to the ceiling, so the depth must be greater than the height.
Operating principle of the lift-and-swivel shield
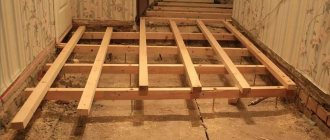
Structurally, such gates have 3 elements: a frame, a lifting leaf, and an opening mechanism. The frame is made of beams (steel or wood). The frame is the main structure; it is installed in the opening. Next, guides are installed along which the entire structure moves during ascent/descent.
The main difference between this type of gate is that the shield is made of solid material. For this you can use wooden panels, boards, steel, etc. A wooden panel has the best price/quality ratio. It is lightweight, which does not require massive frame structures and a powerful drive for the lifting mechanism. However, the tree quickly becomes unusable under the influence of external factors. But with the right approach and treatment, the service life of a wooden panel can be significantly extended. It is best to upholster it with metal. However, no matter what material is chosen for the shield, it is recommended to insulate it.
Stage 3. Preparing the opening
Preparation of the opening Measurements
After measurements and preparation of tools, the gate itself is ordered. Production usually takes approximately two weeks. During this time, you can prepare the opening.
Step 1. First of all, the walls and ceiling are plastered (if this has not been done previously). This can be explained quite simply: after installing the gate guides, access to unprepared areas will be inaccessible.
Step 2. The plane of each wall is checked in relation to the neighboring ones.
Attention! If the opening is not in line with the walls, then installing the gate will not work.
Such structures have the correct horizontal shape, so even the slightest errors in the construction of the garage are unacceptable. Of course, the gate can also be placed on curved surfaces (you will have to work hard), but in this case the strength of the fasteners and aesthetics will be in question. And in winter, snow and cold air will blow in, which will lead to freezing of the room.
Step 3. The walls and ceiling are finished with a metal corner.
Attention! If you have no experience, it is better to entrust the preparation of the garage to professionals, and after completing the work, check the results using a level. If the technical specifications are not met, the owner will have to frequently carry out repairs and replace components, and the service life will accordingly be reduced.
Stage 4. Installation of sectional doors
The main attachment points for the overhead vertical guides and the attachment of the bracket for the torsion bar mechanism
Attention! Joining canvases on your own is an extremely complex process that only experienced craftsmen can handle. Therefore, it is better to order ready-made gates and install them in the frame.
Step 1. First, all weak coating is removed or strengthened. The horizontalness of the floor is checked (the permissible error in this case is only 1 mm). If everything is in order, you can begin preparing the panels for installation. It must be remembered that such gates are quite expensive, so the canvas should be handled with extreme care so as not to accidentally damage it.
Step 2. Next, markings are applied to attach the guides. The vertical profiles are fixed first - they are attached to the wall using mounting screws (these have a long leg). Then, focusing on the vertical profiles, the horizontal guides are fixed. It is important that the “rails” are positioned strictly at right angles to each other, otherwise the canvas will not be able to rise.
Horizontal guide fasteners
Horizontal guide fasteners
Horizontal guide fasteners
Step 3. Next, the panels are assembled (if ready-made gates were not purchased). In this case, you need to carefully measure everything, because sectional doors, as mentioned above, do not tolerate distortions. If they do form, then you cannot use planks of different sizes or polyurethane foam for leveling, otherwise the dimensions of the structure will be disrupted in the future.
Instead, it is better to use iron gaskets of different thicknesses.
Step 4. Next, the controls and lifting mechanism are attached. The accuracy of all measurements is checked.
Before starting installation work, you should read the manufacturer's instructions. Many, “Khorman” or “Dorhan) describe the installation of the structure step by step. Features of installation work may vary depending on the manufacturer, but in general it is a simple procedure.
Installation of the canvas
Step 5. Upon completion of installation of the panels, additional elements (lock, hinges and handles) are fixed. The lock should be given special attention - it must be of high quality, since it is intended to protect property.
Catching device for Hormann sectional doors
Installation of additional elements
Sectional door handles
Step 6. Install the springs that are responsible for opening/closing the gate. At the final stage of work, the limiters necessary to limit the movement of the web are fixed.
Spring Mechanical spring break protection system
Attention! If you are installing a gate model with automatic opening, you will also need to install an electric drive. For proper installation and connection, you should also read the instructions for the device.
Electric gate drive
Installation of automation
Unlocking the electric drive from inside the room
With the proper approach and correct calculations, installing the gate takes a maximum of one day.
Installation of the canvas
Design and calculation of building materials
To make a sectional fabric, you need sandwich panels, which consist of sheets of galvanized metal insulated with each other. You can use different insulation materials as insulation materials. So, foam or polyester are perfect for this role. If we talk about the panels themselves, they are produced exclusively in industrial conditions.
By the way, the decorative coating itself is also applied at enterprises. Therefore, if you decide to make sectional doors yourself, you need to pay special attention to the design and calculation of building materials.
For example, it is worth knowing exactly the dimensions of the vehicle in order to order a gate of the appropriate size according to them.
Stage 5. Verification
The main indicator of correct installation is the presence or absence of clearance when the blade is lowered. In this case, the seals will properly perform their functions of sealing and protecting the garage from precipitation. It is worth noting that the seals should be invisible from the outside. If they are visible, then the measurements were taken incorrectly.
Gates
Next, the bottom panel is inspected. The seal fixed at the bottom should fit as tightly as possible to the floor. If a gap is detected, the structure is checked by level. To eliminate defects that are not level, the position of the guides is adjusted.
The last thing to check is the balancing (balancing springs). They can be located on the sides of the profiles or on a torsion beam - it all depends on the area of the canvas. If you raise the gate by 1.5 meters, then the springs should be in place, without falling or rising.
Video - Installation of sectional doors
Useful tips
- Remember that the reliability of the mechanisms is directly determined by the correct installation. Order sectional garage doors in Moscow only from a reliable construction company that provides a long warranty.
- When operating, strictly follow all instructions. In this case, the equipment will last longer than the period stated by the manufacturers.
- If the mechanisms fail, do not try to eliminate defects and malfunctions yourself. Lack of experience and skills will only make problems worse.
Sectional door installation diagrams
Installation of gates with standard lift
Assembling the bottom panel
Assembling the front panels Assembling the top panel
Installing vertical guides
Installing vertical guides
Installing horizontal guides
Installing brackets Installing spacers
Installation of panels
Torsion mechanism
Torsion mechanism and spring charging
Ceiling mount
Adjusting cables Installing gate parts
Gate valve
Read our new article, installing sliding gates with your own hands, and also find out the process of installing electric gates with your own hands.
Installation of the moving mechanism
The final part of the work for the master is the installation of the moving mechanism. The assembled gate is temporarily installed in the opening to mark the locations of the guide grooves, counterweights and winch (or springs).
Next, the guide grooves themselves are attached directly, the size of which must correspond to the size of the rollers on the gate.
The last step is to install a lever-spring mechanism or a winch with symmetrical loads. The door panel is finally installed and the quality of its work is checked. To seal the opening, you can additionally glue rubber strips along the contour of the frame.