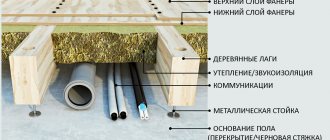
Creating smooth and durable floors in your own home is the most important task. The choice of flooring bases in terms of their manufacturing technology and the use of different materials is considerable. Self-leveling floors made from mineral or synthetic based mixtures have recently become especially popular. This design can not only become the basis for a finishing coating, but can also act as a floor itself. But today I would like to talk about the traditional floor design - wooden floors. Or more precisely, about one of its elements - these are floor joists.
Logs for a wooden floor in a private house Source avatars.mds.yandex.net
Lags - what is it?
Installing a wooden floor on joists in a private house is an old technology. Some changes have been made to it today, but the basic principles remain the same. This floor design is characterized by such advantages as simplicity and reliability. Hence, in principle, its popularity.
So, what are lags? Essentially, these are beams laid across the room. They become the basis for laying wooden boards on them. Typically, lumber is used for this, although we must pay tribute that in the construction of private houses it is allowed to use reinforced concrete products, metal profiles, and today even polymer materials.
The design of wooden logs can also be different. Of course, the best option is an even beam adjusted to certain dimensions. Because it’s easier to work with this material: adjusting, setting and assembling. You can use boards laid on edge with a thickness of at least 50 mm. If the distance between the supports for the logs is large, then the boards are knocked together in twos or threes.
Sometimes they even use logs or round timber, which is hewn on one side to a flat surface, on which a counter-lattice is then laid under the floorboards.
Round timber floor joists Source artc-alisa.ru
Note that in some respects wood is inferior to a concrete base. But it also has its great advantages:
- low specific gravity, which creates virtually no load on the foundation and additional supports;
- the floor base formed on logs is ventilated, which significantly increases the service life of the entire structure and the finishing coating as well;
- Communication networks can be easily placed between the joists, and getting to them in the event of an accident will not be difficult;
- Insulation is usually laid between the lags, which makes this design comply with regulations and standards;
- using logs, you can also level the floor structure, and this is much easier and cheaper if such a problem arises with concrete floors;
- the strength of the log structure is not inferior to any other;
- this design evenly distributes loads over the entire surface of the foundation;
- The floor itself, laid along joists, is easier to repair.
More recently, wooden floors in a private house with joists were criticized for being difficult to combine with heating systems: water and resistive. Today, the problem has been solved by new construction technologies that have emerged. That is, making a warm floor based on wood today is not a problem.
Warm water floor in a wooden floor structure Source i.ytimg.com
Preparation for installation
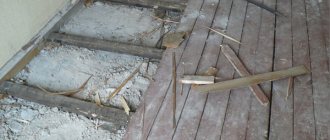
The procedure begins with creating a big mess with your own hands, that is, with dismantling the old floor.
- We completely free up the entire floor area.
- Checking the old coupler. We remove all exfoliated pieces and repair the cracks. We tap the swellings to detect cavities underneath them. If we find it, we open it up and clean the floor slab down to a solid monolith.
- We carefully remove debris and dust, preferably using a vacuum cleaner. The apartment must be clean.
- Next, we eliminate all found defects in the subfloor. First we prime them and wait for the primer to absorb and dry. We fill the flaws with cement-sand mortar evenly with the general surface. A ready-made repair compound sold in hardware stores is also suitable. After drying, prime again.
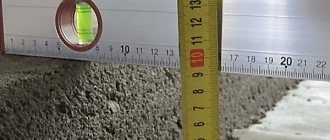
- Using a level, we calculate the highest surface point in the room. We make a mark - this will be a guide for future work.
USEFUL INFORMATION: GKLO drywall: it is also fireproof, heat-resistant, fire-resistant
Material for wooden joists
As mentioned above, the best option is timber. For logs, it is better to use inexpensive types of wood - pine, spruce and others. There are larch elements on the market, but they are more expensive. In addition, for a lag structure it is not necessary to choose high grade wood. Second grade timber is suitable, which already makes it possible to save money.
But it is better not to use third-grade products. Of course, appearance does not matter in this case, but the strength characteristics must be at their best. Still, wooden logs must withstand decent loads. Therefore, you should not purchase timber with a large number of cracks, with rotten rot or with blue areas. A lag structure made from such material simply will not last long.
You should also not purchase timber if its geometric shape has incorrect parameters. For example, a twisted beam, bent or deformed. It will be difficult to match such material to the level.
Beam for lag structure Source solovevgas.ru
Therefore, the advice is to buy timber that has been dried in special installations; its humidity should not exceed 12%. And if you purchase lumber in advance, you will have to create conditions for its storage. Be aware that material with a moisture content of more than 15% will deform during operation under the influence of changing temperatures.
Attention! As for the cross-section of the beam, its height should be 1.5-2 times the width.
But here another question arises, and it concerns the section itself. That is, what section is needed in a particular case. However, this is not where we should start. And from two other parameters:
- location of the logs relative to the room;
- the distance between them.
The first one is simple. Typically, boards, as a finishing coating, are laid perpendicular to the wall on which the window is located. The thing is that there are gaps between the elements of the plank floor. And if you lay lumber across the room, then all the cracks will be visible in the rays of daylight coming from the window. Therefore, the logs are laid across, that is, parallel to the wall with the window. If sheet materials are used as the basis for the finishing coating, for example, plywood, chipboard or OSB, then there is no difference in how the logs are laid.
Location of the log relative to the window Source piorit.ru
As for the distance between the logs, it is necessary to take into account the thickness of the boards that are used as flooring. There are special tabular data, they are standard. The ratio here is:
- board thickness 20 mm, lag laying pitch 300 mm;
- thickness 24, pitch 400 mm;
- 30 – 500;
- 35 – 600;
- 40 – 700;
- 45 – 800;
- 50 – 1000 mm.
It is necessary to pay attention to the fact that when the step of laying joists is calculated, a round number is not always obtained. Therefore, it must be rounded, only downwards. Craftsmen often install elements near walls with smaller spacing. And it is right. The entire floor structure will benefit from this. Distance between lags in the table:
Source m-strana.ru
So, if two parameters are known, you can find out the dimensions of the timber for the floor joists. But even here it is necessary to understand that the calculated value depends on the length of the lag. Because the longer the element, the more sagging it has. This means that the cross section will need to be increased to avoid this problem. That is, the cross-section of the beam directly depends on its length. And in this case, you can use the table:
- if the length of the span on which the timber is laid is 2 m, then lumber with a cross-section of 60x110 mm is used for this;
- 3 – 80x150;
- 4 – 100x180;
- 5 – 150x200;
- 6 – 180x220 mm.
As you can see, the cross-section of the material can be impressive. And this, first of all, makes it heavier, and, accordingly, increases the mass of the entire structure. Of course, the cost of the lag also increases, and the budget increases accordingly. The solution to this problem is simple. It is necessary to assemble, at certain distances, supports for the logs on which they will rest. Thus, small cross-section lumber can be used.
For example, if you assemble support columns every meter, you can lay logs with a cross section of 50x80 mm. If the step is increased to 1.2 m, then the dimensions will be 50x90 mm.
The smaller the distance between the columns, the smaller the cross-section of the log Source artdevice29.ru
See also: Catalog of companies that specialize in foundation repair
Please note that all values indicated are minimum values. That is, they can be changed, but only upward. Often today, thermal insulation material is placed in the space between the joists. And the thicker it is, the better. Therefore, craftsmen often lay logs with a large height, and leave the width as a table.
And one moment. The distance between the elements of the joist structure also directly affects its cross-section. The smaller the step, the thinner the boards can be laid on the floor. Accordingly, the cross-section of the beam is reduced.
And the last thing in the section on choosing material for lags. Wood is a natural material that can decompose over time. That is, logs can shrink, rot, crumble, and so on. In addition, colonies of harmful microorganisms may appear on its surface. To prevent this from happening, the wood must be treated with special protective compounds before use, of which there are many on the modern market.
Today, wooden products are additionally treated with fire retardants. These are compounds that protect the material from fire.
Attention! It is useless to treat damp wood with protective compounds. The maximum permissible humidity in this case is 25%.
Treatment of logs with protective compounds Source www.ivd.ru
Location rules
The first and last lags from the wall should be at a distance of no more than 20 cm. If, while observing the calculated step, the outermost lags are located further, their number is increased and the step is reduced.
They are placed either along the wall in which the door is located, or perpendicular to it. If one wall is much longer than the other, then it is along this long wall that the logs are placed. If the room is square or similar in shape, then the location of the window may influence the choice: floorboards look best if they are located along the flow of light. That is, in this case, the logs are placed along the wall in which there is a window.
Log installation process
We need to start with the fact that the installation of joists under wooden floors in private houses is carried out either on the ground, or on the foundation, or on the floor slab. Let's look at all the options separately.
On the ground
We must immediately make a reservation that the beams are not laid on the ground itself. To do this, columns are assembled from piece materials, or they are poured from concrete. But before forming columns under the floor joists, the soil itself is prepared. What they do:
- cut off the fertile layer inside the foundation structure;
- level it and compact it;
- they fill it with crushed stone or sand, someone makes a concrete screed or rolls up asphalt.
The main task is to do everything so that there is no dampness under the floor base and no vegetation grows.
Next, the supports are raised or poured into the prepared and installed formwork. The distance between the columns is selected from the table. It is important to waterproof the supports both from below and from the sides, as well as treat or cover the top plane, thus cutting off the logs from possible contact with moisture.
If the columns are assembled from piece building materials: brick, concrete blocks or stone, then a foundation of a small thickness is poured under each support. This can be several foundation structures for each support post or one solid one in the form of a tape for everything at the same time.
When all the support posts are ready, proceed to laying the joists. The main task here is to set them as accurately as possible both horizontally and vertically.
Floor subfloor options
These types of floors can be installed on a wooden or concrete base or on the ground. Each option has its own technological features, which must be kept in mind during work. As for the specific purpose of the premises, taking this parameter into account, the base of the floor and its operational characteristics are selected. The technology of the device itself remains almost unchanged. There are, of course, options for warm and cold floors, but these features also have a common construction algorithm.
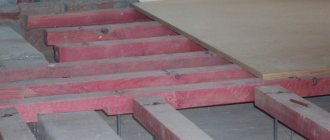
Vapor and thermal insulation with penofol
| Attach penofol with a stapler to the sides of the sheathing bars or joists. |
Instead of the top layer of insulation and vapor barrier film, it is more profitable to lay penofol - a foamed polymer covered with aluminum foil, 10 mm thick.
(also available under other trade names).
Penofol must be laid with the aluminized side up, towards the ventilated gap, across the sheathing bars and lowered on both sides of each bar. After this, penofol is nailed with a stapler to each side of all the bars so that a gap of 3-4 cm is formed between the aluminized surface and the floor covering slabs. The joints of the penofol panels are sealed with aluminized adhesive tape. The penofol layer will provide heat transfer resistance equivalent to a 40 mm thick layer of mineral wool and the necessary vapor permeability.
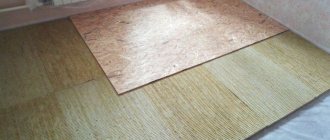
Subfloor boards are attached to the sheathing bars on top of a vapor-proof film or penofol. Instead of boards, slabs are more often used: cement-bonded particle boards (> 22 mm thick), plywood (> 18 mm), etc. Sheets and slabs are placed with the long side on the sheathing bars. Spacers are secured under the short side between the sheathing bars. All edges of the laid sheet must be supported - a block or spacer.
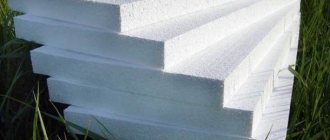
The use of polystyrene foam and polystyrene foam boards as insulation is not recommended. Such slabs serve as a barrier to moisture, which is always contained in the wood of the floor. By preventing moisture from escaping from the wood, foam insulation shortens the service life of the wooden floor parts. In addition, mineral wool insulation, due to its better elasticity, adheres more tightly to the joists than polystyrene foam.
To protect the underground space from ground moisture, it is advisable to cover the entire surface of the soil with a waterproofing film (and not just under the posts, as in the figure). The joints of the covering panels are sealed. The junction of the film to the walls must be connected to the waterproofing of the walls and also sealed. The floor posts lie directly on the film.
As a result, we obtain a ventilated underground space, limited by sealed shells - on top (vapor barrier) and below (waterproofing).
Products for construction and repair
⇆
Such an underground space protects the house not only from moisture and cold, but also from the penetration of radioactive soil gas radon
.
Filling the screed
There are two options for further work.
- Make a screed, simultaneously bringing the surface to one level.
- Level the joists using small plywood spacers.
It is very advisable to make a screed in any case. The question is how much effort and resources will be required for this.
- If the difference in the level of the base is small, then filling with mortar is more profitable. If the result is correct, the logs are placed directly on the floor.
- If the difference reaches 5 cm or more, then the screed is made three centimeters long and the lags are installed on chipboard substrates or even on bars.
When the screed has stood and gained strength, we continue arranging the floor. We spread plastic film or waterproofing material on top of it. We glue the joints with tape.
The smell from the basement often penetrates into apartments on the ground floor. To prevent such an attack in the future, we additionally treat the screed with bitumen diluted with diesel fuel. You will have to wait three days for the smell to dissipate. But for many years you will forget what the smell comes from under the floor. By the way, this solution is a powerful antiseptic.