Pallets are a material that can easily be used in construction. They are most often used to build country houses and children's houses, for which strength is not a priority. Having at your disposal a couple of dozen pallets, a few hours, imagination and desire, you can build a house with your own hands, which will become a favorite summer vacation spot.
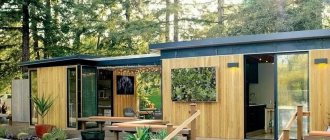
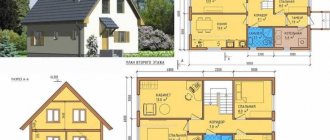
Ready-made pallet house project
Advantages and disadvantages
In recent years, pallet sofas have steadily become a trend.
They can be found in the apartments of many craftsmen. A pallet or pallet is a special type of container that looks like a platform assembled from boards and is intended for storing and transporting large cargo. More recently, such furniture was considered suitable only for arranging a garden, since it had a modest appearance and primitive design. Today, simple materials are used to make household items that are not inferior in beauty and originality to products made from solid wood. The main feature of a sofa made from wooden pallets is its ease of production. The second distinctive feature that makes it popular among a wide audience is its favorable price-quality ratio. Such furniture has many competitive advantages. Its main advantages:
Environmental friendliness. The raw material is natural wood. The products are safe for human health and pets, so they can be safely used to make furniture not only for the living room, but also for the children's room. Budgeting. Making your own sofa from pallets will save you a significant amount of money.
If we take into account that it takes 8-10 pallets to assemble a sofa, and consider that the average cost of packaging is 80-120 rubles, then we get an attractive amount of 1000-1200 rubles. Strength. Pallets weigh 15-20 kg and can withstand a weight of 700-800 kg, which makes them an ideal material for the manufacture of large furniture. Diversity
Sofas made from pallets are the easiest way to add a touch of uniqueness to your home. They are made to individual sizes and decorated to the taste of the owners. Ease of use. There are several standard sizes of pallets available on the market, making the job easier. The finished product does not clutter up the space, which is especially valuable for a small room, both in the country and in a country house. Versatility. A sofa made from pallets has a special appeal, adds natural warmth to the interior, and becomes its highlight. It easily fits into popular styles - loft, eco, Scandinavian; turns into a decoration for a home designed in a rustic aesthetic (Provence or country).
Despite its practicality, furniture made from pallets is not without its drawbacks. The most significant disadvantages:
- Additional preparation of materials. Even new pallets will have to be cleaned of dust and dirt.
- Treatment. The structures originally intended for warehouse needs do not have a flat surface. Many people wonder how to make pallet sofas attractive. To make the furniture look neat and elegant, careful sanding is used, followed by wood processing.
- Protection. The material needs antiseptic treatment, otherwise, with a high degree of probability, bugs will appear in the fashionable sofa.
- Additional expenses. The product is given a presentable appearance by covering all the wooden parts of the future sofa with varnish or paint.
Recommendations
It is best to line the outer surface of the shed walls with clapboard or siding. This will not only improve the appearance, but will also make the entire structure stronger at the same time. Often a situation arises when there is simply not enough money or time to build a shed in one go. In this case, the box of pallets can be treated with drying oil and covered with polyethylene.
If the shed is built on a foundation, then the box can be sheathed with clapboard without fear. For free-standing buildings, the walls are usually not lined in a continuous plane, otherwise the wind will topple the barn
If the barn had to be built without a foundation, then the walls cannot be covered with finishing until partitions or spacers are installed inside. Otherwise, a powerful gust of wind in winter can easily collapse the entire structure like a house of cards.
Upholstered seat design
When a comfortable corner or sofa for a kitchen made from wooden pallets is completed, it’s time to decorate, for which a variety of pillows or mattresses are used. Carefully selected textile accessories can radically change the appearance of furniture. When choosing them, they take into account where the device will be located (in the yard, on a covered terrace or in the house). Based on this, the final decision is made. Recommendations:
- It is more advisable to use water-repellent furniture fabric for the soft seat of a sofa, for example, flock or jacquard.
- Most often, the soft part is filled with crushed foam rubber or wear-resistant sheet polyurethane foam. If you need a particularly comfortable mattress, choose sheet latex foam for filling the sofa.
- On thin mattresses, it is better to use non-removable covers (stitched through), on thicker models - with a zipper.
Sofa made of pallets
Using transportation pallets as the main material provides an opportunity to implement ideas for leisure furniture, such as a sofa.
Before starting the process, having decided on the size and configuration, work begins with the following steps:
- purchase of high quality pallets without cracks and dirt;
- cutting parts for the design of the future sofa in strict accordance with the diagram;
- using a grinding machine, the surface of the frame is made smooth, without burrs and roughness (work is performed in special clothing and a respirator);
- upon completion of grinding, all parts are treated with the necessary varnishes, paints, solutions against mold and water;
- the resulting products are thoroughly dried; resort to the process of assembling furniture after purchasing fasteners according to the diagram;
- The last stage is decorating the future sofa with pillows, upholstery or a mattress.
Other crafts
There are still many different things that can be done in a short time using such inexpensive and pliable material as pallets.
Hanger
You can easily make a very practical and attractive hanger from pallets. It can become an original decoration for a country house or an ordinary city apartment.
To do such a thing, you will need to use the flooring from the pallet (its base). The side parts will need to be carefully removed. There is no need to throw away the leftovers right away - they can still be useful.
The base will need to be thoroughly sanded, coated with protective solutions, and then painted in a suitable color. All that remains is to attach a few hooks to the prepared part. Their number and intermediate distance depend only on the wishes of the owners. The finished structure is installed near the entrance door in the hallway.
Shoe shelf
A great idea is to create a shelf out of pallets to place pairs of shoes on.
You need to cut one pallet into 2 halves, and then put them on top of each other and fasten them together as securely as possible. In the space occupied by such a shelf, it will be possible to place many more shoes than before. In addition, a well-decorated shoe rack can easily become an original interior decoration.
Outbuildings
Few people know, but you can build an entire gazebo or outbuilding from pallets. Of course, these crafts will be more complex to make than shoe racks or hangers, but their functionality will be much higher.
Using the same principle, you can make gazebos, sheds, chicken coops, and so on from pallets. Ready-made designs are complemented with various decorations and decorations.
- If you plan to build a large structure, then you will need to prepare a good foundation for it. The choice of its type depends on the characteristics of the soil located on the site. In places where the soil is clayey, it is better to install a pile-type foundation. If the soil is rocky, then a tape option is suitable. The floor in a home-made building can be laid out with a beautiful terrace board or from the same pallets.
- The frame base for the construction of outbuildings can be made from wooden blocks or metal pipes. It is to them that the pallets will be attached in one or two layers.
- Using pallets it will be possible to completely cover absolutely all the walls of the gazebo or install them only to a certain height. One way or another, the interior space will still be sufficiently filled with natural light and will be well ventilated.
- The easiest way to construct the roof of a homemade gazebo on a summer cottage is from polycarbonate sheets. If polycarbonate seems too simple and boring, then you can use flexible tiles, ondulin or metal tiles instead.
- If you line the inner walls of the gazebo from pallets with plywood sheets, you will get a full-fledged summer house. From the outside it can be decorated with different plants and flowers. They should be placed in the “pockets” formed in the structure. Some summer residents decide to decorate the outside of such buildings with siding panels. As a result, few people can discern homemade pallets in such buildings.
Support for flowers
You can make neat flower stands from wooden pallets. To make them, a minimum of actions will be required: you just need to turn the pallet on its side and it can already be used as a stand for flowerpots with seedling material. Additional shelves with hooks will allow you to turn your homemade structure into a beautiful garden shelf.
Dog bed
From wooden pallets you can make not only furniture for people, but also for animals. Many summer residents often go to their plots in the company of four-legged friends. To take care of your pet, you can make a cozy and cute bed for him from wooden pallets: build small sides, and in the space between them put a soft mattress with thick foam rubber pillows. The end result is a very cute and convenient homemade product. This is an excellent alternative to a simple closed booth in fresh air conditions.
You can make a lot of cool products for your garden from pallets.
Use these wooden structures for beautiful vertical gardening in your summer cottage. The pallet will be an excellent base for hanging flower pots and entire containers of flowers.
How to make a sofa from pallets, watch the video.
Step-by-step instructions for DIY construction
A house made of pallets does not need a strong foundation.
The first step towards construction is design. A location for an object on the ground is selected, diagrams and drawings are drawn up, and calculations are made. Then the necessary materials and missing tools are purchased.
To work you will need:
- roulette;
- hammer;
- level;
- hacksaw;
- tamping;
- screwdriver;
- drill;
- plane;
- paint brush.
The materials you need to purchase are timber, primer and hardware (nails, screws, corners). Before use, the pallets are cleaned of dirt, dried, treated with a fire retardant, hydrophobic agent and antiseptic.
Step-by-step process for assembling a panel house:
- Making the foundation. Concrete blocks are laid along the perimeter of the external and internal walls or brick columns are made. Another option is cast-in-place asbestos-cement piles.
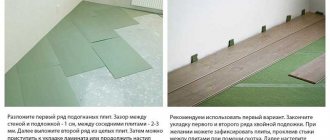
- Floor installation. Waterproofing is first laid on the foundation. A high-quality roofing material is best suited for this. Logs are laid on the supports. It is allowed to lay pallets at once in such a way that their corners rest on the base blocks. Boards, chipboard, OSB or multilayer plywood with a thickness of 16-21 mm are placed and fixed on top of the subfloor.
- Construction of wall frames. The frame is made from timber. First, the vertical posts are installed, then the top trim and crossbars are attached in the areas for windows and doors.
- Wall installation. The blocks, starting from the bottom, are inserted between the supports and screwed to the sides with self-tapping screws. For small buildings measuring no more than 3x4 m and children's houses, pallets are placed without a frame, simply fastened together. For additional stability, you can install an internal wall.
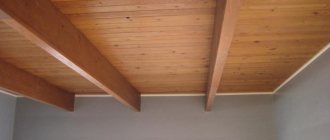
- Ceiling arrangement. If the house is small, pallets are laid on walls and partitions. In another case, the logs are laid first, and then blocks are attached to them.
- Internal and external lining. Outside, you can use a block house, siding or inexpensive plastic panels. It is advisable to sheathe the inside of the building with clapboard, plasterboard, plywood or laminated chipboards.
Finally, windows and doors are installed and the finishing cladding is applied.
No. 2. Benches, armchairs and sofas from pallets
In addition to the table, you can make comfortable sofas, armchairs and benches from wooden pallets. The bench is constructed as follows:
- divide one standard and pre-prepared pallet into two parts so that one of them has 4 boards (future seat), and the second has 3 (back);
- combine the resulting parts at right angles and fasten them with self-tapping screws or screws, you can use double fastening;
- For a more reliable connection of the back and seat, wooden blocks are used, which can be taken from a disassembled second pallet or you can use boards available on the farm. They will also play the role of armrests. It is better to fasten two bars on each side, connecting the back and seat; the length of the bars depends on the angle of inclination;
- Four legs can be cut from the remaining boards. It is better that they are of maximum width, but small in height, which will increase the stability of the bench. The legs are attached to the bottom of the pallet, you can further strengthen the fastening with a corner;
- Finally, you can cut out decorative elements on the back, then cover the bench with varnish or paint of the desired shade and decorate it with pillows. The latter can be bought, made to order or sewed yourself.
In a similar way, you can arrange a corner bench or a separate small chair. It’s easy to create a cozy seating area in the garden using made benches, armchairs and a table.
It’s easy to create sofas and pallets of absolutely any size and configuration (straight, corner, U-shaped). To do this, you will need to sequentially fasten a number of pallets together to obtain a workpiece of the required length and shape. A second row of trays is mounted on top to achieve a comfortable seating height. The backrest is attached to the finished structure. Self-tapping screws are used as fastenings. The workpiece is painted and decorated with pillows.
Floor
First, boards (or OSB-3) of the subfloor are attached between the joists. The protruding edge of the bottom trim beam (150×100 mm) is used as a support.
Do-it-yourself change house floor installation.
Then the surface of the subfloor is covered with waterproofing film. For this purpose, dense polyethylene is often used, but roll materials with bitumen or polymer-bitumen impregnation Gidroizol are considered more reliable. The film is laid with an overlap between the strips of at least 20 cm, with the seams taped with construction tape. The edges of the strips should extend onto the walls (the same 20 cm).
Insulation is placed between the joists. It is better to choose mineral wool, for example URSA. Unlike polystyrene foam, it is not flammable and does not harbor rodents. Its only drawback is its hygroscopicity and the property of losing its insulating properties when saturated with moisture (the same condensate). Therefore, you need a gap between the finished floor covering and a vapor-permeable membrane or use Izospan, which does not allow water to pass through - this will protect the mineral wool from direct contact with water and allow water vapor to erode from it.
The best choice for a finished floor is a tongue and groove board. The tongue-and-groove connection principle of the coating makes it possible to further protect the insulation from water getting into it.
But you can lay the same OSB, and linoleum on top.
How to do it?
You can build a pool with your own hands from pallets step by step only on a well-prepared site. Any unevenness and stones are unacceptable here. All vegetation will have to be uprooted. It is advisable to make a backing made of polystyrene foam boards. A layer of tarpaulin should be laid on top of the polystyrene foam or simply leveled soil.
The next step is the formation of the sides. When placing the pallets in series, they are immediately joined together using fasteners. Initially, the pallets are sewn together with strips. For greater strength, use clamps or mounting angles. Once the sides have been assembled, the bowl is covered from the inside for insulation:
- carpets;
- unnecessary blankets;
- felt.
A film is placed on top of these layers in a uniform layer. It must be brought beyond the edge along the entire perimeter (with an overlap of 20-25 cm). The edges of the film are secured with tape. Advice: you should buy film in either black or blue. In this case, the water in the pool will have a more aesthetic appearance.
To prevent the bowl from collapsing under water pressure, tightening it with a cable or mounting straps, similar to a hoop on a barrel, helps. Additionally, the outer surface is sheathed with clapboard and an elegant edging made of edged polished boards is stuffed onto the ends of the sides.
This edging can replace benches. The boards are impregnated with a protective compound and varnished. The final stage is testing the pool by filling it with water. When everything is ready, you can install the stairs and lighting fixtures. The podium is usually constructed from decking boards mounted on a frame.
Stainless steel screws are used to fasten the boards. The gaps between the boards are 10 mm. Composite deck boards can be laid side by side. The podium must be designed for a load of at least 400 kg per 1 sq. m. Concrete or stone is used as the base.
Door installation
The door to the barn can be made from an edged board, nailing it on both sides to a rectangular frame made of bars. It is better to assemble the door frame from high-quality lumber, securing the structure with long self-tapping screws and polyurethane foam. Once the box is secured in the opening, all that remains is to screw on the hinges, door handle, and locking hardware (such as padlock lugs).
What kind of cellar can you build in your country house? Read the article on our website.
We build an enclosure for a dog on a personal plot with our own hands.
How to install a plastic utility unit? The answer is in the article.
Features of using pallets
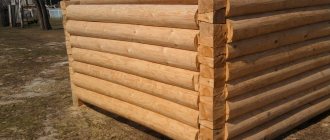
Pallets are wooden structures that act as packaging material, the use of which makes it possible to simplify the transportation of various types of goods.
Pallets have the form of rigid stands assembled from knocked down wooden boards placed at a short distance from each other
The average weight of an empty pallet is 15-20 kg. The overall dimensions of the structure, depending on its purpose, can be:
- 120x100x12 cm (standard pallet);
- 120x80x12 cm (Euro pallet).
The wood used for the manufacture of structures is chosen to be strong and durable. This is done in such a way that they can withstand a load of up to 1000 kg. Therefore, even already used pallets can find a second life, serving as functional elements in the arrangement of the site for more than one season.
Today, furniture made from pallets occupies a leading position among designer products in the popularity ranking. Some designers produce entire collections in eco-style, embodying the most incredible ideas using ordinary construction pallets. Taking the ideas you like as a basis, you can implement them in your own way.
Overview of species
We bring to your attention the most popular children's houses.
A typical house of their painted pallets, which is a scaled replica of a real residential house. There is only one room inside, which allows the baby to stay comfortably.
Chum house with a folding wall. The second name for this type of children's houses is transformer. It is erected from two panels, which are knocked together from pallet boards and then joined at the tops. Children will find this shape of the house and the folding wall especially interesting.
Technology and time saving
Working using this technology, the builder saves a lot of time, since he can implement a wide variety of connections in one way, and it turns out much faster than choosing grooves or forming ridges from solid wood. It is also convenient to work with such blocks because they are lightweight - even one person can stack them at a considerable height.
Before you build a house out of pallets with your own hands, you need to know that the quality of construction will noticeably improve if you select quarters from the boards using an electric planer, a circular saw, or using a woodworking machine. This is additional work, but in this way you will not only get a more durable structure, but also protect the interior from blowing through the wind.
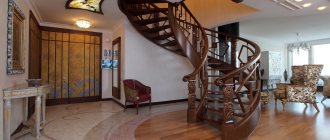
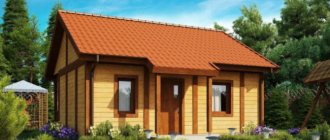
The following shows a house made from pallets with your own hands - in the photo you can see the options for finishing:
So, for small outbuildings it is not at all necessary to purchase expensive long lumber - you can get by with minimal costs. And you don’t even have to look for pallets. Using the above method, wooden building blocks can be made from almost any non-grade board, for example, left over after dismantling an old house, large packaging, etc. As with any type of activity of a home craftsman, a creative approach to the matter is most important here.
Watch how to build houses from pallets - the video shows the simple technology available:
https://youtube.com/watch?v=HPSIq5JpI6Y
Drawing up a project with drawings
If you are planning a construction with more or less comfortable conditions, then it is best to build a warm shed from pallets using a frame scheme.
In this case, the design of the walls makes it possible to lay insulation and sew cladding onto the outer surface with siding or regular clapboard. A gable roof will ensure good drainage of rainwater and at the same time improve ventilation of the room.
If the barn will be used only for household needs, then the box can be built from pallets, only reinforced with frame inserts. In this case, the roof is made pitched, but it is better to also line the walls of the house with plastic or siding panels.
In the first case, the barn can be built on a columnar foundation, which greatly simplifies the process of constructing the building. In the second option, the foundation will need to be poured, otherwise the structure will be unstable.
Construction of a residential building
To build a small house, it is not at all necessary to buy long, expensive lumber. In fact, you don’t even have to look for pallets - the main blocks can be assembled from any non-grade boards. For example, those left after dismantling an old building or large packages.
Therefore, when purchasing pallets for building houses, you should first of all choose environmentally friendly materials without signs of damage, cracks or other obvious defects.
To build a residential building, even the most compact one, you will need a lot of pallets. However, given their low cost, all costs will more than pay off.
Step-by-step instructions for building such a house involve performing the following work.
Each pallet should be divided into two parts. The lumber of the base is thickened - they are used to build the frame. Thinner transverse ones play the role of walls. These manipulations are quite labor-intensive, tedious and the longest in the entire construction process. If you set yourself the task of reducing the cost of work even more, then when disassembling pallets you can use a nail puller. In this case, you will minimize the risk of damage to the wood, and the nails can always be reused.
Then measurements are taken, a drawing is drawn up and the contours of the future structure are marked on the prepared plot of land.
All work is performed in strict sequence:
- installation of the base and its fixation;
- installation of logs;
- fiberboard sheet flooring.
At the next stage, vertical supports are installed; they will be used for mounting door and window openings.
At the final stage of building the frame, the roof is attached; it is also made of boards.
After this, you can proceed to the cladding of the building. To do this, pallet boards are attached to prepared joists.
During operation, it is important to control their location relative to the guide axis
The roof is additionally covered with roofing felt, the top layer is covered with tiles. This creates reliable protection from rain, which is especially important when it comes to wood.
The building is ready. All you have to do is treat the building panels with fungicidal preparations. They will protect the material from fungus, mold and the adverse effects of water. It is advisable to paint the surface - paint creates obstacles to premature rotting and the activity of small rodents.
Keep in mind that such a house can be used as a residential building only in the warm season. By the way, in many areas of the United States, average Americans live in such buildings.
Preparation of material
After purchasing a pallet, it is recommended to carry out the following work:
- Clean the surface from dirt (paint stains, smudges).
- Sand with a machine to remove burrs.
- Treat thoroughly and generously with antiseptic.
- Dry in natural conditions, keeping an eye on the permissible humidity level.
Processing pallets with a sanding machine
The pallet must be completely dry. Otherwise, the finished product will become deformed over time. If you value the deep, rich color of wood fibers, then treat the boards with stain. This will help:
- strengthen the structure of the boards, making them stronger;
- increase resistance to humidity;
- extend the service life of materials;
- make the pallet several tones darker;
- highlight the fiber pattern.
Treating the pallet with stain
Be sure to remove excess nails. Make sure that the tray is perfectly smooth: there should be no burrs on its surface that could damage the skin. If necessary, coat the boards with yacht varnish.
Pallet flowerbed
Flowerbed is a fairly broad concept. It can be any size and any shape. The most spectacular flower beds are stepped structures that allow you to plant ornamental plants in tiers. A flower bed made from pallets can be very original. It can be made vertical or inclined. To create flower beds, both solid pallets and separate boards from them are used.
A simple flower bed made from palletsSource pinterest.com
Vertical flower bed made of pallets
Vertical flower beds look very impressive, do not take up much space on the site, and are quite simple to make. Therefore, they are very popular among homeowners.
Vertical flower bed made of palletsSource freepatriot.club
To make a vertical flower bed you need to prepare:
- one pallet;
- landscape textiles;
- furniture stapler;
- paint or varnish;
- soil for planting.
First you need to sand the pallet. Then it should be covered with paint or varnish. If this is not done, the flowerbed will not last long. The next step is to cover the pallet with textiles. To do this, it is placed face down. Using a stapler, the side walls and bottom of the future flower bed are sewn up with fabric. In addition, the textiles are attached to the central strip on the back side of the pallet.
Next, the pallet needs to be placed vertically, just as it will be installed as a flower bed. You need to fill it with soil. To distribute the soil more evenly and reduce its consumption, you can make a textile pocket under each bed of the flower bed. A bed is a row along the gap between two adjacent pallet boards.
Instructions for making a vertical flower bedSource proremont.ovh
Plants are planted from the bottom row. They need to be arranged in a tight chain so that the soil does not spill out. After this, plants are planted in the remaining beds. The planted flower bed should be well watered. It should lie horizontally for about two weeks so that the seedlings are well established in the ground. After this, the flowerbed can be raised to a vertical position and secured to a wall or fence.
Bright vertical flower bed made of palletsSource coachdecor.com
Only low-growing annual flowers can be planted in vertical flower beds. They need to be watered frequently, as the soil in such a flower garden will dry out quickly. Some gardeners use vertical pallet beds to grow wild strawberries or wild strawberries.
Flowerbed made of pallets and lining
This is also a variant of a vertical flower bed, but it involves planting plants in clapboard boxes. For this product you will need:
- 2 pallets;
- several meters of lining;
- paint or varnish;
- sandpaper;
- 2 strong beams 50 cm long;
- nails or screws;
- priming.
The first step is to clean and paint the pallets. After this, you should place the pallets vertically on the long edges at a distance of about 50 cm from each other and support one pallet on the other. At the next stage, they are secured to each other using beams.
Boxes made of clapboard are hung on the resulting structure and plants are planted in them. This design can be used not only for boxes made of wooden boards. You can attach ordinary flower pots or special plastic containers for plants to it.
Vertical flower bed with drawersSource wtnasos.ru
Other options
You can adapt pallets to a flowerbed on your site in all sorts of other ways. For example, a pallet can simply be laid on compacted soil and plants can be planted in the gaps between the slats. Or, the pallet can be used simply as a rack for flower pots.
Rack for flower potsSource pinterest.com
Another option is to install the tray vertically in a square tub. In this case, plants can be grown in the tub itself and in improvised flowerpots between the boards of the pallet. To adapt such a flower bed, you need not only to secure the pallet, but also to add boards to its design, which will serve as the bottom for the flower pots.
Flower garden in a wooden tubSource rem-stroitelstvo.ru
You can turn a fence made of pallets into a flowerbed, as in the photo below. This multifunctional fence will perfectly decorate any area. With its help, you can separate the territory of the garden or recreation area.
Fence and flower garden made of palletsSource pinterest.com
Some homeowners act differently - they simply disassemble the pallets into boards and build from them the flower beds that they consider most suitable for their site. For example, you can make a basic box of the desired height.
Flower bed made from pallet boardsSource decorits.com
Types of designs
The flexibility of polycarbonate allows you to create structures of various shapes and purposes.
The shape of the shower can be:
- square;
- rectangular;
- cylindrical.
According to their purpose, the following types of shower stalls are distinguished:
- simple;
- with a locker room;
- with toilet.
An outdoor shower for a summer residence is a frame structure of various shapes. A water tank is installed on top of the cabin. It’s not difficult to create a design with your own hands:
- Prepare the base.
- A strip foundation or foundation is erected on piles.
- The frame is constructed from aluminum or steel profiles.
- Lined with polycarbonate.
- Install the tank.
- They supply water.
- Arranging the interior space.
Wastewater is discharged in various ways:
- install a septic tank;
- pipes are used;
- construct collecting pallets;
- create drainage systems.
In some cases, a summer shower with hot water is installed in the country house. The easiest way is using water pipes. However, not every dacha community has this luxury. Sources of hot water supply can be instantaneous or storage water heater.
Most often, summer residents install a boiler for the kitchen and shower. In this case, the outdoor shower is adjacent to the outer wall of the kitchen.
Attention! For a family of three people, a storage water heater with a volume of 50 liters is installed. The water in it heats up within an hour.
Simple summer shower for a summer house made of polycarbonate
The base of a simple polycarbonate country shower design can be round or square.
Photo instructions for constructing a summer shower at the dacha made of polycarbonate with an absorption well:
- In the selected area, a pit is prepared according to the size of the shower stall, 1-1.5 m deep.
- A third of the pit is filled with fine gravel, the second third with medium gravel, and the third with coarse gravel. Formwork made of boards or bricks is installed around the perimeter and the foundation is poured, leaving a hole in the center for the drain.
- Assembling the frame. The second stage of pouring the foundation is carried out with a slope to the center.
- After the concrete has dried, the hole for draining the water is treated with bitumen mastic.
- The frame is covered with polycarbonate.
- A pallet made of boards is placed on the shower floor. Connect the water supply hose.
- A water tank is installed on the roof.
- Arranging the interior space of the cabin. The siphon, shelves and hooks are attached.
The country shower is ready. Before operation, check the water supply and drainage system. If deficiencies are found, they are eliminated.
Shower for a summer house made of polycarbonate with a changing room
When building a polycarbonate shower for a summer house with a dressing room, you should take into account its differences from a simple design. They consist of dividing the space into two sections using a waterproof bathroom curtain or a lightweight door.
To drain water in the floor, a slope is provided under the drain with a grate. The wooden sheathing will not allow moisture to accumulate in one place and will help the cabin dry out quickly.
Instructions for installing a shower with a changing room and a heated tank:
Shower with toilet for a summer house made of polycarbonate
Summer residents often set up a utility block at their dacha, which solves several problems. It includes:
- shower;
- toilet;
- storage place for garden tools.
Sometimes the utility block includes a kitchen. The summer building is built from inexpensive building materials. A frame structure made of profiles, covered with polycarbonate, is a budget option.
A place on a summer cottage for arranging a utility block is selected according to the same parameters as a toilet
It is important that wastewater does not enter the source of drinking water, so if there is a well on the site, the distance from it to the utility block should not be less than 30 m
Before arranging the foundation for a shower and toilet, a cesspool is prepared.
A frame made of a metal profile or a 4*4 cm wooden beam is erected on the equipped foundation. A base is erected for the toilet seat.
The next step is to erect a gable roof. Set up a base in the shower room. The frame and interior are sheathed.
Advantages of furniture made from pallets
It is no coincidence that furniture made using pallets has become a fashion trend in the last few years. The material used in its manufacture has a number of advantages.
The pallets are made of durable boards and their design is designed to withstand heavy loads. Therefore, the products are distinguished by high quality characteristics and a long service life.
This is an accessible material that is low in cost. Used pallets can be purchased very cheaply from building materials warehouses or transport companies. Pallets are often given away free of charge with the condition that the buyer will handle the transportation.
The new design direction involves complete freedom of creativity, a non-standard approach to making furniture with your own hands and an exciting activity for the whole family.
As a result, you can make comfortable and practical furniture that meets all individual requirements, is safe and durable in terms of service life.
Briefly about the main thing
Recycled pallets are an excellent building material. It can be used to create garden paths, light buildings, and play complexes.
Freight pallets are suitable for constructing furniture. They make comfortable sofas and beds, cabinets and even kitchen units. It is enough to show a little imagination in order to create beautiful accessories to decorate different rooms.
Usually decommissioned cargo containers are used for work. It costs almost nothing, so both garden decorations and interior items are very cheap.
How to build summer cottage buildings from wooden pallets
Before you start creating a building, you should think about its design, as well as its future location. For small structures, it is acceptable to do everything for the eyes. For large buildings, you should calculate in advance all the dimensions of the parts and the load. Approximate calculations are undesirable, as they may affect reliability.
Drawing of a utility block for a summer cottage made from pallets
The process of creating buildings can be divided into two main parts: preparing materials and assembling the structure. Also, at any stage, decoration, painting, varnishing and other decorations of wood can be carried out.
Wooden pallet for country houses
Pallets are assembled pieces of wood. Therefore, the process of constructing buildings from wood is absolutely the same as in the case of using boards. However, in the end there are more possible variations.
Preparatory stage
Wooden pallets should be prepared for subsequent use. First of all, they should be inspected for the presence of various defects, the possibility of splinters and general integrity. If necessary, get rid of negative factors that may affect the safety of the structure.
If part of the pallet is rotten, then separate it from the whole part. Use a hammer and a double-sided crowbar or nail puller to remove all nails and screws. Smooth out all roughness with sandpaper.
Sand the pallets before starting construction
The preparatory stage is completed by shaping the wooden pallets for assembly. Here everything depends on the final design of the building. A power tool is best for preparing the workpiece, but a simple saw will suffice.
Preparation of workpieces according to the drawings
Assembly
Assembling the elements is the main stage of constructing a building for a summer house from wooden pallets. The further service life and reliability of the design will depend on its quality, as well as the thoughtfulness of the plan.
The assembly process is individual for each structure. But, there are also similarities. The main methods will be to fasten the pallets.
Connecting pallets with self-tapping screws
The simplest option for connecting would be to use nails or self-tapping screws. They simply attach the pallets to each other. In particularly thick places, hammer nails or screw in screws at an angle.
A more difficult option to implement is remote connections. With this type of fastening, additional materials are used. For example, metal fittings or wooden beams. They are applied to the junction of the pallets and then attached.
Fastening pallets with metal corners
The first method is less expensive in terms of materials and easier to implement, but provides low reliability of the design. The second method will make the structure more durable and strong, but requires additional materials.
Care
To increase the service life of summer cottage buildings made from wooden pallets, they must be properly cared for. Renew varnish and paint in a timely manner, as well as replace damaged pallets. In fact, it is quite simple, and all actions will be carried out quite rarely.
It is recommended to update paint and varnish once a season. The old layer is removed using sandpaper. As a result, nothing should remain on the wooden surface. Afterwards a new layer of paint is applied, dries during the day, then a layer of varnish.
The surface layer of buildings made from pallets needs to be renewed annually
Replacing damaged pallets is much more difficult. Most of their designs are modular. Then getting a separate pallet is either very difficult or impossible. It will be easier to assemble a new structure or think through a disassembly system in advance.