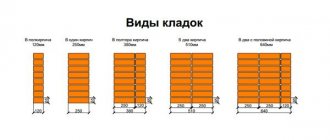
Brick is reliable and durable. This material looks attractive and presentable. But brick walls have one significant drawback: thermal conductivity. Even relatively warm ceramic material conducts heat well and does not sufficiently protect the building from the cold. In our climate, it will be necessary to build walls 64-90 cm thick to provide sufficient thermal resistance. A more rational option would be to make the external walls of the building from other materials with insulation and cladding. How to cover a house with facing bricks? It's not difficult if you know the technology and the nuances of the work.
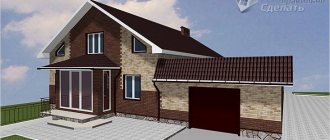
The house, lined with brick, looks solid and presentable, it is protected from wind and other unpleasant weather phenomena. This finishing option is used for both lightweight concrete and wooden houses.
How to choose facing bricks for your home
Before you line your house with brick, you should carefully select the material. It is important to select cladding not only by cost, but also by technical characteristics and properties.
Ceramic bricks are most often used in construction. This material has fairly good (compared to other types) thermal insulation properties. The disadvantage in this case will be high hygroscopicity. The technology involves the use of both ordinary ordinary material and special facial material.
Ceramic brick is simple, durable and easy to use
In the first case, it is strongly recommended to treat the outer surface after installation with a hydrophobic composition. Facing brick does not need such treatment. The composition for treatment is selected with sufficient vapor permeability. This is especially important when finishing a wooden house with brick. It is required that the impregnation does not form a film on the surface that prevents the permeability of the walls to air and steam. Which brick to choose for frost resistance? The brand must be no lower than F35 according to the standards, and no lower than F50 according to the recommendations of the builders.
Another popular option is silicate material. It is the cheapest, but is not durable. Facing a house with this type of brick conducts heat well and absorbs moisture. Most often, silicate is heavier than ceramic. This option is not recommended when finishing a timber house (we also include a frame house and a log house).
Sand-lime brick is less durable than ceramic brick, but for 20-30 years you won’t have to worry about the problem
To decorate bricks with your own hands, you can use clinker material. It is specially designed for cladding a house, therefore it has low moisture permeability and high strength. Clinker finishing looks attractive, but this pleasure is not cheap: prices are on average 50-150% higher.
Undoubtedly, clinker brick is the best choice among all options. You can choose almost any color and shade
Differences from other types of facade tiles
Slabs for decorating the façade of a house can be made not only in the brickwork version. There are other types of facade slabs, but brickwork is universal: there are enough color options to realize any design idea .
If a brick is damaged, it can be replaced with a new one. In terms of performance characteristics, “brick” tiles are not inferior to natural bricks.
The range of color solutions for tiled brickwork is quite wide, which allows you to choose the material to suit the desired design.
How to cover a wooden house with bricks
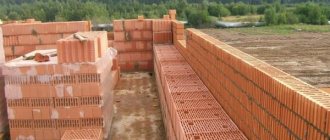
Brick and wood have very different characteristics, so certain difficulties may arise during the work process. When facing a wooden house with bricks, it is imperative to provide for sufficient ventilation of the main part of the wall. Otherwise, the wood will begin to rot or become moldy. Before covering the house with facing bricks, it is worth carefully examining the wall pie. Three-layer walls with brick cladding in this case will include:
- wooden supporting part;
- vapor barrier;
- insulation;
- waterproofing and wind protection;
- ventilation gap min. 50-60 mm;
- brick lining.
1 - ventilation layer;
2 - fastening the cladding to the wall; 3 - facing brick; 4 - additional insulation with windproof membrane; 5 - vapor barrier; 6 - finishing; 7 - thermal insulation; 9 - log wall It is important not to confuse vapor barrier and waterproofing. The latter must be permeable to steam so that it can easily escape from the insulation and brick into the ventilation gap. It is recommended to use modern vapor diffusion windproof membranes.
To ensure free movement of air, when clad with bricks on a wooden house, it is necessary to provide vents in the lower part and outlet openings in the upper part. It is recommended to use mineral wool as thermal insulation. It is characterized by low cost, ease of installation and good air permeability.
Before properly covering a wooden house with bricks, you must wait time for the walls to shrink. This process can take a couple of years, so it may be easiest to re-clad an older house.
Useful tips
You cannot lay out more than 6-7 rows at a time, as the masonry may become deformed under heavy load. Every 3-4 rows are checked with a level to achieve maximum verticality. You cannot fill the gap between the cladding and the wall of the building with anything; the air gap is necessary for ventilation of the surfaces, in addition, it also performs thermal insulation functions. Slope jointing can be done immediately after laying, so as not to rearrange the scaffolding twice.
Brick cladding
Prices for construction and facing bricks
Construction and facing bricks
Advantages and disadvantages
In construction it is very difficult to combine materials with different properties. In this case, nuances and negative aspects always appear. Finishing the facade with brick for a wooden building has three disadvantages:
- decreased ventilation, likelihood of moisture accumulation in the insulation;
- different shrinkage of parts of the wall, which does not allow rigid connection between the cladding and the main wall;
- the high mass of brick compared to wood (more than 3 times) forces the construction of more powerful and expensive foundations.
In general, we can say that it is better to decorate an old house with brick. For new construction, it is recommended to consider other more economical and efficient options.
But the technology has its advantages:
- improvement of thermal performance (especially when using ceramics);
- reducing the level of fire danger;
- reliable and durable protection of wood from negative weather conditions.
Specifications
Brick imitation facade tiles can be presented in two versions:
- in the form of a slab with laid out rows;
- in the form of separate elements (bricks).
The thickness of the tiles differs depending on the material of manufacture.:
- concrete - 24 cm;
- clinker and ceramic - from 0.8 cm to 1.4 cm.
The length of the individual elements is 25 cm, like standard natural brick.
Width may vary:
- 6.5 cm - single brick;
- 7 cm - one and a half;
- 12 cm - double.
Some manufacturers produce artificial bricks in non-standard sizes, for example, 24 x 8.8 cm or 24 x 5.2 cm.
The weight of one brick varies from 360 g and above. Weight directly depends on the composition of the material .
Row panels can be 95 cm long and 65 cm wide.
Technology
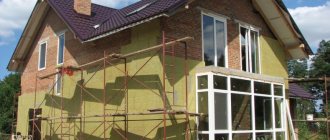
Cladding the façade of a house with brick is done after treating the wood with an antiseptic. You should choose a special composition for impregnation - for outdoor work. It will protect the wall from mold, mildew and other dangerous microorganisms. Next, a vapor barrier is attached to the wall using a construction stapler. Installation is carried out with an overlap of at least 10 cm.
A vapor barrier located on the inside of the wall will prevent moisture vapor from entering the insulation from the room
Facing the facade with brick begins with the installation of the sheathing. The dimensions of the frame bars depend on the required thickness of the insulation. The thickness of the thermal insulation can be selected approximately based on the recommendations of neighbors or the Internet, but it is better to use a special calculation. Using the fairly simple Teremok program, even a non-professional can make thermal calculations. You only need to know the thickness of the wooden wall and its thermal conductivity, as well as the thermal conductivity of the selected insulation. The brick (and all layers after the ventilation gap) are not taken into account in the calculation.
The frame block is attached to the walls with screws or nails. Next, the house needs to be sheathed with insulation. Mineral wool is placed tightly between the sheathing. To do this, the distance between the bars should be 2-3 cm less than the width of the insulation.
Methods for attaching insulation to a wooden frame
Waterproofing and wind protection are fixed on top of the insulation. Fastening is carried out using a construction stapler. After such preparation, they proceed directly to lining the house with bricks.
The hydro-windproof membrane protects the insulation from wind and moisture, but does not prevent excess water vapor from escaping from the wall to the outside
The thickness of a brick verst is usually 120 mm. This is not enough to ensure stability, so the wall must be connected to the main part of the external structure.
This can be done in two ways:
- attaching a reinforcing mesh to the wall and inserting it into the facing layer by half the width (such a mesh is installed across the entire width of the wall with a certain vertical pitch);
Fastening the cladding using reinforcing mesh (steel or flexible) is only possible for new construction - separate special bindings that are nailed to the wall and inserted into the masonry.
The fastenings are located in the places where the supporting frame passes.
The finishing installation technology is also relevant for frame buildings. The only difference is that the connections between the wall and the external materials are attached to the frame posts. In all cases, cladding must take into account the ventilation gap.
Homemade wall design options for brickwork
If you want to save money by making an imitation of brickwork on one of the walls of an apartment or house with your own hands, you can use original techniques developed by folk craftsmen.
There are interesting technologies that allow you to imitate brickwork completely independently.
There are several common options that do not require special costs for the purchase of facing slabs or panels, and also do not create any particular difficulties in installation:
- Self-production of polystyrene foam tiles with a thickness of 10÷12 mm. For this purpose, it is recommended to use extruded material with higher performance indicators than conventional white foam.
- Creating a brickwork relief using a stencil.
- Reproduce the desired design on the wall using masking tape.
Brick-like tiles made of polystyrene foam
If you plan to use the process of melting the edges of foam plastic in the manufacture of tiles, then the work should be carried out outdoors, protecting the respiratory tract with a respirator, since this material is flammable and releases toxic substances when burned and melted.
To be honest, using polystyrene foam for interior decoration is still not a reasonable solution.
- The first step is to mark the “brickwork” on the prepared, leveled and primed wall surface using a ruler, plumb line, building level and a simple pencil. The wall is drawn into horizontal stripes and vertical partitions, which determine the size of the bricks and the seams between them and the masonry rows.
- The second step is to mark the sheet of polystyrene foam into tiles of the selected size.
Sliced polystyrene foam rectangles are the future “bricks” of finishing
- Then the material is cut into individual elements with a stationery knife. The number of such blocks must correspond to the number of bricks required to decorate a certain section of the wall on which the marking was made.
Smooth tiles will not give the desired effect, so they need to “spoil their appearance” a little
- Next, in order to achieve the most reliable effect of imitation brick, you need to work on the resulting tile - this can be done in different ways. Its surface is treated with sandpaper in different or one direction, and notches and grooves are made on it with a knife or other sharp instrument. You can also use a heated soldering iron for these purposes.
Melting the edges of the tile using the fire of a lighter
Another option is to melt the edges and outside of the tile using a regular lighter or torch. In this case, the front surface takes on soft, smooth shapes.
Expanded polystyrene processed tiles arranged in “brickwork”
- After painting the tiles in the chosen color, its relief will be more pronounced. Paint can be applied before installing the tiles or after the wall cladding is completely completed.
Painting can be done using a brush or spraying the coloring composition from a can. The main thing is that the paint does not cause dissolution or softening of polystyrene foam - it is better not to experiment with organic-based compositions, giving preference to water-soluble ones.
The same “brickwork” but after the painting operation
- Laying of foam tiles is carried out according to wall markings using “liquid nails” glue, which is applied to the back surface in three points with a thickness of 3–4 mm.
- The final stage will be the design of the seams between the bricks and rows.
- It should be noted that if the design does not provide for highlighting the tile joints with a different color, then painting the cladding can be done after the grout solution has dried.
Imitation of brickwork using a stencil
In order to make an imitation of brickwork using a stencil, you will need a cement-based mortar. It is best to purchase it in the form of a ready-made dry building mixture for plastering work, since it already has all the necessary additives that make it plastic and convenient for work.
Stencil for “brickwork” and the relief that should be obtained in the end
The solution can be made independently from two materials - this is a plaster and adhesive cement mixture, which are taken in proportions of 1:1. To increase the plasticity of the solution, add a tablespoon of liquid detergent per 5 kg of the finished mixture.
- The wall must be well cleaned, primed and dried.
- The solution can be applied to its surface using a wide spatula or simply with a rubber-gloved hand. The thickness of the applied layer should be equal to the thickness of the stencil strips. This moment will depend on what kind of surface the brick should have - smooth or rough.
- Further, so that the stencil does not have “stickiness” with the layer of applied solution and is easily separated from it, it should be moistened with water - this can be done with a sponge or damp cloth. If the stencil is made of rubber, then you can simply dip it in a basin of water, but in this case you need to wait for the excess to drain, otherwise excess moisture can ruin the whole work.
- After this, the stencil is pressed against the applied fresh plaster and carefully pressed so that the relief of the brickwork remains on it.
- Next, the stencil is removed and applied further, next to the just pressed relief. Here you need to try and apply it so that the masonry is even and its horizontal seams do not become distorted.
- When the relief has been applied to the entire surface, it is left until completely dry.
- After drying, the wall should be completely covered with one color - usually light shades are chosen for this, since it will be easiest to apply any color to them, as well as highlight it with a dark shade or leave all the masonry seams light.
It is recommended to use acrylic paints to paint the surface, and it is best to cover the relief wall with a layer of primer before applying them.
Painting imitation brickwork is already a creative process, so you can allow yourself various fantasies. In this case, of course, it is necessary to keep in mind that the chosen color will set the mood for the entire interior of the room.
Creating a brickwork relief using plaster and masking tape
For this technology of reproducing imitation brickwork on the wall, you will need the above-mentioned composition of cement plaster mortar and masking tape. Some craftsmen even use electrical tape, however, it does not adhere to the wall well, while high-quality masking tape has excellent adhesion to any surface.
This “brickwork” relief can be made using regular masking tape
The width of the tape should be no more than 14 mm, and if you couldn’t find tape of that width, you’ll have to buy a wider one and carefully cut it in half right in the skein. If its edges are not perfectly smooth, this is not a big deal at all, since this factor will not affect the accuracy of the relief, but rather will even play into your hands.
First of all, the wall is marked
- The first step is to mark the prepared surface of the wall to be tiled for brickwork.
Painting tape is glued to the wall along all marking lines
- Next, masking tape is glued along all the marked lines on the wall. It should be secured so that the edges of the horizontal pieces of tape extend beyond the edges of the surface being designed, and the solution should not be applied to them, and the vertical pieces should be well glued to the horizontal ones, always on top of them.
- Then, on the surface of the wall, on top of the glued grid of adhesive tape, using a wide spatula, apply a solution with a layer thickness of 5-6 mm - the height of the relief will depend on this parameter. Do not apply too thick a layer, otherwise you will have to cover the seams with grout.
- After applying the solution completely to the entire wall, you can walk over it with a damp rubber glove to create a textured surface. If you plan to leave the surface of the “bricks” flat, then you should not touch the mortar layer.
Carefully removing the “cobweb” from the tape will create a “brickwork” pattern on the wall.
- The most interesting stage in this method of simulating brickwork is removing the masking tape, since after this operation the relief of the wall will be immediately visible. Several strips of tape are picked up from one of the free sides and begin to be carefully peeled off from the wall, and as a result, in place of the peeled tape, seams are formed between the “brick tiles”. After removing the tape from the entire surface, the wall should be left until completely dry.
All that remains is to apply the final decoration with the selected paints
- It is recommended to prime a dry wall before painting - this operation will make the surface more pliable for the next stage - painting, since the paint will lie flat on the surface and will not be absorbed into the plaster layer. Which shades to choose for the wall depends on the preference of the master.
Video: How to imitate brickwork using plaster and masking tape
From all of the above, we can conclude that the construction market has an oversupply of various materials that perfectly imitate brickwork or other stone surfaces. Sometimes the quality of the imitation is such that when finished, it is impossible to distinguish it from real brick by texture and color. Well, if ready-made tiles or panels do not fit into the family budget, then you can use one of the more economical methods and decorate the wall using affordable materials.
Reinforcement
To cover a building with brick, it is recommended to provide reinforcement for the finishing. To increase strength and rigidity, a wire mesh with a diameter of 3-4 mm and cells of 50x50 mm is used. The mesh is laid in the seams between the horizontal rows. The frequency depends on the brick:
- covering the building with a single brick (65 mm high) - every 5 rows;
- one and a half (88 mm high) - every 4 rows.
The dimensions of seams with and without reinforcement must be the same. To control, the mesh on one side is moved slightly beyond the masonry. This option increases reliability, but increases the cost and complexity of the work.
conclusions
Brick wall decoration is an ideal decorative tool of modern times. To use it correctly, you need to study this article. She will help you choose both the color and type of material. Real brick or its imitation - it all depends on your personal preferences and desires. Always listen to yourself, as well as to the advice of experts, take into account the features of the rooms and do not mix inappropriate styles together.
Did you like the article? Share with friends:
How to clad a house with lightweight concrete
In this case, a lined house can be built from aerated concrete, gas silicate, foam concrete, cinder blocks, and expanded clay concrete. A house made of facing bricks allows air to pass through worse than the listed materials. For this reason, just as in the previous case, it is necessary to provide a ventilation gap.
The installation method is very similar to a wooden house. The only difference is that you can use rigid connections between the wall and the cladding. The minimum number of connections is 3 pcs. per 1 sq.m. Ties are not allowed to be placed in the seams of the main wall; they are nailed to the surface.
When constructing a building from fragile cinder blocks, it is recommended to build a frame that will take the load from the floors and other building structures. In this case, the walls will be self-supporting. Finishing the house with facing bricks is attached to the cinder block very carefully.
Your own brick-lined house is beautiful and reliable. But when carrying out work, you must follow certain recommendations.
Installation on the lathing
The mounting frame must be made of a metal profile or wood. Installation of slabs on the frame is carried out using clamps, clips or self-tapping screws. Fastening can be of two options: hidden (performed using anchors) or visible (performed using special fasteners) .
The slabs are fastened to the fastenings that are supplied with the material. It is important to maintain the horizontal and vertical position of the coating during installation.
You need to start attaching the slabs from the bottom corner (left). If this is a regular panel, then the tiles should be fastened together into locking elements with some force.
IMPORTANT!
If the plate is attached to clamps, attention should be paid to the quality of the fastenings: they must be made of galvanized metal, their thickness must be at least 0.004 cm.
A diamond blade should be used to cut tiles. If the fastening elements are cut off, then the hanging parts should be secured with self-tapping screws in the sheathing, and it is advisable to seal the holes for the screws with sealant and crumbs of the material being laid.
For openings, special angles are used, provided complete with the main material..
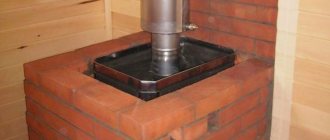
Burning
For firing you will need a furnace, which you can also make yourself. You can build it in a large barrel. To do this, dig a hole half a meter deep, put material for lighting a fire at its bottom, and install legs 20 centimeters high above it. Place an iron barrel on them.
In this improvised oven, bricks are stacked in several rows. After filling, the structure is covered with a sheet of metal, and a fire is built under it. The firing process lasts approximately 18–20 hours, during which time the fire must be constantly maintained.
After this time is over, we gradually reduce the intensity of the fire, and then completely extinguish it. Under no circumstances should the metal sheet be removed until the barrel and its contents have completely cooled. Otherwise, the bricks will crack.
Cooling should occur slowly, naturally, without sudden temperature changes and without drafts. This is the only way you can get a quality product.
Next, take one of the finished bricks and split it in half. Carefully inspect the fault. It must have the same color and structure. Then immerse these pieces in water and wait for some time. If everything is in order, that is, there is no damage or color distortion, then such bricks can be safely used in construction.
Preparing the solution
Before laying facing bricks with your own hands, you need to learn how to make the mortar correctly. The recipe is quite simple - a mixture of cement and sand in a ratio of 1 to 4 and the use of a concrete mixer. It is recommended to add a plasticizer or detergent (liquid soap).
Sequencing:
- It is necessary to wet the walls of the concrete mixer to prevent the mixture from sticking. Therefore, you should pour half a bucket of water into the device and turn it on.
- Then add about 50 grams (more precisely, it will be indicated in the instructions) of plasticizer.
- After this, you need to add two parts (measured in buckets or shovels) of sand to the water, and then (after mixing until smooth) one part of cement.
- Stirring continues until the solution falls off the walls of the bowl. Two more parts of sand are added, and then water in small doses, until a thick plastic mixture is obtained.
Advice! It is recommended to exclude the use of hard water, because... when dried, this will lead to the appearance of efflorescence (white salt deposits) on the front side, which will be almost impossible to remove.
Let's start laying the first row
The construction of the cladding is carried out directly next to the main wall, resting on the outer part of the foundation. To do this, the base is cleared of debris, and a waterproofing layer, for example, roofing felt, is laid. After this, the evenness and height of the surface are checked so that, if there is a difference, it is compensated for using masonry mortar.
First you just need to lay the bricks along the entire base without mortar, taking into account, however, the thickness of the seams between them. This is done to determine the required amount of material and install the mooring cord.
An example of bricklaying using reinforced mesh Source santeh-elektrik.ru
Necessary actions in case the outermost brick does not fit entirely:
- If the size of the residual opening is small (less than half a brick), it will be enough to increase the width of the seams. Usually an increase of 0.5 mm is sufficient.
- Reconsider the joining of corner bricks in a different way, for example: move the brick butts forward from the adjacent wall.
- If the residual gap is large, splitting by seams is not suitable, because the difference in the size of vertical and horizontal seams between each other will increase. Then the size of the gap is subtracted from the length of the brick, and the resulting result is divided by 5. The resulting value is the size that should be cut from the first five bricks in the row.
Briefly about the main thing
Laying facing bricks requires certain skills so that the result is a smooth and neat wall. A beginner will be able to do this partially, having first familiarized himself in detail with the basics - types and methods of masonry, the correct mixing of the mortar, the sequence of laying work and jointing. Laying a simple wall yourself is possible, but more complex architectural facade structures will require the knowledge and skills of a craftsman. It is not difficult to cope with simple masonry - the tools and the work themselves are elementary, and the result is an attractive and durable design.
Expert advice
In order to imitate a brick wall as accurately as possible, you must adhere to the following tips:
- to create a believable imitation, it is necessary to respect the dimensions of natural bricks (250x120x65 mm) ;
- when caring for wallpaper or gypsum tiles, they should be wiped with a sponge or dusting brush, and decorative panels can be washed with soapy water, after which they are wiped dry;
- to get a nasty structure, use finishing plaster; such a wall will be a good background for creating various design styles;
- the color of the finish can be either traditional or other shades;
- if the walls of the room are decorated with brick, then it should have good lighting;
- You shouldn’t get too carried away with this type of decoration, if you have a low ceiling, it’s enough to make one wall or decorate part of it, otherwise the apartment will turn into a basement.
We prepare raw materials
So, the plan is ready, it’s time to get down to business. To make bricks we need a lot of clay, since that is what they are made from. First of all, you need to find its deposit. In this case, it is advisable to choose one that is located as close as possible to the place of future production.
In addition, the area being developed must be dry, otherwise the work will be extremely difficult, if not completely impossible. For the job, you will need tools for cutting bushes, crushing, digging and loading. At a minimum, stock up on a crowbar, a shovel and a pitchfork. And don’t forget about the wheelbarrows on which you will transport the material to the production site.
Raw materials are extracted as follows:
- if the field is overgrown with grass, bushes and trees, then all this must be removed. Brush cutters and shovels will help you with this,
- To make it convenient to transport the mined clay, dig a trench along which you can roll a wheelbarrow to the mining site and back. It is advisable to line the bottom of the trench with boards, then the wheels will spin much easier,
- Then you can proceed directly to development. If the clay is loose, great, just dig it out with shovels. If it is quite dense or completely frozen, then you will have to work with a crowbar. Instead, a pickaxe is quite suitable,
- As excavation progresses, the clay is transferred to waiting wheelbarrows. It can stick to shovels. If this factor interferes greatly, then you can replace the shovel with a fork, the teeth of which are often located,
- Roll the loaded wheelbarrow to the storage location and unload it there. You should not throw all the extracted clay into one pile. It is better to make several cone-shaped embankments a meter high, and the diameter of the base of each of them should be about one and a half meters.
I remind you once again that for every thousand bricks you will have to extract two and a half cubic meters of clay. Don't forget to check your preliminary calculations.
It is advisable to add about 7-10% to them in case errors are made during the production of some bricks. After all, no one is immune from receiving defective products. Especially if this is your first time encountering this type of work.
Features of the material
Brick decoration in the interior can bring a certain touch of brutality, a feeling of reliability and solidity, a spirit of freedom and rebellion, and create a natural and cozy atmosphere in the house.
Brick facing tiles were originally used to decorate building facades, but due to their excellent similarity to real brick, they began to be used in interior decoration. Among the positive qualities of this finish, the following can be noted:
- Visually, the material exactly imitates brickwork, thanks to its clear, even lines, neat design of the front layer, and a wide selection of colors.
- The advantage of the material is its light weight, which allows you to fix the products on any base.
- Tiles that imitate brick are easy to install.
- Regardless of the material and manufacturing method, the products are environmentally friendly and safe for human health.
- The products are strong, durable and easy to maintain, so this type of finish can often be found in the hallway or kitchen.
- The versatility of this finishing material allows it to be used in rooms of any purpose and style. This decoration is equally appropriate in country style in combination with wooden ceiling beams and in a modern loft, where a metal staircase to the second floor can be located against the background of a brick wall.
- The material is easy to process; therefore, in the process of laying products on the wall, a separate fragment can be easily filed, giving it the required shape.
- On internal and external corners, brick tiles look neat.
- A brick wall in the interior is one of the most effective ways to highlight a specific functional area. Such a surface immediately attracts attention and therefore serves as an excellent backdrop for works of art.
- Brick finishing allows you to mask the unevenness of the wall.
Excellent aesthetic qualities allow you to combine this finish with other materials. To create original combined solutions with brick tiles, you can use wallpaper, plaster, paint, wooden lining and decorative wall boards.
Selection of tools
Before laying bricks, you should be careful about choosing the right tool. Required:
- trowel (or trowel) - a metal spatula with a handle used for laying cement mortar, removing its excess and trimming bricks;
- building level or cord - to control the evenness of the masonry;
- grinder equipped with diamond wheels used for cutting bricks;
- a hammer with a pickaxe for splitting bricks;
- metal rods with a square cross-section of 10x10 mm for neat making of seams;
- metal rod with a round cross-section of 10 mm for jointing;
- anchor bolts and profiles or tying wire required when tying the cladding to a load-bearing wall.
An example of laying bricks along a cord Source we build with our own hands.rf