The construction of wooden residential buildings and other objects has not lost its relevance today. Building codes and regulations strictly regulate technological processes, paying special attention to electrical installation work. Changes are constantly taking place in this area, new materials and equipment are being used, including socket boxes for a wooden house. And although hidden wiring in wooden houses is installed quite rarely, these installation boxes are in demand, as they fully ensure electrical and fire safety.
No. 2. Hidden wiring in a wooden house
Electrical wiring in wooden buildings can be done in two ways:
- hidden;
- open.
Hidden wiring in a wooden house is more difficult and has a lot of risks. It is better to trust such work to specialists. Internal wiring is installed when the wooden walls of the house are sheathed on top with finishing material, for example, clapboard or plasterboard. In this case, the wires are placed between the main wall and the cladding layer. Naturally, you cannot leave the wires unprotected - they must be hidden in a metal pipe. Many craftsmen make a mistake and use plastic sleeves, PVC corrugation or metal hoses for these purposes. This cannot be done for a number of reasons:
- there is no guarantee that the cable insulation will not be damaged and a short circuit will not occur, and the walls of the boxes and pipes will not be able to withstand such a load. The result is a fire. Insulation can be damaged not only due to installation errors, but also as a result of manufacturing defects, improper storage and transportation. Most measuring instruments do not detect microcracks in insulation, and over time, when exposed to constant loads, the insulation weakens more and more;
- plastic corrugation and box are a weak barrier for rodents, who can easily damage it by exposing the wires;
- For the installation of hidden wiring, voids are prepared in wooden walls, and over time, wood dust tends to accumulate in them, and a small spark is enough to ignite it. Localizing such a fire is problematic.
That is why hidden electrical wiring in a wooden house must be installed using metal pipes. They can provide reliable protection against short circuits, but a number of conditions must be met:
- such pipes must have an anti-corrosion layer inside and outside;
- It is better to install pipes at a slight angle to allow condensate to drain freely;
- the pipes must be connected to the ground loop;
- sharp edges that are formed when cutting pipes can damage the wire; plastic bushings must be placed on them;
- the pipe connection must be sealed;
- Channels must be cut in the walls.
The best option is copper pipes, but it will not be cheap.
The option of using plaster does not violate safety standards, although, at first glance, it does not seem entirely suitable. To ensure proper protection, the cable must be surrounded on all sides with a layer of plaster at least 10 mm thick, but to ensure that the cable can be replaced, it must be placed in a metal hose. In fact, it turns out that replacing the cable is very difficult, and over time, the plaster begins to crack under the influence of the “breathing” of the wood.
Materials
Sellers suggest using the following as a substrate for parquet flooring:
- foamed polyethylene;
- cork mats;
- expanded polystyrene;
- slabs of pine needles;
- foil polyethylene foam.
There are also combined materials. The choice is quite large. Not as huge as in the case when you have to decide which laminate is best to choose for the kitchen and hallway or which fiber for screed is most suitable for the garage. But the backing for parquet boards is also presented in stores in a fair range.
Polyethylene foam
Most often, manufacturers recommend using rolled polyethylene foam with a thickness of 1–3 mm as underlayment for parquet. This material is not afraid of moisture, is resistant to the effects of cement from the screed, dampens sounds well and is cheap. But it is also flammable and will last at most 10–15 years, and then it will begin to crumble from exposure to oxygen.
Expanded polystyrene
Expanded polystyrene boards are distinguished by high moisture resistance and good shear strength. However, they are more expensive than polyethylene foam. And it is not recommended to place them on a wooden base. Expanded polystyrene will not allow steam to pass through from below, causing moisture to accumulate on the wood, which will inevitably lead to problems.
Coniferous slabs
Pressed needles are environmentally friendly materials and are characterized by a low thermal conductivity coefficient. If the floor requires insulation, then this will be a good solution. But in other cases, it is better to choose a parquet underlay that has a lower price and is easier to install.
Cork
Cork mats are environmentally friendly and have excellent soundproofing characteristics. However, according to the technology, it is recommended to lay the parquet board on a substrate no thicker than 2 mm. A cork of this size crumbles quickly. And when it gets wet, it also begins to rot under the wooden floor, forming mold and mildew. In most situations it is better to refuse this option.
Foil
Foil underlayments are more suitable for laminate than solid wood finishes. Parquet boards do not conduct heat well. A minimum of thermal energy for reflection will reach the foil, as a result of which the positive effect of its presence will be reduced to almost zero. And what reaches the foil layer and is reflected upward will only have a negative effect on the wood, drying out the dies.
Important to know before starting work
Safety conditions
It is important to do all work on installing sockets and switches, laying electrical communications only after a complete shutdown of the current in the network. Turn off the machine or traffic jams
And do not connect until the installation work is completed.
Take the indicator and make sure that the outlet or wiring you are going to work on is de-energized. Professionals suggest using two indicators at once. This will ensure that unwanted consequences are avoided.
Points to consider
- You should monitor the condition of the wire insulation and do not use damaged wires.
- It is strictly prohibited to cut live wires with wire cutters.
- In places where wiring has already been laid, you cannot chisel, drill or cut walls.
Any contact of a screwdriver with the zero and phase wires inevitably provokes a short circuit in the network.
Socket installation standards:
- not lower than 20 cm from the floor;
- for every 6–10 sq. m. of living rooms, one socket is made.
Rules for installing sockets and switches
In order for the installed system to serve for a long time, it is important to choose the right wires and cables to be connected and lay them out correctly
To do this, you should take into account:
- The power of all future energy-consuming appliances in an apartment or house. The performance of all devices is simply added together. It is necessary to know what the maximum power allocated by the network is.
- The choice of wire or cable type depends on the method of laying it: open or internal. It is necessary to decide which gasket is suitable for a specific electrical installation location.
- When laying wiring, do not lay the wires in bunches.
This is interesting: Do-it-yourself electrical wiring and lighting in the garage - how to do the wiring, diagram, instructions with photos and videos
Which substrate to choose
There is no special wooden underlay for laminate flooring. You can use the full range of insulation materials designed for laying laminate flooring. Which underlay to choose for a laminate flooring on a wooden floor depends on your preferences, financial capabilities and operating conditions of the room with a laminate floor.
There is no need to look for any special, breathable insulating pad, because the base is natural. To produce laminate, of course, they use natural raw materials - wood fiber, but after impregnating it with melamine resins and other additives, there is no need to talk about its naturalness. If you want to use a breathable natural material, buy cork for laminate flooring.
It may be worth saving money on the purchase of materials for the underlying layer by choosing the most budget-friendly type: polyethylene foam insulation material. Its disadvantage is that the air bubbles located in the polyethylene structure are blown away over time. As a result, the material wrinkles and ceases to perform its functions supporting the decorative coating.
In rooms with an average level of operational load, the service life of such material is 5-7 years. If you plan to lay inexpensive material, the service life of which is also about seven years, then it is advisable to use a cheaper material for insulation. Polyethylene foam should also be used in rooms with very little load, for example, in bedrooms.
To decide which laminate underlay is best for a wooden floor, you need to understand its purpose.
Any substrate under the laminate must perform the following functions:
- create a compensating layer between the parquet board and the base: smooth out permissible unevenness of the base, distribute the static load from the furniture and the dynamic load that occurs when walking;
- reduce friction: the floating floor covering should slide smoothly over the base during operation;
- noise insulate: a solid lamella board can quite noticeably rattle against the base while walking.
By laying laminate flooring on a wooden base, you have two bonuses: you do not need the vapor barrier and thermal insulation properties of the substrate, because the wooden base and the wood fiber covering have the same thermal conductivity value.
All products offered on the modern construction market for laying laminated floors meet these needs, so the underlay for laminate flooring on a wooden floor can be made of any material. The only limitation - but it applies not only to wooden floors, but also to any other - is its thickness.
Load distribution
To prevent overheating of the contacts and fire of the line, you should distribute the load as evenly as possible and distribute the wiring in the house. For the calculation, data obtained when the network was operating at design capacity for 20–30 minutes is used.
Group consumers according to the following principles:
- similar devices;
- summarized indicators;
- powerful devices with long operating time.
Place the installations along the lines, and upon completion of the calculations, select the number of directions, differential circuit breakers, RCDs, cross-section of cable cores and type of sockets for individual rooms.
Electrification of a wooden frame house is a complex process that requires compliance with numerous rules and recommendations prescribed in the PUE and joint venture. Without proper knowledge and experience, it is almost impossible to do it on your own. It is recommended to seek help from specialists, at least for consultation. Only competent installation of wiring and selection of high-quality materials guarantee the electrical and fire safety of the building.
Test events
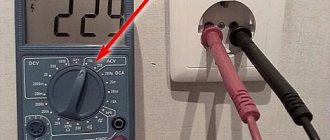
When testing electrical wiring, they use very precise electrical measuring instruments that have the appropriate certificates. Test activities consist of the following:
- visual inspection;
- measurements of resistance indicators on the surface of insulating coatings of wiring;
- measurements of ground loop resistance indicators;
- checking the correct operation in the phase-zero circuit;
- testing of automation and RCD;
- reading indicators in the “device-grounding” circuit.
Testing activities and commissioning of the electrical network are carried out by the governing body to which documents were submitted for permission to electrify the structure. After checking, the relevant specialist confirms the correct operation of the electrical wiring of the entire area. In fact, this is a guarantee that the work was performed with high quality, and allows the consumer to use the electrical network in full without any fear.
Carrying out electrical measurements and testing of the electrical network Source remstroy-blog.ru
number of sockets on the cable 3x2.5
About serial connection. Nothing comes to mind except soldering several 12 V light bulbs in series to get the total. So in “Young Technician” they talked about making a Christmas tree garland with your own hands. In short, you need about 19 light bulbs, you can use car ones.
Just need to solder carefully so as not to melt the base and ruin the light bulb. If one burns out, the whole circuit will open and there will be no light. Tell me, is my concept about serial and parallel connections correct, or am I wrong about something? Perhaps the concepts are somewhat different among professional electricians? Yes, this can be any number of electrical points on the line.
Initial data
Let's take a fairly simple route - take a ready-made and approved project for constructing an electrical panel, filling it with the necessary equipment and laying electrical wires to consumers. Let’s immediately make a reservation that according to the project, 3-phase power is supplied to the house, but there are no 3-phase consumers yet, so the wiring in the house occurs according to a single-phase circuit. This project was compiled individually for a wooden house in the village. Representatives of the network company and energy sales approved the project and checked the final result. Taking the basics and nuances from the presented project, you will be able to apply the knowledge to your home, correctly lay and complete electrical networks.
What we have? A wooden one-story house with an attic and a basement – 7.13 x 8.90 m, which we have to electrify in accordance with generally accepted rules and regulations. Kitchen and room in one room, L-shaped veranda, bathroom adjacent to the building and cellar with entrance from the kitchen.
What electrical wiring is suitable for a wooden house?
Wooden housing is one of the oldest traditions of world architecture. Even today, in the conditions of a wide choice of various building materials, many owners prefer to build a structure made of wood on their suburban area.
Modern housing cannot be imagined without power supply. Electrical wiring in a wooden house has a number of features, primarily related to the increased risk of fire and requirements for laying cables.
Open or closed?
In wooden buildings, electrical wiring is done in an open or hidden way. The first method involves placing the wiring externally, on the wall or ceiling. This can be done as follows:
Use the cable channel. This method is possible if the house has fairly flat walls, for example, covered with clapboard. Among the advantages of this installation method are easy access to the cable, the ability to quickly replace it or, if necessary, create a new branch. The wiring is well cooled, which reduces the possibility of overheating and fires. If you decide to use this method, remember that the wiring should fill the cable channel approximately 60 percent. The channel is laid flat, in a horizontal or vertical plane. In buildings made of rounded logs, the method of installing wires on insulators is used. First of all, the ceramic insulating rollers are mounted, then the wiring is attached to them. This method is considered outdated, however, it enjoys some popularity to this day. Some companies specialize in such wiring and produce twisted pairs of different colors. Mounting on brackets. This method is used when it is impossible to lay wiring in a cable duct or on insulators.
In addition to the open one, there is also a hidden method of wiring installation. It can be used if the final covering of the premises has not yet been carried out. In this case, the wiring is laid in a metal conduit or metal pipes; the use of plastic is prohibited. The method is quite expensive, but the electrical wires will be reliably hidden from prying eyes.
It is impossible to unequivocally answer the question which method of installing electrical wiring is suitable for a wooden house. In each case, this is determined individually, taking into account the level of skill of the electrician, the presence or absence of devices and tools for a specific job.
Drawing up a diagram
All work on installation or modification of electrical wiring begins with the creation of a general diagram. A well-designed project will allow you to install wiring in accordance with the requirements of standards and GOSTs
When drawing up a diagram, special attention is paid to the following points:
All important electrical components (distribution boxes, meter, sockets) should be located in an easily accessible place. Maintenance or repairs may be required at any time, and the electrician must have unhindered access to the place of work. Switches are located in such a way that they are not hidden by furniture. Ideally, they are placed a meter from the floor, however, according to current regulations, there are no height requirements. Approximate wiring diagram When planning sockets, it should be ensured that all household electrical appliances are connected to the network without extension cords. According to standards, electrical outlets are located at a level of 25–40 centimeters from the floor level. Theoretically, there should be one such device for every 6 square meters, but in practice this rule is often violated. For example, three sockets are installed in the kitchen. Twists and unnecessary bends are not allowed. All lines in an electrical diagram are straight, horizontal or vertical. The wiring can be bottom or top. In the first case, the cable runs 15 centimeters from the floor, in the second - at the same distance from the ceiling. All wires are connected to each other in special junction boxes.
Video description
Answers to the questions of which wire to use and what are the differences between single-core and stranded wires can be obtained by watching this video: The
input circuit breaker is selected so that the peak power load in the building does not cause a shutdown, plus 20-30% of the power reserve. Plus, the short circuit current is calculated, upon reaching which the circuit is guaranteed to break.
The selection of a machine for single-phase power supply occurs as follows:
- The sum of the powers of all household electrical appliances is calculated and the maximum current indicator is determined using the formula IHOM=P/U*cosф, where cosф corresponds to 0.8. The result increases by 10% and the resulting current strength will become the indicator at which the machine will operate. Usually it does not exceed 25A.
- Then the current level due to which the short circuit effect will occur is determined by applying the formula Isk=3260*S/L. Here S means the cross-sectional area of the wiring, and L means its length. This calculation is made on the longest section of the network with a minimum cross-section of cores.
- Circuit breakers are characterized by the current strength at the moment of a short circuit, divided by the rated current strength. The electrical network of almost any private home belongs to networks with a mixed load. The ideal circuit breakers for them are type “C” devices.
Types of circuit breakers Source vse-e.com
Practical advice for developing an electrical network project in a house or apartment
The safety and ease of use of household appliances and lighting fixtures depends on the design of the location and wiring of the power line. To correctly calculate the installation height of sockets and switches, you should follow a certain sequence when developing a plan:
- Think in advance about the placement of furniture and electrical appliances around the apartment.
- Make a detailed diagram of each room, taking into account doorways, windows and water and gas wiring.
- On the diagram, mark the location of the sockets, taking into account all recommendations for height and distance between them. Take into account the total power of the required power line, and also add backup points.
- Arrange the switches on the plan depending on the location of the doors and the side of their opening, consider the number of switches in the corridor and the installation height.
Tips for choosing
- Choose boxes and sockets from the same company and check their complete alignment. This will save you from unnecessary hassle during installation.
- The size may vary in depth and diameter, so you need to take into account the distance of the cavity and consider each specific case individually.
- An important detail when choosing is the material of the product . Boxes with fittings made of high-strength polypropylene have proven themselves well. In any case, you need to buy products made from non-flammable materials.
- The shape of the product can be different: rectangular, square, oval, round.
- Don’t forget to buy auxiliary legs, which are used when working with plywood, chipboard and similar materials.
Preparing to install an outlet
There are two main schemes for laying electrical communications - open, made on the surface of the wall, and hidden - when all the electrical wiring is located under the surface of the plaster or wall cladding. Depending on this, the stages of installing sockets also differ.
In the first case, their installation does not require labor-intensive preparation of a niche in the wall in which the socket box and the socket itself will be located.
Outdoor sockets (switches)
On the wall, at the location of the socket, using dowels (nails, screws), a wooden rectangular or round block (plywood 10 mm thick) measuring 20-30 mm is fixed. exceeding the size of the socket (switch).
For outdoor installation, only sockets and switches for outdoor installation are suitable.
Before installation, remove the decorative plastic box and break out the plastic plug on it, at the point where the electrical cord enters, using pliers or a round file.
The terminal block is screwed to a wooden (plywood) block using self-tapping screws or self-tapping screws. After this, the ends of the electrical wiring are connected.
The wires are pre-protected using an insulation stripper or a retractable construction knife with replaceable blades - in the absence of a stripper.
The wires are crimped around the terminal block in such a way that they can easily pass through the hole in the cover in place of the broken plug. After this, the socket cover is screwed over the terminal block.
Installation of hidden sockets (switches)
If the socket (switch) is installed in a standard socket in a brick (reinforced concrete) wall, then installation is not difficult.
The ends of the wires are pulled out of the niche and bent upward. The metal or plastic socket box is oriented so that one of the wire entry plugs is located opposite the wire exit. Using a construction knife or a flat-head screwdriver, remove one of the plugs.
The ends of the wires are passed through the hole.
The socket box is fixed in the niche using quick-hardening gypsum mortar or construction mastic.
After secure fixation, the cracks between the socket box and the niche opening are puttied. To prevent the solution from getting into the socket box, you can fill it with crumpled newspaper or seal it with tape during operation.
After the putty has dried, the wall surface is sanded with an abrasive mesh stretched over a sanding block.
It is necessary to deepen the socket so that it does not protrude above the plane of the wall. Otherwise, a gap will form between the outlet cover and the wall.
After completing this step, a terminal block or switch key is attached to the wires. Excess wires are recessed into the cavity of the socket box. The terminal block or key is secured in the socket box using sliding tabs located on the sides of the terminal block or using the screws included in the socket kit.
Lastly, the socket (switch) cover is mounted. A level is used to check the horizontality of the top edge of the cover. If necessary, adjust with a slight turn. Then the fixing screw is tightened.
Installation of grounding with a residual current device (RCD)
In addition to grounding the junction box, in order to ensure reliable protection of electrical appliances and household appliances, it is necessary to arrange a full-fledged grounding circuit.
Therefore you will need:
- three-meter reinforcing rods with a cross-section of at least 30 cm in the amount of 3 pcs.;
- a dug ditch in the shape of a triangle, about 50 cm deep and up to one and a half meters on a side;
- reinforcement is driven into the ground at the vertices of the triangle;
- the rods are connected to each other with a steel angle and fixed by welding;
- the resulting triangle of one of the vertices is connected to the house by a trench (of the same depth), into which the same corner is placed and welded to the contour.
Directly next to the building, the corner is welded to a meter-long reinforcing rod. Ideally, after burial, a 30 cm piece of rod should remain on the surface. A copper cable from the distribution panel passing through the RCD is attached to the end of this rod. The normal cross-section of such a cable will be 2.5-4 mm.
Example of ground loop equipment Source remontnik.ru
Lighting planning
First, let's decide where lighting is needed.
Lighting points on the plan, represented by the icon
. One lamp is enough in the bathroom. We will place two light sources on the veranda. 2 lamps in the kitchen and one in the room. We combine all these lamps into one group, they will all be powered through one machine (about machines, RCDs, grounding and the electrical panel in general - a little later). We will symbolize the laying of cables for lighting with a green line. In official projects, all wires are indicated by a black line. As we can see, 3 wires go from the switchboard to lighting - 2 wires - group No. 1 (one to the veranda and bathroom, the second to the kitchen and room), the third wire goes to the spotlight outside the house (it is shown on the plan with the icon ), it belongs to the group No. 2 and it will be powered by another machine.
On the way to each lamp we encounter the following icons:
and are switches, single-key and two-key, respectively. The veranda will turn off the lights on two lamps from one two-gang switch; the bathroom is turned off with a single button; the room is also single-key; in the kitchen there are two lamps, turned off by one two-key switch.
To power lighting, copper wires with a cross section of 1.5 square meters are usually used. mm.
Power network planning
Let's move on to the power network plan, that is, sockets. First, let's decide where we will need sockets - this issue needs to be approached scrupulously, since subsequently the absence of an socket in a certain place will entail a lot of inconvenience, and unused sockets will result in a waste of money.
– symbol of the outlet on the plan.
Why do we need electrical sockets? Primarily for the use of household appliances. Decide whether you will have a washing machine, electric stove, electric water heater, microwave oven, electric kettle, oven? Will there be sconces powered by outlets? Where will the computer be located? Where do you need sockets for a vacuum cleaner, electric razor, or floor lamp? If you plan to have a 12-volt voltage somewhere, also indicate it on the plan - in this project, 12 volts will power the cellar lighting (for this, a power cable will go from the switchboard to the transformer - it is shown on the plan with the sign
, and food for it). If you plan to install an electric heated floor, a hot tub, an air conditioner, ... - mark all electrical consumers on the plan.
The picture shows 8 sockets for different needs and a transformer. These sockets are divided into 6 different groups and lines - there is an explanation below the picture. On official plans, all electrical lines are shown in black; in the drawing, the lines are shown in different colors for better perception. Each group or line is designated by its own color and will be powered through one machine in the switchboard of a certain rating.
When purchasing sockets, be sure to consider the maximum permissible load or amperage for each device individually. You can buy all the same sockets, the main thing is that the power of each of the devices connected to such an socket does not exceed the maximum possible for these sockets, and better yet, it is less.
Wires for connecting sockets are also calculated individually. For ordinary sockets not used to connect high-power devices, copper wires with a cross-section of 2.5 square millimeters are usually used. If you plan to power something more serious, say a boiler, heated floor or oven, then the cross-section of the wire may have to be increased.
How to calculate the required wire cross-section
For example, we need to power an electric water heater with a power of 4.4 kW.
According to the formula J = W/U, where J is the flowing current or the amperage we need; W – consumer power, in our case the water heater is 4.4 kW; and U is the network voltage, we also know it - 220 volts. J = 4400/220 = 20 amperes - this is the current that will pass through the copper core when the water heater is operating. You can find out what cross-section of copper wire we need from the table below. Permissible long-term current for wires and cords with rubber and polyvinyl chloride insulation with copper conductors (PUE, 6th edition, table 1.3.4.)
| Conductor cross-section, mm | Current, A, for wires laid | |||||
| open | in one pipe | |||||
| two single-core | three single-core | four single-core | one two-core | one three-wire | ||
| 0,5 | 11 | — | — | — | — | — |
| 0,75 | 15 | — | — | — | — | — |
| 1 | 17 | 16 | 15 | 14 | 15 | 14 |
| 1,2 | 20 | 18 | 16 | 15 | 16 | 14,5 |
| 1,5 | 23 | 19 | 17 | 16 | 18 | 15 |
| 2 | 26 | 24 | 22 | 20 | 23 | 19 |
| 2,5 | 30 | 27 | 25 | 25 | 25 | 21 |
| 3 | 34 | 32 | 28 | 26 | 28 | 24 |
| 4 | 41 | 38 | 35 | 30 | 32 | 27 |
| 5 | 46 | 42 | 39 | 34 | 37 | 31 |
| 6 | 50 | 46 | 42 | 40 | 40 | 34 |
| 8 | 62 | 54 | 51 | 46 | 48 | 43 |
| 10 | 80 | 70 | 60 | 50 | 55 | 50 |
| 16 | 100 | 85 | 80 | 75 | 80 | 70 |
| 25 | 140 | 115 | 100 | 90 | 100 | 85 |
| 35 | 170 | 135 | 125 | 115 | 125 | 100 |
| 50 | 215 | 185 | 170 | 150 | 160 | 135 |
| 70 | 270 | 225 | 210 | 185 | 195 | 175 |
| 95 | 330 | 275 | 255 | 225 | 245 | 215 |
| 120 | 385 | 315 | 290 | 260 | 295 | 250 |
| 150 | 440 | 360 | 330 | — | — | — |
| 185 | 510 | — | — | — | — | — |
| 240 | 605 | — | — | — | — | — |
| 300 | 695 | — | — | — | — | — |
| 400 | 830 | — | — | — | — | — |
The power of consumers can be found either on the device itself or in the documents for this device.