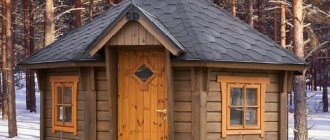
Platform for a gazebo with a tiled covering Whatever the gazebo being built is: an open pergola, rotunda, hexagonal belvedere or glazed pavilion, the first task that requires the right solution is arranging the base. The question is not idle and quite important, since preparing the site for the gazebo can be done in different ways.
What are the criteria for choosing one option or another, and how to make sure that after rain there is no knee-deep water in the building? Readers will be offered a video in this article, as well as instructions for arranging the floor of a gazebo, in which there will be comprehensive answers to many questions.
Preliminary work
Before starting construction, we determine the location of the future gazebo, then select a suitable drawing, and also stock up on tools and building materials.
To complete the work you will need:
- profile pipes of square (for supports) and rectangular (for sheathing and fencing) sections;
- roofing polycarbonate or other finishing materials;
- concrete and cement or ready-made supports for a columnar foundation;
- accessories;
- paint or primer with anti-corrosion properties.
When choosing a suitable location, generally accepted rules are followed. It should be a secluded, quiet place, preferably with beautiful views. The area must be clearly visible so that the gazebo itself serves as a decoration. If you use it as a kitchen, you should not locate the building far from the house.
Measurements and design
The dimensions of the building are determined taking into account the area of the allocated plot, and then the project is selected. Since pipes can be bent if necessary, there are many suitable options, simple and complex. The scheme provides:
- exact dimensions;
- consumption of building materials;
- foundation type;
- roof shape.
If necessary, you can opt for a collapsible structure. It takes 2–3 hours to assemble; when frost sets in, the structure is assembled and hidden in the house. The floor and foundation are made of cheap materials, fastenings are carried out with bolts.
A stationary building will require a more reliable foundation, and its construction will take more time. Inside, you can build a stove or barbecue out of bricks, install electricity, and create a cozy place for home gatherings. In this case, it is better to make the gazebo hexagonal or octagonal; the chimney is organized through the central part of the pitched roof.
You can build a collapsible gazebo and fold it during frosts
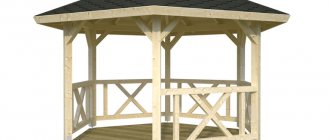
Gazebo pavilion for a summer residence
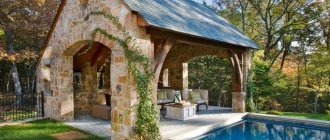
This, of course, is not the easiest project, but a gazebo pavilion for a summer house is an ideal place for a summer dining room. You can always change the size and design of the pavilion to suit your needs and budget, but it is better to use the instructions and tips provided on the diagrams. A gable roof will improve the appearance of the structure, but it will require large investments and a lot of materials. If you want to build a simple pavilion for an enjoyable meal with family and friends, there are several options you can choose from. On the one hand, you can build a gazebo or a simpler structure, like this wooden pavilion. It is possible to do it yourself, but you must plan every step of construction from the very beginning. It is recommended to buy the best materials you can afford. They should be weather-resistant, such as pressure-treated wood, pine or cedar. Carefully take accurate measurements before adjusting sizes. Pre-drill holes in the pieces before inserting screws to prevent the wood from splitting. All stages of construction are shown in step-by-step diagrams, detailed instructions are on the website.
Types and technological features of metal gazebos
Garden houses can be built from various materials - brick, stone, wood, metal. Each of these materials has its own advantages and disadvantages.
Let's take a closer look at the technological features of metal gazebos. The main advantages of metal structures over products made from other materials:
- high strength (the strong frame of the metal gazebo can withstand mechanical loads and does not deform when the soil subsides);
- durability (metal structures can last several decades);
- fire safety;
- combination with other materials: corrugated sheets, slate, polycarbonate can be used as a roof for a metal frame.
The combination of iron and polycarbonate - metal gazebos, photo
Unlike wood, metal does not burn; it will last much longer, does not fade in the sun and does not crack. It will not be damaged by insects and will not collapse under the influence of weather factors. The only drawback of metal is its higher price compared to wood (by about 15%), as well as certain difficulties in assembly (welding).
Advice: you can extend the service life of a metal product with regular maintenance - timely identification and elimination of traces of corrosion.
Types of metal structures
Garden buildings made of metal can be divided into two groups:
- stationary - capital buildings built on a permanent basis on a strip or columnar foundation;
- temporary - collapsible structures installed directly on the ground so that, if necessary, they can be easily removed or moved to another location.
Photos of metal gazebos - stationary and portable
If you decide to build a metal gazebo for your dacha with your own hands, you need to start by choosing a project and determining the method of manufacturing the structure.
When choosing a technology for constructing a metal structure with your own hands, be guided by your own construction skills, as well as the availability of tools and special equipment.
The simplest option is a gazebo made from a profile. It can be constructed from angles, round or profile (rectangular) pipes, channels (metal beams). This structure can be assembled using bolts or welding.
Advice: if you are unable to weld a gazebo from a profile and have no experience working with a welding machine, choose a prefabricated bolted connection.
Welded and bolted connection of elements - photo of gazebos made of metal profiles
Gazebos made from corrugated pipe are mobile, resistant to environmental influences, and reliable. This material is used as a load-bearing element to form the structure frame, since it can withstand heavy loads and cannot be deformed.
Photo of a gazebo made from a profile pipe using forged elements
Profile pipes are often used for the construction of garden houses. And, if the iron pipes are quite heavy, then you can use an aluminum profile pipe, which is lightweight and cheaper.
90f275a7eb5f9092525d1ac86d78afa9.jpe dabaeed38f88ce851238fadfbb82997c.jpeGazebo on a metal aluminum frame
If structures made from corrugated pipe look simple, then forged gazebos are more elegant. Ornate patterns, curls, openwork inserts made by artistic forging will give the building originality and a beautiful appearance. But to create a forged structure, you must have blacksmithing skills and special equipment. An alternative would be to purchase a ready-made forged gazebo, which you can assemble yourself.
Please note: since forged steel structures are labor-intensive to construct, they are quite expensive.
Forging products - metal summerhouses, photo
Do-it-yourself metal gazebos are always prestigious. An iron structure can have different configurations. The most common are rectangular and square structures, a little less often – octagonal and hexagonal garden buildings.
Complex design projects can only be brought to life by experienced craftsmen - original iron gazebos, photo
Taking into account the design solution and functional purpose of a garden metal gazebo, it can be equipped with various attributes for relaxation - furniture, a barbecue table, a barbecue. Some metal summerhouses have special brackets on which you can install seats around the perimeter. This significantly increases the comfort of the building.
A summer building with a barbecue is a cozy place to relax in nature
Advantages and disadvantages
The standard type of columnar foundation is the required number of concrete pillars dug into the ground at a distance of up to 3 m from each other. The upper edges of the supports are tied with wood and reinforced concrete. The concrete pouring method can be used. Used in regions with stable soils.
Users often search for:
- Construction of a strip foundation
- We are building a brick foundation for a gazebo
Among the main advantages it is worth highlighting:
- Short creation time.
- There is no need to deepen the foundation much.
- Such a foundation can be built manually in a couple of days, without involving outside help or special equipment.
- Economical consumption of materials.
- No need for serious hydro- or thermal insulation.
- Inexpensive compared to other types of bases.
But the disadvantage of such a foundation is that it is suitable for structures with a volumetric weight of no more than 1000 kg/m3.
It is most often used under wooden, metal or brick gazebos. In the latter case, a grillage (a solid ribbon of concrete) is poured over the pillars.
It is not recommended to form a foundation from aerated concrete (gas blocks), sand-lime brick, or cinder block. These types of raw materials do not tolerate high humidity, so the service life of a building with such a foundation will be only a few years. In the future, the pillars will begin to crack and warp.
Types of gazebos
Gazebo, altanka, pergola and pavilion - just the names alone of this seemingly unprepossessing structure can recall a good dozen and a half, and each one hides its own small technical feature. Therefore, it is easier to classify “cultural canopies” according to the type of dominant structural material than to later remember all the differences between a belvedere and a gatehouse.
So there are 3 fundamentally different groups of materials:
- Stone. This is brick, shell rock, rubble and even monolithic concrete.
- Tree. In this group: board, log, beam and even willow twig.
- Metal. And finally, we include gazebos made of corrugated pipe, sheet steel or forged parts among metal canopies.
At the same time, structures made of brick and wood are quite massive and require a foundation for their installation, and this, in turn, not only affects the price of the issue, but also imposes some restrictions on the site. It’s easier to bury concrete in the ground than to remove it later and grow a lawn in its place.
At the same time, gazebos made from ordinary metal pipes can not only be built with your own hands, but also do not require any “preferential” conditions for installation. In some cases, it is possible to place awnings even on a garden path, and even, if necessary, hide them in the garage for the winter. Of course, not all models can boast such mobility, but there are plenty to choose from.
And for those who do not believe in the design potential of steel and, despite everything, believe that it cannot compete with natural materials, we invite you to look at the following selection of examples.
Agree, you can feel that these canopies have a soul.
Installation prices
The exact cost of this type of construction service depends on many parameters. Separately it is necessary to highlight:
- base type;
- dimensions of the structure;
- amount of materials consumed;
- the need to attract special equipment;
- type of soil;
- remoteness of the region;
- terms of creation;
- complexity and ease of work.
Thus, in Moscow, the cost of laying a pile foundation made of asbestos-cement pipes will cost 420 rubles per piece, and the total price of a foundation measuring 3x6 m will be 18.5 thousand rubles. A tape type of the same size will cost from 45 thousand rubles, installation of blocks for the base - 590 rubles/block.
A linear meter of installation of metal pipes for the foundation will cost from 600 rubles and more.
Therefore, if your summer cottage is located on stable ground, you have the desire and time for construction, you can try your hand at making a solid foundation for a gazebo yourself, saving money from the family budget.
Profile specifics
Specifics of the profile and advantages of gazebos made from it
A structure made using a profile looks quite original. This kind of construction can be done in the shortest possible time. The main condition is to have experience working with welding equipment.
The source material from which the frame of the gazebo is made is pipes, in most cases with a rectangular or square cross-section, made of carbon and low-alloy steel.
The raw materials are characterized by sufficient strength, multifaceted resistance to harmful influences and practicality.
Profile pipe for gazebo
Profile pipes, taken as the basis for the gazebo, give the building a number of positive characteristics. The main ones are:
- low specific weight of the structure (prevents the preparation of a powerful foundation);
- long period of operation;
- reasonable cost of material;
- fire resistance;
- no need for periodic repairs.
Why distortions form - reasons
If, after some time, a gazebo made of blocks begins to “bother” its owner with cracks appearing on the walls and a general, although not significant, distortion of the entire structure, it means that mistakes were made during the installation of the base.
The main causes of foundation distortions are:
- Soil compaction under the weight of the structure - loose soils will compact under load, causing uneven subsidence of various parts of the foundation and a change in the position of the gazebo in the horizontal plane;
- Shallow foundation depth - when pouring the foundation to a depth less than the freezing level, swelling of the soil will lead to destruction of the foundation and subsidence of the building;
- Low-quality concrete - cement-sand-gravel mortar with an unbalanced ratio of components during hardening will give a monolithic mass with a strength significantly lower than the required one, which will lead to the formation of cracks and destruction of the base.
Gazebo made of rolled metal photo instructions
Now let’s look at the photos and drawings that will allow us to create a durable and beautiful gazebo from a profile pipe ourselves, and we will also conduct an audit of the necessary tools. Still, steel is not birch. You can't get by with your grandfather's axe.
a2fae5669666b3c1625d129b5b08e248.jpe 7ef815168a8f62745653738933613586.jpe 96d6f241b077febfd93eadcee46f83aa.jpe d55750f8e084abe73b4a989 b70ed6310.jpe
Therefore, before going to the metal depot, make sure that your workshop has:
- Welding machine
- Angle grinder
- Electric drill
- Screwdriver
- Saw or jigsaw
- Pencil
- Level
- Square
- Protractor
- Roulette
- Brush or spray
If something is missing, it must be purchased, borrowed or rented.
Now find a suitable concreted area (or pre-make one) and get to work. And in order not to waste extra letters, and also to make the presentation of the material more concise, we will divide the process of making a gazebo into stages and provide each of them with a visual illustration.
- We draw a regular octagon with a radius of 1800 mm right on the ground and make a steel contour around its perimeter from a profile pipe with a cross-section of 60×40 mm, from the corners of which we raise eight racks with a height of the same 1800 mm, but from a 60×30 mm profile. Control the accuracy of the work performed with a level or plumb line.
- To give the racks rigidity, tie them at the end with a belt made of 40x20 mm pipe. To work, you will need to cut 8 fragments, each 1345 mm long.
- The next stage is the floor joists. To construct them, you will again need rolled steel with a cross section of 60×40 mm and our diagram. Work strictly according to the pattern, because this intricate layout is not only the basis of the boardwalk, but also the support for the benches.
And now, actually, a little about the benches themselves. Their installation should begin with jumpers, which must be placed at a height of 400 mm. Then add central supports to them. And finally, focusing on them, screw the side “geobrakes” to the racks. Details on the diagram.
- Stepping back 225 mm above the plane of the bench, weld four rows of 20x20 mm square pipe between the posts, keeping a 50 mm pitch between them. This is a multifunctional element. On one side there is a plane for fastening the back boards, on the other there is a stiffening strap. Same as slanted ones.
- It's time to tackle the roof. For its rafters, take a profile of 40x30 mm and a length of 2071 mm. If you are not sure that you have enough experience to connect all the elements exactly at one point, start installation with one pair of strips, gradually adjusting other frame parts to it.
- The gazebo will not look good without overhangs, and therefore you should take care of the metal fillies. A twenty-centimeter visor will be enough.
- And two more octagonal rings from the thirtieth profile and the twentieth square and with welding work we will assume that you have figured it out.
- Now comes the most time-consuming process. It is necessary to sand down all welds and possible rust, and open the structure first with a primer and then with anti-corrosion paint. And remember, primer paint is not the best solution here.
- Work with wood should also be carried out from the bottom up. First, build a flooring from a fortieth board, having first passed the lumber through a surface planer and opened it with paint and varnish. This way the tree will last much longer.
- Then cover the supports for the benches and their backs, not forgetting to leave small gaps between the boards.
- And finally, roofing work completes the construction of the gazebo. If desired, it is possible to cover the rafter skeleton with ordinary corrugated sheets or sheet metal without fuss. But soft tiles will look much more interesting there. But for its installation you need to prepare a base from OSB boards or plywood.
- And only then lay the modified bitumen. And this is what your pavilion will look like if you followed our instructions exactly.
Do you already have a place to welcome guests? If not, roll up your sleeves and get to work.
What is important to know before starting work
As a starting material, you can use profile pipes, which can have a square or rectangular cross-section. This material is superior in performance to other types of rolled products, such as angles, rods and round pipes. The special cross-sectional shape provides profile pipes with the ability to withstand high loads. The design of these products is durable and weighs little. The gazebo will be beautiful and attractive.
It is convenient to adjust the mounting points from any side, but this cannot be said about round pipes. Profile pipes are universal. They can be used as load-bearing elements, such as roof beams. The racks should be made of pipes of such a diameter that the structure is strong and reliable. The remaining elements can be made from smaller products, which will depend on their functional purpose.
Construction of a gazebo from a profile pipe step by step
The first step towards erecting a metal structure is choosing its type. It can be open, semi-closed or completely closed, with or without lighting. For this purpose, a construction project is drawn up.
Design
The sketch can be sketched by hand, or you can entrust its development to a professional designer. At this stage, you should decide on the dimensions of the structure. The height of the structure should be slightly higher than the average height of a person (180-200 cm), the width of the entrance opening should be no less than the width of the front door (about 1 m).
a drawing indicating the actual dimensions of the building is needed in order to calculate the number of pipes for installing the frame, as well as other necessary building materials.
Detailed drawing of a metal gazebo
To install an iron structure you will need:
- profile pipes with a cross section of 50x50mm and a wall thickness of 2-4 mm for the frame;
- iron rods or pipes with a cross section of 20x40 mm for the transverse elements of the sheathing;
- roofing;
- electrodes, welding;
- grinder, metal drills;
- screwdriver, self-tapping screws.
Preparatory work
Next, they begin to prepare the place for installing a metal gazebo. This could be a site near a pond, in the shade of trees, or near a house - the main thing is that it is picturesque and comfortable for relaxation. In the selected area, remove the top layer of soil (15-20 cm) and level the base. Since the metal gazebo is light in weight, a columnar foundation will be sufficient for it.
Preparing the site for the gazebo
Next, they begin to install the columnar foundation - the base of the gazebo. To do this, holes 50-70 cm deep are dug in the corners of the site, into which a layer of crushed stone (20 cm) is poured and support profile pipes are poured with concrete.
Preparing the site for the gazebo
Attention: the evenness of the installation of the pillars must be checked with a level.
Formation of a metal frame
After installing the vertical metal posts, begin attaching the horizontal crossbars. To do this, you can use iron rods or pipes of a smaller cross-section. Metal elements can be connected to each other by welding, or using bolts and screws. Transverse pipes for fencing the structure are installed at a height of 1-1.2 m. And the top of the support pillars is fastened with the help of an upper strapping.
Please note: the piping pipes should be welded to each vertical post - this will ensure the reliability of the structure.
Methods of fastening metal gazebo elements, photo drawings
Next, they begin to install the frame under the roof. To prevent precipitation from remaining on it, the transverse logs are attached at an angle (30-45 degrees). For a gable roof, several support triangles are made, which are connected by a common profile at the top point, and their bases are connected to the main frame of the gazebo.
Construction of the frame of a metal gazebo for a summer residence, photo
Advice: before installing the roofing, you should prime and paint the metal frame, since this will be problematic after covering.
Roof
One of the simplest and most economical roofing options for a gazebo is polycarbonate. For the roof of the gazebo, 8 mm thick cellular polycarbonate is suitable. It is secured with special bolts with thermal washers. To do this, polycarbonate sheets are cut to the required sizes, and holes for fastenings are drilled in the pipes. The ends of polycarbonate sheets can be covered with special strips - this will provide them with additional protection and give them a neater appearance. As a result, we get a rather cozy and inexpensive gazebo, which only needs to be equipped with benches or other furniture for proper relaxation.
e530c3cdb2eaf85b26c3e7b1dc276bd8.jpe c96b7090affac7b65a7be44bf4449b26.jpe
Attention: when laying the roof covering, install it with a slight overhang. This will protect all structural elements from atmospheric influences. . Do-it-yourself ready-made gazebo made of metal profiles
Do-it-yourself ready-made gazebo made of metal profiles
Metal gazebos at the dacha are a sign of the good taste of the owners of the site. They will become a harmonious addition to landscape design, a reliable and cozy place to relax in nature. These structures can come in different shapes and sizes. Metal combines well with other building materials, which allows you to realize even the most daring design ideas.
Stage 3. Construction of walls
From the existing timber 100x100 mm, I cut 4 racks of 2 m each. They will be installed in the corners of the gazebo. I drilled holes at the ends of the posts and put them on the reinforcement bars. They didn’t really hold the vertical and tried to move at the most inopportune moment. Therefore, I fixed them with jibs, specially cut for this purpose in a miter box. The jibs were nailed to the floor boards and racks. Only after this the racks no longer leaned to the side and swayed from the wind.
Stands in the corners of the future gazebo
Once the corner posts were installed, I attached 6 more intermediate posts. I also fixed them with jibs.
Next, I cut off 4 beams and, by analogy with the lower frame, secured the top frame to the upper ends of the racks. The timber connection was also made in half a tree.
The turn of the horizontal railings came. They will form the walls of the gazebo, without which the entire structure will look like an ordinary canopy. I cut the railings from 100x100mm timber, and for the back wall I decided to save a little and took a 100x70mm board. This lightweight option is suitable exclusively for sheathing.
Gazebo frame with posts, railings and trim
To install the railings, I cut into the posts, installed horizontal rails in them, and hammered nails. Since it is assumed that people will lean on the railing, such a connection cannot be left. Additional fastening parts are needed for rigidity. For this purpose, I used additional jibs, which I tacked from the bottom of the railing. I didn’t install the jibs on the back wall; I decided to fasten the railings there with corners from below.
After everything was done, I began to work on the appearance of the wooden elements of the gazebo. To begin with, I sanded the entire wood using a grinder. I didn't have any other tool. So I took a grinder, put a sanding wheel on it and got to work. By the time I cleared everything out, a whole day had passed. I worked in a respirator and goggles, because a lot of dust was generated. At first she soared into the air, and then settled where she pleased. The entire structure was covered with it. I had to take a rag and a brush and clean all the dusty surfaces.
When there was no trace of dust left, I coated the wood with varnish in 2 layers. For this I used Rolax varnish stain, chestnut color. The structure shone and acquired a noble hue.
Gazebo frame painted with varnish-stain in 2 layers
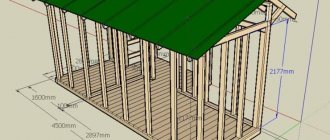
Drawings with dimensions
Before assembly, detailed sketches of the structures should be made: a diagram (drawings, dimensions, detailing) will help to correctly calculate the amount of material. As a sample, you can use gazebos that are available for sale at construction companies. Most often, these are variants of non-traditional shapes: arches and semi-arches, pentagons, trapezoids, etc. The design of a simple 4-6-corner garden building of the classical type can also be taken as a basis.
When drawing up a drawing, it is important to determine the height inside the structure so that a person can stand upright. Benches in non-standard gazebos are often located near short walls or arch slopes
There must be at least 1 m above the seats to metal structures to prevent injuries.
Design
When designing a gazebo, the main thing is to correctly carry out all the necessary calculations. For clarity, you need to draw a drawing of the building on paper. The plan will allow you to accurately calculate the amount of materials required and the approximate cost of the structure.
To correctly create a building drawing, you only need to know the rules of school geometry, and also already decide on the appearance of the gazebo. In our case, the building should look like a square with a side of 4 m. The corners in the structure should be located strictly at an angle of 90°.
To construct such an angle, you should use the Pythagorean Theorem. You need to draw a triangle with sides 5, 4 and 3 m. The angle that will lie opposite the side with a length of 5 m will be rectangular. Next, two lines with a length of 3 and 4 m are drawn from this side so that another rectangle is obtained. After these steps, the diagonals in the square should be the same.
After receiving the drawing, it is transferred to the site. To do this, the same principle is used with the construction of triangles as when creating a building plan. Pegs are driven into the corners of two triangles, and a string is stretched between them. The sides are checked by level. They must be perfectly even.
Large do-it-yourself wooden gazebo
This large gazebo can be called more of a pavilion. Not a bad option if you have a large yard or enough space on your property. It’s not a bad project in the sense that in the future, under such a canopy you can install a grill or barbecue, or even organize a stationary summer kitchen. To build such a gazebo you need a columnar foundation, but perhaps the most difficult part is the roof. To do this, the upper contour of the gazebo needs to be installed with horizontal ties. Then secure them with self-tapping screws to the supports.
For reliability, the screeds must be secured with metal strips. Then secure all other parts. Finally, saw off the central support flush and lay the sheathing.
Please note that the sheathing is made in different ways, depending on the roofing material; if it is slate, it can be either single-layer or two-layer. But that's a separate topic
The entire process of building a gazebo is shown in step-by-step photos; if you have any questions, instructions are on the source website, the link is under the gallery.
Photo source wjday.ru/kak-postroit-besedku-svoimi-rukami-na-dache.html
Which material to choose?
To get a reliable base for the gazebo, you need to purchase the appropriate type of material. These include:
- Brick. It will be the right solution on dry sandy soil, where groundwater is quite low. Brick racks have good load-bearing capacity, so they are suitable for any outbuildings. Their height will depend on the climatic characteristics of the region (how strongly the soil freezes in winter) and the overall size of the base indicated in the drawing. The service life can be up to 100 years.
- FBS. Preparing and pouring such a base takes no more than 2 days. The standard block size is 20x20x40 cm. To make it, you do not need to wait for the concrete solution to dry completely. You can continue working just a day after filling it.
- Tree. Preparation of such a foundation includes mandatory treatment of logs with antiseptics and firing. However, due to low bearing capacity and instability to groundwater, this type of material is rarely used as the main one.
- Monolithic concrete. For such a foundation, it is important to fasten the formwork from wooden boards, fix the reinforcement frame inside it and fill it with concrete. To extend the life of the structure for the base of this type, it is necessary to make a cushion of crushed stone with sand, which will compact the position of the supports and prevent them from being pushed out of the ground during severe frosts and shrinkage of the gazebo.
- Foam concrete. Gained wide popularity due to its low cost and speed of creation. However, a foundation made of foam blocks requires special attention, since it is unstable to excessive moisture, like cinder block material. For it, it is imperative to create reliable heat and waterproofing. The latter is a cushion of sand and gravel; for the outer part, roofing material with bitumen mastic is suitable. Not recommended for use on heaving soil.
- Asbestos pipes. Such a foundation can be built quickly and cheaply. An excellent solution for loose, moving soil. The pipes are filled with concrete solution and reinforced with wire rods with a diameter of no more than 12 mm.
- Steel pipes. Suitable for use are pipes with a wall thickness of 4 mm and above. Before use, coat with a metal primer to protect against corrosion. Among all types of material they have the greatest load-bearing capacity. Such a foundation can easily support a gazebo with a massive stove, barbecue or barbecue.
An analogue of the latter type can be plastic pipes. In rare cases, natural stone can be used for the foundation, but laying it is a labor-intensive process and takes a lot of time.
Preparation for construction
Before starting construction, you need to transfer the dimensions of the gazebo to the site chosen for the construction of the structure. If you need an option with a foundation, dig a pit of the desired shape and type:
- for columnar (pile) excavations are drilled for piles: in the corners of the structure and throughout the entire floor area in increments of 50-70 cm;
- for a perimeter strip building: depth - at least 70 cm, width - 30-40 cm;
- for slab soil, select soil covering the entire floor of the gazebo and 15-20 cm beyond its perimeter.
Concrete is poured into the pit to the soil level and the main supports (corner and along the length of the walls) are strengthened in it. After this, formwork is placed to raise the base above the ground by 15-50 cm. After hardening, the surface is leveled, measuring with a long building level the height differences between adjacent columns or along the upper plane of other types.
While the foundation is gaining strength, you need to prepare the necessary tools:
- grinder;
- drill (for bolting);
- welding machine (if the parts are welded);
- building level, square, tape measure.
Stage 2. Making the floor of the gazebo
I started with the bottom strap; in fact, it will hold the entire frame. I purchased 100x100 mm timber and cut it to size. To make it possible to join half the tree, I made cuts at the ends of the beams using a saw and chisel. After that, I assembled the lower trim, like a designer, stringing the timber onto the reinforcement in the corners. The holes for the reinforcement were pre-drilled with a drill (I used a wood drill with a diameter of 12 mm).
Assembling the bars into the structure of the lower trim
The bars were laid on the foundation pillars - 4 pcs. along the perimeter of the gazebo and 1 pc. in the center, along the long side. At the end of the process, the wood was treated with fire protection.
The bottom frame, laid on the foundation columns, will serve as a lathing for the plank floor
It's time to recoat the floor. Since ancient times, oak boards of just the right size have been gathering dust on my farm - 150x40x3000 mm, so I decided to use them. Since they were not entirely straight and slightly crooked, I had to run them through a frame. My neighbor happened to have the tool, it was a shame not to use it. After the leveling process, the boards turned out to be quite decent. Although there were as many as 5 bags of shavings!
When choosing material for a gazebo, it is important to find a manufacturer you can trust. For example, you can purchase high-quality oak boards here: https://stroyassortiment.ru/shop/suhaya-dubovaya-doska/
I nailed the boards to the strapping bars. The result was a smooth oak plank floor.
Recent Entries
Lilac perennials that are beautiful, compact and do not crowd out other plants Why when buying seedlings you should not take the sellers’ word for it and how to determine the age of the plant using 3 signs Tomato seedlings have turned purple or whitish: why the color has changed and how to save the plants
Gazebo floor made of oak planks
Design features
When planning a gazebo from a profile, you must definitely decide on its design, which can be of two types:
- collapsible (that is, created using fasteners);
- capital (welded).
The first type is a frame assembled from profile pipes with a canopy roof made of plastic or water-repellent fabrics. The advantages of this option include simplicity and high speed of installation, which does not require any special skills or specialized tools. The process of erecting a gazebo rarely takes more than 2-3 hours, and when cold weather sets in, it is removed just as quickly. Other features of such structures include the lack of a foundation and the need to fasten the main components with bolts and pins.
Non-removable options are built on a foundation. And their main advantages are durability and the ability to withstand heavy loads. In this case, the frame is made of metal profiles, and other elements are made of brick, plastic or wood. A stationary gazebo can be open, semi-closed or closed - and the latter type makes it possible to place furniture and even household appliances inside. Electricity is supplied to such gazebos, thanks to which they practically play the role of summer kitchens.
Construction company prices
If financial resources allow, then the installation of the foundation and the creation of the entire structure can be ordered from one of the construction companies. Specialists will carry out the work in accordance with the gazebo design, providing a guarantee for their services.
The price range in different cities may vary significantly. So, for 1 m3 of a columnar foundation in Moscow you will have to pay from 25 thousand rubles. And this is provided the ground is level and motionless. If the depth of the pillars is different, then the cost of 1 m3 will immediately double. In Kyiv, pouring this type of base will cost from 3,000 hryvnia per 1 m3.
In addition, at the request of the customer, the foreman goes to the site free of charge, carries out the necessary measurements and calculations, and draws up a cost estimate, thanks to which the consumer can choose the most profitable option for cooperation.
DIY outdoor gazebo
Here we show you how to build an outdoor gazebo with your own hands from wood. The design, as you can see, is solid. The main building material will be wooden beams, the volume and quantity will depend on the size of the structure, the author does not provide numbers, so you will have to select it yourself. The second necessary material is metal rods of two types: T-shaped and L-shaped. You will also need screws, very large screws, twice the thickness of the beams. Don't forget about a ladder, preferably a strong one, it is the main tool in this project. Concrete is another essential material for building your gazebo and will be used as the base and anchor for the entire structure.
After you make the drawing, you will be able to see what dimensions are needed for all the wooden parts. If you have the tools, you can cut all the components yourself. This is the cheapest option. If you don't have the skills or tools, you need to find someone who will do it...
The first step is to build the foundation.
- Prepare the area and pour the required size slab. If you want more strength, add metal reinforcement to the concrete.
- Next, install the wood beams and metal supports into the concrete at a 90-degree angle.
- If there are gaps between the metal and wood portions of the supports, use tar and silicone to fill them and create a watertight seal.
- Repeat this step for all supports. Typically four posts are installed, but if you choose a different design, more posts may be required.
- Next step, install the wooden slats onto the supports, remember to measure all sides and make sure they are equal. Then secure them in place with screws.
- The next step is to attach the side rails to the ones you installed on the posts.
- Then you need to make a triangular structure that will support the roof. The triangular shape of this part of the design is designed to distribute weight down towards the supports, which will be especially useful if you live in an area with high levels of precipitation, especially snow.
- Use metal rods to securely hold the diagonal pieces in place. Run a metal rod through the two pieces of wood to make sure they are held firmly in place.
- Now install the top crossbar where the roof will be attached. This may require the use of rope or additional help to hold the pieces together.
- Now it's time to install the roof supports to help support the weight. Place supports approximately every 55 cm. Secure the supports with screws.
- Cover the roof with sheets of plywood, this layer must withstand a lot of weight, it must be secured very securely.
- After this, attach the waterproof layer. There are different types of roofs, you can choose which one you prefer, but laminated tiles are a popular and effective choice.
Photo source www.instructables.com/id/Build-a-gazebo-from-sketchup-to-reality
How to pour concrete for a gazebo area
When creating concrete platforms, there are a number of nuances that must be taken into account. So, it can be damaged by tree roots or weather conditions.
Find out also how to design a rectangular area.
To prevent this from happening, consider the following:
- Tree roots extend along the diameter of their crown. This means that the foundation must be further away than the roots of the nearest tree. Old trees do not grow in size, so it is better to install a site next to them than near young ones.
- The resistance of the foundation to cracking depends on the quality of the material used. Therefore, sand and crushed stone must be clean, and cement must be fresh. If it is stored for a long time, its quality decreases.
- To prevent contact of ground moisture and the floor of the gazebo, it is necessary to use a waterproofing membrane between the crushed stone layer and the concrete.
- To ensure the site is level, you need to accurately place the formwork, and then apply height marks to it, which will help level the surface during pouring.
- Concrete is poured at several points so that it can be leveled across the site and not stretched, otherwise height differences will inevitably result.
- Further work is carried out after the mass has dried.
The use of a particular foundation design depends on the type of soil, mass and shape of the building. The right choice ensures that your gazebo is durable and will serve you for many years to come.
Photos of metal gazebos
In general, the options for gazebos made of metal structures are very numerous: welding, forging, different materials with which the frames are finished. Profile pipe, round, made of steel and aluminum, there are even stainless steel options. All this is complemented by any shape: from square and rectangle, to any complex shape. Metal is so flexible that there are many, many variations. Some of them are collected in the photo gallery.
The roof has an unusual shape and the awning, with decorative elements visible, is stretched from the inside
Metal frame covered with an awning instead of a roof: there is shade, it’s not hot and it’s inexpensive
An unusual openwork made of thin pipes, painted white, adds lightness to the design
Very nice decor. This is not a metal gazebo, but a song in metal
Another option for a multifaceted gazebo
Artistic forging in the design of racks - elegant and exclusive
Round gazebo for a summer house under blue polycarbonate - romantic
A simple solution for a summer house: a square gazebo covered with beige polycarbonate
The rafter system can be beautiful
Unusual structure - a very interesting solution
It’s not often you see a metal gazebo made of round pipes. The welder is a master of his craft
An openwork gazebo made of metal is a summer option for a summer house or in the yard near the house
Drawing of a hexagonal gazebo - top view
Drawing of a hexagonal gazebo - front part
Hexagonal outdoor gazebo made of iron
Sketch of a metal gazebo with polycarbonate finishing. The lower part has a shaped finish made of pipes, which are covered with dark translucent polycarbonate.
Photo of a hexagonal gazebo made of metal profiles with partial wood trim
Metal gazebo with barbecue
Drawing of an octagonal metal gazebo with dimensions
Sketch of an octagonal metal gazebo with dimensions
Octagonal gazebo made of metal
Round gazebo with metal frame and polycarbonate cladding
Metal frame combined with tinted polycarbonate cladding
This is probably the simplest gazebo: two bent pipes that are attached to the backs of garden benches. Polycarbonate is attached to the pipes. Summer garden gazebo is ready
0751f2a9c760c9e5c7006b741371c608.jpe
65857ffe9c95f068902dce63ded64806.jpe
d92155ab77a2168a3a07b76e80f5d50b.jpe
How to weld a gazebo for a summer house, watch the video.
DIY garden gazebo
This project is, of course, larger-scale. To build a garden gazebo with your own hands, you don’t have to be a high-level carpenter or a jack of all trades, although it wouldn’t hurt. All stages of construction are shown here.
- Work begins with markings. To ensure proper drainage and prevent grass and weed growth, remove the turf and about 4 inches of soil.
- Then fill the prepared area with gravel.
- Then install the spot foundation forms and fill them halfway with concrete.
- Use a level to make sure the tops of each shape are at the same height.
- In this case, the relief is slightly inclined, so the height of the molds for each hole is different.
- In the second photo you see a device, a laser level, which was used for marking.
I won’t describe all the details further, everything is shown quite well in the photographs, and detailed instructions can be read on the website, link under the gallery.
Photo source www.scout.com/home/build/story/1386859-build-a-hip-roof-gazebo
Construction of a gazebo
The first step in building a gazebo from a profile with your own hands is the construction of a foundation - usually a pile or columnar one. To do this, they first dig holes for the support posts, install the structures themselves, fill the recesses with stones or crushed bricks and fill them with cement-sand mortar.
The next stage is the construction of a metal frame, which is attached to the supports and placed in such a way as not to interfere with the passage into the gazebo - that is, above the level of human height in the area of the door. This point should be taken into account at the stage of drawing up the drawing.
When creating the cladding of a structure, polymer materials are most often used. And the roof is installed on a metal profile sheathing. The simplest design for making a gazebo yourself is the classic gable roof, which can be easily installed on any frame.
The work is completed by arranging the gazebo. After this, the stylish and durable design will become an excellent decoration for your garden or country landscape. And it will provide an additional place where you can relax, chat and even cook food, if the design provides for combination with a barbecue area or installation of a stove directly inside the gazebo.
Construction of a foundation for a grill or barbecue
A structure with a heating and cooking device is equipped with two independent bases.
For gazebos with a barbecue or other stove, the best option would be to pour a strip foundation or a monolithic concrete slab. In the first case, the area under the stove must be tied to the main tape and immediately filled, not forgetting to mount a double horizontal belt of reinforcement.
On the barbecue area, the tape should be 20 cm above the floor level, or even more.
It should be remembered that in such buildings, according to the requirements of SNiP, it is necessary to provide for the possibility of access by a fire engine.
In addition, the part of the pipe that goes onto the roof is well insulated so as not to provoke a fire in the roofing material.