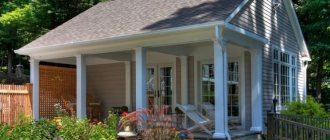
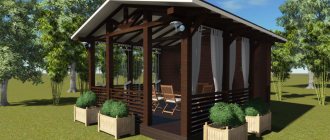
The two-story gazebo design is a unique and interesting solution that will decorate your summer cottage and add more space for relaxation. Such a structure is extremely rare in dachas and villages; usually something similar can be found at recreation centers.
With a circular lift to the second tier
The essence of a two-story gazebo is the presence of an open terrace on the second floor - for sunbathing, drinking tea and admiring the sunset. Or organizing additional space with a protective roof for privacy.
Depending on the owner’s hobby, on the second floor you can organize a fish dryer, a place to use a steam generator, a point with a telescope, and the like.
A gazebo with two floors can easily be implemented on a regular site near a country house. There are quite a lot of design options, so you can get an idea for your own construction without any problems.
After looking at photographs of two-story gazebos, you will be able to independently draw on paper a project for your future construction, and then begin construction. Below are various options for two-tier structures that can serve as a prototype.
Create a drawing
A detailed drawing is the first thing that should be started long before the construction of the gazebo begins. First of all, not only the harmony and proportionality of the entire structure, but also the correctness of calculating the volume of building materials depends on its details. This often does not require special knowledge and skills, since in the construction of small architectural forms it is permissible to do this schematically.
A correct drawing must describe:
- general site plan;
- the foundation of the building and its shape;
- the shape of each side of the structure, including the roof;
- frame diagram;
- all supporting structures;
- position of window and entrance openings.
In addition, the correct project always contains information about the materials used, their characteristics and methods of fastening individual elements. At the same time, maximum scrupulousness at the planning stage allows you to take into account all the nuances, as well as avoid all kinds of unforeseen difficulties.
Important! The main drawing, as well as additional images, must be made to scale relative to the future structure. This is the only way to correctly recreate the circuit in real life, without any errors or inaccuracies.
Independent design
When building a closed winter gazebo, special attention is paid to its layout. This is explained by the fact that snow will accumulate on the roof of the building. This design requires insulation and glazing. Tasks of designing an open and closed gazebo for a summer residence:
- location of the structure;
- options;
- degree of illumination;
- material calculation;
- type of construction;
Drawing with dimensions for building a gazebo - presence of foundation;
- walling;
- roof installation.
To independently carry out the above tasks, experts advise using various computer programs. With their help you can create 2D and 3D drawings. The last image allows you to look at the future structure as realistically as possible. But 2D drawings are easier to work with. Beginners can use programs such as HomePlanPro and ArConHome. The user can choose for himself the optimal ready-made template for future construction. In this case, individual sizes are specified and suitable consumables are determined.
The following computer programs can be used to design a gazebo:
- GoogleSketchUp - great opportunities open up for the user in planning a future design.
This is what a designed gazebo looks like in GoogleSketchUp. To automatically create a three-dimensional model, the user needs to use simple tools (shapes, two-dimensional lines, abstract forms). Beginners can prepare a project using such a program using built-in tips. - AutiCAD - you will need professional skills to use it. With its help, the user will be able to design certain structural elements with a terrace (stairs, columns, windows).
- 3D Studio MAX is a professional program for architects that helps create a report on the quantity of consumables and creates a detailed design of a gazebo for a summer house.
Required materials and tools
To build a gazebo, almost any building materials intended for the construction of permanent structures can be used. However, natural wood is considered the cheapest and easiest to process option, and it allows you to create a fairly aesthetic design.
From wooden materials you will need:
- mounting rail;
- timber 100×100 mm (tiring, frame and ceiling);
- timber 150×50 mm (rafter system);
- moisture-resistant polished board;
- decorative railings.
In addition, you will need perforated metal corners and plates, wood screws, anchors, as well as reinforcement and a concrete mixture of at least M200 grade. Concrete can be made either independently or purchased in finished form. You will also need roofing felt or any other similar waterproofing material.
The following minimum tools will be needed for construction:
- hammer;
- wood saw;
- cross screwdriver or screwdriver;
- impact drill or hammer drill;
- shovel;
- container for mixing and storing concrete mixture.
Projects for REALLY LARGE gazebos 6 by 6
From timber
For a large building - thick timber. You won’t be able to install a “weave” for free; you’ll have to use a section of 150 by 150 mm.
With barbecue
I saw an interesting solution with a patio, that is, a small area next to the gazebo. The building itself turns out to be small, but due to the site it expands to just 36 square meters.
From a log
Many trees will have to be felled to make such a gazebo, oh, a lot... During construction, they use the cheapest log with natural moisture, otherwise the cost of the structure will be prohibitive.
You can save on material by increasing the number of entrances to the gazebo. There are two of them as standard, but four can be implemented this way.
Small openings can be made in the walls to again use less logs. In the future, they can be covered with polycarbonate or simply left as is.
Made of metal
Large metal buildings are expensive. Due to the scale, it is impossible to use a thin profile pipe, otherwise the entire structure will sooner or later bend and collapse. For safety reasons, it is recommended to use wrought iron; fortunately, a lot of solutions have already been implemented.
The cost of such a turnkey gazebo will be estimated at hundreds of thousands of rubles. Do you need such a structure for relaxation? The owner is a gentleman, choose.
More options
Large gazebos come in a variety of shapes and designs. In some cases there is a utility block, sometimes a stove complex, somewhere a platform in front of the entrance. There is something to diversify the building, unlike small buildings.
Selection and preparation of a site
Careful selection of a place for a gazebo is one of the main requirements when creating a durable structure that provides optimal comfort. That is why the best place for a gazebo is considered to be a remote part of the garden, located in the shade of tall tree vegetation. If there is an artificial pond or fountain on the site, the gazebo should be located towards the water feature as quickly as possible. At the same time, the structure should complement the garden area as harmoniously as possible, as well as all kinds of vegetation.
General rules for drawing up drawings
Drawing up drawings of a gazebo for a summer house will allow you to accurately plan the location of various important structural elements - lamps, doors, windows, perhaps, or. In addition, accurate diagrams and sketches will help determine the amount of building materials needed.
How to make gazebos with your own hands (drawing, photo)
There are rules for drawing up drawings with your own hands that should be followed:
- First of all, you need to measure the space on the site allocated for. The dimensions of the structure in the drawing should not exceed its area.
- Next, a sketch is drawn.
A sketch of a wooden building or its 3D model clearly shows how it will look in the end
- Then the frontal and profile projections of the building are drawn, indicating the dimensions. For complex structures with barbecues or massive furniture, you will also need to attach a plan (projection from above) to the set of drawings.
- Next, a separate diagram of the foundation is drawn, which can be.
Columnar foundation diagram
- After this, walls and large elements (barbecue, table, etc.) are drawn. At the same stage, you should note the locations of windows and doors.
- Then, on the finished drawing, mark the dimensions of all frame and cladding elements.
Drawing of the frame of a summer building with the indicated dimensions
- At the next stage, a roof diagram is drawn up with dimensions and angles.
- The locations of the lamps and the electrical wiring diagram are noted.
- If necessary, draw a barbecue with a foundation and a chimney (oven, barbecue).
- Next, you will need to “arrange” the furniture on the plan.
The plan should also include furniture
If it is planned to build a closed structure, it is necessary to indicate the location of all ventilation openings.
Laying the foundation
The foundation is laid in relation to the area marked with pegs. To do this, create an even trench along its perimeter with a depth of at least 50 cm and a width of 30 cm. Formwork, 15–20 cm high, is installed on top of it. Subsequently, reinforcement must be installed in the hole at the level of the formwork, and then the concrete mixture must be poured. After the mixture has hardened, the formwork can be dismantled and further steps can be taken.
To save materials and money, the strip foundation can be replaced with concrete pillars. To do this, instead of a solid structure along the perimeter of the marked base, you should create 4–8 blanks for the posts, into which the concrete mixture should then be poured.
Important! Concrete dries and gains strength for at least 25 days. It is not recommended to build walls or a frame before this time, otherwise there is a high probability of compromising its integrity.
How to build?
Foundation
You can build a lightweight structure with one floor on a flat surface and not attach it to the base, but for a two-story gazebo you will need to build a foundation
.
When installing a frame structure, vertical posts should be installed. The ideal option for such a structure would be to use a point foundation
. The cost of such work is relatively low, and moreover, you will need to spend a minimal amount of time on it.
The optimal cross-section of foundation supports is 0.4x0.4 m (or so). It is recommended to choose solid blocks or bricks to create the base
.
Monolithic pillars
Foundation supports can also be monolithic. The design will be more durable, but this option is more expensive. You can pour the foundation directly into the ground (if the walls of the hole are strictly vertical and the hole itself has the correct geometry). The pillars are brought to the surface by 0.2 m, no more
. However, for greater reliability, many prefer to use formwork.
- Dig a hole about 0.3 m deep. The formwork box will need to be installed around the perimeter of the excavation. Then take polyethylene and cover the hole and formwork with it. It will prevent the penetration of ground moisture and prevent liquid from escaping from the concrete.
- The reinforcement cage must be lowered into the column. You should immediately make formwork for each support. The concrete will have to harden to a certain extent. It is necessary to wait until it hardens, and this is one of the disadvantages of this method.
- Usually the formwork is removed a week after pouring. Installation can continue in approximately two weeks.
Fastening
If the foundation is monolithic, then special units can be provided to secure the wooden columns. If you have cast a rod into the foundation, make a hole in the vertical beam and place it on the support. After this, you will only need to take care of additional fastening.
Additionally, you can secure the frame using wooden dowels, struts, brackets or steel angles
. When installing vertical elements, you need to constantly check whether they are level.
For structures with one floor, one post is usually enough, but for two-story structures it is recommended to install 2-3 posts in the corners
. This way you will make the gazebo as stable as possible. The distance between the vertical elements depends on the size of the gazebo, as well as on the type of structure.
The height of vertical posts varies. You can install a vertical element along the entire height of the structure: it will be a solid column. This is a rather difficult option for doing construction work yourself. You can choose another method: how to build up the vertical elements of the 2nd floor onto the racks of the 1st
.
Having installed and secured the pillars of the 1st floor, begin to install the floor beams, which should be located between the floors. They are held in place by a cross strap. You will also need to take care of additional fastening. Craftsmen use a variety of methods that allow them to reliably connect various elements. This is, for example, the use of hidden spikes that prevent the beams from moving.
A two-story gazebo in the country is a comfortable and functional place to relax in the fresh air. Such a building is built taking into account the number of people in the family and the area of the land.
354ec586628604fbf0158db776e10243.jpe
Project of a two-story wooden gazebo with barbecue and barbecue
A two-story gazebo has the following advantages:
- Multifunctionality - this design is large in size, so it can be divided into several zones. Experts advise dividing the space of the gazebo into two floors into a summer and winter zone. You can make a separate children's corner.
- Aesthetics - such buildings decorate the dacha.
- Space saving - in a small area you can build such a spacious structure as a two-story gazebo with an open terrace.
- Complete rest - the structure in question will allow all family members to enjoy the sunrise and sunset.
It is built according to a previously prepared project. You can use ready-made ones or prepare projects yourself. You must first decide on the functionality and season of use (all year round or in summer) of the building.
Bottom trim and frame installation
The installation of the lower trim and frame begins after the concrete mixture has completely hardened. To do this, a wooden beam with a cross-section of 100×100 mm should be laid along the perimeter of the foundation on each side. This can be done in two ways: overlapping or flush with the adjacent side. In the first case, intersecting grooves must be made at the joints of the beams; in the second, the strapping is fastened together using mounting plates or corners. The structure is secured to the foundation with anchors or metal rods driven tightly into the foundation.
After securing the strapping, you can install load-bearing beams. They are placed in the corner of each side, as well as at a distance of 50–100 cm, adhering to the ideal vertical of 90°. Their height must correspond to the designed ceiling height. A 100×100 mm beam is used for the wooden frame; it is attached to the frame using metal corners and perforated plates. The latter are secured so that the connection is made in the form of a bevel at an angle of 45°.
Construction of a hexagonal gazebo
Construction of a hexagonal gazebo
A hexagonal garden gazebo always looks very elegant and is a decoration for any area. During its construction, the accuracy of calculations is very important, because errors at any stage will significantly affect the final result. You need to start with a drawing of the future building, which will allow you to correctly mark the site and calculate the amount of materials.
Sectional diagram of a hexagonal gazebo
For construction you will need:
- cement mortar;
- brick or cinder block for pillars;
- wooden beams with a section of 150x150 mm;
- planed timber 100x100 mm;
- edged board 50x100 mm;
- roofing felt;
- floor boards;
- self-tapping screws;
- primer;
- wood varnish;
- screwdriver;
- jigsaw;
- building level;
- roofing covering.
Step 1. Marking
To mark the area you will need two wooden slats and a rope about 2 meters long. The selected area is leveled, freed from vegetation and stones, a strip is driven into the ground in the middle and tied with a rope. The second end of the rope is tied to another strip and, using such a homemade compass, a circle with a radius of 1.75 m is drawn. The resulting circle is divided into 6 equal parts and beacons are placed on the marking line. This is where the support posts for the gazebo will be located.
Step 2. Making a columnar foundation
In place of the beacons, holes are dug 0.5 m deep and rectangular in shape. River sand is poured onto the bottom in a layer of 10-15 cm, then a layer of coarse crushed stone of the same thickness. A steel rod 70 cm long is driven into the middle of the hole, after which everything is filled with cement mortar. Bricks are laid on top in 3-4 rows with obligatory bandaging. The reinforcing rod should be in the center of the masonry. Lay out the remaining 5 supports in the same way and allow the solution to dry well.
Step 3. Installation of the gazebo base
Making the base
Measure the distance between adjacent pillars and cut the beams according to the measurements. You should get 6 beams of equal length and thickness. To reliably connect the supports to each other, cuts are made at the ends half the thickness of the tree. After this, the lumber is primed and dried, and then laid on poles in the form of a hexagon. Pieces of roofing material must be laid between the beams and foundation pillars.
Construction of a gazebo
When the beams of the lower frame are secured, the logs are fastened inside the hexagon. The central joist is placed exactly in the center of the structure, aligned horizontally and fixed to the beams using metal plates and bolts. Next, 2 logs are mounted perpendicular to the central one, and all the rest are inserted at an angle, for which small cuts are made at the ends of the boards on both sides. Finally, the logs are reinforced with timber lintels and sheathed with boards.
Step 4. Construction of walls
Hexagonal wooden gazebo
The frame of the gazebo is made of 6 beams 100x100 mm of the same length. Each beam is installed on one of the corners of the base and fixed with anchor bolts. Be sure to check the verticality of the support posts so that the structure is not skewed. A frame made of thick boards is mounted along the upper edge, and at a height of 70-90 cm from the floor, the racks are connected with horizontal beams made of timber, leaving the entrance free.
Walls can be made in several versions, depending on the available materials. You can cover the gazebo halfway with sheets of waterproof plywood, sheathe it with boards, and attach wooden shaped grilles to the lintels between the posts. You can make two or three walls blank, and decorate the rest with forged elements.
Step 5. Roof installation
Making a roof on the ground Installing a roof frame
When the walls are ready, we begin to install the rafters for the roof. 50x100 mm boards are used as rafters; For convenience, assembly is carried out on the ground. Since there is no central post in the gazebo, it is quite difficult to connect the rafters neatly. To simplify this process, a hexagon cut out of timber will help, each side of which will correspond to the thickness of the rafters. The ends of the boards are cut at an angle and fastened with nails to the hexagon; and on the inside of the trim, grooves are cut out for installing the rafters. After this, the structure is sheathed with boards in a circle, leaving small gaps, lifted upward and secured with bolts. Now all that remains is to lay the roofing material.
Gazebo furniture
Prices for various types of fasteners for rafters
Rafter fasteners
4cdba508d2897c7cb96489b8cd92cfb8.jpe a3b29294965794cfa46fc6843c17d071.jpe
Installation of floor joists and top trim of the first floor
As soon as the base is ready, you should first of all tie it. For this purpose, bars of the same cross-section are used - 100×100 mm. They are placed on top of the supporting beams and secured with perforated corners and plates. The corner intersections of the strapping bars should be connected using the groove method, which will require creating contact cutouts on each of them. Additionally, the strapping is reinforced with the help of elongated screws or anchors.
Did you know? The homeland of gazebos is considered to be the Mediterranean coast, as well as the northern part of the Atlantic Ocean. In Rus', such structures first appeared in the 18th century, on the territory of the royal gardens.
The finished frame begins to be strengthened from the floor. To do this, it is strengthened using so-called lags. They are bars with a cross-section of 100×100 mm, laid in one direction with a pitch of no more than 50 mm, resting on the strapping. The installation of the first floor is completed by installing decorative railings in the openings between the vertical beams. However, the frame on the inside as well as the outside can be sheathed with boards, clapboard or any other material.
Design examples
A very convenient option when the staircase leading to the second floor of the structure is located on the street.
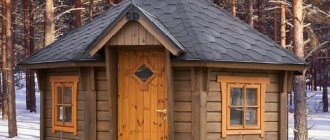
A log gazebo looks very beautiful; such a structure will become a unique highlight of your site.
Some people prefer space: such a gazebo is suitable if you are not trying to save space on the territory.
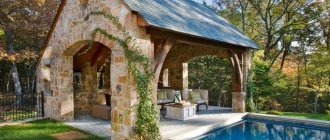
A very attractive option for many owners of summer cottages is a 2-story structure with a stove complex.
We should not forget about the design. In appearance, this building looks quite simple, but the pleasant color gives it individuality and makes it more interesting.
Such designs are suitable for people who strive for originality and do not think about saving space on the site.
An interesting version of the gazebo is presented in the following video.
https://youtube.com/watch?v=bjs0q6LQY44
Construction of the second floor
The construction of the upper floor of a two-story structure begins with the installation of the ceiling. To do this, beams with a cross section of 100×100 mm are laid between the two shortest sides, the pitch should be no more than 50 mm. They are attached to the base using anchors, further strengthening the place of the bundle with metal plates and corners. After this, roofing material or an alternative waterproofing material is laid on top of the ceiling. At the end of the installation, a fencing barrier with a height of about 50–100 cm must be secured around the perimeter of the structure; in this case, decorative railings are considered the simplest solution.
Find out more about the features of a terraced landscape.
Peculiarities
There are a variety of designs for two-story gazebos. There are designs that have very unusual shapes. It is impossible to cope with the construction of such structures on your own; you have to turn to specialists.
The situation is completely different with designs characterized by simple shapes (rectangular, square, and so on). It is quite possible to build such a gazebo with your own hands, you just need to understand the basics of construction and take into account certain recommendations.
To create a drawing, you will need to turn to professionals or draw it yourself. You can use a single-story structure as a guide. It will only be necessary to increase it by adding a second floor.
A barbecue can be installed in the gazebo. In some cases, a small extension is built for it. However, difficulties may arise with smoke in the main room, so many people prefer to place the barbecue not inside the structure, but next to it. The device for frying meat can be protected from wood using corrugated sheets.
Floor installation
The flooring is fixed over the joists, starting from the first floor and ending with the top. The cheapest option is a sanded board or special panels. To achieve the longest service life of the coating, the floorboard is treated with moisture-proof substances. At the same time, wood impregnated with additional special antifungal preparations is used to cover the ceiling of the second floor.
Brick house - more difficult work
You can draw designs for simple wooden structures yourself. Whereas, a brick gazebo is a more complex structure that requires some architectural knowledge and a certain skill. For example, a building with a barbecue on the ground floor and a recreation area above requires a competent smoke removal system and air supply to the fireplace.
A house for year-round leisure needs high-quality thermal insulation and an autonomous heating system, which can also be done with your own hands, but will require more skills and knowledge. The same applies to gazebos with their own water supply and sewerage.
You should also not forget about such a mandatory attribute of a two-story structure as a staircase. It can be installed outside or inside, with or without railings, made of stone or wood.
Thematic material:
- DIY wooden staircase
- Stairs on a metal base
Ladder
Installation of the stairs is considered the last and one of the most important stages in the construction of a two-tier building. This object can be installed both inside the gazebo and outside. In this case, the last option is the most profitable. It not only allows you to create a comfortable staircase width and step height, but also makes it possible to avoid cluttering the internal space of the gazebo.
Did you know? The tallest building in the world is considered to be the Burj Khalifa skyscraper, located in Dubai (United Arab Emirates). Its height is 829.8 m, which is an absolute record.
Most often, wood or metal is used to construct this object. At the same time, metal structures are most preferable for external stairs. You can make a staircase of any complexity yourself, but it is recommended to purchase a ready-made structure consisting of several modules. This will greatly simplify its construction and also protect it from all sorts of difficulties during further operation. In this case, it is recommended to pay attention to models with a step height of 17–25 cm; with other ranges, the rise will be more difficult and not comfortable.
Beautiful DIY wooden gazebo
A simple rectangular structure with a gable roof and beautifully designed side walls. The gazebo was assembled from ready-made forms; all the details of the project were made to order according to the author’s personal drawings. The third photo shows the modules manufactured in the workshop. The structure is installed on a red brick foundation. See step-by-step photographs for assembly procedure. Due to the uneven terrain, the gazebo is slightly raised; the staircase apparently was not included in the author’s plans, so a temporary option was made.
052260510b6eaf8f430eb831ba7e9aa0.jpe
b265fb0da0c35c793771e5cc629d4934.jpe
Photo source fishki.net/52871-besedka-svoimi-rukami-25-foto.htmlAuthor forester86
By length to width ratio
2 by 2
The smallest version of the gazebo, which is designed for a maximum of two people. Sometimes in such buildings they don’t even put a table, but limit themselves to chairs or a bench.
2 by 3
Another extremely small class of gazebos. Seats about 3-4 people depending on the size of the table and chairs. The rectangular shape allows you to sit with increased comfort (compared to the previous version).
With figures at the entrance
3 by 3
The most popular format of gazebos, in incredible demand. Nine squares completely covers any need for a family dinner or relaxation with friends.
Classic sizes of a summer gazebo
There are many options for purchase on the market, but you can build a similar gazebo with your own hands. More details in this publication - https://besedkis.ru/razmer/besedka-3-na-3.
3 by 4
A rectangle with an increased area, where vacationers can now comfortably turn around. Several times I have seen reviews from people who spoke positively about the dimensions of 3 by 4. The area is just a few meters larger, but the increased capacity is immediately felt.
3 by 4
3 by 5
An even more elongated seating area, in which you can put a barbecue or a small stove.
Due to the large length, the corners of the gazebo remain free. Therefore, the entire interior can be moved all the way to one corner, and the means for frying meat can be placed in the second. There is a choice of grill, tandoor, smokehouse.
3 by 5
3 by 6
And here God himself ordered a brazier to be placed, since it would be difficult to communicate at such a great distance between people in different corners of the table.
With barbecue
And yet, if you don’t need a barbecue inside the gazebo (many people have subjective reasons for this), then you can install a rectangular table. Alternatively, you can install a TV or speakers for music at the end.
4 by 4
The gazebo is medium in size, but for a summer cottage it can already be called quite large. More construction resources will be needed, and the structure itself will be heavier.
4 by 4
Therefore, before construction, find objective reasons to build such a large recreation area and overpay for scale. If they are not there, then give preference to the classics - 3 by 3 meters.
4 by 5
The presented building is at the psychological mark of 20 square meters, after which the gazebos can already be called really large. A rectangular shape will accommodate more people, although from an aesthetic point of view it does not always look better.
4 by 5
4 by 6
As mentioned earlier, it is in elongated gazebos that it is more convenient to place a place for cooking on coals. Sometimes part of the building is fenced off and a utility block is obtained, in which you can make a warehouse for equipment or an outdoor shower.
4 by 6
5 by 5
I have never seen such large sizes on a classic summer cottage, but at recreation centers they can be found everywhere. The large capacity and open type of structure are perfect for large groups of vacationers.
5 by 5
In the evening, however, mosquitoes begin to bother us. To do this, you can use a mosquito net to hide from annoying insects. This is especially true on the banks of reservoirs or in forests.
5 by 6
Quite a rare aspect ratio in a gazebo, but it exists. If large squares do not evoke any positive emotions in you, then give preference to these sizes. If desired, the width can be expanded even further.
5 by 6
6 by 6
We will stop at a huge recreation area, the size of which is more reminiscent of a tennis court, where you can easily have a wedding or celebrate a holiday with a corporate circle of colleagues.
6 by 6
For a dacha, “this” is not considered, since the house on the site itself has approximate dimensions. Against the background of such a gazebo, it will look ridiculous.
Additional items
Arrangement of a guest toilet
The dressing room can be decorated with various accessories:
- homemade hangers with wooden hooks;
- clay jugs;
- samovar, wooden mugs;
- various figurines;
- paintings, black and white photographs in frames;
- original lamps;
- candles with stands;
- towels;
- decorative deer antlers;
- helm, gear;
- bath hats, brooms;
- shelves with books;
- old dishes, pots;
- homemade jewelry;
- gingerbread, bagels on a rope;
- potted plants;
- homemade lamps;
- forged firewood;
- with a beautiful ax or bladed weapon on the wall.
With an open second floor
The most interesting option is the second floor with an open roof. In this case, you can put a table and chairs below, that is, organize a place for eating on the first floor, and allocate the second floor as a recreation area.
As mentioned above, at the top you can sunbathe, enjoy the smoke from the steam generator, enjoy the gusts of wind and everything like that.
The problem is that the second floor will not be protected in any way from atmospheric influences - rain, wind, hail, snow.
Therefore, in bad weather, the top floor will not be used, and in winter it will need to be preserved somehow - at least simply laying several sheets of corrugated board at an angle so that the snow can roll off.
As a summer option, it seems amazing - there is a lot of free space, more options for relaxation (some of the guests are downstairs, some are upstairs) and the appearance is aesthetically pleasing. If you are interested in such variety in terms of summer holidays, then this option is definitely yours.
Foundation part
If a light one-story gazebo can be assembled on a flat area (see Platform for a gazebo: how to organize it correctly) and not attached to the base in any way, then a two-story building, in any case, must be installed on a foundation. For a frame gazebo, the main load-bearing structures of which are vertical posts, a point foundation is simply an ideal option - both the labor intensity is low and the price is quite reasonable.
- As a rule, foundation supports have a cross-section of 40*40 cm or close to it. If these are brick pillars, then their cross-section is the sum of the length and width of the brick: 25 12 cm = 37 cm (one and a half bricks). When cinder blocks or expanded clay concrete blocks are used for this purpose, one block with a typical size of 390*188*190 mm is laid in length. In the example below we see exactly this option. It is better to use solid bricks and foundation blocks.
Gazebo base: bottom frame on a columnar foundation
Monolithic pillars
You can also make monolithic foundation pillars - it will be a little more expensive, but the structure will be more durable, since there is no danger of the masonry mortar being washed out of the seams. Pouring can be done directly in the ground, bringing the supports to the surface, but no more than 20 cm. If you need to raise the building higher, you will have to deepen the foundation further and use formwork along the entire height.
- The process itself looks like this: a recess measuring 40*40 cm, up to 30 cm deep, is dug under the post. Its bottom is leveled by approximately 10-15 cm with compacted sand, and a formwork box is installed on the ground around the perimeter. Then the recess along with the formwork is covered with polyethylene - it will prevent moisture from the concrete from escaping into the ground and will subsequently serve as a barrier to ground moisture.
READ MORE: Foam block baths: projects, drawings, DIY construction. Projects of bathhouses made of foam blocks with a swimming pool photo
Formwork with reinforcement for a monolithic foundation column
- The next stage is reinforcing the pillar. A pre-welded or tied frame made of reinforcement d=8 mm is lowered into it. The formwork for all supports is placed simultaneously, the level is checked and the mark of the top of the foundation is marked, up to which the concrete will be poured.
The only inconvenience of this method is that you have to wait until the concrete gains a certain strength. Since large loads are not expected during the construction of a wooden frame gazebo, and if construction is carried out in the warm season, then after 10-15 days work can continue. The formwork is usually removed on the sixth or seventh day after pouring.