An ordinary pediment is a continuation of the wall of the house, which is limited on the sides by the slopes of the roof, and below by a cornice overhang. But the latter may not exist when the pediment and the wall underneath are in the same plane. There are other varieties of this element of buildings, but in any case it needs finishing just like all the others. The cladding of the pediment can be carried out along the sheathing or on a solid base, perform a purely decorative function or be part of an insulated “pie”.
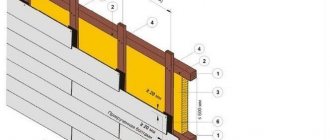
Insulation is often placed under the cladding Source state-18.rf
Types of pediments
Only hip roofs do not have gables. In other roof structures they are present, but can have different shapes. They also differ in the presence or absence of insulation, windows, doors, and gable cornices. And also according to the material from which they are made. Today it is very common to cover the pediment with siding, especially when we are not talking about luxury housing. But there are many other solutions.
Form
The shape of the pediment depends on the design of the roof, which can be a regular one- or two-slope, half-hip, or gable roof.
Since the easiest to install are pitched roofs, which crown not only residential buildings, but also bathhouses, garages and other buildings, triangular-shaped pediments are most often found:
- in the form of an isosceles triangle - for symmetrical gable roofs;
- in the form of an irregular triangle - for asymmetrical gable roofs;
- in the form of a right triangle - for pitched roofs.
The so-called Danish half-hip also has a small triangular pediment just under the ridge. Source dachnaya-zhizn.ru
Living quarters are rarely arranged under one- or two-slope roofs; the space under them is usually not used in any way or becomes a storage area for unnecessary things or building materials. Therefore, the finishing of the pediment most often does not require insulation.
The second most popular are keel-shaped (or bulbous) pediments, the shape of which is formed by two figures - a triangle resting on a trapezoid. They are formed when constructing sloping gable roofs, sometimes called mansard roofs.
This shape vaguely resembles an onion cut lengthwise or the keel of a ship Source srv-maps.ru
There is much more space under such a roof than under straight slopes, so it is used when they want to get additional usable space on the second level of the building. Accordingly, all external structures are insulated. And if the pediment is finished with siding or other facade material, then a frame is mounted under it, into which thermal insulation can be laid.
The trapezoidal gable can only be seen on a half-hipped "Dutch" roof. Its upper part is “cut off” by a short half-hip, the cornice of which hangs over the pediment. It itself is often a continuation of the facade wall, made of the same wall material and has the same finish. But nothing prevents you from making such a pediment from siding or other budget material.
House with a residential attic and a trapezoidal pediment Source na-dache.pro
The least common are circular gables formed by domed, arched and other complex arched roofs.
Design
By design, gables are:
- capital;
- and frame for cladding.
Capital ones are a continuation of the end walls with beveled edges; they are made of brick, wall blocks, timber, and logs.
In log wooden houses, such gables are called male gables Source nuclearblog.ru
Brick and stone gables can be of a regular triangular or trapezoidal shape, for which the outer edges of the building blocks are cut at an angle. But there is also a stepped form, when the blocks are laid without cutting the corners. In this case, the roof does not hang over the pediment, but is adjacent to it.
Stepped pediment Source krovlyakryshi.ru
Pediments made of SIP panels can also be classified as capital ones, since they do not require insulation and mandatory decorative finishing.
Whether to sew up a pediment made of wall materials with decorative panels or leave it as is, each owner decides for himself. As well as the issue of additional insulation.
Frame gables along the perimeter are formed by the roof truss system. Their internal filling is most often made of timber and boards, but sometimes a metal profile is preferred. It is chosen if the cladding will be made of heavy materials - for example, corrugated sheets, metal or fiber cement siding, DSP with clinker tile cladding.
Wooden pediment frame Source supersadovnik.ru
For materials such as vinyl siding, lining, boards, plywood, and facing façade panels, a wooden frame is sufficient.
See also: Catalog of companies that specialize in roofing work
Device
The main function of the pediment is to protect the under-roof space from precipitation, winds, the penetration of birds and other uninvited guests. An additional decorative function is to give the building a finished look. Preferably cute. In addition, the pediment can also solve the problem of heat conservation, but this function is not mandatory and depends both on the characteristics of the attic space and on the design of the pediment itself.
Non-residential attics of any design do not need insulation; thermal insulation of the ceiling is sufficient to retain heat in the house. It is enough to cover the pediment with siding or any other facade material, making a small dormer window or door in it if necessary.
If living rooms are located under the roof, the gables and roof slopes are insulated regardless of the season of residence, since in summer thermal insulation is necessary to protect against heat. They have full-fledged windows, and if there are balconies, doors to exit onto them.
The insulation is mounted under the sheathing Source eco-kotly.ru
Often the choice of material for cladding or other type of finishing of the pediment depends on the need for its insulation. If it is made of brick and has a smaller thickness than the walls, plaster alone will not do. To maintain the overall style, the pediment is finished with thermal panels with brick-like clinker tiles or a frame is attached to it, and after laying the insulation, it is sheathed with facade panels that imitate brickwork.
The situation is simpler with structures made of warm gas or foam concrete blocks. With the correct thickness, they do not require additional insulation; decorative finishing is sufficient. For example, covering the gable with siding, which will perfectly protect the blocks from atmospheric influences.
It is a pity to hide the rounded log and profiled timber of a male pediment or a wooden superstructure over a stone house under the finishing. It is enough to sand these materials, treat them with protective agents and cover them with varnish, tinted impregnation, or glaze paint.
If it is necessary to insulate the pediment, this is done from the inside or they choose materials for cladding over the insulation, such as imitation timber, lining, or block house.
Pediment covered with imitation timber Source rubankom.com
The frame gives the greatest freedom in choosing finishing materials, regardless of the need for thermal insulation. It can be made not only in the form of a lath, but also as a solid one, covered with OSB or DSP sheets, which will become a reliable basis even for facing with facade tiles.
Preliminary calculations ↑
A pediment made of profiled timber has its own characteristic features, which play an important role in the calculation and construction.
For example, it should be taken into account that this material is far from perfectly smooth, so gaps of different sizes form on the surface of the structure. They are filled with tow. In a similar way, the cracks in the pediment made of laminated veneer lumber are also caulked. Gaps are filled regardless of the type of cladding chosen.
When performing a preliminary calculation of such a gable wall, one more very important point must also be taken into account - the shrinkage of its triangle and the frame, which occurs during at least the first two years.
In one-and-a-half-story houses, gables are cut from 150x150 timber. As for internal partitions, others are used for them - 100 by 150. Their height can reach 2.5 m. However, many builders adhere to the so-called gold standard for how to make a roof: the pediment for buildings optimally has a height of 150 cm, in other words , has 10 crowns.
Video description
This video shows how to insulate an attic roof with frame gables from the inside with mineral wool:
The distance between the frame racks is selected according to the width of the insulation - it should be 1-1.5 cm smaller so that the slabs are tightly sandwiched between the side walls of the racks. The cross-section of the frame elements must be such as to easily withstand the load from the selected cladding material. It is also important to determine the direction of laying out the sheathing to which the trim will be attached.
- Having chosen clapboard, edged board or siding for the gable, the sheathing is laid transversely in relation to these materials.
- Under sheet materials such as corrugated sheets, plywood, OSB or cellular polycarbonate, the lathing is installed in the direction corresponding to the length of the sheet.
Another important point is the step of laying out the sheathing, which is tied to the parameters of the facing panels or slabs. Therefore, it is necessary to select a finishing material before installing the frame.
If there are window or door openings on the gable, the sheathing bars must also be secured along their perimeter.
Pediment frame with one window Source rasco-ural.ru
Future plans
We will someday cover the remaining gaps at the junction of the sheathing with the gable overhangs with wooden corner profiles, but even now they are not at all noticeable. And the likelihood of snow and rain getting into these gaps is low. In addition, behind the sheathing they are covered with sheathing boards.
Sheathing the pediment with the window would not have been much more difficult if we had not decided to build a canopy on it, which should cover the planned porch and the main entrance to the bathhouse (we are currently using a temporary entrance with a plywood door). But making a canopy is another story.
Source
Video description
You can start installation from the top, as in this video:
In any case, the groove should look down. If the lining is installed vertically, the direction of the groove is chosen arbitrarily.
Finishing the pediment of a house with tongue and groove boards is done in the same way. And the edged one is simply installed tightly end-to-end, trying to eliminate cracks. The disadvantage of edged boards is that cracks will still appear over time. There are two ways to eliminate them: fasten the boards horizontally with an overlap in the “American” style, or cover the joints with strips.
Pediment made of edged boards with flashings Source 1povagonke.ru
To install overlapping trim, a support block or batten of the same thickness as the boards is secured along the bottom edge of the gable. The first board is laid with its lower edge on it and attached at the bottom to the batten, and at the top to the sheathing. The second row is laid with the lower edge on the lower one with an overlap of 2-3 cm, all subsequent rows are similar.
After completion of the covering, the surface is primed or treated with impregnation, and after drying, it is covered with a decorative composition - varnish or paint.
Siding
Both frame and permanent gables are sheathed with siding. And it itself can be light plastic (vinyl), relatively light metal and rather heavy fiber cement. A frame for fastening is needed in any case, even if the base is a flat and durable surface made of timber.
Depending on the initial data, they choose what to make the frame or lathing from. In principle, wooden blocks with a cross-section of at least 50x50 mm will support the weight of any siding, but it is better to install a metal frame for heavy materials. It is more reliable, it does not rot or dry out. And it does not respond to fluctuations in humidity with the risk of deformation of the skin.
Metal profile frame for siding Source kwahobi.ru
Steel profiles are attached to the base and aligned in one plane using direct hangers. If siding is to be installed on a pediment made of brick or concrete blocks, the hangers are mounted with dowels and nails in specially drilled holes. They are attached to the tree with ordinary self-tapping screws.
If you plan to insulate the pediment, then first build a frame for thermal insulation boards with the required spacing between the posts. Then they tighten the frame with a windproof membrane, fixing it with a stapler and gluing the joints with tape. And only after that the siding sheathing is installed.
Note! If there is a cornice between the pediment and the end wall, then a windproof film is placed on it, and then sewn on top with sheet metal, corrugated sheets or other material, forming an ebb.
Pediment with cornice Source remontnik.ru
Benefits of wood
Despite the many advantages of vinyl or metal siding, many people prefer less durable and more vulnerable wood. Sometimes - in the format of the same standard panels, installed according to the scheme that has already been described above.
But wooden cladding materials that are more difficult to work with are often used. In other words, people continue to choose wood, despite its capriciousness, relatively low protective characteristics and high price. Why?
It's all about how aesthetically attractive this material is. It visually seems warm, alive, real. In addition, wood goes well with various decorative details, stone, brick, and glass surfaces. Fits well into almost any architectural style.
Vinyl siding cannot boast of this. This is why wood remains relevant, despite all its imperfections and the emergence of new modern materials.
Video description
How to cover the gable with siding and trim the roof overhangs, see this video:
Sheathing with sheet materials
When covering the pediment with corrugated sheets, plywood, or OSB sheets, the frame is mounted taking into account their width so that the joints of the sheets fall exactly on the studs. Installation begins from the central part of the pediment, installing a whole sheet, then moving to the right and left of it.
The corrugated sheet is mounted with an overlap on one wave, and the overlap across the entire width of the pediment should be directed in one direction. Fastening is carried out using roofing screws with a press washer in the color of the coating in the lower wave. The sections are hidden in metal U-shaped profiles pre-installed on the sides, made like additional strips for siding. The lower part of the profiled sheet is placed on a steel casting.
Cutting out the sheathing elements
Having fitted the first sheathing element made of painted tongue-and-groove boards into place, we tightly joined the blank for the next element to it. Using the beveled end of the finished element as a base surface, the markings were transferred using a ruler, first to one edge of the workpiece, then to the other. A guide bar for the circular saw was attached along the marking line applied to the workpiece. The correct installation of the tire was additionally controlled by a tuned small scale.
The edges of the workpiece were filed with a circular saw to make the cut even and smooth. In addition, on the working edge of the guide bar there is an anti-splinter clamp made of elastic plastic, thanks to which no unnecessary processing marks remain on the front side. All cladding elements were manufactured using this technology, starting from the second. It turned out pretty quickly.
Reference by topic: Structures, types and construction of roofing
Briefly about the main thing
The finishing of the pediment largely depends on its shape, whether it needs to be insulated, and what its frame is made of. Sheathing is always required for frame gables, while permanent gables made of brick, blocks or timber can be left in their original form. A variety of materials are used for cladding - boards, wooden lining, all types of siding, corrugated sheets, plywood and even plastic panels and polycarbonate. It is attached to the sheathing, the design of which is selected taking into account the selected finishing material. To get a beautiful result, it is advisable to use various additional elements - profiles that allow you to neatly connect the panels and hide their sections under the slopes.
Decorative stone as a facing material
This method of cladding a pediment is considered one of the most expensive and is used quite rarely. He is quite difficult to deal with. However, it can be found in photographs of the gables of houses designed by the world's leading architects.
Decorative stone forms a very active and attractive texture, which, when properly combined with other materials, can look very impressive. It interacts well with different types of plaster, brick, and classical design elements.
Base for flexible tiles
Despite the fact that soft roofing can be laid on almost any roof, the requirements for the base for installation are quite stringent.
The base must be even and smooth, otherwise the soft material may take on an irregular shape, which will significantly spoil the appearance of the roof. An individual sheathing should be made, because roofing structures made from other materials are incompatible with bitumen shingles.
The technology for laying flexible tiles requires laying plywood with moisture-resistant properties or OSB boards on top of the sheathing structure.
To further protect the roof from possible water leaks, an underlayment carpet is used along with a flexible roof. But it doesn’t make sense to use it on all types of roofs. Typically, underlayment is installed on pitched structures with a slight slope. It is laid on top of the plywood, starting from the bottom point of the roof with a slope, overlapping. Therefore, the liner strip at the very top overlaps the carpet underneath, preventing leakage.
To install the lining yourself, the surface of the base must be lubricated with bitumen mastic, and then, after installation, heated with a gas burner so that the coating becomes solid.
Subtleties of styling technology
As already mentioned, the disadvantage of laying soft tiles is the inability to do this in frosty winter conditions. According to the technology, it can be installed with your own hands at a temperature of at least +5 degrees in the absence of precipitation. If the temperature is expected to be below +5 degrees, the roofing material should be kept for a day at a temperature of +20 degrees. During the installation process, each element of the soft roof must be heated using a hair dryer.
If you still need to install the tiles yourself in the winter, you should use a frame that you build yourself around any section of the roof. It consists of a galvanized profile, which is covered with polyethylene on top, creating a kind of dome. Inside such a “warmhouse” the required temperature is formed using a heat gun.
If you want to keep roofing costs to a minimum, choose flexible material in green, brick or brown. But if, on the contrary, you want to achieve a spectacular roof, then choose foil material for laying it on large slopes.
On roofs with a slight slope, a soft roof in the form of flexible tiles will be invisible. Experts do not recommend using it on such structures. In this case, it is better and cheaper to use ordinary roofing material.
The technology for installing a soft roof requires the use of special nails for flexible tiles. A special feature of these fasteners is the large diameter of the caps and galvanization, which protects the fasteners from negative environmental factors. Thanks to this, the nails secure the flexible material well and prevent it from tearing. You can also use felt buttons, which in their appearance resemble regular stationery buttons.
What material should be used to cover the roof gables to make it warm and economical?
Finances can no longer withstand the stress of building a house
Therefore, it is very important to make pediments of high quality and not expensive. What material should be used to cover the roof gables to make it warm and economical?
There are a lot of options for insulating gables; the gable can be insulated both from the outside and from the inside.
The more popular (more often used) option is the one with polystyrene foam, or mineral wool.
Sprayed insulation materials, such as polyurethane foam (PPU), are also used.
Extruded polystyrene foam, glass wool and so on.
Of all the materials listed, the least expensive are polystyrene foam and glass wool.
And finally, if we are talking about external cladding, the inexpensive option is to cover (cladding) the pediment with PVC clapboard.
This option has enough advantages, firstly, the plastic panels themselves are not expensive (you write about finances), working with them is not difficult, the basic skills of a builder are enough.
There is a choice of colors
It will cost a little more than PVC lining to cover the pediment with wooden lining or siding, look at the location and you can cover the pediment yourself with siding and wooden lining, this is a significant saving.
Do not forget to protect the insulation with waterproofing.
I think in this situation you have two options: cover the gable of the house with either clapboard or siding. I will try to talk in more detail about these two options.
Covering the pediment with wooden clapboard will significantly save your budget. But we must remember that it must be coated with special special antiseptics or impregnations to prevent destruction under the influence of moisture, fungus, and rotting. Also, this procedure must be repeated several times as the compositions lose their protective properties. So the benefit will most likely be immediate. This is what the gable of a house looks like, covered with clapboard and treated with impregnation.
Siding is also an inexpensive and practical material. You can choose it from PVC (the cheapest option), asbestos cement or metal. Siding is more durable than lining and does not require additional protective measures. To update its appearance, it is enough to wash the casing with soap and water once a season.
Pediment finished with polyvinyl chloride siding.
What material should be used to cover the roof gables to make it warm and economical?
There are a lot of options for insulating gables; the gable can be insulated both from the outside and from the inside. The more popular (more often used) option is the one with polystyrene foam, or mineral wool. P…
Execution of work
The installation process is a complex undertaking that includes several stages.
Base
The base for soft tiles must be level and dry. For the construction of the sheathing, tongue and groove boards, OSB sheets or moisture-resistant plywood are used. Moreover, the moisture content of the material should not exceed 20%. When laying, the base material is laid with a two-millimeter gap.
Ventilation
It is necessary to ensure ventilation of the under-roof space to prevent the formation of condensation. Otherwise, the roof truss system will quickly begin to collapse. Necessary elements of the ventilation system:
Laying waterproofing
It is necessary to lay a membrane waterproofing material on the base. On slopes with a slope angle of more than 30 degrees, waterproofing is allowed to be installed only in areas of greatest leakage. With a smaller slope, the waterproofing covers the roof surface completely.
Installation of ridge and pediment strips and arrangement of valleys
Before laying the tiles, metal strips are attached along the eaves overhangs. They are fastened with mounting nails, the spacing of the nails is 10 cm. The gable strips are installed in the same way.
In the locations of the valleys, a special element is laid - a valley carpet, which is matched in color to the main covering. The elements are laid with an overlap, all joints are carefully glued.
Laying tiles
The first row is laid along the cornice; the petals of the shingles are pre-cut off. The tiles are laid from the center of the overhang towards the ends of the roof. The shingles in the first and subsequent rows are secured with roofing nails; 4-6 pieces are used per element.
The attachment point of the previous row should be overlapped by the shingles of the next row. The same tiles are installed on the roof ridge, having previously been cut along the marked lines.
So, soft roofing tiles are one of the practical options for roofing. You can lay the tiles on the roof yourself, after studying the instructions.
Bitumen mastics and primers for soft roofing
For asphalt roofing carpets and shingles, we produce a wide range of high-quality, applied products for gluing shingles, underlayment and valley carpet. Everyone, Finnish Katepal has “K-36 glue”, etc. Feature - any bitumen adhesive is applied at a temperature not lower than + 5 degrees.
Attention! It is important. Unlike underlayment, it is better to use adhesives and mastics from the same manufacturer as the shingles themselves. Having our own construction department and having extensive experience in installing different types of soft tiles, we note that there are products from different manufacturers that are not compatible with each other. For example, bitumen glue from Tegola is not suitable for Katepal soft tiles. When purchasing a complete set of flexible tile roofing, we advise you to consult with a specialist practical engineer.
Flexible tile laying technology
Laying flexible tiles is easier if you first mark the roof and then follow the marks. This is necessary so that the installation of the shingles, which are small in size, occurs without any distortion. This has a particularly negative impact on large rooftops. Therefore, it is better to make markings for soft roofs.
The first thing you need to do before laying is to make with your own hands two straight lines across the inclined surface, between which a distance of 50 cm will be maintained. The lines are drawn to ensure a horizontal shift of the flexible tiles. It is best to make lines from the edge of the roof, because most often the laying of soft material begins from there.
Do-it-yourself flexible tile installation can become easier thanks to markings. Therefore, perpendiculars are drawn to straight lines in increments of 25 cm, on which the shingles will be installed.
Before you begin directly installing flexible tiles with your own hands, you need to lay the ridge-eaves material. The strip should be attached to zinc coated nails. The indentation should be 2.5 cm from the edge. In this case, the tile ends should be attached to the planks with bitumen mastic. To install a valley, valley carpets should be placed on top of the substrate, the color of which should match the shade of the tiles. The edges are also secured with glue or nailed, taking into account increments of 10 cm.
Do-it-yourself flexible tile installation
After this, you can begin installing flexible tiles. If you come across shingles of different shades in a batch, you should not look for identical samples in packs, since gradually in the sun the tiles will take on the same color.
Laying flexible tiles with your own hands begins at the bottom in the central part of the inclined surface. After you have removed the film from the bottom layer, the tiles need to be pressed more tightly to the surface of the base. It should be additionally secured on top with nails.
During installation with your own hands, special attention must be paid to the intersection of the material with the ventilation or chimney, in the territory of which the substrate will also be fixed.
The ventilation base must be treated with bitumen mastic. After this, a hole of the required size is created in the shingles, and the shingles are laid in place. Finally, it must be treated with mastic again.
The technology for laying flexible tiles next to the chimney is more complicated. First of all, the slats must be fixed with nails in the shape of a triangle. Its 90 degree angle should be facing the chimney pipe. A backing is laid overlapping around it, and tiles are placed on the batten, and the upper edge of the material should rest against the chimney. A valley substrate is mounted on top of the tiled material with your own hands. Some of the sheets should be lifted up the chimney, the second part should be nailed directly to the roof. On the pipe, the substrate is covered with an abutment strip, and the seams are coated with sealant.
Advantages and disadvantages of finishing walls with brick tiles
Advantages:
- Has good qualities and practicality.
- It is not susceptible to destruction from exposure to ultraviolet rays due to its high strength.
- Large selection of different colors and shades.
- The special structure allows you to withstand significant temperature changes.
- The bitumen base ensures the tightness of the coating.
- Very flexible, can be used for cladding walls of any shaped complexity.
- Mold, mildew, and putrefactive bacteria do not form on the surface. The operational period is 40 years.
- Acts as heat and sound insulation.
- Thanks to its low weight, it is easy to transport without causing any hassle. No additional strengthening of the foundation is required.
Interesting! Any man can handle the installation of a flexible roof, even one who has never done such work. This does not require special tools or equipment.
Flaws:
- When replacing flexible tiles, you will need to replace several tiles. During operation, the bitumen part melts under the influence of high temperatures. The individual parts stick together.
- The bitumen coating does not allow installation in severe frosts; adhesion is significantly reduced or absent at all.
- To begin cladding, you need to install the sheathing.