22971 0 3
Michel September 28, 2016Specialization: plumber with 10 years of experience, computer repair specialist, powerlifting coach. I have extensive experience in construction, interior decoration, and making homemade furniture. Hobbies: sports
When does it make sense to install a plasterboard sheet on a frame in general, and on a wooden one in particular? In what cases is it not advisable to use wooden sheathing? How and from what to properly assemble a wooden frame for drywall? How to cover the frame and putty the gypsum board? In my article I will try to answer these questions.
Wooden frame and sheathing for plasterboard.
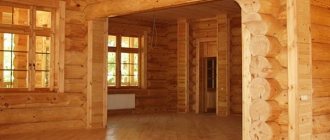
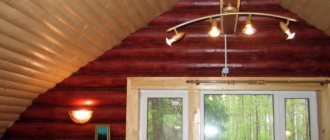
Features of installing drywall in a wooden house
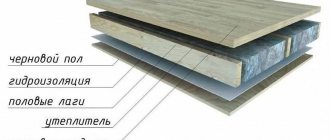
Wood is a natural material that not only has positive properties, but also some disadvantages. To avoid negative consequences during the construction and operation of a wooden house, it is important to take into account its features. The question of how to sheathe the inside of a wooden house with plasterboard correctly and complete the interior finishing can be solved by following the rules for its installation:
- Before installing drywall sheets, wooden walls are treated with antiseptic agents that will protect against the appearance of rot, mildew and mold.
- The wood is coated with fire retardants to protect the log or timber house from fire. These can be two-in-one antiseptic-fire retardant products.
- Plasterboard finishing is carried out after partial shrinkage of a wooden house - a year after construction.
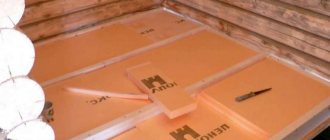
- In case of additional insulation from the inside, a vapor barrier film is laid under the plasterboard sheets. The vapor barrier film prevents the formation of condensation in the insulation.
- Caulking cracks in the crown of the house and sealing cracks in logs and beams will help prevent the appearance of moisture on drywall.
- After the building shrinks, the building material is mounted on a frame that is not rigidly connected to the ceiling and floor of the house.
A deformation gap of 30-50 mm is left between the plasterboard and the floor or ceiling. To do this, pads made of any building materials are placed on top and bottom of the plasterboard sheets. Then they are removed. After finishing, the gaps are closed with decorative skirting boards. The frame must also be independent of the supporting foundation of the house so that the drywall does not deform during operation.
It is very important that the frame is secured to the “slippers” and is floating
What is needed for finishing
Finishing the inner surface of the walls of a house with plasterboard requires careful selection of materials. The master will need to purchase:
- GKL slabs are moisture- and fire-resistant (GKLVO).
- A sufficient number of screws for wood or metal (depending on the chosen frame).
- Putty and composition for priming drywall.
- Silicone and polyurethane foam.
- Solutions for impregnating timber to provide protection against insects and rodents.
- Insulation boards and soundproofing materials.
Tools and materials
For installation and assembly of the metal frame, additional fasteners will be needed so that the structure can withstand increased loads; sheets of drywall should be sewn in 2 layers with an offset. You also need to stock up on vapor barrier, which will prevent moisture from the house from penetrating under the assembled structure and being absorbed into the wood.
Advantages and disadvantages
- low cost. To cover the walls of a house with plasterboard, you will need a much smaller amount than when finishing with clapboard;
- easy and quick installation. Drywall sheets are large in size, so they can sheathe large surface areas of walls and ceilings in a fairly short time;
- plastic. The material bends easily. It can be given any shape from rectangular cascades to semicircular arches;
- has good thermal insulation properties, which allows you to save on energy costs and heating;
- has light weight. You can make the interior lining with plasterboard alone, with your own hands, without anyone’s help;
- During installation, free space is created under the drywall in which utility lines can be hidden;
- environmentally friendly material. It does not contain toxic or synthetic additives and is safe for human health;
- The constituent element of gypsum board is gypsum. It is fireproof. Only the cardboard part of the material can ignite, but only from the side of the fire. There are also fire-resistant plasterboard sheets that are not afraid of fire;
- fragility. Drywall can break off during transportation, operation, or installation. Therefore, it must be handled with care. To hang a heavy item on a plasterboard box, you need to use special fasteners. They will help avoid damage to the material;
- cannot withstand temperature changes. It is mounted at a temperature not lower than -10 degrees;
- It occupies a significant area, so it is not used in small rooms.
Material selection
What exactly is the wood frame for drywall made of?
It’s not for nothing that I cited a 50x50 millimeter block as an example of the price of lathing: it is the most popular material for assembling frames of partitions and lathing (ceiling and wall).
If there are special requirements for the rigidity of the partition, it can also be assembled from 50x100 timber; in this case, the wide side is oriented perpendicular to the plane of the wall: this is how maximum resistance to lateral load is achieved.
The frame is assembled from a 100x50 block.
Finally, when installing wall sheathing, edged and unedged boards of arbitrary width can be used. It is attached to the main wall with long dowel screws or even nails into wooden choppers.
Are there any requirements for the quality of wood?
When assembling the partition frame or when installing the sheathing on hangers, yes.
This is what a quality block for a wooden frame should look like.
Wood must not have any defects from the following list:
- Rot and woodworm damage;
- Cross-layer (significant deviation of the direction of wood fibers from the longitudinal axis of the bar);
- Falling out knots with a diameter of more than a third of the side of the block.
The instructions are due to the fact that all these defects have a detrimental effect on the strength of the frame. In addition, the moisture content of the wood should not exceed 20%: when drying, the block often warps.
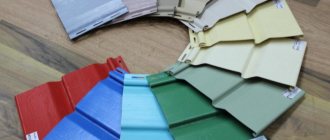
Types of drywall
According to the intended purpose, plasterboard can be:
- arched. This material is thin 6.5 mm thick;
- ceiling It is intended for arranging suspended structures and finishing ceilings in dry rooms with humidity up to 70%. Its thickness is 9.5 mm;
- wall It is used for cladding walls and arranging interior partitions. Its thickness is 12.5mm.
According to technological features, plasterboard is divided into:
- standard or regular plasterboard;
- moisture-resistant gypsum board;
- fire-resistant gypsum plasterboard;
- moisture-resistant and fire-resistant;
- acoustic. It is used in rooms where increased sound insulation is required.
The material varies according to the type of edge. The edge is:
- straight. Gaps between straight-edged sheets are not sealed. Designated PC;
- Refined edge of the UK. The joints between sheets with such an edge should be puttied, reinforced with sickle mesh;
- the semicircular edge is sealed with putty, but not reinforced (HRK);
- rounded edge of the lock.
Appearance of different drywall
Preparatory stage
Drywall is a finishing material characterized by durability. It is this fact that makes us think about carrying out preventive treatment of all surfaces that will be hidden behind gypsum board sheets. The owner of the building can only find out that fungus has appeared on the surface of the main walls or mold has grown at the moment when the structure, erected several years ago, begins to crumble and collapse.
Natural wood is a fire hazard. Therefore, all surfaces should be thoroughly treated with antifungal agents. The gaps between the beams must be caulked with tow, impregnated with compounds that ensure the structure’s ability to resist fire. Silicone or foam can be used as an additional treatment.
Foaming cracks
All components of the structure are pre-cut or sawn into separate pieces, the length of which is determined after accurate measurements are taken. This applies not only to the contour. Longitudinal (rack-mount) guides and jumpers are prepared in advance.
GVL
GCR is a material consisting of a gypsum core and 2 sheets of cardboard. The elements are connected using glue. Cardboard is used as a reinforcing element. It also gives shape to the material.
GVL are gypsum fiber sheets. They consist of a mixture of gypsum and fluff pulp. Waste paper is mixed with water and sheets are made under a press, which are then dried. They are used to level surfaces and frame frames. GVL is a more durable material. Unlike drywall, it can be used to finish floors.
Finishing gypsum fiber board walls in a wooden house is more labor-intensive. Before screwing the screws into the gypsum fiber, you need to drill holes.
Otherwise, it is impossible to tighten the hardware due to the high density and strength of the sheets. Heavy objects can be hung on a wall covered with gypsum plasterboard: shelves, mirrors. This material is suitable for finishing a bathroom in a wooden house. GVL is not flexible, so it cannot be used for arranging shaped elements.
GKL against plaster
First, let's decide whether it's worth messing with drywall at all or whether it's better to use plaster the old fashioned way.
Here are the arguments in favor of gypsum boards:
- High finishing speed due to the large sheet area (3 square meters with a size of 2500x1200 mm);
- Possibility to eliminate significant unevenness of the base at minimal cost. Let's say, if the height difference between adjacent elements of a slab floor is 8-10 centimeters (yes, yes, this also happens), leveling the ceiling with plaster is very expensive and unsafe: the fall of peeling plaster of such thickness can cause a lot of trouble.
But for gypsum boards on the sheathing, the condition of the surface underneath does not matter at all - as long as there is something to attach the frame to;
It is easier and cheaper to level an uneven and littered wall with plasterboard.
- The surface of kraft paper (gypsum core shell) has excellent adhesive properties. You can glue wallpaper of any density to it using any wallpaper glue; tiles also adhere perfectly to cement tile adhesive or homemade cement-based mortar.
Interesting: I used spot-applied silicone sealant to adhere the tiles to the drywall above the bathtub. It was also used to seal the seams between the tiles and to connect the apron to the bathtub. All seams maintain absolute tightness for three years of active use of the bathroom; The tile holds more than securely.
Ceramic tiles adhere perfectly to drywall using any tile adhesive. And not only them.
How does drywall compare to plaster?
- Mechanical strength. Let me clarify: in this parameter, gypsum sheet material is second only to cement plaster. Using gypsum board to decorate walls in a gym or workshop is a dubious idea;
- Resistant to water with constant contact with it. Alas, even moisture-resistant drywall only tolerates high air humidity. If you immerse a gypsum core in water, it will get wet just like any other gypsum product. Accordingly, it would be a bad idea to use gypsum board without protection with a waterproof finishing finish for the construction of shower walls;
- Occupied usable area of the room. It is better to level walls with minor unevenness in a small room with a thin layer of plaster: even when glued directly to the wall, without lathing, a sheet of plasterboard, taking into account the thickness of the glue, will shift the surface of each wall by at least 20 mm. When mounted on a frame, each wall will move towards the center of the room by 60 - 80 mm.
The space under the sheathing is wasted.
Which to choose
To choose the right material, it is important to know the operating conditions of the premises.
For rooms, standard plasterboard is usually used; for rooms with high humidity: kitchen, toilet, bathroom - moisture-resistant.
If possible, you can buy fire-resistant drywall for the entire house. In this case, for the interior decoration of the kitchen and bathroom, the material must also be moisture resistant. Therefore, moisture-resistant GKLVO plasterboard sheets are chosen.
You should pay attention to the quality of the material.
It is better to buy drywall from a well-known brand to be sure of its strength characteristics, for example Knauf.
When choosing, you should determine for what purposes it will be used: for walls, for finishing the ceiling or for creating curly elements. Based on the purpose of the material, you need to select sheets of a certain thickness.
Requirements for lumber for sheathing
Wooden sheathing made from plasterboard may have high humidity during the purchase process, which can subsequently cause warping of the material. The shrinkage percentage will be less if the moisture content of the material is below 22%. It is this value that indicates that the material in front of the consumer is dry. When purchasing bars with natural moisture, you may face the risk of their geometric parameters changing over time. This will certainly affect the evenness of the drywall installation.
As for the wooden sheathing for drywall, the lumber may belong to the first or second grade. The material in this case should not have increased strength. An important factor when choosing is the deviation from the curvature and cross-sectional dimensions. It is important to exclude material that has wane. But if after purchase it is still detected, you should additionally use an antiseptic. It is applied in several layers, sparing no composition.
Recommendations for choosing the size of bars
The timbers for the frame can be selected with different sections to save on lumber. Thus, support posts must be made of products with a minimum cross-section of 75 x 25 mm. Guides and horizontal struts can be installed using 50 x 25 mm minimum lumber. Values greater than those specified are permitted, but less values are not.
The material must be selected taking into account the equivalent thickness. When cutting the bars to length, you should be guided by the fact that they should be 4 cm less than the height of the walls. This will provide a compensation gap between the sheathing and the ceiling. After completion of the installation work, these gaps will be covered with skirting boards or shaped slats.
Expert advice
- The moisture content of the lumber used in the work should vary from 12 to 18%.
- If you plan to install a partition with a height of up to 4.2 m, you should use a beam with a section of 60 x 50 mm. The thickness of the sheet will vary depending on the height of the wall. If this value is 2.8 m, the sheet thickness should be 12.5 m. As the wall height increases to 4.2 m, an 18 mm sheet should be used. And as an intermediate value there is a 14 mm sheet, which is suitable for a wall 3.6 m high.
- When carrying out fire retardant treatment, it is necessary to achieve the indicator of the first group regarding fire safety.
- The step between the rack bars should not be more than 60 cm.
- If the master cannot choose between self-tapping screws, tenons and nails, the second option should be preferred - with its help you can achieve a rigid connection.
- The minimum thickness of the wall on the frame can be 85 mm.
Attention! Before starting installation work where a wooden beam is used, it should be left for acclimatization in the room where it will be installed.
Common mistakes
The most common errors include:
- laying sheets of drywall with the front side facing the wall. They should be positioned with the front side inward. When the front sides of the sheets are combined, a recess is formed at the joints, which is convenient for treating them with putty;
- the formation of cross-shaped seams leads to a deterioration in the strength of the material. Plasterboard sheets must be installed with offset seams;
- the location of the screws is close to the edge. When temperature changes occur, the metal expands and breaks the plaster. The fasteners should be located at a distance of 10-15 cm from the edge and always not opposite each other on adjacent sheets, but offset;
- The screws are screwed in incorrectly. The cap should not stick out from the sheet, this will make it difficult to putty the seams. The level of the hardware can be checked with a spatula. If, when passing the spatula along the surface of the sheet, the head touches the canvas, then the self-tapping screw must be tightened;
- the absence of a compensation gap from the floor and ceiling can lead to the formation of cracks at the joints. The gap should be 30-50 mm.
Surface preparation
When starting to install a frame made of wooden blocks, you should prepare the surface. For this you will need:
- Clear the wall of unnecessary objects so that nothing interferes with your work.
- Remove wallpaper, if any, remove hanging pieces of paint, remove cobwebs, dust and other dirt.
- If different types of stains appear, you should get rid of them. If these are stains caused by dampness (fungus, mold), they should be dried initially. It is best to do this with liquid bleach with the addition of aspirin. For 10 liters of diluted bleach, two aspirin tablets. After the procedure, the wall should be completely dry. Using a rag, remove traces of the solution (white spots) and cover with a primer.
- All irregularities should be plastered and the surface brought to a flat plane. This should be done so that the wooden blocks do not move when fastened.
- After the plaster has dried, the surface is covered with a primer solution containing an antiseptic. It will be better if the surface is primed twice.
Cleaning the wall of old finishing
A very important point is preparing the surface and identifying wet spots. The wall must be dry and level.
Sliding frame device
If everything is clear with the first and third points, then the second forced me to get involved in studying this issue thoroughly. Because, when making repairs with our own hands, we had never thought before that the frame could be mounted in any other way than rigidly to the wall. On the contrary, they tried to screw everything tighter.
But, as it turned out, it can rest securely on the base and at the same time “float” in a vertical plane along with the cladding screwed to it, which eliminates its deformation and the appearance of inter-seam cracks. Moreover, the frame can be either wooden or metal.
Metal carcass
If the cladding of a wooden house is planned immediately after the main shrinkage, it is advisable to use only metal profiles for constructing the frame, as they are not subject to their own deformations due to the influence of external conditions. Everything you need to create it is listed in the table.
| Name | View | Dimensions | Application |
| Guide profile | 28x27 mm | Floor leveling, support for racks | |
| Ceiling profile | 60x27 mm | Load-bearing part of the frame | |
| Self-tapping screw for washer | 5-10 cm depending bridge from unevenness walls | Attaching the frame to the wall | |
| Self-tapping screws | 12.5-13.5 mm | Connecting frame elements to each other |
And a standard set of tools: a level (preferably a laser), a tape measure, a screwdriver with attachments, a cutter, a small grinder, a stepladder, and a pencil.
Now about the main points of the sliding frame design.
- First, as usual, a level is struck along the floor and ceiling, but the guide is attached only to the floor .
- Then, using a laser level and a tape measure, lines are marked for the vertical posts, the distance between the axes of which should be 40 or 60 cm. That is, one guide should be located exactly at the junction of two adjacent sheets 120 cm wide, and one or two more should be under them.
Markings for rack profiles
- Next, the height of the wall is measured, and the racks are cut so that their length is approximately 10 cm less than this height: they should not rest against the ceiling . And 10 cm is a sufficient margin for possible shrinkage, of course, if the house has already been standing for at least a year.
- By the way, I advise you to pay attention to the thickness of the profiles. 0.4 mm is not enough, the frame turns out to be flimsy. It’s better to take 0.6 mm, the price is higher, but the quality is at the same level.
- Now comes the fun part. Take the first post, apply it to the markings and mark 3-4 attachment points on it in those places where there are no joints or deep cracks in the timber. Write the number 1 on both the wall and the profile so as not to get confused later.
- In the marked places, cut a groove with a grinder along the axis of the profile, 10 cm long and slightly wider than the thickness of the self-tapping screw. Its edges need to be cleaned, they must be smooth. The main length of the groove should extend downwards from the intended attachment point.
This is a later photo, but you can see the grooves
- Prepare all other wall and corner posts in the same way, remembering to number them, since the grooves may end up at different levels.
- Now, just above each slot on the wall, you need to attach stops from pieces of bars that will prevent the profile from “falling through.” Their thickness should be such that the outer edge coincides with the plane of the future frame.
Simple self-tapping screws screwed into the wall to the required level can also serve as stops.
- We screw the racks to the wall using self-tapping screws with washers of such a diameter that they rest firmly against the plane of the profile. In this case, the profile is installed “topsy-turvy”, and the self-tapping screw is screwed into the upper part of the groove, departing from its top point by about a centimeter. When the house settles, it pulls the rigidly fixed fasteners down, deforming the posts or tearing out the screws. In our case, this will not happen, since it will move along a specially made slot inside the profile. There is also a small space left on top in case the wood expands due to moisture.
The self-tapping screw is not tightened all the way, but so that the washer under it can be turned with little effort
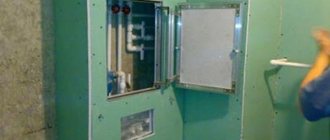
- During the installation process, do not forget to lay electrical wiring in metal sleeves behind the frame.
This is what should happen in the end
- Since drywall cannot be screwed to such a frame, the next step is to combine the already installed U-shaped profiles with the same ones, but turned to the desired side. They are twisted together with self-tapping seed screws through the side edges or connected with a cutter.
- Finally, transverse stiffening profiles are installed, after which plasterboard cladding in a wooden house can begin.
The sliding frame is ready
There are also several nuances regarding the cladding, but more on them later.
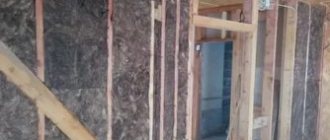
Wooden frame
It is recommended to use wooden blocks as a load-bearing frame only in houses that have undergone complete shrinkage. They themselves must also be dry and treated with the same compounds as the walls.
The principle of constructing the frame is the same, the groove is simply sawed through in the block. It is advisable to make a recess on the outer side around the groove so that the head of the screw does not protrude beyond the plane of the frame.
Installed wooden stand
It is assembled faster than metal, since there is already a plane for attaching drywall. And if you need to minimize the distance between the wall and the sheathing, then the bars can be recessed into the wall by sawing a groove in it slightly wider than their thickness. The main thing is that they stick out everywhere beyond the unevenness of the wall and create one plane.
Video description
How to make an interior partition from a metal profile with an arch can be seen in the video
How to install a ceiling frame
Before you start connecting all the frame elements, you need to take into account that all sheets of sheathing material must be joined on the rack. The process itself is carried out as follows:
- The guide profile is fixed according to the established markings.
- On each side of the square of the ceiling frame mesh, straight hangers are installed exactly in the middle, securing them with dowels. They will capture the main elements.
- Ceiling elements are inserted into the guides and secured with self-tapping screws.
- Measure out 60 centimeters of the profile, cut it off and attach it with screws across the main profiles. At their intersections, “crabs” are used.
- The frame for the ceiling is leveled and fixed with hangers. The antennae are bent and secured with self-tapping screws.
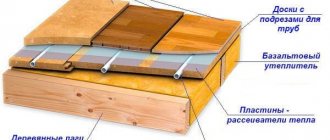
Advantages
When the lathing is made from wood with your own hands, the home craftsman gains many advantages. Firstly, such a frame does not form cold bridges, which cannot be said about a metal profile. The internal cavities will only need to be filled with insulating material, which will also soundproof the walls. Secondly, installation work using wooden blocks is somewhat easier to carry out, because it can be difficult to deal with load-bearing, rack and guide profiles. Thirdly, all the disadvantages of wood such as fire hazard and susceptibility to insects can be eliminated by treating the material before installation with fire retardants and compounds that ensure biological inertness.