Most new materials and finished structures introduced into the construction and finishing industry almost completely eliminate the free movement of air. The tightness they provided, along with the advantages, brought a significant disadvantage - a violation of ventilation processes.
They simply need to be restored, because, you see, without a regular supply of fresh air to the room it is impossible to live in it!
We know how to solve such a difficult problem: exhaust ventilation through the wall to the street will form the normal movement of air masses. A small wall device will ensure exhaust flow removal and excellent air exchange.
The article we propose will introduce you to the intricacies of choosing a valve for organizing exhaust ventilation, and the rules for its installation and operation. The information presented for consideration is confirmed by photographic materials, diagrams and video instructions.
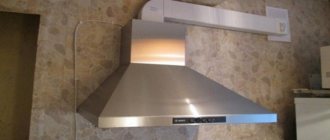
Installing a hood in the kitchen
kitchen hood location diagram
Usually, the exhaust pipe is led into an existing ventilation duct connected to the general ventilation system of the house, using a corrugated hose or pipe. This method does not require the installation of special filters because the vapors from the air immediately exit into the ventilation shaft.
Installing a hood in a kitchen in a country house requires making a hole in the wall if there is no built-in ventilation. The diameter of the hole must correspond to the diameter of the hood pipe. If the diameters do not match, the air will “stumble” as it exits, like in a bottle with a neck. In this case, not only will the air exit speed decrease, but the noise factor will also increase.
The installation of a hood in the kitchen should be done at a height of at least 65 cm. The optimal distance above an electric stove is 70 cm, and above a gas stove it can be 10 cm higher, that is, 80 cm. The dimensions of the hood, for its more efficient operation, should exceed the dimensions of the stove by a few centimeters.
The connection between the corrugation and the hole in the wall occurs using a flange with a check valve. If such a valve comes with the hood, it will need to be removed. A non-return valve is necessary to prevent air from returning back into the hood. This happens when a strong wind blows and in other similar cases.
A smooth pipe is passed through the outlet hole and a mesh is placed on the outside to protect against insects.
Easy way to calculate
In theory, the dimensions of the supply ventilation window in a kitchen in a private house for calculations are taken to be 70% smaller than the cross-section of the exhaust pipe. In practical work, adjustable gate valves are installed for air flow, with the ability to change the flow area from 70% of the calculated value to 150%. In this way, you can effectively and accurately regulate ventilation performance and the level of gas exchange in the kitchen, without using noisy electric exhaust systems.
In a situation where the room is divided into several sectors or levels, the ventilation system in a private house in the kitchen is calculated based on building regulations No. 60.13330.2012, 62.13330.2012, 7.13130.2011. But there is one problem. The longer the air duct pipes, the more difficult it is to take into account the influence of turns, elbows, splitters, valves, filters on the resistance of the air ducts and the loss of flow energy.
Therefore, the design of a kitchen ventilation system for two- to three-story private houses is traditionally calculated in several stages. Initially, calculations are performed using air flows under ideal conditions, without taking into account friction. In the second pass, the air speed values are checked, taking into account losses in elbows and turns, joints and branching of pipes. Speed reduction coefficients have long been calculated and tested experimentally; their values can be taken from reference tables in SNiPs.
The work is not difficult, but requires accuracy. If you don’t want to bother with calculations, you can use pipes that are obviously larger than 10-15% of the cross-section accepted for a standard kitchen. A small reserve of throughput will allow you to reduce the flow speed to 0.8-1.0 m/s, which will make the operation of the ventilation system less noisy, but more cumbersome.
You cannot arbitrarily choose the cross-section of pipes used in the kitchen ventilation layout; there are limitations here. In pipes of small diameter, usually 90-110 mm, at a speed of more than 2 m/s, the air flow begins to hum at joints and turns, especially in windy or frosty weather. For the kitchen, this limitation is especially relevant, since hot air is removed from the room. As it moves through metal air ducts, the flow quickly cools and loses its energy of movement before it rises to the roof and is thrown out through the vent pipe.
Making air ducts with a large cross-section, especially if one central exhaust pipe is used, is also dangerous. The slow and at the same time massive air flow after turning off the hood can easily tip over and return to the ventilation system of a private house. Even if there is a check valve in the kitchen, kitchen fumes and odors easily flow through the air ducts into the bedroom and living room.
How to make a natural ventilation system with your own hands
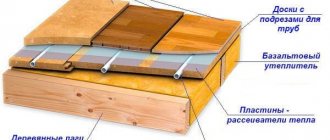
Natural ventilation works based on physical laws - due to the difference between warm air indoors and cold air outside (warm air is lighter) as well as pressure differences. Based on this, we came up with a simple design that is quite simple to make in a private house: in the center of the future home, most often in a load-bearing wall, a channel with a cross-section of about 130–140 mm is laid. Horizontal branches with a diameter of 100–100 mm are drawn from it into the rooms of the house.
Ventilation system design
Correct installation
Ventilation duct in the wall
To organize the wiring, plastic pipes are used. Then physics comes into play - warmer room air is pressurized and drawn out due to traction force, colder street air enters the rooms through specially made channels, or naturally (doorways, open windows, etc.).
Placement of supply ducts in the wall
Basic recommendations:
- The thickness of the walls of the exhaust duct must be at least one and a half bricks. Otherwise, the air in it will quickly cool and the reverse process will occur - the air will not be drawn out, but will flow into the rooms.
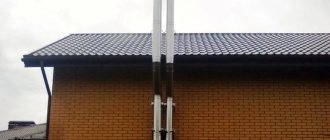
- The pipe at the outlet of the exhaust duct on the roof must be higher than the ridge. Otherwise, roof turbulence will interfere with the normal operation of the traction.
Bringing the system to the street
The main flow channel, as described above, is done in a standard manner. But the influx of fresh air coming from the street can be organized in two ways - either by making flow channels in the window sills, or by making gaps in the windows. When choosing the second method, it is better to use metal-plastic windows, which have one competitive advantage over wooden ones - an increased level of sound insulation. These measures will be enough to ventilate the house to the required extent.
Fresh air is essential
If we talk about the advantage of using natural ventilation in a private house over forced ventilation (filters, radiators, etc.), you need to focus on two points - noise and air frequency. Natural ventilation does not require the presence of additional equipment (at least, you can do without it)
This means that there will be no extraneous noise in the house from operating fans and radiators
Natural ventilation does not require additional equipment (at least, you can do without it). This means that there will be no extraneous noise in the house from operating fans and radiators.
Many people, when installing air purifying filters, forget that they require constant replacement. After prolonged use, the filter becomes dirty and the air passing through it is not cleaned, but is supplied with an additional dose of dust and other substances, making it even more polluted. There is no need to control air exchange during natural ventilation, especially since some of the large particles coming into the house from the street along with the air settle on the windowsills, where they can be easily removed with a damp cloth. And if we assume that wet cleaning is carried out in the house regularly, then this should not cause any additional inconvenience.
Video: how to arrange a natural hood
Don't forget about the air conditioning system. A properly organized tandem of natural, forced ventilation and air conditioning will make life in the house comfortable and safe for health.
Material updated 04/24/2017
Fans
Fans can be installed in any room.
The number and power of devices depends on the size of the room and its air exchange needs. Fans are installed in the openings of exhaust ducts, in windows or walls with access to the street. Fans are available as exhaust and supply fans, with low, medium and high power. The devices require access to electricity to operate.
The cost of fans is not very high. The shape and size are selected individually, depending on where installation is planned. You can install the fan in the ventilation duct yourself. Installing the device into the wall is more difficult; you need to punch a hole to suit the size. If there is no special tool, you will need the help of builders.
Preparatory work for installing a kitchen hood through the wall
Connecting the hood to an outlet through the wall is an option for private houses or apartments where ventilation is not provided for by the design or is in poor condition. In such cases, for the normal functioning of the exhaust unit, the outlet is made directly to the street, punching a through hole in the wall, providing a channel of minimum length. For the air duct, it is recommended to choose a round pipe.
To prevent the external channel from freezing and leaking, a check valve is installed in the hole inside the wall.
At the preparation stage, the exact installation location of the unit is determined and materials are purchased: a galvanized pipe with a canopy for arranging external ventilation, a corrugated aluminum pipe for the air duct, clamps and a check valve. You will also need hardware.
When preparing the room:
- remove kitchen utensils, textiles and decorative items;
- cover furniture and equipment;
- cover the floor in the installation area with thick fabric;
- clear the wall where the unit will be installed.
Equipment location and dimensions
The location for installing the air purifier is selected taking into account the location of the exhaust unit and the area of the kitchen.
According to the location of installation, exhaust units are divided into:
- Island - above the stove located in the center of the room.
- Wall-mounted. The dome is attached to the wall on one side, and the opposite side is located above the slab.
- Corner ones are installed above the hob in the corner of the room.
The shape of the hoods is flat, inclined and dome. The size of the suction surface should not be smaller than the area of the hob, otherwise the hood will be ineffective.
According to the rules of SNiP, the socket for powering the hood is installed above the wall cabinet, inside it or in the casing of the device at a height of 1900-2200 mm from the floor.
Selection of materials for the exhaust duct
When choosing a check valve and an outer pipe for the air duct, they are guided by the thickness of the wall and the material from which it is built. The best option is a galvanized round pipe with a canopy. Any moisture-resistant material is suitable as insulation for such a pipe. Most often, penofol with a thickness of 100 mm is used.
The check valve for the hood is made of:
- PVC;
- polypropylene;
- polyurethane;
- vinylurethane;
- plastic;
- polyethylene.
The most durable valves are made of polyethylene and reinforced vinyl urethane. The latter is almost impossible to damage.
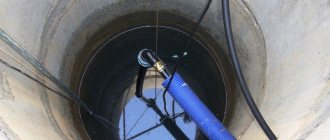
Creating and preparing a ventilation hole in the wall
The hole for the air duct in the wall should be located at a distance of 200-300 mm from the ceiling on the outer wall as close as possible to the slab. Ideally, directly above the hob.
Before starting work, empty the kitchen of decorative items, utensils, small accessories, and cover furniture and appliances with film or cloth. The location of the hole is measured on the wall and markings are made for the air duct.
A through hole in the wall and installation of a ventilation duct are done in several stages:
- Drill a hole in the wall to install the frame.
- Hammer a dowel into the hole and screw in a pin to secure the frame.
- Attach the frame to the wall and install the hammer drill.
- Install a coolant drain for the crown made of foil or tin cans.
- The drill bit of the hammer drill goes through the finishing layer inside the room.
- The crown is freed from the building material and the inside of the wall is passed.
- The front part of the wall is drilled out, after which the frame with the tool is dismantled.
- Prepare the hole for installation of the ventilation duct, freeing it from debris and dust.
Next, a system of check valves is assembled, which will prevent dust and debris from entering the channel and will not let cold air from the street into the room. After installing the valves, the hood body is attached.
Air duct installation rules
Types of air ducts
- Pipes can be attached to walls, ceilings or placed directly on kitchen wall cabinets.
- If it is decided to fix the air duct to the walls or ceiling, then the installation begins with drawing up a diagram and applying markings for fastenings along it. The step between them on a straight section is 50-60 cm, and an additional holder is placed at each bend.
- Drill holes for dowels according to the markings.
- The assembly of the air duct begins from the exhaust hole. It is recommended to treat the joints with sealant. The holders are fixed with self-tapping screws, screwing them into the installed dowels.
- The hood is connected to the air duct using corrugation.
Lastly, the decorative casing is installed. Sometimes it has to be cut to height. It is allowed to make a side hole in the casing for the air duct outlet (if this is required by the layout features).
To hide the air duct, you can mount a box made of plasterboard, wood, or other materials that match the facades of kitchen furniture.
What types of hoods are there in the kitchen?
There are many options for hoods on sale, which can be selected in detail for certain operating conditions. They have significant differences, among which the following areas are especially distinguished:
According to the cleaning method.
Here there are evacuation and circulation options, where the first one is connected to the air duct and removes harmful substances and unpleasant odors outside. This option is protected by a backdraft valve. The second option includes a carbon-type filter in its design, thanks to which the kitchen ventilation in the house purifies the air without any contact with the external environment.
According to design features.
The appearance of the device is very important, since everyone needs it to fit perfectly into the design of the kitchen, look aesthetically pleasing, be easy to clean, and also its installation takes a minimum of time, without the involvement of third-party specialists. There are domed and built-in options here. Dome has this name due to the shape of the air exchanger.
The pyramidal filter passes the outgoing air through itself and releases it out through a special hole through a pipe. A built-in hood is often hidden in furniture that is made to order. It is distinguished by ergonomics, saving space, but at the same time, convenient process management.
Planning stage
The cheapest and most common option is the natural drive system. It is suitable for both home and utility rooms: baths, cellars, chicken coops, etc.
It is a mistake to think that with natural ventilation, heat is lost from the house to the street. If the room is well sealed, there are no gaps in the frames, walls or floors, then the hood removes as much air as the influx allows.
Before you start installing ventilation, you need to calculate the total air exchange, the volume of supply air. Methods and standards are adopted exclusively in accordance with SNiP (clause 9 of SNiP 31-01-2003; SP 60 13330.2012 Appendix “K”). Preparatory calculation work for the preparation of technical documentation must be carried out by a specialist. You cannot do this on your own without specialized knowledge.
Equipment selection
Supply ventilation equipment is not limited to the installation of fans. The types of supply ventilation systems are:
- ventilation with heating of forced air (equipped with electric climate control);
- ventilation with filtration (in this case, filters, depending on the type, can either simply clean the air from dust impurities or capture gases harmful to health).
The air flow is provided from the street, therefore, before being evenly distributed throughout all rooms in the house, the air must undergo pre-filtration at the inlet. Full filters can only be installed if the air intake is equipped with a suction fan.
If the ventilation system in the house is exhaust, and there are simply grilles at the entrance vents, then it is impossible to install full-fledged filters in them - they will act as an artificial barrier, and the air will not have enough pressure to overcome it.
As a result, the supply of fresh air will not occur through the openings provided for this in the room, but through various cracks, and sometimes this air will not be fresh at all. For example, if the ventilated room is located on the ground floor, then exhaust gases from warming up cars can penetrate through the cracks in the doors.
The choice of equipment for an exhaust or supply forced ventilation system should be based on the following criteria:
- fan motor power;
- operating noise, which influences where exactly the fan unit should be located: inside the building or outside it;
- ventilation system cost.
A fan for an exhaust hood in a private house should be selected after calculating exactly how much air you need to remove from the room per unit of time, and depending on this, the power of the unit is selected.
There is no need to install outlet filters, but it is strongly recommended to install an exhaust valve that will shut off the air duct when the hood is not working. This will prevent heat from escaping from the room.
Expert advice
As in any other work, when making holes there are features and nuances that must be known to achieve the desired result. For example, how to choose the correct hole size. The choice depends on the material from which they are made. If the hole is made of wood, then it is necessary to leave a gap, which is determined by the thickness of the heat and waterproofing layer. It is not recommended to make allowances that are too large, more than 10 cm, as in this case they will be difficult to weld. It is sometimes difficult for a craftsman to make a round hole in wood. It is possible to make a square hole, which in practice is much easier to make.
However, in concrete walls and ceilings it is better to make holes with an exact diameter. This material is resistant to fluctuations in temperature and humidity. One of the typical mistakes in work may be the following features of building a house:
- wiring. Without knowing the exact electrical diagram, do not start work. Recovery will take a lot of time and money;
- equipment. Without special equipment, it is difficult to find a place where its absence is guaranteed. If the drill suddenly hits an obstacle, stop working, try making a hole in a different location or cutting out metal;
- Weakening the load-bearing wall. A hole in a concrete monolithic wall can be made without worry. However, a brick or block wall is less durable. When working with a hammer, you can easily break the integrity of the area above the hole, which can crack and, in some cases, collapse.
All work must be carried out in accordance with current regulations. Holes with a diameter of less than 200 mm are not adjustable and can be made by property owners at their own discretion. If it is necessary to drill a well with large values, it is necessary to coordinate this operation with the relevant authorities, otherwise serious problems may arise, including a minor fine and restoration of the drilled well.
Rules for ensuring air exchange
To effectively change air, remove household fumes and prevent the formation of condensation, it is necessary to correctly calculate the total cross-sectional area of all ventilation openings. According to the rules, it must be at least 1/500 of the overlap area.
Properly organized air exchange will not only prevent excess moisture, but also equalize internal and external pressure. And, accordingly, it will protect the connecting elements of the roof from destruction.
In addition, it is important to consider the properties of building materials. Modern versions of insulation and moisture-proof films allow less air to pass through than their predecessors
Therefore, more efficient ventilation is required.
Therefore, when using materials with a high degree of tightness, it is worth increasing the cross-sectional area to 1/400 and even 1/300 of the total floor area.
Additional Information
- The ventilation pipe must protrude so that the angle between the ridge and its upper part does not exceed 10 degrees, otherwise the draft level will be significantly reduced.
- Cables, gas pipelines and other elements of communication systems should not be placed in the interior of the air ducts, as well as at a distance of five centimeters from them.
- The passage of flows should be carried out to the hood even with the interior doors closed, and not in all cases it is necessary to install grilles. It is enough to leave a gap at the bottom 1.5-2 cm wide.
- Too little ventilation of the living space does not allow achieving a high level of environmental safety, especially if materials based on plastics, formaldehyde resins, and so on were used in the finishing process.
This principle is used to determine the installation height of the exhaust pipe.
Selecting an exhaust device
The hood should be selected so that it matches the volume of the room and the loads from the stove. Therefore, the main criteria for choosing a device are technical characteristics, which include:
- Productivity measured in cubic meters per hour (m³/h). To do this, the volume of the kitchen is calculated by multiplying its area by the height of the ceilings. And then the result obtained is multiplied by a factor of 12, which determines the standard air exchange per hour. For a gas stove, a coefficient of 15 to 20 is taken.
- Device dimensions. They should not be smaller than the dimensional parameters of the hob.
- Noise level. The manufacturer indicates this indicator in the product passport. And each consumer chooses it according to his own feelings. For example, 50 dB is conversational speech, so the lower the level of such noise emitted, the better.
- Various operating modes. There are two positions here: a flow-through system for the emission of polluted air, and a recirculation system. The first is a direct connection of the device to the street or ventilation duct through an air duct, the second is air filtration and the subsequent return of the purified air mass back to the kitchen area.
- Control. The panel through which modes and lighting are configured can be push-button, electronic or touch-sensitive. In this regard, everyone chooses at their own discretion. But the more modern the model, the more expensive it is.
- Design. Manufacturers today offer a huge range of products, distinguished by a variety of colors, shapes and sizes. Exhaust devices come in two forms: flat and dome. The latter are a cone-shaped shape that tapers towards the ceiling. Thus, the efficiency of the passage of polluted air through the internal channels of the device increases.
All exhaust devices are divided into groups according to installation method:
- Wall-mounted. They are attached to the plane of the walls with self-tapping screws and dowels.
- Hanging. They are attached to the bottom plane of the kitchen wall cabinet suspended above the hob.
- Built-in. They are installed in the same cabinet, which does not have a bottom plane. At the same time, the control panel of the hood is also visible.
- Corner designs. They are mounted in the corner of the room, provided that the hob is installed there.
- Island. Suspended from the ceiling above the kitchen island if it has a built-in hob.
Where to install the socket
There is often a situation in which a block of sockets and switches is installed on the wall, between the hob and the hood. This is not entirely the right decision. Sockets cannot be located immediately behind the burners. The power cord from the hood is shorter than the distance to the hood from the outlet. To avoid this, it is recommended to install a power supply point for the hood.
The socket should be installed at a height of about 2-2.5 meters. This will be a place above the wall cabinet or inside it
Before fixing the outlet, you should pay attention to the location of the air duct. Receptacle installation cannot be done on a duct line
The outlet point should be equipped at a distance of 15-20 cm from the air duct.
The hood must be safe
Since ventilation in a kitchen in a private house through an exhaust hood will be in contact with people and will be located next to furniture, the safety factor of this device is paramount. Even at the repair stage, you need to install a separate socket for the device or at least a group of wires in order to make a hidden connection under the case. The latter option is more aesthetically pleasing, but inconvenient if you have to frequently remove the system.
Safety precautions require placing the socket or wire at a level no lower than 60 cm above the sink or stove. It’s even better if you connect the general power supply to the kitchen to a differential circuit breaker or RCD, which will eliminate even the slightest chance of electric shock.
Number of sockets
How many minimum outlets are required in the kitchen?
Here, follow the rule - for each stationary kitchen appliance, plan your own socket + 2 blocks along the edges of the countertop + 1 piece near the dining table.
In addition, it doesn’t hurt to mount one socket immediately under or near the switch at the entrance to the room.
The area with switches usually remains uncluttered, and a free point where you can take voltage (for example, for a vacuum cleaner) is never superfluous.
Now mark the points on the apron for connecting non-stationary devices. Place at least two pieces on each part (right and left) of the kitchen.
This will include an electric kettle, blender, mixer, etc.
Natural ventilation system
The natural type of ventilation operates completely autonomously. In this case, air circulates through arranged vents and channels located in the walls. The air moves here according to the principle of drafts and does not require any external devices. Installation and maintenance of such ventilation does not require large financial expenditures.
Natural ventilation is present more often in old buildings and sometimes in modern ones. In multi-storey buildings, ventilation systems have outlet ducts at the locations of the ventilation riser.
In order for a natural exhaust system to work correctly, the openings for air flow are located on the external wall below, and the hood is discharged on the opposite side at the top or in another room. Valves can be located in different places.
Ventilation hoods in modern houses with plastic windows are not always necessary. Such window systems already have supply systems equipped with filters and dampers that allow you to regulate the functioning of the valve.
But where the climate is harsh, it is better to make supply openings under the window sill, next to the heating pipes, so that the air entering from the outside is heated and enters the room warm.
Exhaust holes are made with a drill fitted with a large drill bit. The shape of the canals is usually round. There are, of course, square channel shapes, but their construction requires more effort.
Why does the valve freeze up?
The phenomenon occurs in areas with low winter temperatures. The source of frost is condensation falling on the very cooled surfaces of the ventilator. To fix the problem, you need to identify the cause of freezing:
- Natural exhaust works ineffectively or does not function at all. Result: water vapor remains inside the room and partially escapes outside through the supply valve.
- The power of the heating system is not designed for infiltration (natural supply) of air by the supply unit. The head becomes supercooled and moisture condenses on it.
- Violation of installation rules, for example, placing the ventilator too close to the window, a large distance from the radiator, or insufficient insulation of the pipe.
- The head is covered with curtains that are too thick, which creates a cold zone along the wall. Ice appears on the lid.
Among user reviews there are complaints about a decrease in temperature after installing ventilators, literally - there is a lot of blowing from the valves. We would like to remind you of a simple rule: the air flow through the element depends entirely on the operation of the hood. Try to adjust the flow at the wall valve or partially block the exhaust vent.
The photo on the left shows the correct installation of the ventilator; cold air is mixed with the warm flow from the radiator. The valve on the right is too low
Natural ventilation system
The natural type of ventilation operates completely autonomously. In this case, air circulates through arranged vents and channels located in the walls. The air moves here according to the principle of drafts and does not require any external devices. Installation and maintenance of such ventilation does not require large financial expenditures.
Natural ventilation is present more often in old buildings and sometimes in modern ones. In multi-storey buildings, ventilation systems have outlet ducts at the locations of the ventilation riser.
In order for a natural exhaust system to work correctly, the openings for air flow are located on the external wall below, and the hood is discharged on the opposite side at the top or in another room. Valves can be located in different places.
Ventilation hoods in modern houses with plastic windows are not always necessary. Such window systems already have supply systems equipped with filters and dampers that allow you to regulate the functioning of the valve.
But where the climate is harsh, it is better to make supply openings under the window sill, next to the heating pipes, so that the air entering from the outside is heated and enters the room warm.
Exhaust holes are made with a drill fitted with a large drill bit. The shape of the canals is usually round. There are, of course, square channel shapes, but their construction requires more effort.
What would I do differently now if I were starting from scratch?
- I would check the ventilation operation using a device for measuring pm2.5 immediately at the manufacturer’s demo stand.
- I would check the design of the housing and filter unit at the demo stand to see if there are any cracks there.
- I wouldn't contact Minibox. It's not even about air leaks, but about the approach to solving my problem.
- I would not install a ready-made system with a HEPA filter, but a separate ventilation unit and a separate filter unit. I would look first of all for ventilation from Turkov: there were excellent reviews about them. Filter blocks - for example, this one or this one.
- I would install a system with an air exchange of 600 m3/h so that it would be even quieter than my current one at 350 m3/h, for example, Turkov Capsule 600. The difference in price from 350 m3/h is small.
- I would not buy the Air Quality Pollution Monitor. I would only buy AirVisual Pro.
- Perhaps I would install a breather instead of an inlet: it’s cheaper and simpler. As an option, Tion with a silencer. Or I would look at breathers that can be quieter than Tion, for example, a breather from Xiaomi. For a room that does not border a balcony, I consider this as the main option.
- I would be prepared for the fact that ventilation in an apartment is largely an accident. You don’t know in advance at what speed the ventilation or breather will need to be set for your room. Therefore, you don’t know the noise level in advance, even if you go to listen.
- I would take a closer look at systems with recuperation to save on electricity bills and maintain humidity. In November-December, I spent 1,500 rubles on electricity to heat the air in the ventilation. Initially, I rejected recovery, thinking that by law it could not be done in apartment buildings. But it seems I was wrong.
- I would glue everything not with ordinary tape, but with aluminum or reinforced tape. In the comments and on the ixbt forum it was indicated that this is better, and aluminum tape is usually used in ventilation.
Ventilation in a private house
When designing country houses and city cottages, it is necessary to take into account all the little things. Properly installed ventilation in a private home is especially important.
In this case, the mechanical ventilation system can be equipped in several ways. But most often, exhaust or supply and exhaust is used. These types of ventilation provide the most comfortable indoor microclimate while maintaining the integrity of structures.
How to do this correctly in a private home? The ventilation structure is implemented in several steps:
- the volume of clean air that must be provided in accordance with the standards is determined;
- the dimensions of the required air duct are calculated;
- Next, the optimal ventilation scheme in the load-bearing wall is selected;
- a plan is being prepared for the installation of air channels;
- the installation location of ventilation is determined;
- devices are installed to provide air inflow and outlet;
- An air exhaust system is being built.
Professionals point out that it is customary to design ventilation with an outlet into the wall in private households from the very beginning. There are three types of ventilation systems:
There are three types of ventilation systems:
- natural ventilation;
- forced with fans;
- mixed system.
The compulsory system is set up in several ways:
- using a fan through the window;
- vents and outlet channels;
- exhaust hole in the wall.
For high-quality operation of structures, you need to choose the right location for the hood. The inflow and outflow of air should cover all places that are sources of odors and steam.
Conclusions and useful video on the topic
The video tells about what happens when the owner of the premises has violated the integrity of the ventilation duct structure and this has been discovered.
Legislation, public opinion and even common sense are against drilling ventilation ducts. The reason is that this redevelopment will not provide any cardinal advantage, but will reduce, and in some cases significantly, the comfort and safety of living. Microclimate parameters will also worsen, which often leads to various diseases, including asthma.
Have you encountered the issue of violation of the integrity of the ventilation duct and want to supplement the above material with useful information? Or do you still have questions? You can express your opinion, share your experience, and ask for advice from our experts and other site users in the block located below this article.
Installation work
Installation of forced ventilation in a private house should, of course, begin with a project. And only when you know exactly where the inlet ventilation hole in the wall should be located, and also where the ventilation outlet will need to be removed, should you take up the drill.
A hole in the outer wall is drilled using a special cutter-cup, which is installed on a drill (with a power of 2 kW or more, operating in non-impact mode). You can also use a hammer drill if you switch it to a regular drill mode.
It is recommended to first install the air ducts and all power units of the ventilation system inside the house, and only at the end start drilling the external wall. This will prevent heat loss in winter, and prevent unpleasant insects from entering the house in summer.
After the holes are drilled, pipes should be passed through them. The space between the wall of the hole and the wall of the pipe should be filled with sealant.
The inlet pipes are installed flush with the outer surface of the wall, and the hole is closed with a decorative grille. The outlet pipe should protrude above the outer surface of the house wall by at least 2 cm. The formation of the outlet ventilation hole ends with the installation of an exhaust valve on the pipe.
Until the final installation of the entire ventilation system in the house is completed, it is not recommended to carry out further interior finishing work. As a rule, there is always a need to change the original design, which can lead to damage to the finish.
In general, the ventilation system is installed after the electrical circuit is installed in the house (unless it is decided to place electrical wires in the ceiling space), but before the heating and water supply system is ready.
Video description
The video shows how to properly install a ventilation supply valve in a wall:
Since there are many types of valves on the market, the methods for installing them also vary, but the principle is the same. For example, there are devices in which a heat-insulating shell is installed in the cylinder. That is, they drill a wall along the diameter of a plastic pipe. The external decorative grille is not attached to the wall, but is inserted into the protruding end of the cylinder in the form of a lid. The same goes for the head.
Solving the problem using a fan
Many people probably thought that the conversation was about installing fans in place of ventilation grilles. Nobody forbids doing this, although it has already been described above what this can lead to.
We are talking about a fan that is installed in the system on the roof. This may be a mechanical deflector or a rotary turbine. Both devices are powered by the wind, so they are of no use in calm weather. Although, as practice shows, it is the installation of these devices that sharply increases traction and prevents reverse flow.
As for fans on ventilation grilles, you should first calculate their power. It depends on the cross-section of the ventilation ducts and on such indicators as air exchange in the premises. For example, in the kitchen this figure should vary in the range of 12-20 m³/hour depending on the type of stove and the number of burners.
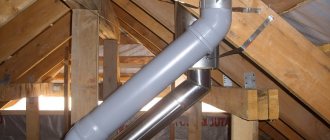
Purpose of the roofing element UP
Diagram and overall dimensions of the passage unit for a soft roof.
The unit for the passage of the ventilation duct through the roof is marked UP; in the standard version there are 11 items. For difficult operating conditions, this additional element is designed and manufactured individually. The pipe passage through the roof is regulated by GOST 15150, which determines the diameter and dimensions of the structure.
With the help of a roof penetration, only cold air is removed; for chimneys, structures made of fire-resistant materials are used, the dimensions of which are controlled by other SNiP standards.
When choosing a control unit for an air duct through the roof, they are guided by the degree of dust, temperature differences, gas contamination, and humidity of the transported air mixture. The additional element of the passage of the air duct through the roof is fixed to the roof's load-bearing frame (lathing or counter-lattice). Shown in Fig. 1.
Supply devices
Due to the advent of modern materials, buildings began to be more airtight, which led to another problem associated with a decrease in air flow inside.
If previously houses and apartments could be ventilated without additional inflow, now the situation has changed. It is especially difficult to breathe in a home if plastic is used as the main material.
About the functionality
Finished products for air intake from the street can completely prevent the penetration of dust, insects and all kinds of sounds. After installation, there are no drafts in the rooms. The air supply device resembles the operating principle of an air reducer, which slows down the flow rate.
This is a valve for air flow.
Operating the supply valve is extremely simple, as it is equipped with a convenient handle for closing the channel. Its visible part fits perfectly into the interior of the room. Being located from the outside, it does not spoil the impression of the façade of the building. During operation you will not have to spend financial resources.
More information about the design of the products
The air throughput element is a small plastic tube, the diameter of which can vary widely. Inside there is insulation that prevents the penetration of sounds.
Below you can get acquainted with the structure of products of this type.
- The plastic channel is the basic component, since it is through it that air enters the room.
- The adjustment knob is located on the inside. With its help you can block the channel.
- The filter element allows the incoming flows to be cleaned from dust particles.
- The internal fragment of the head, equipped with a ventilation flap, is the main limiter.
- The O-ring is designed to improve the seal between the elements of the product.
- Insulating material provides the ability to protect the interior space from sound and other effects.
- The outer grille helps protect the structure from precipitation.
- The mosquito net inside it completely prevents the penetration of insects.
The main parts of the product are shown.
Carrying out installation work
The first step is to select a suitable location for installing the element on the side plane bordering the street. There must be direct access to the functional head, otherwise control will be problematic. The best option involves installing it next to a heating radiator so that the incoming air has time to warm up.
One of the installation options is demonstrated.
After selecting an acceptable location, proceed directly to making the hole. If the walls are wooden, then use a regular drill and drill. In other cases, diamond drilling is carried out with a special tool. When constructing an opening, it is recommended to make a slight slope towards the street to drain condensate.
You will have to make approximately the same hole.
A plastic sleeve of the required size is inserted into the finished hole. A ventilation grille is installed on the outside, and a functional cap is inserted from the inside. In the process of fixing the elements, small bolts are used, with the help of which the structure gains rigidity.