It often happens that over time the lining darkens. This may also be due to poor-quality wood processing or failure to comply with proper operating conditions.
But don’t despair, you can carry out repairs and bring the finishing material back to its original form.
There are several ways to lighten darkened lining yourself and make it look like new.
Causes of darkening:
- High humidity.
- Sudden temperature change.
- Improper use of the material.
- Poor care of the material.
- The lining served for more than 12 years.
The lining has darkened, what should I do?
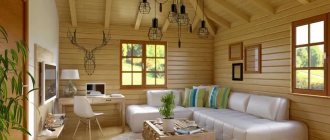
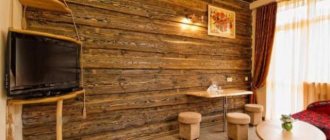
Quite often, the interior decoration of a balcony, attic, or dacha room is decorated with wooden paneling.
This material is especially popular, creating a comfortable indoor atmosphere and a favorable microclimate. It is able to compete with modern materials: plastic panels, wallpaper, tiles. The lining absorbs high humidity and can release it in a dry room. Therefore, it is easy to breathe in rooms decorated with wood. The aroma of wood is not comparable to the smell of chemical finishing materials. However, owners often encounter the problem that the lining has darkened over time; what should be done to restore its former beauty and attractiveness.
The lining has darkened, what to do?
How to update darkened lining
Reasons for lost attractiveness
Blackening of wood is more common when finishing it yourself. Here, technological errors are made when working with wood, which leads to a change in the external attractive appearance and even the appearance of fungus and mold. And this is caused by the unfavorable influence of the environment. Sometimes darkening is caused by poor quality building materials.
However, even under all favorable conditions, any tree loses its attractiveness and freshness over time. Therefore, protection is necessary when using it as a finish.
You can restore the attractiveness of the lining in several ways: lighten it with bleach, cover it with brightening varnish, cover it with acrylic paint, having previously sanded the surface, or paint it.
The lining has darkened, how to lighten it
Don’t be upset about this, immediately dismantle the darkened lining and run to the construction center for a new finish.
Craftsmen from among the people have long invented and put into practice a lot of methods for lightening wood. The ingredients used are oxalic acid, bleach and water (ratio 1:10), and hydrogen peroxide. And manufacturers have not ignored this situation and have developed special bleaching agents that do not harm the structure of the wood. Moreover, these products are harmless, non-toxic, and increase the material’s resistance to fire and mechanical damage.
After bleaching the lining, a protective coating should be applied and preferably several layers of it to reliably preserve the new light surface. Of course, you won’t get the original appearance, but the surface will be significantly improved.
Here, for example, is one of the methods for bleaching a darkened surface with the ready-made product “Iney Prof”, “Neomid-500-T” or “Senezh”. The packaging of each product contains detailed instructions on how to bleach wood. Give it a try.
The workflow looks something like this:
Apply the product to the wooden surface with a brush for 10-15 minutes, and then rinse with warm water. The brightening effect is immediately visible. However, now the lightened surface must be primed and then varnished in 1-2 layers.
When working, you should take precautions: wear rubber gloves and a ventilated area.
Painting the lining
It will allow you to radically change the surface, however, the effect of the natural structure of the wood disappears.
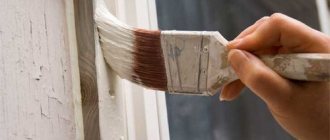
First, you need to prepare the surface before painting. To remove all dirt, treat the finish with an alkaline solution. Now you should treat it with pumice, sandpaper or a grinding wheel. This removes the old protective layer from the material. By using classic varnish, you manage to preserve the unique structure of the wood and that’s where your finishing ends.
If you decide to use an opaque finish, you will lose the interesting texture of the wood. To improve the decor of the room, you will need to change the design of windows, doors and flooring.
lighten and varnish
How to cover the lining so as not to darken
To protect the wooden surface you need to use varnish. Which one to choose?
Polyurethane varnish protects wood from yellowing and fading in the sun.
Water-based coating is environmentally friendly.
Alkyd varnishes are suitable for floors, walls, and also for exterior surfaces. They are abrasion resistant.
Chemical cleaning methods
When the darkening has penetrated deep into the thickness of the lamella, it is impossible to remove it mechanically; removing something too thick will lead to deformation and destruction of the entire finish. Traditional methods developed over the years on how to bleach darkened lining inside a house suggest using regular bleach or bleach. Processing should be carried out only in a well-ventilated area, wearing a respirator and gloves. The method is quite effective, but the fumes released over a long period of time can be harmful to health. This option is definitely not the answer to the question of how to bleach the lining in a bath; when heated, the remaining chlorine will evaporate and harm people’s health.
Specialized products for bleaching lining
To bleach lining in a bath safely for health, specialized water-based cleaners have been developed. The substance is diluted according to the scheme indicated on the packaging, it depends on the recommendations of the manufacturer, and is applied to the entire surface using a brush or roller. The surface must be left for 15 minutes, the lining will turn white literally before your eyes. After the exposure time has passed, the mixture is washed off with warm water using a sponge.
When the process of cleaning the lining from blackening is completed, the wood should dry well. After complete drying, protective mixtures, primers and selected paint and varnish coatings are applied.
Source
Classification of painting materials
Darkened lining can be painted with oil, alkyd or acrylic paints to restore the attractiveness of the surface. Let's look at the advantages and disadvantages of each type of paint.
Oil paints
They have an unpleasant odor and are painted in good weather so that the room can be ventilated.
- service life is approximately 5 years;
- the paint is well absorbed by wood and dries within 24 hours;
- oil coating protects against moisture;
- The low cost is captivating.
The disadvantage is the loss of shine during long-term use, it is difficult to apply another type of coating on top of this coating, and the oily surface does not breathe.
Alkyd paints
They are used for walls and floors. However, they should be applied to a completely dry surface, otherwise bubbles will form and the paint composition will then peel off. The alkyd composition is resistant to moisture and its cost is low.
Acrylic based paints
Experts recommend using these paints for lining because of their many advantages.
- Acrylic paints are environmentally friendly and do not harm human health. They breathe, protect from moisture and are resistant to sub-zero temperatures.
- Acrylic is odorless, dries quickly, without forming streaks.
- The surface remains attractive for a long time.
- However, you should not buy cheap types of acrylic paints - they can change color after drying. And also the process of applying acrylic is lengthy; it is necessary to apply the next layer after the previous one has completely dried.
Advice from experienced craftsmen
- If you paint with oil paints, then the shade is chosen one tone darker than the desired color, since over time the surface becomes lighter.
- Do not paint in hot weather; drying occurs quickly and the surface may crack.
- The lining should be coated with polyurethane varnish, which will enhance the texture effect and naturalness of the wood.
- The color of natural wood is more suitable for bedrooms and country rooms.
So we looked at the issue, the lining has darkened, what to do . To enjoy attractive lining longer, you need to know about the basic rules for using wood and follow them. To choose lightening, consult with specialists.
If you find an error, please select a piece of text and press Ctrl+Enter.
Source
Is it possible to bleach wood after using Pinotex, firing, or brushing?
Pinotex is an acrylate-based impregnation for wooden surfaces. In addition to the acrylate base, different brands of Pinotex may contain antifungal additives, water repellents and ultraviolet ray filters. There are several shades on sale - from colorless to dark brown. In some cases, the painting result may differ by several shades from the shade stated in the catalogue.
It is easy to correct the color to a darker one: to do this, you need to cover the wood with a darker Pinotex. The opposite situation is more difficult, when you need a lighter shade. Since Pinotex is not a varnish, but an impregnation, it penetrates into the deep layers of wood, from which it is difficult to remove.
A slight lightening can be achieved by removing the top layers of the board by sanding. It is not recommended to use bleaching mixtures. Practice has shown that with this method the wood can lighten unevenly with the formation of unsightly spots.
Brushing is a process in which the softer layers of wood are sanded away. As a result, the surface of the board acquires a texture, in which the natural pattern of annual stripes and rings in places where branches branch off becomes more pronounced. Brushed wood is coated with an impregnation containing substances that prevent fungal growth.
The principle of firing is the same as that of brushing - removing loose layers. The method differs in that instead of abrasive materials, fire is used to burn out the soft layers. As a result, the smooth surface is covered with an exquisite relief of dense wood veins of a darker tone. Boards treated by firing are not bleached; carbon deposits are removed using hard brushes and water.
I hope that the material presented is enough to properly process wooden structures that have lost their visual appeal on their own. The following video will help you understand the above.
Source
Why the lining darkened: how to fix it
At the moment, covering the surface with clapboard is one of the most popular options for finishing the surface. Unfortunately, after a certain period of time, the shalevka loses its former attractiveness and begins to darken. What to do if the lining has darkened? Is it possible to correct the current situation or will I have to do all the work again?
Why does the lining darken?
As practice shows, darkening of the surface of the lining is a fairly common phenomenon. In most cases, the reason for this is the negative influence of external factors. Among other things, darkening may be due to improper storage of the material or its poor quality.
Another important nuance that should be taken into account is that any wood, regardless of how it was treated, loses its attractiveness over time and begins to darken. For example, if you pay attention to the cedar shalevka, it is very afraid of sudden temperature changes, as well as exposure to moisture.
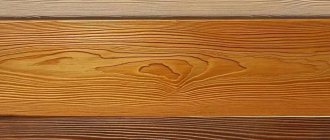
As for linden, it is less capricious, but, one way or another, it also gradually begins to change its color to a darker one. A similar situation is observed with regard to pine or larch lining, as the photos clearly indicate.
What to do if the lining darkens?
If the shalevka has darkened and lost its former attractiveness and has become too dark, it is absolutely not necessary to dismantle all the panels and replace them with new ones. There are 4 main methods that answer the question of how to lighten darkened lining and allow you to correct the situation. You can treat the surface with a special bleaching solution, cover it with a lighter tint varnish, paint it, or, after preliminary sanding, cover it with acrylic.
Each of these methods has both advantages and disadvantages.
- You can use a bleach solution made from hydrochloric acid, chlorine or another active substance. In this case, you should take into account the fact that after the processing is completed, the shalevka will become significantly lighter, but to maintain the effect, it is necessary to cover it with a protective varnish.
- If the wood has darkened, using a light-colored varnish is also a fairly relevant solution. In this case, the lining, of course, will not regain its original appearance, but will become much more attractive.
- Using paint can completely change the appearance. The main disadvantage of this method is the fact that after all the work is completed, the wood structure of the lining will completely disappear, giving way to the classics.
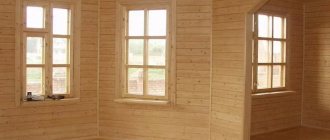
- The unique rating is completed by sanding and acrylic coating. It is acrylic that will not only help restore the skin to its former attractiveness, but also make it more resistant to various external factors. An example of the final result is shown in the photo below.
Video description
You can see how a special bleach and whiteness for wood works in this video:
As you can see, the effectiveness of professional products is noticeably higher, since in addition to the main active compounds they contain additives to improve bleaching and other properties.
- Catalysts promote better penetration of bleaching substances deep into the wood.
- Stabilizers prolong their effect time.
- Surfactants make rinsing easier.
- Fungicides disinfect and antiseptic wood, destroying pathogenic flora.
In addition, bleaches are usually available in concentrated form; they are diluted with water in a certain proportion, which is selected depending on the degree of damage. Therefore, their consumption is relatively small, and instructions for use are detailed on the packaging.
It is more difficult to use home remedies precisely because it is impossible to determine the required concentration of the active substance. For example, bleaching wood with hydrogen peroxide is ineffective; instead, it is better to use a more concentrated perhydrol, and after exposure, be sure to neutralize it with a 4% solution of acetic acid. This means extra time and extra labor.
Regular 3% peroxide will not cope with bleaching; it is better to take a concentrated solution for swimming pools Source oknakr.dp.ua
For reference! All professional bleaches are washed off with plain water, with the exception of acidic ones. To neutralize them, soda is added to the water.
Preparing for painting
If it has been decided to varnish the shalevka, or paint it with acrylic paint, before starting the main process, the surface should be prepared accordingly.
First of all, we are talking about cleaning the lining from various types of contaminants. When the surface is clean, the shalevka is degreased with an alkaline solution. The next step is sanding. To perform this, you can use a flat pumice stone or an abrasive wheel. As a result of sanding, the shalevka loses all its protective properties, which means it needs to be coated with an appropriate antiseptic solution, which not only plays a protective role, but will also preserve all the properties of the paintwork.
When the preparation is completed, the lining can begin to be painted.
If you use classic varnish, it will preserve the original pattern of the lining and will not require additional decoration. If the coating is opaque and completely hides the wood grain, then to obtain an attractive and original appearance, you should take care of additional decorations, such as window and floor design elements.
Restoration of varnished panels
The quality of the coating will depend on the degree of opacity required to obtain the walls. If you do not need to completely cover the wood structure, it is better to sand off the varnish and rub in the coating. You can use impregnation to preserve the wood texture .
Attention
If preservation of the structure is not required, then nothing needs to be removed. Acrylic paints with high adhesion adhere well to all surfaces and are quickly tinted to any shade. You can use polyurethane tinted enamel, but walls with such a coating will be very shiny, so this method is not for everyone.
How to paint the lining correctly?
There is a misconception that the most relevant option is to use oil paint. This is actually not true. If you use it to renew the shalevka, the surface of the wood will acquire an unnatural shine and will take a very long time to dry. Among other things, after a very short period of time, the shalevka will again lose its attractiveness and will require updating or even replacement.
It is much better to use acrylate paints and varnishes. They will not only provide an attractive appearance, but will also give the base material high protective properties from moisture, temperature changes, and, at the same time, allow the shalevka to “breathe.” It should be noted that the approximate service life of such a coating is 8-10 years. Then the whole process will have to start all over again, or replace the panels with new ones.
There are often cases when, after applying paint and varnish, the color of the surface becomes non-uniform. This is due to the fact that the paint was not completely mixed. To ensure the correct choice of tone, a small stroke is made on the surface of the shawl. It is advisable to do it in the most hidden place. When the color is chosen, the lining is coated with an antiseptic that protects the wood from rotting, mold or fungi.
Why bleach wood
Among the fungi that attack wood, there are both very dangerous ones that destroy it, and quite harmless ones that cannot affect the structure of the tree. But they spoil its appearance, causing the appearance of black, green, blue or brown spots. During their life activity, wood-staining fungi increase the permeability of wood to moisture, and in a humid environment, harmful wood-destroying microorganisms can already develop. Therefore, it is necessary to combat this phenomenon not only to restore the marketable appearance of lumber, but also to protect it from more dangerous fungi.
Blackness and blueness can appear not only on fresh boards and logs, it also affects finished wooden structures, especially those that are not protected or are used in damp conditions. Not only does bleached wood look better, it is more resistant to infestation by dangerous mold organisms.
Logs damaged by blue fungus Source winterhouse.ru
The cause of wood discoloration is not always caused by fungi. It gradually darkens and turns gray from contact with air, under the influence of sunlight. Unsightly dark spots often appear around the installation sites of metal fasteners and fittings. This happens as a result of a chemical reaction between iron particles and phenols contained in wood.
In such cases, bleaching the wood with bleach or special means also helps restore the original color of the surface.
Finally, bleaching is used when it is necessary to lighten the natural shade of wood. The active components of the bleach discolor not only fungal cells, but also the pigment bonds of lignin - a natural polymer compound that holds the cells and fibers of wood together and determines its color.
Old grayed boards before and after bleaching Source kraski-net.ru
How to update darkened lining without much effort?
It often happens that over time the lining darkens. This may also be due to poor-quality wood processing or failure to comply with proper operating conditions.
But don’t despair, you can carry out repairs and bring the finishing material back to its original form.
There are several ways to lighten darkened lining yourself and make it look like new.
Causes of darkening:
- High humidity.
- Sudden temperature change.
- Improper use of the material.
- Poor care of the material.
- The lining served for more than 12 years.
Required materials and tools
In order to put the finishing in order, you will need the following available tools:
- bleaching composition for wood;
- brush;
- sponge;
- wide brush;
- roller;
- spray.
Darkened areas of the material that are caused by external climatic factors can be lightened using a bleaching solution.
In addition to traditional methods in the form of bleach, hydrogen peroxide or oxalic acid, special compounds are often used that protect the natural structure and do not clog the pores of wood.
These mixtures are non-toxic and fire-resistant; they do not destroy the texture of the material, but increase its level of wear resistance.
Lighting instructions
Important! The brightening solution can be used for interior and exterior work only at temperatures of 10 degrees and above.
- First, you should wipe the lining with a damp cloth to remove small debris and dust.
- Then you need to wait until the wood dries or dry it with a hair dryer at low temperature.
- The brightening mixture can be purchased at a hardware store; it needs to be diluted with a small amount of water (1:1 ratio), so that the solution is not very thick.
- You should test the mixture on an inconspicuous area, if everything is good, then you can start working.
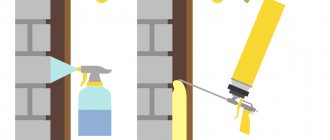
- Next, you need to apply the product to the darkened parts of the lining using a roller; in hard-to-reach places you can use a brush, for example in corners. This brightening solution can also be applied using a spray bottle.
- After the material has dried, it needs to be opened with varnish.
Mechanical cleaning
If the blackening of the lining has not penetrated too deeply into the wood, it can be dealt with by mechanical cleaning. The work can be done manually using sandpaper when the area is very small, or use a grinding machine with a wheel diameter of 125 mm and a grit size of about 40 units. Using this method, without losing the quality and aesthetic properties of wood, you can remove a layer of up to 3 mm.
There are a number of folk methods that talk about ways to bleach darkened lining inside a house, but they cannot be classified as effective. The most popular of them will require a lot of effort and time. The entire surface must be rubbed with soapy water, and then rubbed with sand or crushed brick until a layer of the required thickness is removed.