Window surrounds are traditional decorations that were once a very popular architectural element for decorating the front of a home. Modern architecture has reduced the prevalence of these details for some time and has learned to build without them.
However, you should not abandon traditional window decoration. We will recommend how to choose the appropriate window framing style and what materials are best to use.
Framing windows on the facade with wood
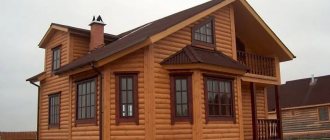
The house is in a rustic style, often decorated with wood. Solid wood in a dark brown color can be used to frame the windows here. Beautiful wooden frames, covered with mastic and varnish, will decorate the light, smooth facade of the building. For harmony, you can emphasize the line of the foundation with a wooden belt in a dark shade of brown.
You can also order openwork wooden window decorations, which will emphasize the character and give shape to the house, creating a new aesthetic quality for the facade.
Openwork window decorations attract attention and enliven the appearance, providing a play of light and shadow. Decorative openwork forms, depending on the ornament, can change the proportions of the window opening - visually expand and improve it
Wooden decorative lace, embellishments and relief details can completely change the appearance of a building.
It can be:
- decorative openwork windows;
- bindings and decoration of decorative windows;
- stylized wooden shutters;
- decorative wood details, including moldings, stripes and side stripes, lintels.
Modern architecture offers us a large selection of materials and methods that allow us to create practical and aesthetic window framing, which will become a real decoration of the facade of the house and at the same time will perform all the necessary functions to protect the window from weather surprises. We can choose traditional decorations when restoring an old house or when building a new one, or we can resort to architectural elements of a modern form.
Moldings, cornices and window sills are offered by manufacturers of thermal insulation systems, as well as many other companies. These architectural elements will help us emphasize window openings and even visually change their shape - make them higher or lower, wider, more massive. You can also change the shape of the window using semicircular arches made of foam, brick or wood, as well as other materials. When choosing a window framing option, moderation and harmony should be observed between the design of window openings, the style and design of the entire facade of the building.
Stone edging
This framing option should be chosen for brick houses. It will look organic and beautiful. You can use artificial or natural stone. The latest products are more expensive. Granite, gravel, and sandstone are suitable for the external cladding of a window opening. Stone tiles are attached with special glue to a previously leveled and cleaned surface.
The stone is characterized by frost resistance, high strength, heat resistance, and durability. Therefore, a frame made from it will last a long time and maintain an attractive appearance throughout the entire period of use.
How to frame an opening
How to cover polystyrene foam on the facade of a house
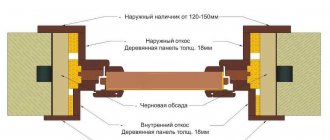
Window edging, like brick laying of any other architectural elements of the facade, can only be done during the construction of a wall, or during renovation, when windows are replaced. Their appearance will largely depend on the design of the lintels in the openings. They can be reinforced concrete, brick (arched or wedge-shaped) or metal (steel angle or profile). So:
Brick cladding of a window opening, which is called a “quarter” in construction, is the most popular type of architectural facade decoration. At the same time, the facing brick is laid with the butt forward, protruding beyond the surface of the masonry by a fourth of the brick body - hence the name.
Window openings when faced with quarter brick
To lay out the quarters, use halves of bricks, which must be cut with a grinder and a diamond wheel before starting work. Based on the standard brick length (25 cm), the size of a half will be 12.5 cm. Accordingly, a quarter is 6.25 cm. When cutting, you can deviate from these dimensions by no more than 7-10 mm. If the protruding part of the window frame is too small, there is no point in it at all. Too large quarters can create a different kind of problem - the window opening will be too wide, and in order to seal the gaps after installing the window, you will have to fill the gaps with foam that are too large
During the construction of walls, window areas must be particularly carefully reinforced. Particular attention should be paid to controlling the verticality of the masonry and the horizontality of the rows. If the master’s level is always at hand, then the window openings will have the correct shape
The window covering must be connected to the wall masonry with a reinforcing wire mesh 3 mm thick (cell 50*50).
Steel corner in the opening
- To lay out the quarter, it is most convenient to block the opening with a steel corner. For this purpose, the size 100*100 or 120*120 is usually used. Before installation, it should be coated with any anti-corrosion compound, or simply painted. The corner is mounted so that it does not protrude inward due to the quarters. A concrete lintel will be installed five centimeters above the corner.
- In order for the row of masonry that will be carried out along the corner to be flush with the general plane of the wall, the bricks will have to be cut in thickness. A window that is not rectangular in shape, but, say, arched, is framed in a similar way, only instead of a corner, the opening is covered with a wooden template, according to which a quarter is drawn.
- After the mortar has hardened in the masonry, the template is removed and the seams are carefully cleaned. To create a double frame, as in the example below, the first row of the quarter is overlapped with the same pattern. Following the facing brick is backfill masonry, which is also covered with a template so that an arch is formed on both sides.
Arched window with brick frame
In general, there are at least a dozen options for laying facing bricks around the perimeter of the window. Moreover, the display can be done not only with a poke forward, but also with a spoon; they can be beautifully combined, creating a beautiful composition above the window. Spoons can be placed either standing or lying down. For example, by alternating three vertical and three horizontal spoons, you can get a pattern that resembles a chessboard. And by alternating spoons and pokes, you get a jagged pattern. A figure can be made above the lintel, resembling a gable roof or a house roof or a dome. So, the design possibilities for window cladding are quite extensive.
The process of working with facing bricks: do-it-yourself masonry
Compared to other technologies for finishing the exterior of buildings, facing brick is the most labor-intensive material to work with.
However, its durability, expressiveness and reliability pay for these expenses. Laying face brick yourself is not easy. Cladding requires greater precision than conventional brick construction. Neatness, cleanliness and precision are extremely important in this work, because the task of the facing material is not only to create a surface, but also to decorate it. It’s good if you have a partner who can do the stitching, control the cleanliness of the luggage and supply the necessary materials to the stacker.
Video - the process of laying facing bricks
The first step is to horizontally level the base using a level. Then they plan the amount of material and interchanges. All rows of bricks are first laid out dry in order to exclude non-standard, chipped, defective bricks, and to see how the stones will fit in the places of door and window openings, in the corners. At this stage, dressings are also planned.
Cut the material using a grinder (using a stone disc). You cannot use a circle on metal or chop off excess parts of brick with a hammer or ax. A cement mixture is well suited for binding bricks: water + sand + cement, and the sand fraction must be fine, or it must be sifted. To tint the cement to match the color of the cladding, dyes are poured into it or tinted. You cannot dilute a lot of cement at once, since the mixture dries out quickly, losing its properties. It is better to do several batches one at a time.
The mortar is applied to the façade cladding using a special template so as not to stain the decorated edges of the tiles; the template allows you to avoid bringing the mortar to a centimeter to one and a half centimeters to the edge. It is better to take less mortar to create a narrow fastening layer, this will help avoid dirt during work
It is important to dilute the mixture so that it seems harsh, then the brick or tile will not “float” when laid. The solution is made in a ratio of 1 to 4: fine clay sand is mixed with cement and liquid using a concrete mixer
Apart from the very first line of bricks on the base, the remaining rows are laid out only after the corners have been laid. That is, the beginning of the masonry is the corner joints (the initial height is 5-6 rows). A thread is then stretched between the corners over each row to bring the bricks level.
If the outer part of the wall is dirty, it is worth wiping/washing it immediately, since it will be much more difficult to do this after drying. Are there several rows laid out? Now is the time to wipe the front side with a wet cloth.
The finished masonry is embroidered by rubbing the seams and using a special tool. Excess solution is removed. If the seam is ready, it should protrude beyond the surface by a maximum of a couple of millimeters. The width of vertical seams should be no more than 10mm, and their thickness should not be more than 12mm. There is a rule that will help create proper surface ventilation: every fourth vertical seam in the bottom
the row is left empty. The surface must be embroidered directly during the main work, since otherwise the scaffolding will have to be re-built.
The durability and reliability of the structure is ensured by brick dressings: chain and single-row dressings are the simplest. The masonry mesh is selected depending on how much space is left for the cladding. Usually, during work on the facade carried out after the main construction, the base must extend beyond the wall by at least 12 cm. Otherwise, it will not be possible to provide high-quality support for the facade brick. If there is no stop, the base also needs improvement.
Window slopes and door openings are laid with a poke, laying the column in 1 brick. Sometimes stones of other shades are used to highlight doors and windows.
Window decor made of facing bricks
Construction tools required for laying facing bricks:
- concrete mixer (concrete mixer);
- trowel (trowels);
- buckets;
- forests;
- plumb line, threads;
- hammer;
- seam cutting tool.
Finishing the doorway and windows in the same style
How to properly install polystyrene foam on the facade of a house
To give it a stylish look, we decided to install window sills made of acrylic stone under white marble on the first floor. They are durable, repel water and are not afraid of frost and UV rays. They look more solid and elegant than standard plastic moldings. Place brackets and moldings under them. On top there is a wide sandstone with a triangular protrusion in the center.
Window finishing
To increase the width of the doorway, we mounted pilasters on the sides, creating the illusion of semi-columns. Similar wide consoles decorated the windows. Moldings along the perimeter of the frame emphasized the geometry of the lines and their severity.
On the second floor they installed a plastic window sill, platbands, and along the side wall the opening was finished with false shutters with an arched sandstone. On the front side of the facade, they imitated the cladding of the walls around the opening with rustication. At the top were keystones and molding.
A realtor I know, after we completed framing the windows and transforming the facade, said that the value of the house had risen by 30%. A correctly created façade image is of great importance. After all, it is the exterior of the house that makes the main impression.
In addition, we have significantly improved the thermal insulation of windows. The exterior decoration not only decorated it, but also reliably protected the walls from getting wet. It became quieter inside; there was almost no noise from outside. The light frame enhanced the natural lighting of the rooms.
In what cases is it worth sealing a window in a log house?
- an old house was purchased and the new owners decided to carry out a large-scale reconstruction;
- during the first years of operation, it turned out that real heat losses exceeded the calculated ones, and since windows are the main channel of heat loss, the owners decided to reduce the total glazing area (most often, a similar situation arises after the construction of a bathhouse);
- there was a need to change the internal layout of the rooms and, as a result, it was necessary to install one or more old windows;
- During the construction of the house, the requirements for the casing design were ignored, as a result of which the installed PVC double-glazed windows burst, and it was decided to install new windows with a reduction in the glazing area.
Please note that removing a window is a complex and expensive operation, so before deciding to start such work, we recommend weighing the pros and cons several times.
In addition, it should be taken into account that in order to completely hide the location of the sealed window, you will have to significantly modify the interior and exterior of the house.
Finishing window openings
Washing windows and facadesWashing facades
The process of finishing a window opening
As for performing such work, for a beginner it is quite a difficult task. The window opening must fully comply with the structural dimensions, deviations in which may lead to the fact that the standard window sizes will not fit into the space allocated for them.
During the cladding process, a protrusion of a quarter of the brick should be provided under the windows in relation to the rough masonry.
As for the width of the opening, it should be laid a little wider than the stated size in the drawings.
Need accurate measurements
It is customary to cover the upper part of the resulting window opening with corner No. 120, which must be installed in a strictly horizontal position; a level check is required. To avoid mold and freezing of window openings, it is necessary to insulate the perimeter.
Situations arise when it is necessary to make changes in the dimensions of an already finished window opening; to do this, it is necessary to carry out the work of trimming bricks or partially dismantling part of the wall structure. Such a task requires the performer to be extremely careful in order to obtain:
- straight line of junction with the frame;
- do not damage the integrity of the entire wall structure;
- appearance consistent with the general color scheme;
The best material for this work is the same material that was used for wall cladding. You can complete a completely new window design with bricks, photos of which are presented to you to select the required option. The chosen decorative option must match the texture and color of the building material.
Window opening trimmed with brick photo
Window decoration with brick can be done with special figured arched segments and even special round structures. It all depends on the shape of the window package that will be installed in it. You can find out what decorative brick is by reading this article. Read how to lay decorative brick and stone here.
To avoid mold and freezing of window openings, it is necessary to insulate the perimeter. Internal seams can be sealed with foam or mortar. Interior finishing of the window opening surface can be done with the following materials:
- plaster treatment;
- drywall;
- plastic;
- tree;
High-quality finishing will provide warmth and will not dampen.
Paper snowflakes
Snowflakes with paper are the most common way to decorate New Year's windows by hand.
Each of us at least once in childhood.
To make them we need:
- round plate.
- white or colored sheet of paper.
- pencil.
- scissors.
- Toilet soap.
The operating principle is as follows:
On a piece of paper, place a circle at the top of the size you want your snowflake to be. Draw an outline around the plate with a pencil, so that the same circle appears on the paper.
Cleaning the paper will make cutting the snowflakes easier and more sensitive.
- Shorten the circle and cross it in half three times.
- Make a pencil drawing on the resulting cone and then cut off the inside with scissors.
We opened the newspaper and received an original and beautiful snowflake.
If it turns out to be Minty, it can be ironed at a low temperature.
If you make these ornaments from thin porous paper, after cutting the snowflake, it can be painted with watercolors on both sides.
Construction guidelines
Wood is a material with good natural thermal insulation and vapor permeability. Therefore, no additional thermal insulation is required between the facing layer and the wall. But there must be a gap between the brick and wooden wall. It is enough to leave 4-5 cm so that moisture does not accumulate on the tree and there is space for small temperature expansions. Still, decorative brick and a wooden wall have different properties under temperature changes.
Decorating tips:
- To decorate facades, you can use any facing brick; you can combine decorative finishes of two or more colors.
- In laying the walls of a decorative facade, you can use either ordinary mortar or add dyes to the composition.
- From the outside, the facade should look perfect, so the masonry should be done especially carefully. If you decide to use bricks of different colors when decorating your facade, from which a certain pattern is formed, then you should make a sketch in advance, as in the photo, and very accurately calculate where and in which row the inclusions of a different color will begin and end.
Other variations
To ensure that the frame lasts a long time and does not deteriorate due to changeable weather, it is better to use ready-made sheet materials for this purpose. These can be galvanized metal panels, vinyl or ready-made siding products (here’s how to insulate a wooden house from the outside with mineral wool under siding, it is indicated), the choice will depend on the purpose of the house - if it’s a kitchen, then you can use less expensive materials, and for the main house and natural stone.
Framing (edging) windows on the facade of a residential building or any other building helps to significantly improve the external appearance of the building and gives it grace and completeness. Currently, a large number of materials for facade stucco are produced. A significant part of them is characterized not only by high quality, but also by accessibility.
Framing windows on the facade of a house with brick, photo
We live in a climate that tests our façade finishing materials' ability to cope with the challenges associated with changes in temperature and humidity. For example, in late winter and spring, water can freeze several times a day, penetrating the finishing layers and destroying weak, poorly designed and constructed building exteriors. This forces us to use some established solutions. On the other hand, finishing with good materials provides good protection from rain, adverse temperatures and noise.
Simple brick is well suited for framing arched window openings and door portals. The bricks are rounded on one side and beveled on the other, forming a soft frame, emphasizing the recess in the wall, letting more sunlight inside. There is a more decorative brick of the Gothic form, it is ideal for houses decorated in the Gothic style, it is used in prestigious offices, elegant houses in the loft style.
Currently, you can find a large assortment of bricks and clinkers on sale, which are distinguished by a varied palette of colors. This choice allows you to realize an exceptional window design, create elegant contrasts and stylish combinations with the facade and window sill.
You can insert colored stripes or inserts of individual bricks of different colors with the wall into a light brick arch. You can create an arch from bricks of two colors, one of which will be the same color as the facade, and the other darker or lighter.
Brick window frames must provide adequate thermal protection, protection against water penetration, structural safety and satisfy the aesthetic needs of the building owner. Brick makes an effective solution to technical problems, an interesting accent, and sometimes very impressive decoration.
During installation, you need to pay attention to moisture insulation between the invisible part of the window frame and the brick window sill, as well as thermal insulation between the wall and the foam, so that thermal bridges do not arise in these areas
Curtains for children's room
The place where a child lives is the territory of play and fairy tales. Here you can do everything that is “not allowed” in a living room or bedroom: contrasting colors, unusual designs, bright children’s curtains with cords, flags, and images of cartoon characters. It is from this cheerful mosaic of color and pattern that a feeling of joy is created. That is why you need to buy curtains for a nursery, focusing on your own imagination and taste. Bows, ties, frills - all this is quite acceptable in the design of a nursery, especially if you are arranging a room for a girl. And the boy will most likely like fabrics with thematic patterns or appliqués
When ordering curtains for a children's room, pay attention to blue-blue and yellow-orange shades. But they cannot be black, gray, or brown - this is contraindicated for the baby
Types of bricks for facade cladding
The facades of brick houses can be made of different materials. The best is brick. It can be of different types and colors. In addition, you can find original substitutes for this material on sale; for example, facades made of artificial stone look beautiful. So, what material to choose for cladding the facade of a house? Let's look at popular types.
Classical
This material is also called sand-lime brick. It is often used in construction for the construction of various buildings. In addition, it is often used for cladding the outside of many private houses and windows.
Advantages of this material:
- provides excellent protection of the facade from negative external influences;
- has simple masonry - there are no difficulties during its installation;
- various colors - you can often see facades made of sand-lime brick, which have different colors - light, white brick, red brick, and so on;
- low cost - this material has a low cost, so it is in high demand.
Hyper-pressed
The hyper-pressed type is made from a moistened mixture of crushed stone, limestone and cement. Pigments for color are also added to this mixture; this process is carried out under increased pressure. During hyperpressing, all elements are soldered at the molecular level, which makes it possible to obtain high strength of the material. The finished material can withstand load levels of up to 250 kg per 1 square meter.
Features of this material:
- hyper-pressed porous material is highly resistant to severe frost;
- increased moisture resistance - this type of brick does not allow liquid to enter the walls during rain or snow;
- has high strength and durability;
- the cost is not too high compared to the excellent qualities of the material;
- wide range - on sale you can find material that imitates an artificial stone facade.
Modern hyper-pressed products may have unstable colors. The design of buildings made of yellow, red, or brown material looks quite beautiful. These products can also be used for window cladding.
Ceramic
Ceramic finishing material is considered the most expensive, and it also poses certain difficulties during installation. But despite the fact that it belongs to the decorative varieties of stone, it is able to withstand loads of up to 150-200 kilograms per 1 square meter.
Positive qualities of the material:
- long service life - this material can last more than 20 years;
- has increased resistance to moisture, sunlight, and temperature changes. In addition, it does not collapse or fade;
- has a strong structure;
- The appearance design of ceramic bricks is attractive, so it is often used to decorate the exterior of a home;
- does not require increased care - in order to wash off all the dirt, just rinse everything with water from a hose.
Ceramic material is available in various shapes and surfaces - smooth, rough, wavy, even. It can be used for cladding wooden walls, as well as for decorating windows.
Clinker
Clinker bricks for facades are a type of material for construction and finishing. The strength of clinker finishing has long been proven by many European houses that were built several centuries ago.
It is worth highlighting the main advantages of this material:
- Due to the fact that during the production of this material traditional firing of clay bricks is used, its strength and wear are increased. 1 square meter of this material can withstand a load of almost 400 kg;
- high frost resistance, the material can withstand frosts down to – 150 degrees Celsius. For this reason, clinker brick cladding is used in northern regions with cold climates;
- has high moisture resistance - wall decoration made of this material can withstand heavy rains, snow and other precipitation;
- clinker material has a variety of textures and different colors, which makes it possible to use it for cladding walls with different architectural styles.
However, this imitation of brick has a very significant drawback - its high cost. Its cost is sometimes almost twice that of ceramic material.
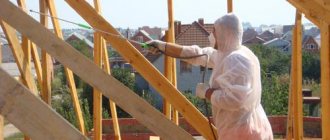
Preparatory stage
If you decide to decorate your home yourself using brickwork, then you should first carry out a series of preparatory work. You should not neglect them if you want to achieve a good and sustainable result. Make sure that the foundation of the house, as well as its overall structure, is designed for the installation of brickwork. The foundation must be constructed in compliance with all building codes. It must withstand significant loads. Cheap and simple bases will not work in this case.
You should also make sure that the foundation of the house is made of raw materials such as monolithic concrete (concrete blocks are also acceptable). The foundation itself must be sufficiently wide
This requirement is especially important because it is on the foundation structure that the facing brick will rest. In some situations, bricks are placed on special steel corners, which are attached to the base using anchor bolts
In addition, it is allowed to organize an additional foundation if the quality of the main one leaves much to be desired. Another foundation must be poured along the perimeter of the building, retreating about 30 cm from the first foundation.
Next you should pay attention to the roof structure
It is very important to take a closer look at the roof. In most cases, in old houses, the cornice part does not protrude beyond the perimeter of the building by more than 25 cm
With such a structure, the bricks will become endlessly wet and may even be subject to destruction. After about 5 years of such use, the brickwork will become unusable. This problem can be solved in one sure way - you will need to coat the walls of your home every year with a special water-repellent compound, but keep in mind that such products are quite expensive
In most cases, in old houses, the cornice part does not protrude beyond the perimeter of the building by more than 25 cm. With such a structure, the bricks will become endlessly wet and may even be subject to destruction. After about 5 years of such use, the brickwork will become unusable. This problem can be solved in one sure way - you will need to coat the walls of your home every year with a special waterproofing compound, but keep in mind that such products are quite expensive.
If you plan to cover the main wooden walls with brickwork, then before starting work you will need to coat the wooden bases with antiseptic compounds. If you are decorating external walls, then you need to buy the appropriate product for them. For external work, you should not purchase internal impregnations - they will be of little use. In addition, it will be necessary to attach a vapor barrier material to the wooden walls using a construction stapler. These coverings should be laid with an overlap (minimum - 10 cm).
You will also need:
- carefully inspect the surface of the walls of the house, remove all unnecessary parts, such as lanterns, gutters and other similar objects;
- the previous paint layer, peeling elements, and shedding should be removed;
- all noticed defects must be covered with a layer of putty;
- if the damage to the walls is too serious, you will have to completely plaster them;
- In order to install the insulating layer, you need to put a layer of primer, which will be responsible for better adhesion of the wall and the adhesive.
In addition, it will be necessary to properly prepare the solution. A simple cement mixture is hardly suitable here, because facing bricks are resistant to water absorption. This problem is especially acute when it comes to the installation of clinker bricks, which simply require specialized additives to ensure more effective adhesion.
The correct solution consists of the following ingredients:
- cement grade M500 – 1 part;
- sand – 4 parts;
- water.
Some craftsmen add a little clay to the solution to achieve greater plasticity of the composition. However, here the opinions of different masons differ - some see this as only harmful due to the leaching of the clay component from the composition and a decrease in its strength, while others, on the contrary, believe that clay makes the joints of the brickwork more durable. In this matter, each user relies on his own opinion and experience.
Finishing doorways
When renovating or remodeling houses and apartments, there is often a need to relocate door openings. In order to move an opening in a wall ceiling you need:
An example of a doorway trimmed with brick
- mark the future opening according to the size of the door block, taking into account gaps of 15 cm.
- dismantle the baseboard.
- knock out a row of wall blocks under an iron or concrete lintel.
- install the jumper and secure with mortar.
- Leave for two weeks until firm.
- knock out brick blocks according to the markings.
- level the floor with a screed.
But such work requires maximum precision and accuracy from the performer, but can still lead to damage to the wall partition. A more suitable option for making holes in a brick wall would be diamond cutting, its advantages are as follows:
- accuracy of cutting line;
- speed of work performed;
- minimal impact on the supporting wall;
- reduced noise level;
If work is required to reduce the doorway, the sequence of work will be as follows:
- It is necessary to perform brickwork in one brick.
- Plastering of the sides is carried out three days after installation.
- After a week, you can install the door block.
It is also necessary to take into account the moment of strengthening with metal structures if the strength of the hole under the door is insufficient.
The work on finishing the doorway is carried out by a master
Work order
Proper use of masonry mortar.
As a rule, when sealing an unnecessary doorway with brick, a partition thickness of 12 cm (half a brick) is maintained, since this structure does not bear any load; the upper part of the existing wall is held by a lintel. A window in an external fence can also be laid in half a brick, provided that additional insulation is provided.
To ensure that a blocked door can bear the load from hanging cabinets or any household appliances, the usual method of laying stones is used - on spoons. In this case, it is necessary to bandage the seams by half or a third of the length of the brick. Sometimes another method of embedding is used - a one-and-a-half hollow stone 88 mm high is laid with a bandage on the edge. But it should be taken into account that such a partition will not be able to bear additional load.
The work is carried out in the following order:
- Prepare a simple cement-sand mortar of M50 grade, using 1 part M400 cement to 5 parts well-sifted sand. Another option is to purchase ready-made masonry mixture and mix it with water, following the instructions on the bag.
- Moisten the base and sides of the opening with water. Place 1 row of stones near the installation site, cut the last one to the required size.
- Carefully spread the mortar to the length of 2-3 stones and begin laying 1 row. After each laid brick, pull the mortar to its side with a trowel, and then press it with the next stone.
- Apply the mortar to the end of the last brick in advance and put it in place. To maintain the thickness of the seam, the stones must be tapped.
- Fill the entire opening in this way, focusing on the plane of the existing wall. Do not allow the masonry to bulge or cave in; to do this, constantly check the wall, applying an even plank to it. Another option is to pull the mooring line and navigate along it.
In a situation where it is necessary to pass heating pipes made of PPR, metal-plastic or metal through the gap being laid, steel sleeves (cases) are placed in the partition. Their diameter must be greater than the outer size of the pipe. The length of the case is selected so that its ends extend beyond the surface of the masonry by 2-3 cm.
After the mortar has hardened, the structure must be lined so that the door covered with bricks does not differ in appearance from the rest of the walls. Choose the appropriate type of finishing - plaster, drywall or other material.
Advantages and choice of facade decor
No one needs to be convinced that decorating the walls of a house is good. Everyone understands that a beautiful, well-kept home is pleasing to the eye, and with individual decoration it takes on its own personality. In ancient times in Rus', every owner tried to highlight his home with carved platbands, wooden lace on shutters, unusual skates and weather vanes. Today there are many ways to make your home not only beautiful, but also unique. This is precisely the main advantage of façade decor - to make a building stand out from hundreds of others. Facade decor will replace architectural delights, and a house built according to a standard design will make it one of a kind.
Private house project
Tile decor
Before you start thinking about finishing elements, you need to provide a general background, or, more simply, the design of the walls. This is an important part of the future picture, and in order for the image to take shape, it is necessary to make a project. Finishing projects are freely available in large quantities, and you can create them yourself or order them from a designer. First, think about what style you want the future facade to be. For example, if you are attracted by the old Western European architectural style, then you should not cover the walls with bright flock chips, and in the case of Venetian chic, do not paint the house in bright colors.
Decorating walls with tiles will be a solution for any design. Facade slabs and tiles are available to suit all tastes. In this case, not a single wallet will be harmed! You can decorate the walls with a stone look, while the texture of the slab will convey the coolness of the natural material and its strength, or you can decorate your home in a rustic style and use tiles that are no different from wood.
Unique types of facades that combine two or more types of tiles. For example, brick-like tiles can be combined with stone, as in the photo.
Combination of brick-like tiles and stone-like panels in wall decoration
The classic Middle Ages will be conveyed by tiles with imitation stone and forged gratings.
Classic medieval design style
Clinker tiles are a classic that goes with most styles. It looks reliable and respectable and is very popular all over the world for its durability. Look how in this photo the general background of the walls harmonizes with the façade elements.
Clinker wall and façade elements
Finishing a house with tiles can be done independently using frame and frameless methods. Read how to tile your house with your own hands on our website.
Plaster decor
Wall decoration using decorative plaster has been used for several centuries and has not lost its relevance. It is not only beautiful, but also easy to do yourself. Such houses look presentable, and the color and future decorative elements can be chosen according to your own taste. The application of plaster is carried out in several stages. The first few steps are overlay and grout. Lastly, a mixture of marble chips is added, which creates the pattern. There are ready-made mixtures of Venetian plasters for facades. You can choose the color separately. In the photo you can see several ways to create a “drawing” on the wall.
Creating a Venetian plaster pattern: master class
The combination of plastered walls with tiles, stucco and other decorative elements is striking in its diversity. Using the “Venetian” in several steps you can create any architectural style from baroque to high-tech. The photo shows how the plastered surface harmonizes with the “stone” base.
Plastered walls and stone plinth
With the help of plaster, you can inexpensively and effectively make your house bright and make it stand out among others with vibrant sunlight.
Bright plastered facade
General information
Like other facing materials, brick performs protective and decorative functions. It reduces heat loss in the building, prevents the penetration of moisture into internal structures, and partially protects windows from mechanical stress, increasing their strength.
The decorative function is manifested in the ability to create various patterns, adjust the thickness of the layer of materials, thereby changing the amount of sunlight entering the rooms. The frame visually highlights the windows against the background of the walls.
In most cases, polyurethane foam is used to secure window frames. Without external protection, it becomes deformed and becomes covered with cracks. This happens within 1-2 months after its application; exposure to moisture accelerates the process. Timely framing helps prevent such negative phenomena.
Other materials used for framing:
- Stone. Framing with stone requires the use of a large number of elements and significant labor costs.
- Tree. Allows you to decorate windows in the classic Russian style. Relatively expensive material.
- Elements made of polyurethane. They combine ease of installation and high performance characteristics.
- Wood-polymer composite.
- Plastic panels. They are inexpensive and easy to install, but do not allow the implementation of complex decorative solutions.
NOTE! The materials used for window decoration must be combined with the building wall cladding materials. Thus, a brick frame looks good against the background of brick walls, and is less compatible with a wooden or plastic facade
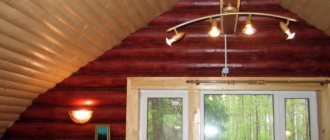
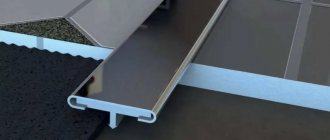
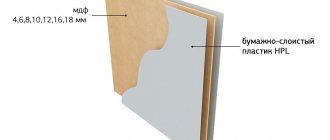
Frame-type slopes
So, if plaster is a continuous covering of a slope, then there is also a frame type, when there is empty space inside that can be additionally insulated. The choice of material for such solutions directly depends on the type of building cladding. Slopes can be made of plastic, wooden lining, vinyl or metal siding, window profile, metal cassette element. The installation of these materials is almost identical, so we did not separate them.
View the following photographs showing similar slopes.
Metal cassettes with matching façade cladding
Slopes made of wooden lining
Siding slopes with external frame
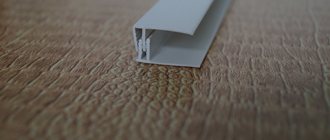
Special window profile
Slopes made of plastic with a metallic sheen
Each of the listed materials has its own set of characteristics, but none of them provides the window system with additional thermal protection, like special compositions of plaster mixtures. However, there are methods for insulating such slopes: the internal space is filled with polyurethane foam or mineral wool.
External insulation of window slopes and walls
Installation proceeds according to the following scheme:
- A frame is exposed, which can be external and internal, or only external. In the first case, a belt of slats or metal profiles is attached near the window frame and the same along the outer perimeter of the slope. In the second - only the outer element - the inner one is replaced with a starting profile, which is attached directly to the frame. The last solution is suitable for plastic and thin lining.
- All frame elements are set clearly in level, since they completely determine the geometry of the future slope.
- They are attached differently, depending on the material. Most often, anchors and metal hangers are used as fasteners.
- The finishing material is installed according to the fastening scheme of the specific material. For example, wooden lining can be held in place by nails and self-tapping screws directly or through metal clamps, and siding is held in place by self-tapping screws and a special fastening profile.
- The outer corner of the slope is covered with a decorative element. Usually these are overhead corners, examples of which you could see in the photographs shown above.
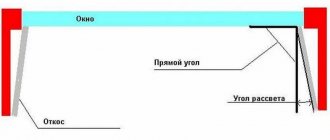
Determining the width of the slope
Galvanized profile frame
Sheathing for lining
Slopes made of fiber cement siding can also be installed over the sheathing.
It is much easier to make a frame slope than a plaster slope, and in 90% of cases it does not require additional processing. The product begins its service life immediately after installation. Everything would be great, but not every material will last long. Painted elements fade over time in the sun, wood can rot and change color. You can repeat the coloring, but it will not look like the factory one, and the slopes will definitely lose their attractiveness. But plaster surfaces can be renewed an unlimited number of times.
General information
The construction industry is developing very rapidly, and the market for construction and finishing materials is regularly replenished with new high-tech materials, which allow expanding the field of activity of designers and architects.
New and modern finishing materials make it possible to make the framing of your home's windows stylish, original, attractive and durable. For decorative window framing, materials such as brick, natural stone, gypsum, polyurethane panels, wood and other materials can be successfully used. Most often you can see the framing of openings on the facade with brick and wood.
The choice of material directly depends on the goals that the home owner achieves. In addition, it should be remembered that framing with brick, wood, polyurethane slabs and other materials allows you to create an original style of window framing.
Home wall decor
Also, with the help of interfloor molding, we visually reduce the not always proportional height of the house. And the final piece in the set of façade decorations for the walls of a private house is the plinth strip. This element is primarily a logical separator between the basement part of the structure and the main wall. The base profile can also perform technical functions - smoothing out the difference between the protrusions of the wall and the base, drip edge, etc.
Below are several examples of facade decoration on the corner of a house. You can see more ready-made design options for the entire house facade HERE.
Self-installation
The variety of options for designing openings using polyurethane is reflected in numerous design projects with different levels of complexity. Installation on the facade is carried out in the shortest possible time, which is due to the ease of processing and installation of polyurethane elements. Fastening polyurethane parts to the facade can be done using glue or self-tapping screws.
For polyurethane decoration on the facade, you will need to purchase elements, the type and quantity of which will depend on the number, size and shape of the windows. Manufacturers of ready-made frames produce the following elements:
- sandriks of various sizes;
- arches of different sizes;
- round windows;
- wall panels and various false shutters;
- polyurethane moldings;
- cornice strips;
- radius moldings and cornice strips.
A decorative element of a façade window frame in the form of a platband is intended for finishing a window from the sides and top. As a rule, the type of platband is selected in accordance with the stylization of the entire building.
Platbands in the style of the Greek order system have been very popular lately. The use of platbands in the framing of window openings contributes to the visual expansion of space.
For the facade of a house in a classic style, you can choose a platband that will stand out with its protrusions above the wall plane. It is allowed to color the element.
A very interesting and original option is the use of window framing elements in the form of columns and pilasters. This design creates an overall impression of nobility and grace.
It should be remembered that each decorative element of the window frame must correspond to its purpose and advantageously emphasize all the features. Decorative elements can transform any type of building and are successfully used in the external design of both small private houses and multi-storey buildings.
The variety of decorative window elements produced on the basis of polystyrene foam in the style of antiquity, baroque, modern or classicism makes it possible to realize any stylistic idea easily and at the lowest cost.
You can also read the material in the article in which we talk.
High-quality and modern decoration of window openings on any building can become an original and fashionable decoration of the facade.
conclusions
Facing brick provides a whole range of design possibilities for cladding a house. A variety of colors and textures allows you to realize unique ideas. In general, this is not a demanding material that is easy to care for.
Content
- Advantages and disadvantages
- Finishing methods
- Types of bricks used for facade finishing
- Choice of color and style
The facade is the calling card of any building, because it is by it that everyone will judge the tastes and preferences of the home owner. Correct and attractive finishing of the facade can change the external perception of the house, making even the most modest and small house noticeable. Today, manufacturers of building materials offer the buyer a variety of materials and facade design options to choose from. However, despite the abundance, brick was and remains the best option.
A facade made of brickwork will decorate not only the house, but will also emphasize the unity of the house with the landscape. Brick is a material that combines both severity and elegance. Due to its practicality, it can be used both for finishing a house, a cottage, a bathhouse or a commercial building.
Homemade run
When designing window openings of non-standard sizes, the production of the lintel (its filling) is carried out at the location. To do this you will need to perform the following typical operations:
- first of all, the masonry surfaces on the sides of the window opening are cleaned of mortar residues;
- after this they are thoroughly primed;
- At the final stage of work, formwork is installed at the location of the lintel.
Formwork
Reinforcement
Upon completion of these procedures, a thin layer of pre-prepared concrete mixture is poured into the formwork, after which a reinforcing mesh is immediately placed there. After this, you can continue pouring the lintel, followed by placing another reinforcing fill in the concrete. When dismantling the formwork, it should be taken into account that it is not always possible to dismantle its lower part.
Supports for formworkLintel laying
When decorating window openings lined with facing bricks (the so-called facing brickwork), in order to preserve its decorative advantages, it is allowed to use channels (wide metal corners). In this case, the visible part of the purlin will be located only on the inside of the load-bearing wall.
Laying a figured window opening
At the same time, there should not be any noticeable traces of the presence of a lintel on its façade surface.