Ceiling repair does not end with finishing; an equally important stage is the arrangement of lighting. This step determines how comfortable the room will be. Subtleties and nuances are determined by the materials used. In this article, we’ll look at which lamps are best to choose for a ceiling made of PVC panels, and we’ll also describe in detail the DIY installation process.
Installation of light sources in PVC ceiling
When planning, selecting and installing lighting devices, consider several nuances.
For good illumination of rooms with a height of more than 2.6 meters, ceiling lamps are installed in increments of no more than 1 meter, and the distance from the wall to the first device is no more than 0.6 meters. Point light sources illuminate the space below them in a cone with an angle of only 30˚. Before installing ceiling light sources, prepare a layout diagram. This will help you clearly plan the wiring, calculate the number of devices and cable length, placement and type of switches.
To install lamps on your own, you will need to prepare:
- lighting devices in the estimated quantity (plus 1 or 2 pieces in case of replacement);
- wire, length is checked with the diagram;
- terminal blocks;
- electrical tape;
- switches.
Installation of lamps
When choosing spotlights for installation in a plastic ceiling, please note that the power should not exceed 40 watts. Otherwise, there is a risk of plastic heating, deformation and the release of toxic fumes
LEDs or halogen lamps are selected taking into account power and illumination. The wire for plastic is fireproof, multi-core. The terminal blocks connect the wires well, but they need to be checked approximately every two years.
The wire is fixed in the places where the lamps are installed, at the point of the proposed hole, in the panel we make a loop of 10-14 cm wire. For convenience and reliability of fixing the wire on the frame, use plastic latches or clamps. Do not over-tighten to avoid damaging the braid. After pulling the wire, the ceiling is covered with plastic panels.
Use a wood bit to make holes. The diameter must match the size of the lamps - less than 4 mm of the diameter of the front ring. The standard diameter is 58-74 mm. When planning the installation location, weigh everything carefully, since it is difficult to correct the consequences of making a hole.
Making holes in PVC panels
https://youtube.com/watch?v=AqFCVOLHCPU
Wiring diagram
You need to make a wiring diagram before starting work; this will help you calculate the cable length, as well as think about the location of sockets and junction boxes. In addition, it is important:
- Calculate the number of ceiling lights. One element usually covers from a meter to one and a half spaces. For good light, they can be placed every 50-60 cm, the maximum distance is no more than a meter. The distance from the walls is at least 30 cm.
- Determine the exact position based on the width of the PVC panels. It is better if the lamps stand in the middle of the elements, it is much easier to make holes. When narrow panels are used, on the contrary, you need to make holes at the joint so as not to weaken the surface too much.
- Wiring is done as usual. It is better to make grooves in the walls, and use special fasteners with clamps on the ceiling. Lay parallel to the walls, turn at right angles, do not run the cable diagonally or cross it. Attach firmly, leaving enough margin to pull out the ends and connect to the lamp.
Electrical wiring diagram.
Important! Before starting any wiring work, turn off the electricity.
It is better to draw a diagram on paper, this will make it easier to carry out calculations and correctly plan the position of the elements. It is convenient to make marks with chalk on the ceiling or with a construction pencil.
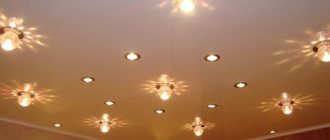
Spot location rules
True, in order to squeeze the maximum aesthetic appeal from the mounted panel, you need to know the basic rules for the safe placement of spots on a stretch ceiling. Let's try to list below those that are considered basic:
- if the spots are located along the wall, then maintain the minimum distance required for high-quality light dispersion - 20 cm. If you ignore this recommendation, you will not be able to get the level of illumination you want from the mounted lamps;
- the recommended distance between spots is from 30 centimeters, the optimal one is determined by local need and the type of stretched panel;
- parallel placed spotlights visually lengthen the room - this can be successfully used for rooms that need some visual correction;
- a rectangular arrangement is ideal for small and narrow rooms, but most often requires support in the form of “heavy artillery” - a weighty chandelier in the center;
- if you use spots in connection with stretch ceilings made of ordinary PVC film, then the maximum permissible power for halogen lamps is up to 20 W, for a satin panel a little more - up to 35 W;
- the exact number of lamps is always determined by the type of light pattern in the room, but one spot can illuminate no more than 2 m2 of free area. This figure must be kept in mind when drawing up a plan for the placement of spotlights on a suspended ceiling.
Requirements
The lamps, fixed at the same level with the ceiling surface, according to their technological parameters, have a 30-degree lighting angle. Therefore, to create brightness, they must be installed at intervals of up to a maximum of 1 meter, and the distance from the last lamp should not exceed 60 cm to the wall. Provided that the ceiling height in the room is standard - 2.5 meters.
To create sufficient brightness for lighting the room, preliminary calculations are made so that the intersection of the corners of each spot is at a certain height, taking into account the height of the furniture and the configuration of the suspended ceiling.
Basic rules for placing spotlights
There is only one rule here - do not place lamps closer than 15 cm to the seam of the stretch ceiling. Because if you do otherwise, there is a high risk of damage to the tension covering during installation.
Otherwise, there is complete freedom of action, but if you want to maintain at least some geometry, then it makes sense to adhere to rule number two - do not place the lamps closer than 20 centimeters to each other.
And, if the exact distance is not your case and you want to depict chaotic chaos on the ceiling, then rely solely on your taste.
And yet, before making holes in the stretch ceiling, it is better to carefully draw circles with chalk on the surface itself, in the place of the intended points. This way you can see it much better than drawing on paper. It’s always the same in the picture, but in reality everything looks completely different, and you can’t fix the hole!
Better spend an extra half hour, draw everything and look carefully at what comes out. As a rule, after such a sketch, the desire to experiment with asymmetry instantly disappears.
Serial connection
You can connect spotlights in series, although this is not the best solution. Despite the fact that this type of connection requires a minimum number of wires, it is practically not used in everyday life. This is because it has two significant drawbacks:
- The lamps do not glow at full strength because they are supplied with reduced voltage. How much reduced depends on the number of connected light bulbs. For example, if three lamps are connected to 220 V, you need to divide by 3. This means that each lamp receives 73 V. If 5 lamps are connected, divide by 5, etc.
Series connection principle - If one light bulb burns out, all of them do not work. The cause of the malfunction can only be found by sequentially changing the light bulbs in the entire chain.
It is for these reasons that this type of connection is used exclusively in Christmas tree garlands, where a large number of low-power light sources are collected. You can, of course, use the first disadvantage: connect 18 or 19 12 V light bulbs in series to a 220 V network. In total they will give 220 V (with 18 pieces 216 V, with 19 - 228 V). In this case, you don’t need a transformer, which is a plus. But if one of them burns out (or even the contact deteriorates), it will take a long time to find the cause. And this is a big minus that negates all the positive aspects.
Diagram of serial connection of light bulbs (spotlights)
If you decide to connect spotlights in series, this is easy to do: the phase bypasses all the lamps one after another, zero is supplied to the second contact of the last bulb in the chain.
If we talk about the actual implementation, then the phase from the distribution box is supplied to the switch, from there to the first spotlight, from its second contact to the next... and so on until the end of the chain. The neutral wire is connected to the second contact of the last lamp.
Diagram of sequential connection of spotlights via a single-key switch
This scheme has one practical application - in the entrances of houses. You can connect two incandescent light bulbs in parallel to a regular 220 V network. They will glow incandescently, but will burn out extremely rarely.
Features of the selection of lamps for suspended ceilings
Stretch ceilings are different, and so are lamps. The most key point in selecting spots for a stretch ceiling is not their visual appeal and size, but their power. You should “dance” from it, since there is a high probability of damage to the coating due to heat.
But a melted stretch ceiling cannot be repaired, you understand. So, be careful at this moment so that it doesn’t cause excruciating pain later.
What types of suspended ceilings are there: film (PVC) and fabric. Moreover, both the one and the other option do not tolerate strong heat, but the fabric one is a little more stable. In addition, if you heat up the film ceiling too much, in addition to rapid deterioration, you will daily receive a portion of formaldehyde vapor into the air, since it is released at temperatures above 70 degrees.
So, what then is the optimal possible power for spotlights?
For fabric ceilings:
- Halogen – up to 35 W
- Incandescent lamps – up to 60 W
For film ceilings:
- Halogen – up to 20 W
- Incandescent lamps – up to 40 W
There is also another great option - LED lamps. Their cost is slightly more than those mentioned above, but:
- last much longer;
- There is no way they can melt the ceiling;
- since they emit almost no heat at all.
But there is also one small point here: in order to “start” these lamps, you need to connect them to a special adapter, which not only heats up, but literally “burns”. Therefore, under no circumstances place this device on the ceiling itself, under the film!
It is better to place it somewhere on the wall, in a corner, behind a curtain. This will be even more convenient for you, since adapters periodically need repairs, and disassembling a suspended ceiling for this purpose is not fun for the faint of heart, to put it mildly.
Apart from this, we have nothing more to add. You are free to choose absolutely any design and size of spots, based solely on your taste and wallet.
Marking
We make the first markings on the base, when we have not yet sheathed or plastered anything. The task is to determine the point of organization of the output according to the project. We recommend marking all these places on the rough surface.
Circles or crosses, no matter how
A couple of points. To find the center of the room, you can find the intersection of the diagonals on the floor and use a plumb line to move the point to the ceiling. If we have a row of several lamps, then for uniformity of lighting, the outermost ones are placed from the side walls at a distance equal to half the distance between the lighting fixtures inside the row. For example, to calculate the location of 3 lamps, the following formula will be applied: B/4 : B/2 : B/4, where B is the length of the wall.
Principles and selection criteria
During a room inspection, measurers can offer several dozen options for the placement of spotlights on a suspended ceiling. Small lighting bulbs can be combined with chandeliers or LED strips. All these combinations will result in a huge number of design options, so it’s worth taking technical aspects into account.
Area and layout
First of all, you need to keep in mind the size of the room, its purpose and the coefficient of natural light in the room
It is important to remember that you can reduce the brightness using additional switches or a combination of several lamps, but it is impossible to increase the illumination. Installation specialists will help you calculate a favorable light level
physical characteristics
Spot lamp models are most often built into the ceiling or installed in close proximity to it. In this case, heat release indicators are taken into account. Tension models in which PVC film was used will not withstand a load of more than 40 W. Fabric models cope with the heat emission of 60 W bulbs. Halogen lamps reduce the permissible parameter to 20 and 35 W. These values are extremely important, because they allow you to increase the service life of the ceiling.
For very spacious rooms, experts recommend installing a chandelier in combination with spotlights. The latter act as a room divider into zones and create comfort and a pleasant atmosphere. The chandelier will provide the required level of lighting when necessary.
Design Features
If the design of suspended ceilings with spotlights does not involve the installation of a full-fledged chandelier, then it is worth considering the option of installing elements with external fastening. This will solve the issue of thermal conductivity and increase the permissible power.
It is recommended to additionally equip halogen lamps with a dimmer. A special device for smoothly adjusting the light is not suitable for energy-saving lamps, since the models will periodically turn off completely and quickly fail.
A master measurer will be able to accurately calculate the required number of lamps. The basic standards look like this: one chiseled lighting element should account for 2 m2 of ceiling space. This means that for a room of 25 m2 you need to install about 15 lamps. But the standards can be adjusted, since it all depends on the model, power, type of ceiling, room, combination with other elements and level of natural light.
How to install spots yourself
Installing lighting fixtures in a suspended ceiling is very simple.
Step 1. You need to run electrical wires to the places where the lamps will be placed. And this must be done before installing the ceiling.
Step 2. After completing this stage, work on the holes for the spots. Cut them into the ceiling. It is best to use a circular saw for this. Then connect the wires and insert the lighting fixtures, to do this, squeeze the clamps and bring them to the top. When you place them in the holes, the latches should be released. This way the lamp will be securely fixed in place.
Installation of spotlights in a suspended ceiling
Step 3. Screw in the incandescent bulbs. Halogen bulbs need to be handled differently than standard incandescent bulbs. First install the plug-in connectors, and then insert the lamps into the luminaires. For fixation, use locking rings; manufacturers supplement each set of lighting fixtures with them.
Step 4. Don't forget about protection; work with fabric gloves. It is not recommended to touch the glass of halogen lamps with bare hands, as the products may prematurely lose their functionality.
How to markup
Since you will have all the spot spots inside, it is not surprising that the lighting angle of the room will be limited. Near the lamp it reaches 30 degrees, and then, at a short distance, the light dissipates. To avoid shadows and keep the room flooded with bright light, place the lighting fixtures so that the light streams intersect. This trick will ensure that the room is illuminated evenly. For example, the room has standard-height ceilings, then you should retreat 60 centimeters from the edge of the wall. Place the spots at a distance of 1 m from each other.
Popular placement options for spotlights
Apply marks before starting work. They are easy to make using pieces of electrical tape. Cut two small strips and stick them crosswise in the place where you plan to install the lamp. Repeat the action, the number of stickers should correspond to the number of lamps.
Once you've made your markings, look at the placement of the marks. This must be done after the crosses are evenly distributed across the ceiling. Take a tape measure and measure the distance between adjacent marks. Make adjustments if necessary.
Do not place lights where two panels meet. When the marking is completed, you can move on to the next stage.
Marking the ceiling for lamps
How to make holes for spots
To make holes, prepare the following tools.
- Buy an electric drill. If it is not there, use a regular screwdriver.
- Prepare the crown. it should be made of wood. Focus on the diameter of the spots, usually it is 6.8 centimeters.
Insert the crown into the electrical appliance and use it to cut holes. If there is no crown, then the circles will be harder to make. In this case, buy a wood or metal drill. You will also need a utility knife.
Drywall crown
Draw a circle of the required diameter. It should be slightly smaller than the diameter of the outer part of the lighting fixture, then the lamp will not fall inside. Drill a hole using a thin drill bit. Use a utility knife to remove burrs on the surface of the material. When all the holes are ready, you can move on to the next stage.
Correct placement of lamps
Before attaching the lamps, you need to decide on their location. There are several functional areas in the bathroom, each of which takes into account:
- room size;
- color of walls and ceiling;
- presence of window openings.
Bathrooms in multi-storey residential buildings are small in size, but have great functionality. As a rule, such rooms contain a shower stall, a washing machine, and a sink with a mirror and shelves. But even with an acute lack of space, lighting in the bathroom should be multi-level. For example, several built-in ceiling lights can set the overall background, and adjustable wall sconces will add light near the mirror with the sink. Properly lighting a larger room is more difficult. You will either have to use your own imagination, or trust a special company engaged in lighting and bathroom design.
It is worth noting that there are many options for organizing lighting in a large bathroom. However, today the most relevant is three-level lighting, which involves the placement of lamps of different types at different distances from the floor. The overall luminous flux is determined by ceiling lamps. Built-in models in bathrooms with plasterboard and suspended ceilings look practical and modern. They can form geometric shapes or be located above the most popular places: shower stall, front door.
Local (spot) lighting in the bathroom is formed by wall sconces or spots located near mirrors or along the perimeter of the room. They are connected from a separate switch and used to obtain greater light output.
The third level serves as decorative lighting and is necessary to create a relaxing, intimate environment. These can be ready-made LED light sources built into a shower stall or bathtub. Or projects made on the basis of RGB LED strips, allowing you to set the brightness and color of the radiation according to your own mood.
Main conclusions
Selecting a cable for an LED strip is an important and necessary procedure. It allows you to improve the glow mode of the tape and extend the service life of the backlight. The correct choice of cable is made according to the following criteria:
- current consumption;
- voltage drop;
- installation and connection conditions.
Calculating the cable cross-section is not difficult, but there is an easier way. You need to find one of the online calculators on the Internet and use it for quick and accurate calculations.
- https://logopult.ru/what-wire-to-use-for-spotlights-how-to-conduct-wiring-under-a-stretch-ceiling.html
- https://220.guru/osveshhenie/svetilniki/ustanovka-tochechnyx-spotov.html
- https://www.komfortek.com/e-lektrosnabzhenie/kabel-i-provod/vy-bor-secheniya-kabelya-provoda-po-moshhnosti.html
- https://obosveschenii.ru/baza-znanij/kak-vybrat-sechenie-dlya-kabelya
- https://cdelct.ru/vidysvet/toch/montazh-provodki-svetilnikov.html
- https://pod-potol.com/osveshchenie/lyustry-i-lampy/kakaya-skhema-podklyucheniya-tochechnykh-svetilnikov-luchshe-vidy-i-sposoby-montazha.html
- https://stroychik.ru/elektrika/podklyuchenie-tochechnyh-svetilnikov
- https://remontkit.ru/ehlektrika/provodka-pod-natjazhnym-potolkom.html
- https://svetilnik.info/svetodiody/kabel-dlya-svetodiodnoj-lenty.html
Why should you use LED lamps?
Compared to other artificial lighting sources, LED lamps deserve the highest rating. Their superiority when organizing lighting in the bathroom is in the following points:
LED lamps are completely interchangeable with all known types of light bulbs, as they are manufactured for all types of sockets. Taking into account this fact, switching to LED lighting in a bathroom that has already undergone a major renovation will not be difficult. The temperature of the body of a high-quality LED light bulb does not exceed 80°C, and the body of the lamp itself with such a lamp remains cold or barely warm. As a result, overheating and subsequent yellowing of the ceiling sheet are eliminated. You don’t have to be afraid to use any type of spotlights. In addition to the usual standard voltage of 220 V, light sources are commercially available that are designed for a voltage of 12 V (safe for lighting rooms with high humidity). LED lamps can be produced without the use of glass and, unlike incandescent and halogen lamps, do not explode when switched on at high voltage. Based on personal taste and the color of the interior trim, you can choose LED lamps with the most suitable shade of white light. The high efficiency of light sources based on LEDs has made it possible to reduce the size of LED lamps and luminaires
Compact and at the same time bright lamps not only emphasize style, but also save space, which is important for small bathrooms.
Which provides protection from steam and moisture
The moisture-proof lamp is equipped with additional gaskets and seals that prevent water from getting inside.
You can find out the degree of protection of a lamp by the protection index – IP, which is indicated in the labeling. IP is a two-digit European humidity standard. The first number indicates the degree of protection of the device from the ingress of dust and solids, and the second is responsible for the ingress of moisture.
Dust protection:
- IP – 0: the lamp is not protected from dust;
- IP – 1: the lamp is protected from large particles larger than 5 cm;
- IP – 2: protection against particles larger than 1.2 cm;
- IP – 3: average value that protects the lamp from particles larger than 2.5 mm;
- IP – 4: protection against foreign bodies larger than 1 mm;
- IP – 5 and IP – 6: this is ideal protection against dust; with these values, foreign bodies do not get inside the lamp.
Moisture protection:
- IP – 0: no protection from moisture;
- IP – 1: protection against drops of water and condensation falling from above;
- IP – 2: option for the bathroom, drops do not fall into it at an angle of 15 degrees;
- IP – 3: protection against drops falling at an angle of 60 degrees;
- IP – 4: protection against any splashes;
- IP – 5: protection against drops and jets of water;
- IP – 6: resistance to sea salt water;
- IP – 7: resistance to immersion in water to a depth of 1 m;
- IP – 8: perfect tightness, moisture does not enter even at great depths.
The choice of one or another lamp is determined by the humidity zone in the bathroom.
Children's room
A children's room is an ordinary room for you, but for a child it is a whole world. This is a bedroom, a playroom, and a work area all at once. Therefore, it is most logical to delimit specific zones with spotlights. The work area, where the child will do homework, read, draw or write, as well as the play area should be very well lit - this is where as many spotlights as possible should be concentrated. They can be placed, for example, at an angle. This option is also suitable for the living room, where the emphasis is, for example, on the recreation area. But in the place in the baby’s room where the bed is, there may be fewer light bulbs.
Connecting point models
Twelve-volt light models are connected via a transformer. The connection is parallel. To calculate the number of sources, you need to find out the power of the transformer.
Conversely, purchasing a transformer begins with calculating the number of point sources and finding out their power. The transformer power is calculated with a reserve.
How to cut a hole for a lamp on a suspended ceiling
What we need:
- thermal ring
- glue
- knife
- small screwdriver
Depending on the manufacturer, tread rings can be clear or white and can be made from a variety of materials. You should not save on them; a difference of 2 rubles may later result in a replacement of the canvas. The main burden of removing heat from the lamp falls on the thermal rings.
The diameter of the ring should be selected correctly. It should not fall into the hole in the installation platform. But also, the protector ring should not be too large and extend beyond the edges of the mounting cup of the lamp. Usually the cut-in diameter is written on the box with the spot.
To fix the thermal ring on the canvas, a special glue from the cyanoacrylate group is used. For example, such as Cosmofen or even regular instant in 3g tubes.
When applying glue to the tread ring, be careful. Don't overdo it and overfill. Excesses protruding from the outside of the ring can be noticeable, especially if the diameter of the lamp just overlaps them. Whereas the glue that comes out inside is not so dangerous
It is important to position the ring correctly on the ceiling - there will be no second chance. If the ring is pressed tightly to the film, fixation occurs almost instantly
After the glue has completely dried after 3-5 minutes, check if the ring is holding well. It should be firmly and securely glued along its entire length. If there are any omissions, they must be eliminated. A drop of Cosmofen on the end of a screwdriver will help with this. You can easily remove dried glue from a screwdriver with a knife.
Then, as we are convinced of the reliability of the reinforcement of our future hole, we can move on to the next step. You need to cut the film right under the ring. You should not leave the fringe of the canvas inside. This will allow you to easily install the lamp in the future. Use only sharp knife blades!
Advantages and disadvantages of LED lamps
The continuous increase in the cost of electricity forces us to think about saving. Replacing incandescent light bulbs with LED ones reduces costs by 10 times.
There are other advantages:
- compactness;
- no soot;
- fast ignition (without warming up);
- long service life;
- low sensitivity to voltage changes;
- ease of installation;
- high quality (if you buy products from a popular manufacturer);
- environmentally friendly.
LED lamps have an attractive appearance, but they are more expensive than all others. If you purchase cheap Chinese-made products, the quality of the glow and service life will decrease.
Disadvantages include exaggeration of some advantages:
- the real service life is not 10-11 years, but 3-5 (taking into account the degradation of LEDs);
- narrow directionality of the light beam, requiring the installation of a large number of lamps;
- the need for expensive drivers and cooling systems.
The costs of reconstructing lighting systems are not reimbursed in any way. Those who have begun to use LEDs in residential premises claim that it takes some time to get used to their glow.
Spotlights in the interior:
Now let's move on to specifics and use real examples to see how they can be arranged. As we have already said, a schematic picture is very different from reality, and you can see this by looking at our selection of photos.
Kitchens
Usually, the question of how to arrange lamps in the kitchen is not too complicated. The room is, as a rule, small and there is no point in placing lamps around the perimeter or in some figurative way.
Practicality is important in the kitchen, which means you just need to “blow” the lumens over the work areas: countertop and table.
There are no other functional places in the kitchen. True, if you have a large one, with an “island” and other unusual elements, then be sure to take into account their presence and do not leave it without lighting. A gloomy kitchen is a gloomy sight.
Bathroom
In the bathroom you need to illuminate the bathtub itself, the sink, and the rest is optional. In general, bathrooms are rarely particularly large, therefore, for a standard 3 - 4 squares, 5 small lamps arranged in a circle are quite enough.
Living room
Particular attention should be paid to the placement of spots in the hall, since the style and general appearance of the room directly depends on this. Spot lighting alone is not enough here, for one simple reason: it will look boring
It is better to combine spotlights with other lighting fixtures, and it is advisable to place them in tiers, in special ceiling niches, which must be done in advance, at the stage of planning the ceiling itself.
Living rooms in which zones are separated from above, using differences in the ceiling, look very interesting. For example, above the sofa there is a tier, above the dining table there is a circle with spots, etc.
Bedrooms
Spots in the bedroom are a matter of business
But in this room, more than in any other, it is important to remember about glare
If the stretch ceiling is glossy, then you shouldn’t bother with spotlights at all. For a rest room, glare is an aggressive and irritating thing that will interfere with sleep.
In this article we have covered everything and even more on this topic. We hope that after reading our material, the placement of lamps on a suspended ceiling is no longer a problem for you!
Parallel connection - diagram
Lighting devices with parallel connections shine with the same intensity, but installation involves the use of more wires. Despite this, installation of spotlights with parallel connection is popular. This method allows you to install an unlimited number of lighting devices, including LED lamps, the main thing is to use a non-flammable VVG ng cable. The shape of the cable can be round or flat, but it must be non-flammable. This especially applies to installing lamps on wooden ceilings.
Parallel connection is carried out in two ways:
- Beam connection.
- Daisy chain connection.
In the first case, solving the question of how to connect lamps on the ceiling involves connecting each point lighting device to its own piece of wire. Using this option requires a lot of cable consumption, however, if one lamp fails, the entire circuit works without interruption. The cable routing along the ceiling should look like this: a cable is pulled from the junction box to the center of the room and fixed in this place. Wires go to the lamps from one central point. The presence of a large number of wires converging in one place requires reliable fixation. Single-core wires can be twisted, and the twisted area can be crimped with pliers and soldered.
The mounting of ceiling lamps is strong, reliable, but not detachable. A simpler method involves using connectors with a certain number of inputs to which wires are connected. In addition, there are special devices - terminal blocks, they are more expensive, but the wires in this case, the problem of how to connect spots on the ceiling is solved quickly, easily and firmly. You can use terminal blocks with screw connections; they also provide a reliable connection, but in order to supply voltage to all wires, additional jumpers must be installed on the terminals involved.
In the second case, two wires are alternately fed and exited to each lamp. The connection diagram for spotlights on the ceiling is as follows: a cable goes from the distribution box to the first lighting device. A second cable is connected to the output of the same device and stretched to the next lamp. Similar actions are performed with other devices.
If desired, you can divide the lighting fixtures on the ceiling into two groups; in this case, you must connect to a switch with two keys. The complexity of such a scheme lies in the use of more wires.
How to correctly connect a lamp in the bathroom ↑
Often the ceiling is made of seamless plastic panels. They are attached to a wooden sheathing (or sheathing made of metal profiles). The distance from the base (concrete floor) to the sheathing should be such that the hidden part of the lamps fits there.
In those places where the installation of light sources is planned, the panels are cut with a construction knife. The holes should be of such a diameter that the uneven edges of the plastic are covered with a decorative overlay. The cable cores are connected to the terminals of the device, which is fixed to the ceiling using spring latches.
The light is fixed
Another finishing method involves the use of moisture-resistant plasterboard. This is possible in rooms with good ventilation. Drywall is attached to the sheathing at the required distance from the base. Holes are cut in it using a bit and an electric drill. They come out with smooth edges. Installation of lighting elements is carried out similarly to the method described above.
Making holes
The third finishing method is using stretch film made of polyvinyl chloride. All preparatory work is carried out in the same way as in the case of finishing the ceiling with plasterboard and plastic. But at the light installation stage you will need special plastic rings. Their diameter corresponds to the diameter of the hidden part of the body. The rings are attached to the film, which is cut through with a sharp knife
Proceed with caution: accidentally touching the film with the sharp edge of a knife can damage the ceiling. Thick plastic rings are necessary to ensure that the spring latches hold the point securely
It is advisable to install LED lamps: they practically do not heat up and are not dangerous for polyvinyl chloride film.
PVC film ceiling lamp
Installing a lamp in the bathroom can be done independently if the owner of the house is familiar with the nuances of electrical installation work and the basics of electrical engineering; if not, then it is worth inviting specialists.
Which light bulbs will not harm plastic?
To prevent the material from melting from close contact with the lamp, it is better to choose energy-saving or LED lamps. The latter are also convenient because they turn on at full power immediately. In addition, when using a dimmer, the brightness of the lighting is adjusted.
Diodes operate on a current of 220, 12 or 24 Volts. The first option connects directly to the network, and for low-current ones an adapter is required. It is better to install low-power lamps - 12V - in a ceiling made of plastic panels. Their impact on the material is minimal, and therefore such products are completely safe and more durable.
Plastic panels
One of the popular materials used for finishing ceilings is polyvinyl chloride (PVC) panels. They have their advantages and disadvantages, but the main advantage is that they allow you to embed light sources. We’ll talk about how to do this and how to arrange the lamps in this article.
Plastic is an inexpensive type of finishing for ceilings. Installation of PVC panels does not require special skills, and anyone who owns a tool can install a plastic ceiling at home with their own hands.
The range of PVC panels makes it possible to choose products to suit your taste, harmonizing with the interior of the room. The choice of plastic coverings is wide; they are available in various types:
ceiling-mounted, lightweight and elastic, but requiring careful handling during installation; wall, hard and heavy; glossy, varnished; with thermofilm decor; textured like wood, marble, etc.;
Plastic panels are made in various sizes, take this into account when purchasing materials
An important advantage of plastic is its moisture resistance; it can be easily washed by any means. Installation of plastic panels is carried out in bathrooms and toilets; they are used to decorate loggias, verandas and saunas
Plastic options are available with a beautiful coating and texture, and the panels will decorate even an expensive interior.
Plastic panels
PVC boards differ in how they decorate the surface with a pattern. Simple and economical - white, smooth, without a specific pattern and plain. Coating options of other colors and textures are available, which are applied in two ways:
- transferring the ornament from the thermal film base to the PVC panel, this method is simple and economical;
- direct printing, allowing you to obtain a high-resolution design with a rich color gamut. It is done on special equipment.
Parallel connection
In most cases, a parallel circuit for connecting spotlights (lamps) is used. Even though a large number of wires are required. But the voltage is supplied to all lighting devices at the same level; if one burns out, one does not work, all the others work. Accordingly, no problems with finding the location of the breakdown.
Parallel connection diagram for spotlights
How to connect spotlights in parallel
There are two ways to connect in parallel:
- Ray. Each lighting fixture has a separate cable (two or three wires, depending on whether you have a ground connection or not).
- Trailed. The phase coming from the switch and the neutral from the panel go to the first lamp. A piece of cable goes from this lamp to the second one, and so on. As a result, four pieces of cable are connected to each lamp, except the last one. Methods for implementing parallel connection
Radial
The beam connection scheme is more reliable - if problems occur, then only this light bulb does not light up. There are two disadvantages. The first is high cable consumption. You can put up with it, since the wiring is done once and for a long time, and the reliability of such an implementation is high. The second disadvantage is that a large number of wires converge at one point. High-quality connection of them is not an easy task, but it can be solved.
You can connect a large number of wires using a conventional terminal block. In this case, a phase is supplied from one side and, using jumpers, it is distributed to the required number of contacts. On the opposite side, the wires going to the light bulbs are connected.
Methods for connecting wires in radial design
In almost the same way, you can use Vago terminal blocks for the corresponding number of contacts. You need to select a model for parallel connection. It is better if they are filled with a paste that prevents oxidation. This method is good - it’s easy to implement (strip the wires, insert them into the sockets and that’s it), but there are a lot of low-quality fakes, and the originals are expensive (and it’s not a fact that they will sell you the original). That's why many people prefer to use a regular terminal block. By the way, there are several types, but carbolite ones with a protective screen are considered more reliable (they are black in the picture above).
And the last acceptable method is to twist all the conductors with subsequent welding (soldering will not work here, since there are too many wires, it is very difficult to ensure reliable contact). The downside is that the connection is permanent. If something happens, you will have to remove the welded part, so you need a “strategic” supply of wires.
An example of a beam connection for spotlights
To reduce cable consumption with the radial connection method, a line is drawn from the switch to the middle of the ceiling, fixed there, and wires are routed from it to each lamp. If you need to make two groups, install a two-key (two-position) switch, draw a separate line from each key, then turn off the lamps according to the chosen circuit.
Daisy chain connection
Daisy chain connections are used when there are a lot of lamps and it is very expensive to run a separate line to each one. The problem with this method of implementation is that if there is a connection problem in one place, all others also become inoperative. But localization of the damage is simple: after a normally working lamp.
Actual implementation of parallel connection in a daisy chain method
In this case, you can also divide the lamps into two or more groups. In this case, you will need a switch with the appropriate number of keys. The connection diagram in this case does not look very complicated - just add one more branch.
How to connect spotlights to a double switch
Actually, the diagram is valid for both methods of implementing parallel connection. If necessary, you can make three groups. There are also such three-position switches. If you need four groups, you will have to install two two-position ones.
What to consider when choosing devices?
In the process of creating a design project, it is necessary to select the optimal model of the lamp, taking into account the characteristics of the room, the design and texture of the finishing materials.
For example, built-in models are not suitable for arranging a bathroom with a ceiling made of a monolithic concrete slab. In this case, it is better to use overhead fixtures or ceiling fixtures in the form of chandeliers.
In an effort to create a stylish interior and a comfortable environment, special attention must be paid to the choice of lighting equipment. In this case, it is necessary to take into account the design, characteristics, dimensions, lamp power, methods of mounting the electrical appliance and the need for additional structural elements
When arranging a spacious room, designers advise focusing on traditional lighting solutions that will fit perfectly into the interior
If the bathroom is large, then a beautiful chandelier will look organic. But spot models, correctly and evenly distributed throughout the ceiling space, will allow you to create a stylish interior that takes into account current trends.
When choosing lamps, the following factors must be taken into account:
- room area and distance between lamps;
- zoning of the room, the need to highlight separate areas;
- instrument level;
- interior style direction;
- color scheme of walls, floors, furniture and plumbing;
- the presence of mirrors, tension structures, ceramic tiles and other surfaces that reflect light.
Before you begin installation work, you need to think through the layout of the light sources and the nuances of cable routing. Some models offered by manufacturers in the assortment require the creation of special conditions.
The quality of products directly affects their service life. Expensive branded models of built-in or surface-mounted lamps compare favorably with cheaper ones. They are of higher quality, wear-resistant, and therefore retain their aesthetic appearance for a long time.
In an effort to create a stylish and original interior in the bathroom, we must not forget about safety. Electrical devices intended for installation in rooms with high humidity must have a maximum degree of protection, which corresponds to the IP65 marking.
The bathroom is divided into zones with different humidity levels. The bright blue area is exposed to maximum splash water.
When arranging rooms with high humidity levels, certain rules must be followed.
The following recommendations will help you organize safe room lighting:
- You can only use moisture-resistant electrical appliances with a degree of protection of IP24;
- in areas of high humidity, install low-voltage devices up to 12 V;
- use lighting devices of protection class 2 near the bathtub or shower stall;
- it is desirable that all metal parts are made of stainless steel or have anti-corrosion properties;
- Light bulbs and other heated parts of electrical appliances must be equipped with protective covers or shades.
You should also remember about the features and properties of light rays. So, next to the washbasin it is better to use lamps with a softer yellow light. Otherwise, the mirror will reflect rather pale skin, which will prevent you from applying makeup correctly.
Our recommended article will familiarize you with the rules for choosing color temperature and the nomenclature designations of lighting devices, which allow you to select an LED light bulb in accordance with this important characteristic. Proper lighting should be bright, soft and diffused
This will highlight the colors of the interior elements and finishing materials and create a cozy atmosphere.
Proper lighting should be bright, soft and diffused. This will highlight the colors of the interior elements and finishing materials and create a cozy atmosphere.
For a bathroom with dimensions of 5x2 m, 2 lamps of 60 W are sufficient. You can use 2 lamps spaced on the sides, but in this case the mirror will require additional lighting. You can get acquainted with guidelines for selecting lighting devices for the bathroom in an informative article, the content of which is entirely devoted to this issue.
Lighting devices
Modern technologies and fashionable trends in interior design have made spotlights popular and ubiquitous. Offers on the lighting market are distinguished by a variety of models. Designers successfully use this wide choice and include combinations of lighting devices in their ideas and interior design. The types of lamps used in luminaires are divided into four categories:
- incandescent lamps;
- halogen sources;
- luminescent sources;
- LEDs.
Lamps built into plastic ceilings have become fashionable and popular; many original design ideas use them in different combinations. The desire to make a home modern leads to a change from traditional central lighting with lamps and chandeliers to point light sources, especially if the apartment has plastic ceilings. Such lamps give your home an elegant and stylish look, create comfort and functionality.
Example of built-in lighting in plastic
For public institutions, their own standards for lighting and the type of lighting devices have been developed. Such requirements come from the function of the premises, depending on which the appropriate lighting is installed.
There are fewer lighting standards for residential premises. The selection of lighting fixtures, placement of lamps and chandeliers is carried out by the customer in accordance with the taste and recommendations of the designer. When planning and installing lighting fixtures, do not forget about the ability to replace the wiring yourself if necessary.
Installation diagram in a suspended plastic ceiling
Which lamps are best to use in the bathroom ↑
Incandescent lamps are gradually becoming a thing of history. The reason is not only their high energy consumption: during operation they become very hot, which is dangerous for plastic. High temperatures cause it to turn yellow and a fire is possible. The dimensions are also not in their favor, because of which they have to lower the suspended ceiling sheathing low.
Compact energy-saving fluorescent lamps heat up less, but their high cost is not justified by their service life.
The variety of shapes allows you to choose an option for any interior
Halogen devices are a glass bulb with an incandescent filament placed in it. Inside the flask there are bromine or iodine vapors that prevent the tungsten filament from burning out. This increases the service life of halogen lamps.
LED lamps are assembled on the basis of LEDs - semiconductor devices. They do not heat up, which means they are the most economical and optimally suited for the bathroom. They are currently the most expensive, but as demand increases, the price goes down.
LED dots are the most economical
It is preferable to use lamps operating on reduced voltage. To do this, a 220/12 V step-down transformer is installed under the suspended ceiling. The power of the transformer is selected in accordance with the total power of all lamps (plus some reserve is needed).
Installation is recommended using a step-down transformer
How to choose the best option
The appearance is selected in accordance with the decoration of the ceiling and the entire room. For example, when choosing plastic panels that match the tone, the switched-off lamps will become almost invisible, while with a contrasting one, on the contrary, they will stand out noticeably. A more modern interior will suit a chrome-plated external part, a classic one - gold-plated or with pendants.
If the room is low and the ceiling has no noticeable differences, it is better to place overhead models that lower the ceiling height less. And in a spacious room, place the PVC panels a little lower and embed built-in models; the overall look will be more harmonious.
How to correctly calculate the required number of lamps
Before making the correct selection of the number of lamps for the room, you need to decide on the type of light sources used. Their number will depend on this.
To perform the calculation you will need the following data:
- room area;
- type of lighting sources installed in the room;
- the presence of windows in the room and their installation location;
- methods for zoning room area;
- interior design, as well as the purpose of the room.
An example of calculating the number of light sources is given in the table.
| Room | Standardized quantity for incandescent light bulbs, W/m2 | Normalized number for diode light sources W/m2 |
| Bathroom | about 20 | 2-3 |
| Living room | 22 | 3 |
| Corridor | 12-16 | 1-4 depending on the purpose |
| Bedroom | 15 | 2 |
| Children's | 60 | 6-10 |
For a room with an area of about 20 square meters, you will need approximately 10-13 light sources. To ensure a more convenient arrangement of lamps, it is recommended to select an even number of lamps.
It is better to choose more light sources, since spotlights emit soft lighting, it will not harm a person.
What is needed for installation
The following elements will be needed from the material: spotlights; lamps; supply wire; terminal blocks or sleeves for connecting wires; insulating heat shrink, electrical tape; switch.
It is advisable to select lamps of the same type for each type of lighting. According to the type of design, the lamps themselves are purchased in the required quantity
It is important to strictly check the presence of a reflective layer along the cone at the base of the base for incandescent lamps and the technical characteristics in accordance with the requirements for the lamp
For suspended ceilings, 40 W lamps are used; more powerful ones will significantly heat the suspended ceiling material and can lead to structural damage or even a fire. Halogen and LED versions of lighting elements are selected according to the power and spectrum of the light produced.
The wire is selected depending on the material from which the suspended ceiling is made. So for drywall, which is a fire-resistant material, a regular two-core or three-core wire VVG-2(3)x1.5 is suitable. For materials such as MDF or plastic, it is necessary to select a fireproof version of the RKGM wire.
The wire must be soft, that is, each core is represented by many small veins united under one insulation. To connect wires and connect lamps to them, you can use special terminal blocks, which are sold at any hardware store.
However, the bolted connection is serviceable. You will need to check the tightness of the clamping bolts at least twice a year. Otherwise, at the point of contact, the terminal blocks and wires may begin to heat up and char. A more reliable and durable option is fixation using copper or tinned copper sleeves.
It is necessary to protect the connection points using electrical tape or using a special heat-shrink tube to insulate the supply wires.
Materials for installation of lamps
Before you begin installing the luminaires, check for the presence of:
Lamp with ready-made mounts; Electric drive; Lamps (it is important that they match the base of the lamp); Sleeves or terminal blocks for connecting wires; Standard electrical tape; Switch for lamps. When purchasing a lamp in a store, select lamps of the same type
For example, you know that you won’t have enough power from the main chandelier and will have to buy several more small spotlights for it: choose options from one collection. This way you will avoid inconsistencies in design and it will be easier for you to start installing lighting
When purchasing a lamp in a store, select lamps of the same type. For example, you know that you won’t have enough power from the main chandelier and will have to buy several more small spotlights for it: choose options from one collection. This way you will avoid inconsistencies in the design and it will be easier for you to start installing the lighting.
Be sure to check if they have a reflective layer on the special cone of the bulb. Check their compliance with the technical characteristics of the lamps.
The lamp power should not exceed 40 watts. If you choose this power, the lamp will not overheat and the drywall around it will remain intact. LED and halogen lamps are better suited for this purpose: you just have to select them according to their emission power.
Also pay attention to the selection of wires, and it is better to consult with specialists on this issue when purchasing. If your ceiling is plasterboard, then 2-wire VVG-2x1.5 is perfect
Don’t forget to purchase terminal blocks from a specialized store: you will need to keep an eye on them even after installation is complete.
Over time, they heat up without maintenance, so it is necessary to periodically tighten their bolts
Do not forget to purchase terminal blocks from a specialized store: you will need to monitor them after installation is completed. Over time, they heat up without maintenance, so it is necessary to periodically tighten their bolts.
Tools
To install ceiling lights with your own hands, you will need the following tools:
- drill;
- distribution boxes;
- cable of selected length;
- screwdriver;
- construction knife;
- pliers;
- terminal blocks.
Some of the listed tools are usually found in every home.
Tools for installing lamps
Position light sources
Before placing lamps in the bathroom, it is recommended to determine the number of functional spaces. The wide rooms have several levels.
- wash areas with a sink and mirror are designed;
- area for water treatments with shower or jacuzzi;
- space for changing clothes and placing things.
Small built-in lamps with a gentle light also illuminate furniture structures - shelves, cabinets, cabinets.
The location of lighting fixtures at the ceiling level depends on the size of the room
It is important to calculate the dimensions of the room in order to determine the best layout, but which arrangement is more harmonious will also depend on the design solution. Lighting can be represented by 1 lampshade or a complex combination of lamps of different types
Combining lighting systems at different levels is popular. The basic principles of bathroom design involve lighting the work area, which includes a mirror, washbasin, and shelves.
Preference is for unobtrusive soft light. Lower lighting often serves as interior decoration. Such lamps are placed 40 cm from the floor or on the lower surface and under interior items. It is possible to place light sources on the steps and under the podium.
Washbasin and mirror lighting
The middle level includes the installation of lighting fixtures above the bathroom mirror and washbasin. The requirements for the devices are to create natural light, a clear image on the glass surface - without distortion or shadows.
Experts recommend hiding lighting fixtures in white or matte lampshades so that the radiation is soft and diffuse.
The optimal arrangement of devices is on the sides of the mirror or along the perimeter. Any type of lamp can be installed. It is better to avoid devices under the mirror, because... they create glare on surfaces.
Bathroom vanity and mirror lighting
Shower or bath lighting
The shower or bath area requires additional lighting to create a cozy atmosphere. Specially designed luminaires for wet environments are suitable.
The structures can be designed in the form of sconces. Lamps are also placed in the center or spotlights are mounted in rows. The system of overhead lamps will help to visually expand the space and increase the level of illumination.
Bath lighting
ShVVP, PVS or VVG
The main topic of debate regarding the choice of cables and wires for spotlights is the choice of one of three brands of cable products:
- SHVVP;
- PVS;
- VVG;
Which of them can and which cannot be used? Let's look at it in order.
SHVVP - a cord with a vinyl sheath and core insulation and PVC. The cores are made of twisted copper wires, which ensures a high level of flexibility. This fact makes installation easier.
It is designed for non-stationary connection of electrical appliances to the power supply network. According to the definition, it is no longer suitable for such a task as lighting installation. Its element is the power cords of hair dryers, televisions, fans, as well as various household appliances that are low-power or very mobile during operation. However, craftsmen often offer it for connecting spotlights as an inexpensive solution. In addition, the good flexibility of the cord significantly speeds up and simplifies the connection of the points themselves. Its insulation is not too thick, although it is within normal limits. This is also why it is not suitable for long-term work. According to GOST, its time between failures is about 5000 hours.
Apart from this definition, there are no other regulated reasons not to use it to connect “dots”, it is simply not designed for that.
PVS – vinyl connecting wire. This is the abbreviation for the marking of this cable product. The cross section of this wire is already round; accordingly, it has thicker and more durable insulation than that of the SHVVP. The cores are the same multi-wire flexible.
PVA is also designed for non-stationary connection of electrical equipment to the network. Therefore, the PVA wire is similarly not intended for lighting installation. But it is great for extension cords and for powering a variety of hand-held power tools and other appliances.
Nevertheless, a high-quality shell allows it to be used for wiring, and electricians often use it for electrical installations behind plasterboard ceilings and tensioned fabrics. A flexible wire is easier to install than a rigid wire with single-wire conductors (solid-core).
VVG is a wire with rigid monolithic conductors. Its insulation is also made of PVC, both the overall shell and the insulation of each core. Designed for permanent connection of electrical equipment and wiring.
This means that by definition it is suitable for installing wiring for spotlights. But electricians do not always like to install VVG cable to connect spotlights. VVG is rigid, which makes it difficult to connect the lamp in a limited window space to install a point. In addition, the lamps themselves usually have soft wires and connecting to hard wires can be difficult.
Nevertheless, a detailed study of GOST 7799-97 slightly corrects the above, as follows:
That is, according to this information, SHVVP is still allowed for connecting lamps, but for PVA this is not said. Apparently we are talking about table lamps, floor lamps and similar devices.
And this is an excerpt from GOST 31996-2012, which concerns the VVG cable:
Basic requirements for light bulbs and lighting fixtures
Due to the characteristics of PVC film, which is used as a canvas for suspended ceilings, certain requirements are imposed on lighting devices:
- the lamp should not heat above 60°C - high temperatures lead to deformation of the canvas;
- there are no sharp corners or other protrusions on the device body that could damage the PVC film;
- lamps for recessed luminaires must be equipped with a reflector so that the light does not spread into the ceiling space.
It is recommended to lay all wiring in corrugated plastic pipes, which protect against sparks hitting the canvas in the event of a short circuit. When installing lamps, thermal rings must be used to protect the PVC film from deformation and overheating.
When choosing lighting for a stretch ceiling, pay attention not only to the lampshade, but also to the types of lamps. They come in four types:. When purchasing a lighting fixture, pay attention to the model of the base.
Now the most common:
When purchasing a lighting fixture, pay attention to the base model. Now the most common:
- G5.3 for halogen and LED devices;
- GX53 for LED and energy saving devices.
LED lamps with GX53 socket are the most profitable because they are manufactured using advanced technologies. But their design must have a cooling grille, which is made of metal or composite materials, and extends the service life of the device.
Electrical and high humidity
Large amounts of water, frequent temperature changes, humidity and hot steam, condensation - all these conditions characteristic of the bathroom create an increased danger when using electricity within its confines.
To ensure the safety and proper operation of electrical appliances, during installation in such rooms, electricians use only elements protected from exposure to steam and water.
Moisture-proof terminal blocks are perfect for the bathroom, as they can withstand high humidity for a long time, and at the same time they significantly facilitate installation.
The installation of any distribution boxes and assemblies must be carried out strictly outside the bathroom. Inside the bathroom, connecting separate wires should be avoided as much as possible.
If for some reason it is still necessary to do the so-called twisting, then each such place should be protected as thoroughly as possible with insulating materials from moisture penetration. Most often, lighting in the bathroom is organized using low-current systems with a power consumption of 12 V.
When installing main and additional lighting in the bathroom, it is recommended to use special terminal blocks equipped with additional moisture protection
It is almost impossible to receive any dangerous electric shock from such an LED lamp, even in high humidity. But this does not mean that you can forget about security measures. All LED devices must be grounded.
The lighting system must be connected to a residual current device, which is activated when a current leak occurs and interrupts the power supply to a specific object.
With the help of LED lamps and LED strips, you can significantly diversify the interior design of the bathroom, providing the necessary amount of light in the room
In bathrooms, it is recommended to organize a separate power supply line to each object or group of objects. Usually a line is allocated for sockets and separately for lighting fixtures.
If the bathroom is supposed to use powerful equipment (an automatic washing machine, hydromassage cabin, electric sauna, etc.), then a separate power supply line should be made for each such object. And for each such group of electricity consumption it is recommended to install a separate RCD.
All lighting and electrical appliances located in the bathroom must be connected to the distribution panel through a residual current device (+)
Electricity is supplied to low-current LED systems through a special step-down transformer. This device must also be installed outside the bathroom, i.e. away from sources of high humidity. Almost all modern LED lamps are equipped with a special grounding terminal.
This method of protection should not be neglected. Even weak currents can be transmitted and accumulated on wet surfaces. And thanks to steam and condensation, any surface in the bathroom can become wet: walls, floors, profile structures, ceilings, furniture, appliances, etc.
Every light fixture installed in a bathroom should be properly grounded. The lack of such protection can bring many problems to the owner of the premises (+)
An accidental touch can transfer a discharge of accumulated electricity to the human body, which in some cases can not only cause discomfort, but also lead to serious electrical injury.
Mistake 8. Not paying attention to the material of the lamp
Even the most fashionable metal sconce without a protective layer will eventually become covered with red spots. And models made of glass and plastic will last much longer. Such materials are not destroyed by moisture and detergents, and in the long run save time and money. If you still cannot do without metal materials, check the composition for the presence of a reliable powder coating (protective layer).
Unsuitable material for bathroom fixtures
Suitable material for bathroom fixtures
Illumination of mirrors, washbasin, other elements
The lighting of the mirror should be natural so that it does not distort the reflection. It is better to install the lamp above it, on the sides, or combine these 2 options. Choose lighting fixtures with white shades with a matte finish that emit soft light.
The LED strip can be installed under the sink or along the edges of the bathtub. Plates with diodes are used to illuminate niches, drawers with clothes, cabinets, or along the perimeter of the wall.
In the bathroom or shower, lamps help create a relaxing atmosphere. Several devices can be installed above the bathtub or in the shower stall.
Kinds
There is a huge variety of models of LED lamps for suspended ceilings. The main types of such devices include built-in, surface-mounted and suspended.
- An absolute hit in recent years has been built-in appliances that take up almost no space and are easy to maintain. The models have become a real godsend for suspended, plastic, plasterboard ceilings, and Armstrong structures.
- For those who like to save space even overhead, it is better to purchase overhead lamps with low weight, dimensions, and compact diodes.
- Hanging specimens, on the contrary, are suitable for rooms with high ceilings. They are also easy to operate and maintain.
If halogen, energy-saving lamps are also suitable for fabric fabric, then only LED lamps are suitable for PVC film. The fabric withstands high temperatures better. Models with a diffuser and prismatic refractive elements look quite interesting.
An interesting design for rooms with low suspended ceilings will be hanging LED lamps. With their help, you can decorate a room or office in an original way, illuminate only certain areas, and zone the space in an interesting way. Their design can have several lamps, the optimal temperature for which is 4,000 K. Most often they are installed in offices, kitchens or bathrooms.
The price of mounted models varies depending on the body material: steel, aluminum, environmentally friendly plastic. Such products come complete with a mini-plug cable, and the switch may have several additional options.
Dimmable LED spotlights for suspended ceilings are very popular. Their peculiarity is that they allow you to smoothly adjust the brightness of the glow. The devices got their name because of the process of adjusting the light.
Not every LED light has this option, so when choosing, pay attention to the specifications of the models. With their help you can:
With their help you can:
- adjust the degree of illumination when the brightness of daylight changes;
- set the on and off timer;
- use a ceiling lamp as an original night light;
- become a real “master” of light remotely (from the kitchen, bedroom, bathroom, children's room, etc.).
Many people are looking towards linear LED lamps. People are used to seeing them directly above the work surface, but these models can also be found under a suspended ceiling. The device consists of super-bright LED crystals. With a minimal luminous surface area, they have high luminous efficiency.
The strengths of the interior are beautifully emphasized by lamps with prismatic diffusers, as well as various modular systems with traditional or double lighting.
Hidden lighting is often installed in ceilings decorated with plasterboard and stretched film. It illuminates the canvas around the perimeter, creating interesting light scenes. There are also special profiles made of translucent film. Together with properly selected lamps, the effect is created that the tension structure shines and glows from the inside. In this case, designers often play with shapes and sizes, depicting the ceiling as a porthole with a view of “space,” the seabed or the sky.
Another interesting option is ultra-thin LED panels. They provide a pleasant matte glow. The advantage of this type is absolute safety for vision. Models are overhead and built-in.
Lovers of refined interiors will receive tremendous pleasure from such an LED lamp. It has impeccable technical characteristics and can be used both at home and in office buildings and conference rooms.
Mistake 7. Buy a chandelier/sconce with a dark shade and pattern
The material of the lampshade or floral shades can eat up the light power and convey the color of the light incorrectly. For example, a lampshade made of dark, light-retaining material reduces the level of illumination, which is most inconvenient in the bathroom, while many decorative details leave a shadow. Therefore, check immediately in the store how overly designer and decorative models transmit light.
Unsuccessful sconce for the bathroom, photo example
A successful example of a sconce for a bathroom, photo example