At the junction of the foundation walls and the soil horizon, a blind area is installed to increase the service life of the building. Its size is usually about 60 cm in width. This element of construction is of enormous importance for the strength and performance characteristics of the entire structure. And even novice builders without experience can construct a blind area.
Concrete blind areas are a type of rigid device. A monolithic screed is poured over a bed of sand and concrete. Concrete pouring near the building is rightly considered the most durable.
Device Rules
Concrete blind area is not only the most durable, but also the easiest to construct. But here, too, you must adhere to certain rules and comply with certain conditions:
- The width of the fill should be greater than the overhang of the cornice, namely more, not less or even. The optimal size is considered to be the size of the cornice protrusion plus 200 mm;
- The fill strip must be continuous along the entire perimeter of the building without breaks;
- The blind area must have a double slope to drain water:
- From the walls of the building towards the street;
- To the corner of a building with a stormwater system.
As a rule, the concrete blind area has a thickness of about 100 mm. But the base cushion should be 2 times thicker. At the same time, the device will be greatly strengthened if the pillow has a layer of clay.
Since concrete needs to contain water to gain strength, it is possible to pour the solution without any additives only at a temperature of + 5 0 C. Almost everyone knows about this, even beginners in construction. But what many people forget is that it takes up to 14 days for concrete to gain 70% strength. And it is within 2 weeks that the temperature should not drop below + 5 0 C. A short-term drop in temperature is acceptable, but not below 0 0 C. Why is this important? The water in concrete should not freeze during the setting period.
It is also important to consider the soil temperature when pouring. That is, in order for the blind area to serve for a long time, its construction must be carried out after the soil has thawed.
What it is
The soft blind area around the house is the same ordinary blind area as the one made of concrete. For a long time it was believed that the most effective way to drain sediment and melt water is a solid structure, through which water flows not directly under the foundation, but further from it.
Soft does not involve concrete in the structure or any hard materials at all. This is the same path, it just has many layers of different materials, each of which can filter and retain water. And the effectiveness of such a multilayer cake will be no less than that of a concrete structure.
Functions of the blind area
It is very important that the concrete pour is of high quality and durable. For the reason that although the blind area gives the building a finished, neat appearance, its main functions are purely practical:
- Protection of the foundation from the destructive effects of moisture;
- Reducing the level of soil freezing around the building and also reducing the impact of temperature fluctuations on the structure;
- Protection from the biological threat of destruction: roots of trees, shrubs, etc.
- 1 If you don’t have a blind area.
- 2 We build the blind area according to the norms and rules
- 3 Mistake #1. Dimensions and location
- 4 Mistake #2. Stagnant water
- 5 Mistake #3. Violation of regulations for concrete work
- 6 Mistake #4. The blind area was not insulated
- 7 Mistake #5. Soft blind area allows moisture to reach the foundation
- 8 High-quality blind area is easy
When planning a country house, even an inexperienced developer knows what he will need for construction and is aware in advance of the necessary components of a country house (foundation, walls, roof, ceilings, windows and doors). However, there is one more component in the construction of a summer house, which is not formally included in the scope of the house and therefore is often not paid attention to.
Many people forget about the blind area. But in vain! This is fraught with unpleasant consequences
And if they do, they leave its arrangement for a vague “later”, mistakenly believing that there is no urgency in its construction, because “there is no rain on us.” There is perhaps no more inappropriate saying when it comes to the blind area. The fact is that she’s just “dropping” on her! And if mistakes were made during construction, drops often lead to irreversible results.
Recommendations from experts
The main advice that professionals give is to use only high-quality materials. Reliable protection will be provided only if each layer properly performs its functions. It is also important to strictly follow the technology for laying a soft blind area so that the result is perfect.
A flexible blind area is an excellent alternative to a concrete path, which, with proper installation and minimal maintenance, will last much longer than its concrete counterpart.
In addition, such a design can add attractiveness to the exterior and become an original flower bed.
Construction of a blind area according to GOST: how to do it correctly, read here.
If you don't have a blind area.
The editorial inbox receives letters with annoying regularity in which summer residents talk about loose foundations, cracks in the walls, and lopsided corners. As real practice shows, this problem often appears as a result of the influence of ground moisture on the “zero cycle” and the movement of heaving soils. But this disaster could definitely have been avoided if the foundation had been protected. This is precisely what the blind area is intended for. That is, it is a mandatory technological component for most types of foundations, and not an additional item of unforeseen expenses imposed by greedy builders in an already growing budget, as many summer residents think.
Feasibility of construction
A solid blind area is the most popular option used to remove moisture from the foundation, thereby extending its service life.
But it will not always function correctly, for example, in conditions of heaving soil, a solid structure is rarely used .
In this case, it is advisable to install a soft blind area, which is simpler, cheaper and more repairable. In addition, you can put insulation and waterproofing, as a result of which the structure will perform the same functions as a solid one.
We build a blind area according to the norms and rules
I hope I have convinced you of the need to arrange a capital blind area. Then let's move on to the nuances of construction, which everyone who is to build housing must know.
There are two known types of blind areas - hard and soft. When covering the first, concrete, asphalt, stone, paving slabs are used, and for the second, gravel, lawn, and light tiles are used.
You can use lawn to cover the soft blind area
First of all, I think, it is necessary to eliminate the typical technological mistakes that inexperienced builders make when constructing both types of blind area.
Price for turnkey construction services
To calculate the exact cost of the necessary materials and work, you will need the help of a specialist. After all, this is the only way to assess the condition of the soil and select the type of blind area.
It is recommended to carry out work on the installation of a blind area simultaneously with the installation of drainage and storm sewerage.
The final cost of work is influenced by many factors , including:
- material used to construct the structure,
- building area,
- width and depth of the blind area,
- as well as some soil features (flatness, need for dismantling, etc.).
For example, in the Moscow region, the cost of installing a structure using sand, membrane, geotextile and crushed stone will vary from 1300 to 1600 rubles. depending on the width of the blind area. The more materials are used, the higher the final cost of the work will be. In Novosibirsk, the cost of similar work varies from 1000 to 1600 rubles, in St. Petersburg - from 1200 and above.
Mistake #1. Dimensions and location
Waterproof blind areas must be constructed around each building. Everything is clear with the length, it is equal to the perimeter of the building, but what should the width be? Is it possible to make the blind area narrow? No way! This would be a fatal mistake! Drops of rain falling from the roofing edge (even with a well-organized drainage system they will still occur) should not fall on open ground. That is, the width of the blind area should be approximately 20 cm wider than the size of the roof overhang.
A narrow blind area is useless - it cannot protect the foundation
It would be appropriate to emphasize here that almost all parameters in construction are quite strictly regulated. To clarify the details that interest you, it is worth looking, for example, at the “Norms and rules for designing complex landscaping on the territory of Moscow MGSN 1.02-02 TSN 30-307-2002”. The regulatory document states in the most definite way: “The width of the blind area for buildings and structures is recommended to be 0.8-1.2 m, and in difficult geological conditions (soils with karsts) - 1.5-3 m.” Additionally, I note that a porch with a staircase often blocks direct access to the outer foundation wall. Of course, here the blind area must expand in order to clearly prevent precipitation from entering the “forbidden zone” at the foundation.
For what purposes is the material used?
The technology for creating a blind area is a collection of layers like a pie, the top of which becomes the finishing coating, which can be hard, semi-hard and soft. Any structure requires a reliable foundation so that during the passage of groundwater the trench is not washed away and the blind area retains its functionality.
The first thing they suggest using clay for in construction is strengthening the bottom of the trench. The wet rock is laid as the first layer, compacted and then covered with a layer of sand. Clay, due to its viscosity and density, protects the blind area from destruction.
With the onset of frost, the moisture inside the soil turns into ice and begins to put pressure on the soil . This process is called heaving; pressure of such area and force destroys the foundation of the building and raises the blind area, deforming it.
Clay is the first layer that helps insulate the thin coating from water and retains heat in the soil. The process should not be confused with creating a clay castle (emphasis on the last letter).
It is used for blind areas:
- concrete;
- asphalt or asphalt-concrete;
- from paving slabs, paving stones;
- soft (lawn, crushed stone, granite chips).
Creating a blind area with a layer of clay to protect the foundation is a labor-intensive task.
It is necessary to compact the material carefully so that when moisture gets in, it does not heave, but protects the foundation and blind area. To do this, they use technical means, for example, a vibration machine. The layer should be small, 10-15 cm. It is necessary to lay drainage.
The second method of use is to make an outer covering from clay , which is located on the surface of the earth. This type of flooring is a type of soft blind area; it is suitable for southern regions where the level of soil freezing is low. Lay it no deeper than 30-40 cm from the surface of the earth.
This option was used before the advent of concrete and paving slabs. Clay holds its shape well, serves as a thermal insulation layer, and helps remove wet precipitation from the foundation, maintaining its integrity.
The material is environmentally friendly, perfectly suits any type of cladding, and looks natural. In addition, clay prevents the growth of plants and prevents the roots of trees and bushes from getting to the foundation and base.
Mistake #2. Stagnant water
Water that has fallen from the roof remains on the surface of the blind area and forms puddles next to it. This only means that the authors of the blind area did not take care of the slope of its surface. According to the above-mentioned standards MGSN 1.02-02 TSN 30-307-2002, the transverse slope of the blind area should be taken at least 10%. For example, if the width of the protective tape at your dacha is planned to be 1 m, then the height difference between the longitudinal sides of the formwork should be about 10 cm, and no less!
The importance of lateral slope
A failed height difference can be a consequence of unsuccessful concreting of a monolithic blind area if, at the stage of hardening of the concrete mixture, the builders did not ensure that it was given a transverse slope, and the concrete “stacked” into a horizontal position.
The blind area should drain water from the foundation
Drainage trays for drainage along the outer perimeter
The story with water does not end there: to drain it along the outer perimeter of the blind area, it is advisable to provide drainage trays. These can be modern plastic boxes, closed on top with metal bars, or simply sawn along the pipe, laid on a reliable base.
And we will take care of beauty
And it is reasonable to frame the structure of the blind area around the perimeter with curb paving stones. It will give the building architectural completeness.
Pros and cons of flexible design
The main advantages of the design are:
- Resistant to temperature changes.
- The material is not subject to shrinkage, which improves its quality characteristics and does not harm the base of the structure or building.
- The soft blind area does not require periodic repairs.
- If a special membrane is installed during the installation of the structure, its thermal and waterproofing qualities will improve, as well as frost resistance and immunity to seasonal soil heaving will increase.
- You can install the soft blind area yourself.
- The design can serve a decorative function. Depending on personal preferences, you can pour multi-colored stones onto the surface of the blind area, plant grass, or organize a flower bed.
Despite the predominant number of advantages, the design also has disadvantages. For example, the need for constant care, since grass can grow through the stones, plant roots can grow, etc. The surface of the pebbles requires constant cleaning of dirt.
Mistake #3. Violation of regulations for concrete work
The sad consequence of mistakes of this kind will be the appearance of cracks on the concrete surface of the blind area. How they threaten the foundation structure is not difficult to guess even for a summer resident who is far from construction.
Concrete production must be carried out strictly according to the rules.
The composition of the concrete mixture is probably known to every summer resident: cement, coarse aggregate (crushed stone fraction up to 20 mm), fine aggregate (sand), water. Then why are there so many mistakes on the dacha horizon? The answer is clear: firstly, the errors lie in the incorrect mixing algorithm. Secondly, in violation of the weight ratio of the components: this often happens if they are measured by eye. Experts strongly recommend abandoning such frivolity. Making concrete is not a case where you can count on chance. You can accurately dose the components even in country conditions. How ? In my opinion, nothing better than ordinary buckets has yet been invented, and if in addition you use a steelyard (even a very simple one), the weighing accuracy will be sufficient.
Cracks in the blind area are the result of improperly prepared concrete mixture
Concrete mix proportions
Sequence of mixing components
Mixing time
How long does it take to rotate the bulb of a household concrete mixer? To mix the dry ingredients, 2 minutes are enough, and after gradually adding water, another 2 minutes.
Not only the sequence of adding components is important, but also the mixing time
Eliminate the appearance of cracks
Compaction and tilt
The final stage of concreting is compacting the concrete mixture and imparting a slope in the transverse direction. You will have to rent a vibrating plate, the operation of which will ensure high quality finishing work.
Requirements
Properties required for the clay that is used inside the “pie”:
- clayey granulometric composition;
- the percentage of plasticity is low;
- high adhesive properties;
- flow rate no more than 0.5;
- low porosity and ability to absorb moisture, the indicator decreases when the material is compacted;
- minimal water permeability.
Properties that a clay composition must have when used to create a top layer:
- high density from 1600 kg per cubic meter. m;
- low frost heaving;
- water resistance;
- low porosity and fluidity;
- minimal plasticity;
- load-bearing capacity from 4 kg/m3;
- sand content no more than 15%.
To build a blind area, you cannot use porous clay with a high percentage of moisture penetration. This material has low frost resistance; with the onset of cold weather it becomes deformed.
Mistake #4. The blind area was not insulated
Such an error will lead to negative consequences. If the blind area is not insulated, frost heaving inevitably occurs on heaving soils (clayey, silty sandy loam, loam) in winter, which has a most destructive effect on the foundation structure.
To avoid destruction of the foundation, experts recommend not saving on insulation of the blind area
Advantages of an insulated blind area
- in normal soils, an insulated blind area protects the foundation from the appearance of cracks (when melt and sediment water penetrates into the concrete, which can destroy it when frozen);
- reduces the impact of external low temperatures and reduces home heating costs.
Therefore, experts recommend not saving on insulating the blind area - it will cost you more. As practice shows, in the modern building materials market you can find the ideal combination of high quality and reasonable prices. For example, practicing builders positively characterize the product, in a particular case - extruded polystyrene foam (XPS) TECHNONICOL CARBON ECO with sheet dimensions of 580x1180 mm and a thickness of 50 mm.
Laying thermal insulation boards CARBON ECO. Photo from the site eva-stroi.ru
The material in practice (and it was used in various climatic conditions) proved the characteristics declared by the manufacturer:
- high compressive strength;
- does not absorb moisture;
- cannot be destroyed by microorganisms, plant roots, mold and fungi.
How much is it?
Let's use an example to calculate how much it will cost to insulate a blind area: the cost of 1 m² of such material ranges from 160 rubles. If you have a country house measuring 8x8 m, then you will have to insulate an area of 36 m². The purchase of material will require an amount of about 6 thousand rubles. Is this a lot for many years of operation of the foundation?
There is no need to skimp on installing a blind area
Required consumables and tools
To build a well blind area with your own hands, the following building materials may be useful (depending on the type chosen):
- fine sand or crushed stone;
- clay;
- Portland cement for preparing the solution (preferably grade M400-M500);
- a skein of twine (to mark);
- dense waterproofing material;
- tiles, borders - for decoration;
- mesh for reinforcement;
- wooden boards for formwork.
You also need to stock up on the following tools:
- building level;
- shovels - bayonet and shovel, sometimes a pickaxe for hard soils;
- devices for working with cement - containers, trowels;
- tape measure;
- saw - grinder and rubber hammer for working with tiles;
- concrete mixer;
- crowbar for working with clay.
Mistake #5. Soft blind area allows moisture to reach the foundation
When constructing a soft blind area, its top finishing coating can be compacted gravel, green lawn or metlakh tiles. Of course, such coatings require reliable waterproofing protection. The optimal solution to the problem is to use a profiled membrane PLANTER-geo (TechnoNIKOL) and install it on the wall of the house. It will create a sealed layer and block the penetration of precipitation to the foundation.
The PLANTER-geo membrane is laid with an overlap on the wall of the house
High technology guarding buildings
The membrane fabric consists of two layers:
- the lower one is made of high-density polyethylene, has protrusions on the surface in the form of spikes, forming a drainage gap to drain water from the house;
- the top layer is geotextile, which filters water and prevents clogging of the drainage gap.
Waterproofing membrane PLANTER geo
The cost of such a high-tech membrane is close to 250 rubles per 1 m².
Estimated cost
The cost of restoring the blind area depends on the cost of the materials used during the work.
We will give approximate prices for drawing up estimates (for example, material consumption per 1 m2 is taken) when carrying out work with your own hands.
- Concrete blind area:
- concrete preparation – 318 rubles;
- pillow – 340 rubles;
- reinforcement – 180 rubles;
- formwork - 800 rubles.
- Tiled blind area:
- pillow – 420 rubles;
- finishing layer – 110 rubles;
- front layer – 2360 rubles.
Carrying out repairs by specialists will require large material costs.
Here is the approximate cost of the work (per 1 m2):
- excavation of soil to a depth of 25 centimeters with removal of plant fragments – 160 rubles;
- laying and compacting a lining layer of sand (height 10 centimeters) - 500 rubles;
- construction of formwork and formation of an expansion joint around the perimeter of the house - 50 rubles per linear meter;
- backfilling a drainage 10-centimeter layer of crushed stone and compaction;
- laying reinforcing mesh measuring 1x2 m - 50 rubles;
- installation of drains – 100 rubles per linear meter;
- pouring concrete 10 centimeters high with the formation of an angle of inclination from the wall to the edge - 1000 rubles.
High-quality blind area is easy
The main thing is to eliminate the mistakes listed above and use high-quality materials. Once again, I will allow myself to recommend that summer residents (in their own interests!) do not skimp on the construction of a blind area, because the strength of the structure depends on how reliably it protects the foundation! In my opinion, to build a high-quality blind area, it is technically correct to use both products mentioned in the article.
- CARBON ECO slabs are laid on the prepared base (compacted sand) (thereby we protect the foundation from frost).
- To reliably protect the blind area from the negative effects of moisture, a profiled PLANTER-geo membrane is laid on top of the thermal insulation. It is recommended to form a connection between the sheets by overlapping the membranes into four tenons and additionally gluing the joints with PLANTERBAND tape; geotextiles should also be joined together with adhesive tape.
- Next, you can begin to form the finishing layer of gravel or plant substrate; another layer of sand is poured under the tiles or natural stone.
Proper heat and waterproofing during the construction of the blind area. Photo from the site ivanovo.tiu.ru As you can see, the use of modern high-tech materials is justified: with their help you will create a reliable and beautiful (which is also important, you must admit!) blind area that will faithfully protect the foundation of your house for many years.
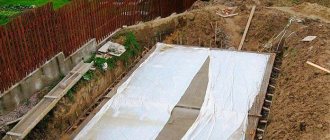
Pouring the foundation is an important stage of construction at which mistakes should not be made. The strength and reliability of a building depends on a number of factors, including weather conditions. Natural phenomena such as snow, rain or heat can make changes to the established and detailed work procedure and throw even an experienced builder into a stupor. For example, rain: for a long time it was believed that such days are absolutely unsuitable for work, since they nullify all the efforts of the work team. But is this really so?
The cheapest and easiest option
A soft blind area is considered the most inexpensive and simple way to protect the foundation from moisture. Crushed stone or sand are most often used for the top layer ; they are cheaper and easier to work with.
The most economical and simple option is to plant ornamental grass or form a flower bed on a blind area. This will not only reduce the financial costs of arrangement, but also improve the appearance of the site.
It is better not to skimp on waterproofing and geotextiles, as they play a primary role in structural reliability and durability.
It is worth noting that the soft blind area is highly susceptible to spreading, since bulk materials are most often used for the top layer. To prevent this, a concrete curb is laid around the perimeter of the structure .
To make it cheaper, it can be replaced with wooden formwork, which is mounted in poured clay. Such a barrier is capable of retaining bulk material and also maintaining the integrity of the structure.
Over time, the wooden formwork can be dismantled and a concrete curb installed in its place.
How can rainy weather affect the quality of a concrete base?
Since the foundation is a multi-layer structure, the work will be long and requires special attention, accuracy and experience from the concreting specialist. Rain is not a serious obstacle to the preparatory stage - there are no special instructions for this case in the regulations.
But during precipitation, you need to pay attention to several nuances:
- Soil composition. The soil should not be oversaturated with water. Unlike crushed stone and sand, which conduct liquid well, clay retains it, so it is better not to ignore this point.
- Method of pouring concrete. If the foundation has a complex non-standard shape, you will have to use construction vibration equipment for continuous pouring. But a large amount of precipitation can interfere in this case.
Cement is a hydraulic binder; it gains strength much faster under certain conditions: with air humidity levels of at least 80%. Therefore, some experienced builders believe that light rain or humid, cool weather will only benefit concrete: it will harden faster and this will increase the strength of the building.
Groundwater repair and restoration
If during the inspection it turns out that the water seal is not working, then it can be repaired. When the upper part of the lock has peeled off and a gap has appeared between the clay and the ring, as well as in the ground, it means that the well has shrunk, and you can get by with repairing the upper part. To do this, you need to dig out and remove the clay to a compacted area. Compact the layer again and add the required amount again. For repairs, it is better to use new clay, fatter than before.
If it is clear in the shaft that groundwater is flowing through the butt joints, then the entire castle must be repaired. Here you will have to do everything again. Completely remove the clay from the trench and fill it with new clay. Of course, you can try to use the old one, but in this case it needs to be thoroughly processed (soaked in water, mixed with slaked lime).
Is it worth starting work if it's raining?
You can ignore the drizzling rain, but if the weather forecasters promise heavy rain, it is better to postpone the work to another day. The optimal time of year in this case is autumn, but the risk of frost has not been canceled. Violation of the temperature regime entails stress in the unhardened concrete and freezing of the liquid. The concrete becomes loose, riddled with many microscopic pieces of ice, and cracks appear over time. Antifreeze additives will help avoid this situation.
Recommendations and features of concrete work in the rain
It is impossible to carry out concreting with bare hands, so you need to prepare the equipment in advance according to the list:
- A metal bucket, a shovel, a mixer or a concrete mixer, a wide container for stirring the composition. If the structure is large, it is a mesh.
- A piece of thick plastic film of a suitable size to cover first the finished solution, and then the poured structure.
- An electromechanical vibrator that will help remove excess moisture, avoid internal voids and make the concrete surface even stronger.
- Supply channel (for transferring the solution to a height).
Technology for preparing concrete mix in rain:
- Prepare a covered shed in advance to prevent rainwater from entering the container with the solution. It can be made from films and covered with film. Whole pieces of slate and plywood will also come to the rescue.
- Pour one part of cement into the prepared container, then 1.9 or 2 parts of river sand, and mix all the components. They must be stirred dry.
- Pour in water (half the volume of the binder). During rain, the amount can be reduced slightly.
- Add 3.9 parts of gravel (these are the proportions that will help you get concrete that has high strength and can withstand heavy loads).
- Stir the contents for 10-15 minutes.
The next stage is filling:
Place waterproofing material into the prepared frame. It will prevent moisture from penetrating from below.- Install the reinforcing mesh inside the structure (at a distance of 5-6 cm from the edge). Secure the mesh parts with wire.
- The formwork should be covered, for which the film is cut into strips. The width can be any, depending on the size of the foundation itself (plus a small margin).
- The solution is not laid all at once, but in parts, as follows: a small section of the structure is freed from the film, filled with the prepared solution, and so on until it is completely filled. After some time, the mixture will “set”; rain streams will no longer cause damage to it, so the film can be removed.
The use of plasticizers with polymers in the base makes it possible to regulate the fluidity and increase the adhesion of mixtures with metal reinforcement in the composition of the concrete itself. Such materials make the foundation even more waterproof and durable.
Excess moisture can cause mold to form under the floor. Therefore, it is necessary to equip additional ventilation ducts: they can be done while pouring concrete or after drying. Part of the foundation for organizing communications is cut out with diamond drilling using special circles.
How to properly make a blind area around the house?
The installation process depends on the type of structure and the selected material. For example, when installing a soft structure, no additional work will be required, but when installing a hard one, you will need to lay several waterproofing layers. How to carry out installation correctly will be described in the following subsections.
Installation of a rigid blind area
It is recommended to install a rigid structure on a heat- and waterproofing layer, which will significantly extend the life of the structure. For these purposes, it is recommended to use heat-insulating materials that are highly resistant to moisture and have increased strength under significant mechanical loads. An example would be expanded polystyrene or foam boards.
Installation of formwork and waterproofing
Attention! Before laying the insulation, it is necessary to install formwork, for which it is recommended to use boards lined with a waterproofing film from the inside. This solution will prevent the absorption of moisture from the subsequently poured concrete solution and it will be able to gain design strength. Otherwise, the dehydrated parts will become brittle and the service life will be significantly reduced.
To understand the technology of pouring a blind area around a concrete house, how to make formwork and what sequence of actions to follow, you need to read the step-by-step instructions. It looks like this:
- We install the first slab from the corner of the building along the wall, checking the correct position using a building level.
- We fix the insulation onto a suitable type of fastening, pressing it tightly against the wall.
- We install the next one butt to the first plate with a minimum gap.
- We secure the slab and carefully seal the joint with construction foam.
- Similarly, we lay the entire perimeter of the walls with heat-insulating material.
Attention! If the blind area is installed in the northern regions, then it is recommended to lay two layers of insulation with ligation of the joints of the two layers. This will avoid the formation of cold bridges.
Installation of polystyrene foam boards
Before pouring concrete into the formwork, it is necessary to lay the reinforcing mesh. For these purposes, ready-made meshes with a rod diameter of 8-10 mm and a cell size of 10-15 cm are used. It is important to lay them in such a way that the steel rods are in the concrete layer. To do this, you need to use special plastic supports.
It is recommended to fill the structure with concrete mortar grade M400 or higher, and at one time, so that the structure acquires maximum strength. Therefore, you need to calculate the approximate volume in advance and order the solution in the required quantity at the cement plant.
Pouring concrete
When pouring, it is important to create a uniform layer, for which you carefully smooth the concrete over the surface using a shovel or mop. Additionally, the solution must be stirred to remove air bubbles from the layer. After driving the layer to the level of the edges of the formwork, it is necessary to level the surface as a rule. The side parts of the formwork will serve as guides.
Leveling the blind area
At the final stage, the surface of the blind area must be sprinkled with a thin layer of cement. To ensure ideal conditions for concrete hardening, you will need to cover the entire top part with a layer of polyethylene. Every day it is necessary to moisten the surface with water. The curing time is 28 days depending on the temperature and humidity of the environment.
Installation of the rigid blind area is completed
Installation of a soft blind area
The soft blind area around the houses is laid on a waterproofing layer laid on top of a sand cushion. It is recommended to use rubemast as an insulating material, which has an increased service life. Laying is done overlapping at a distance of 10-15 cm not only along the main surface, but also on the walls of the main building. The connecting seams are sealed with bitumen under the heat of the burner.
The laying of the crushed stone blind area is completed
On top of the waterproofing it is necessary to pour a 10 cm layer of a dry mixture of sand and crushed stone in equal proportions. Then the surface should be thoroughly compacted and leveled. In this case, it is imperative to maintain the angle of inclination. Another layer of crushed stone with a grain size of no more than 5 mm is laid on top of the embankment and also compacted.
DIY semi-rigid blind area: step-by-step instructions
Is it possible to create a semi-rigid structure on your own in the absence of suitable experience? The task is completely solvable and you can create a reliable blind area with your own hands - step-by-step instructions will allow you to go through all the stages without errors. It is installed directly on a prepared sand-crushed stone cushion, on top of which an additional layer of sand 8-10 cm thick is poured. To paving paving slabs, it is necessary to study the layout of the elements in advance, and also choose the direction of laying. In this case, the layout can be absolutely any and not limited by anything. The main requirement is to create joining seams that are minimal in thickness.
The installation technology step by step is as follows:
- The first tile is placed on the leveled base.
- Using a mallet, its surface is gently tapped to ensure reliable fixation.
Laying tiles with leveling
- It is necessary to control the angle of inclination with a level to prevent distortion.
- The next tile is placed end-to-end with the previous one.
- To level, it is necessary to lay a wooden plank on the surface of the tiles and, by tapping, achieve their correct location.
- If there is subsidence in one of the corners of the tile, then you need to add a little sand and repeat the leveling using a mallet.
- If you need to cut tiles for laying under the wall of a house or along a border, you need to use a grinder.
- We lay paving slabs over the entire area of the blind area.
Laying tiles on the blind area is completed
What grades of concrete are best to use?
When planning to build this or that building or structure, you probably took the time and studied the characteristics of the most popular brands of cement on the market, and remembered that compositions of higher grades are also more stable. Choose brands with an index of 400 and above. Such compositions help to carry out the pouring procedure with greater comfort, without worrying about the long hardening of concrete. However, be prepared for the fact that the cost of such material will be high.
Concrete grades differ in several parameters: strength, hardening time, resistance to low temperatures and granularity (the drying speed of the finished mixture depends on this indicator).
When to finish the base?
Finishing the base above the blind area
Usually it is recommended to do the blind area as the very last thing, after finishing the base. But these tips go back to the times of Khrushchev-Brezhnev mass construction, when plinths were, at best, plastered. And now, for example, how to make a waterproof thermal joint between the blind area and the base, trimmed with relief stone or base siding?
Taking into account the use of modern finishing materials, the base of the building should be finished after installing the blind area. It won't get worse, it will only get better. Look at fig. In the place marked with a red dotted circle, above the thermal seam, the finishing of the base forms a small cornice - a teardrop. Now only a tropical hurricane can drive moisture into the seam.
What happens if it rains after pouring concrete?
If, upon returning to the construction site, the bucket with cement mortar is filled with water, do not panic. The fillers are heavy, so they sink to the bottom, and the water rises to the top, that is, the liquid does not mix. You just need to pour out the excess water and mix the mixture properly.
But if the foundation pit is flooded with water, the work should definitely be stopped. It will be difficult to make a high quality base. If possible, you need to drain the pit using a drainage pump or wait until the water leaves the pit on its own.