Here you will learn:
- Eight ways to increase efficiency
- Integrated approach and technical solutions
Traditional potbelly stoves are not characterized by the highest efficiency. Up to 30-40% of the heat they generate flies into the chimney. Simple technical devices will allow you to increase the efficiency of a potbelly stove. In this review, we'll look at eight ways to increase the efficiency of these furnaces. They differ in level of complexity, but all work is done with your own hands using auxiliary tools. Let's go through these methods in more detail.
Obvious advantages of a potbelly stove
In its design, a potbelly stove is an ordinary stove; it is a very simple design, the operational efficiency of which has been proven by a huge number of its uses. That is why furnaces operating on mining have still not lost their demand. Do-it-yourself potbelly stove drawings and their subsequent implementation is an activity that everyone can do.
Modern manufacturers, in some cases, still produce factory models that can please the demanding owner. Potbelly stoves made by the owners themselves are often used. It should be noted that ratings from users of such models are much higher than ratings of factory models that owners purchase.
The following is a list of the most significant characteristics of a homemade heating device; this information will help to form a list of those points that you must pay attention to in the process of creating a potbelly stove.
The main positive characteristics are the following:
- Simplicity. The design of a potbelly stove is extremely clear; a craftsman of any level of training can build it using available materials and tools.
- Mobility. The final product is very compact, given that it contains a fairly large thick sheet of metal or lining.
- Heating efficiency. This is facilitated by metal walls. For this reason, a potbelly stove is suitable for a summer house or garage.
- Budgeting. Both furnace parts and fuel are low in cost. Plus, potbelly stoves often work during mining.
When asking the question “How to make a potbelly stove with your own hands,” you need to be aware of a number of disadvantages of such a device. Due to the limited degree of heat capacity, it warms the room only at the moment of combustion itself. In addition, you need to behave extremely carefully near the stove, because its walls get very hot during operation.
Types of devices
Among air types, the classic model for self-assembly is a tubular heat exchanger. But there are also a large number of other types. They remain relevant for chimneys of long-burning stoves, small-sized potbelly stoves, and stoves undergoing mining. Their heat converted from combustion energy is called dry heat. Pipes can be welded to the firebox horizontally and vertically. Vertical localization is many times more effective because the air flows better through the channels. The material is usually steel.
Another type of heat exchanger is a pipe that wraps around the firebox. For proper heat transfer, 2-3 curls are required. They move apart a little, increasing the heating area. The performance corresponds to the difference in the level of inlet and air supply. The draft corresponds to the temperature difference, so the hole for the fence is often exposed to the street.
Coil
Partitions in the housing are also a type of heat exchanger. The characteristic labyrinth is constructed from vertical metal plates. The optimal thickness of each part is 6-8 mm. The inlet and outlet openings of the air duct are formed opposite each other, and a cover is welded on top to seal the housing.
Partitions in the housing
The next option is pipes that pass through the firebox. The structure is constructed already at the stage of assembling a home-made device, before welding the walls. The channels are located parallel at the same distance. The cross-section of the pipes is not less than 50 mm.
Pipes through the firebox
In vertical channels, air moves more actively, therefore increasing productivity. Less commonly, horizontal channels or partitions are appropriate. Any described scheme is suitable for design, provided you have welding skills.
Material used to create the furnace
In the manufacturing process, high-quality steel is often used, less often and in special cases - cast iron. Depending on the type of metal, elements from natural stones are added or not.
Cast iron provides fairly low heat capacity, the material is difficult to find in the public domain, and it is also difficult to use for cooking. This is the main reason why the choice falls on steel; it lends itself to deformation during operation much more readily.
In this case, the further service life of a self-made gas stove depends on the thickness of the material.
When assembling a device for use in rare special cases, such as in the event of a failure with the heating system, it is better to shave iron with a thickness of 1 mm.
To create a stove, you will need factory-made fittings; standard doors, valves, burners and grates will do. If desired, these parts can be made by hand from steel.
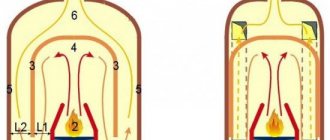
Economizer Fehringer
The device is used to improve efficiency. It works by extracting heat from the chimney. It has 4 pipes, 60 mm each, with spiral-shaped swirlers.
The passing gases from the smoke swirl, resulting in maximum heat release. The device is made of black steel. It is designed for the entire period of operation of the stove. It allows you to quickly warm up the steam room.
Feringer is valued by bath lovers as one of the best models. They are produced in different versions, but in two main categories:
- Steam - the heater is closed, creating a steam room atmosphere - temperature up to 50-70 degrees, humidity reaches 40-75%.
With closed heater
- Golden ratio - the heater is open, suitable for saunas, where at a temperature of 80 degrees, low humidity is needed - 10-15%.
With an open heater
Since 2011, the company has developed a new line - Lamel. It has a natural stone cladding and small innovations in the design that allow you to confidently heat log steam rooms.
Lamella
The system for securing the decorative stone of the stoves is unique - a holder is installed on the cut plates of the stone. Its hooks are fixed in a groove. The design is simple, at the same time very effective, installation work is simple, it will take no more than 1 hour.
Case: material and shape
If you decide to carry out the work process according to a drawing or photo, then you need to use a metal sheet, which is then cut out. In addition to this you will need:
- square pipe;
- rods;
- fittings;
- necessary corners;
- molded profiles.
The above will be needed to create a furnace body. Thanks to the rectangular shape and the presence of planes, the stove will have all the ergonomic properties, that is, the stove will be extremely stable, the process of processing and covering it will be extremely simple. The stove will be extremely easy to attach to any other structure or part.
For the base, you can use existing metal products, such as a box or any other cabinet product. Often objects have the shape of a cylinder: a can, a cylinder, a large pipe.
The work process will also include welding. Drills, bolts and screws are useful only if the thickness of the metal is not particularly large.
It doesn’t matter at all which model the master chooses. Although the work seems simple, you need to have a drawing in any case.
Air convector
There is not always enough finance to purchase a ready-made heat exchanger. In principle, it is not difficult to make a heat exchanger for a heating furnace. For this, copper and aluminum are used; if desired, you can completely do without welding. With proper preparation and accurate calculations, the budget is significantly saved.
First, a location is selected, parameters are calculated, and you need to decide what material to choose to make the heat exchanger. You can build a structure from an old cast iron radiator, a radiator from a car. The main thing is to take into account the conductivity of heat. It is also important to think over a set of tools, prepare everything in advance, each detail makes installation much easier.
Assembly must begin with drawing up a drawing taking into account the dimensions. If the stove is weak, a disproportionately large heat exchanger will do harm. When using copper for the coil, its length is maximum 3 m. The speed of heating depends on the length of the pipe and the number of curls. It is important to remember that distortions reduce the life of the equipment.
Air convector equipment
To twist the pipes into a spiral, a template is required. This is any available part in the shape of a cylinder. Its diameter must fit into the size of the firebox.
The sequence of actions is as follows:
- bend the pipe, wind it around the workpiece to form a spiral;
- keep the dimensions to fit the coil;
- the average design power of the heat exchanger is 1 kW per 10 m2.
Work on the combustion chamber
A larger oven size will provide more heat. This means that the bottom of the chamber will require a lot of space. But in the future it will be possible to conveniently place firewood there. This determines the required shape of the stove: cylindrical, laid on its side.
Even a rectangular oven must still be horizontal. Verticality is only possible with a particularly large size.
Why modernize?
The potbelly stove is a very simple heating device, although today it is deeply modernized. Such a stove, which has become a favorite solution for heating small country houses, can have not only a single-chamber, but also a two-chamber design. A modernized potbelly stove can provide heat even to houses where residents live permanently.
The simplicity of design and manufacture makes it accessible to purchase and use. In addition, a significant advantage for the construction of such a structure is the absence of a foundation. But, despite so many positive properties, the potbelly stove also has significant disadvantages:
- Its efficiency is quite small, the simplicity of the design carries with it an inherent drawback - a huge part of the heat from the potbelly stove “flies into the chimney”.
- To work with such a stove, strict safety requirements must be observed, since falling combustion elements can damage nearby premises and even lead to a fire.
- To heat a room with a potbelly stove, it is necessary to consume a significant amount of fuel elements, which is due to the fact that this type of heating is used only for short-term operation.
But this is not a reason to be discouraged; over the years, our “Kulibins” have found several simple but effective ways to increase the efficiency of a potbelly stove. In this article we will look at the modernization of the stove design itself.
The process of working on the ash pit
This element is present from time to time, since ash can be removed directly from the space of the fuel chamber. You will need holes in the door to supply air.
If you plan to have a stove with a garage for an ash pit, then the stove is given the shape of a box. This will avoid using the combustion chamber area. The metal will be thin. Welding is also not needed, screws will suffice.
How to maintain a constant temperature?
When wood or coal burns out, the heat transfer rates of the stove are significantly reduced, and after a while the structure completely cools down. To reduce fuel consumption and maintain the set temperature, experienced stove makers advise using the following methods:
- place side metal screens next to the potbelly stove (no closer than 5-6 cm) to additionally heat the room due to the circulation of warm air,
Protective screens
- The heat can be retained much longer by the structures in the metal casing,
- To reduce air circulation, it is important to place logs in the oven as tightly as possible. If coal is used as fuel, the ash should be stirred up as little as possible,
- by placing a metal box or bucket of sand on top, even after extinction, the accumulated heat will be evenly distributed throughout the room.
Pour sand into the bucket or box and place it on top of the stove - To preserve heat, you can line the potbelly stove with bricks (in 1-2 layers), but not tightly, but at a distance of 5-7 cm, leaving gaps for ventilation.
Door and openings
These parts are most often metal, made from residual material after the main work. Welding will be needed to attach the parts to the body. It is extremely important to install a locking device. This could be a deadbolt or a latch.
For openings you need to know the dimensions according to the standard: firebox - 250x50 mm; blower - 100x250 (width by height). Canopies at a distance of 10 cm.
Ensuring heat removal
It is possible to increase heat removal by creating devices that promote natural and forced convection. To ensure natural air circulation, screens are made with a guide device that allows you to create a powerful convection flow and distribute it throughout the room. The guide apparatus is made in the form of curved strips of metal, welded to the screen and directing warm air not only upwards, but also to the sides. The prepared device is attached to the oven.
The heat removal device can also be made from scraps of water supply and profile pipes. The distance from the floor to the bottom edge of the elements must be at least 15-20 cm. The pipes are welded to the stove body and covered with a screen on the sides to protect against accidental contact. A traditional potbelly stove heats the air around it by 0.5-1.0 m, and the use of such a design allows you to increase not only the radius, but also the rate of temperature rise in the room. When the body of the heating device is heated above 60 °C, a stable convection draft appears in the device, the power of which increases as the temperature of the furnace increases.
Heat removal can be increased by using fans to blow over the heat transfer surface. Both household and old car fans are used. Devices with variable rotation speeds have proven themselves especially well. They allow you to regulate the temperature and heating time of the room in various oven operating modes.
For more efficient blowing of the furnace elements, special casings are installed that allow cold air to be directed to the hottest areas of the heating device, while it can be taken from various places in the room. A potbelly stove with pipes welded into the firebox for heating air has proven itself well. A multi-speed car fan installed on a common discharge manifold allows you to effectively heat the room.
The combined use of devices for artificial airflow and natural convection can significantly increase the efficiency of a potbelly stove, which means heating the room more efficiently.
Smoke outlet
For this you need a pipe with a diameter of 150 mm. It will be constantly involved in thermal conductivity, so it requires steel and no insulation. The pipe is mounted on the side or on the stove. Pipes inside the house go along long lines and to the farthest point. This will increase the amount of heat received.
Following the information on the drawings, chimney pipes must always be equipped with valves (rotary or along a guide). With them you can influence the process of warming up and smoke removal by closing the chimney at the time of combustion.
Heat exchanger from a cylinder
To use already exhaust gases for additional coolant in the heat exchanger, you need to slow down the exit of smoke by creating a barrier in the chimney. For construction you will need three empty gas cylinders, sheet metal and scrap metal. The sequence is:
- Build a firebox from a cylinder - cut out the top so that the diameter of the hatch reaches 200-250 mm.
- Mark a rectangle measuring 50 by 20 cm on the wall, apply a mesh with cells 30 by 40 mm. Make holes in the crosshairs.
From a cylinder
- Build an ash pan slightly larger than the area with the holes. It must have a lid. This is a collection for ash. Supports are welded to the wall at the corners.
- At a distance of 4 cm from the bottom of the cylinder, at the rear wall of the firebox, a hole is first marked, then a hole 3 cm smaller than the cylinder itself is cut.
- It is better to make the door for the firebox from the head of the second cylinder, cutting a hole in the center of it. A piece of pipe with a diameter of 7.6 cm, equipped with an adjustable damper, is attached to the hole. The mobility of the sash is supported by hinges and locks of inventory drawers.
Balloon frame design
- Construction of a heat exchanger from the second cylinder. Make 3 bulkheads from 4-5 mm metal so that they cover the internal size of the cylinder. They cannot fit around the edges of the hole according to the diameter of the chimney pipe and for a margin of another 2 cm.
- Cut off the bottom of the cylinder, cut it in the shape of a fit on the firebox at an angle of 90 degrees.
- Cutting a hole for the chimney in the valve part.
- Installation of the bulkhead - holes in a checkerboard pattern.
- Installation of the heat exchanger, scalding, welding of the pipe.
Combustion enhancement parts
The photo of a self-made potbelly stove shows all the elements. In order for the combustion process to be long, in addition to the pipes, a suspended load is useful. A metal pancake is suitable for these purposes.
The video of making a potbelly stove with your own hands also discusses all the points that need to be taken into account. By sticking to the plan, the desired result will be quickly achieved.
Ensuring heat removal
It is possible to increase heat removal by creating devices that promote natural and forced convection. To ensure natural air circulation, screens are made with a guide device that allows you to create a powerful convection flow and distribute it throughout the room. The guide apparatus is made in the form of curved strips of metal, welded to the screen and directing warm air not only upwards, but also to the sides. The prepared device is attached to the oven.
The heat removal device can also be made from scraps of water supply and profile pipes. The distance from the floor to the bottom edge of the elements must be at least 15-20 cm. The pipes are welded to the stove body and covered with a screen on the sides to protect against accidental contact. A traditional potbelly stove heats the air around it by 0.5-1.0 m, and the use of such a design allows you to increase not only the radius, but also the rate of temperature rise in the room. When the body of the heating device is heated above 60 °C, a stable convection draft appears in the device, the power of which increases as the temperature of the furnace increases.
Heat removal can be increased by using fans to blow over the heat transfer surface. Both household and old car fans are used. Devices with variable rotation speeds have proven themselves especially well. They allow you to regulate the temperature and heating time of the room in various oven operating modes.
For more efficient blowing of the furnace elements, special casings are installed that allow cold air to be directed to the hottest areas of the heating device, while it can be taken from various places in the room. A potbelly stove with pipes welded into the firebox for heating air has proven itself well. A multi-speed car fan installed on a common discharge manifold allows you to effectively heat the room.
DIY potbelly stove photo
What to drown with
In general, a potbelly stove can be heated with anything, wood, oil, coal, etc. When considering tree species, many prefer oak. Dry wood from this tree can add about two more degrees of heat when burning.
If you're worried about cleaning up the ash, you're in vain. The resulting bedding at the bottom of the stove from coals and ash will not only protect the bottom from burnout, but also what remains as coals during the first fire will burn out the next time. Accordingly, the combustion percentage increases.
Using simple ways to modernize a potbelly stove that you made with your own hands or bought in a store, you can achieve its maximum, but at the same time correct operation. To improve the device and increase efficiency, you do not need special skills or large financial costs.