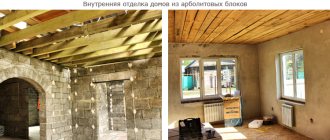
Currently, with the development of scientific and technological progress, an industry such as construction has begun to improve. Today, construction stores have a wide range of different building and facing materials, one of which is decorative plaster. But sometimes people do not know the technology for applying it, as a result of which it begins to chip off or even fall off in pieces. To prevent this from happening, you need to know which surface it can be applied to and which it is not recommended.
Is it possible to glue wallpaper onto plaster?
Surface plastering is a procedure for leveling the building base for subsequent decoration. Wallpaper is most often used as a finishing coating. Since in most cases homeowners carry out the restoration of the premises with their own hands, the craftsmen have a question - how to put wallpaper on plaster? To do this, it is recommended to adhere to some rules for decorating the surface. In this case, you can count on high-quality and durable finishing.
When is it wrong to glue wallpaper onto plaster?
Whether or not you can glue wallpaper onto plaster depends on what composition was used to level the surface:
- Cement based material. It is not recommended to apply wallpaper to such a composition without prior puttying. This is explained by the fact that the cement product has a granular structure, so after hardening the surface becomes rough. If you paste wallpaper onto such a base without puttying, then small imperfections in the form of roughness and bumpiness will appear on the surface, which will negatively affect the appearance of the finish.
- Gypsum based material. In this case, it is not recommended to glue wallpaper onto plaster due to the lack of moisture resistance of the composition. Gypsum quickly absorbs moisture and has the ability to draw liquid from any composition, including wallpaper glue. As a result, after a certain period of time, the decorative coating will lag behind the surface, which will necessitate repeated restoration of the walls.
Wallpapering plaster is also not recommended if thin, light-colored material is used. As a result, the color of the base will appear through the wallpaper. There will be a feeling that stains have appeared on the wallpaper, which will cause the finish to lose its attractiveness.
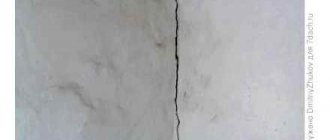
Another reason why you should not wallpaper plaster is cracking of the surface of the building base. After some period after finishing, such a defect appears on any type of surface. This leads to a lag in the wallpaper and a loss of visual appeal of the finish.
Based on this, before wallpapering it is important to prepare the surface. This will increase the service life of the finish and preserve the aesthetic appeal of the finish coating.
Copper tape instead of brass
The trend for metal accents in the interior has been around for several years now, and one of its formats is brass profiles or strips that are used in wall decor. The shiny finish looks very beautiful and expensive - and costs the same: a brass profile can be found on average for 1,900 rubles per 2.7 meters, and stripes for 380 rubles per meter. In addition, this technique requires high professionalism and pedantry from builders, which is why designers do not actively use it in their projects.
Glue selection
Before wallpapering walls, you need to choose an adhesive. The quality of the finish also largely depends on this material. The choice of product depends on the type of wallpaper for which the composition will be used. So, for a regular paper finish, PVA glue is suitable. For other wallpapers, it is recommended to use special material.
Price is not the main selection criterion, but cost should also be taken into account when purchasing a product. Professionals do not recommend choosing cheap glue. As a rule, such material is of low quality. It is also not advisable to buy an expensive composition. It is recommended to choose material in the mid-price category.
When purchasing, they also pay attention to the manufacturer. Professionals prefer only well-known brands, since popular companies value their reputation and supply quality products to the market.
Decorative sides
Typically, such sides are used to decorate walls with 3-D panels along the entire perimeter or along the sides. The sides are matched to the color of the main coating, but can also be contrasting.
Such elements are well suited for joining panels with other materials. The junction will look more aesthetically pleasing and neat. There are sides of different widths on sale, and the widest of them can serve as independent interior decor.
Edge for table top
When can you glue wallpaper onto plaster?
Gluing wallpaper onto plaster, video tutorials confirm this, is possible if there is no time to carefully prepare the surface and when the aesthetic side of the reconstruction is not of great importance. In such situations, finishing rules are neglected. However, in order for the decorative coating to last for a long period, it is recommended to follow the technique of wallpapering plaster:
- the surface is cleaned with an industrial grater to get rid of roughness and other flaws;
- several layers of wallpaper glue are applied to the construction base with a break for drying;
- After the last surface treatment, wallpaper is immediately applied.
This finish will not last for a long period, but will save time on puttying.
Application of non-woven and liquid wallpaper to plaster
Is it possible to glue non-woven wallpaper onto plaster? This is another question that interests non-professional finishers. This material has a denser structure than a paper product. However, even such wallpaper will not hide the graininess of the cement plaster, and the gypsum product will also absorb the glue water. For this reason, it is recommended to glue non-woven material onto putty only after plastering.
Liquid wallpaper should also not be applied directly to a plastered building base. To prepare such decorative material, water is used, which negatively affects the plaster, destroying the product. For this reason, before applying liquid wallpaper, the surface is treated with water-based paint. After this they act like this:
- Knead the decorating material. To do this, place the product in a clean container and fill it with water. The proportions are indicated on the packaging. The solution is mixed using an industrial mixer or a drill with a mixer attachment. The product is left to mature for 15 minutes and the product is stirred.
- The material is placed on a wide spatula using a narrow spatula. The composition is distributed over the surface. It is recommended to treat all walls at one time. The layer of material should not be thick. The product is immediately leveled with a spatula so that there are no defects. To apply the solution, you can use a special tool that is sold in hardware stores. In this case, the hardening period of the material will be 3 days.
- After applying liquid wallpaper, you can structure the surface. To do this, the perimeter of the building base is treated with a textured roller. Next, the surface is painted or left unchanged.
Sealant
This tool is suitable for eliminating a joint if the edges of two materials fit perfectly together and their texture is similar. In such a situation, you can make the joining line invisible using a sealant of a suitable color or a transparent composition.
Important! The sealant is best suited for combining tiles, mosaics, porcelain tiles, and panels.
Sealing the joint with sealant
It can be used even in damp rooms. True, it will have to be replaced periodically, since the service life of the material is only 2-3 years.
Is plaster suitable for gluing?
- Cement plaster. The diluted material has a heterogeneous granular structure. After application and hardening, the plaster acquires a rough, bumpy surface. If you attach wallpaper without putty, especially thin wallpaper, then all the imperfections of the uneven base will be visible through it. In addition, the mixture is dark in color. Because of this, the appearance of the wallpaper may deteriorate. The plaster mixture will simply be visible through thin wallpaper, especially if the wallpaper is translucent. Cement mixtures are also capable of absorbing moisture. When applying wallpaper glue, moisture from it can quickly be absorbed into the plaster, which will lead to poor quality of gluing. After getting wet, the plaster darkens unevenly, becoming stained throughout the wet area. This type of mixture is often used in new buildings.
- Gypsum plaster. The solution also has moisture absorption properties. Therefore, the wallpaper will not stick to the surface in the best way. And after a while they will begin to peel off completely and disappear completely. Often the surface of the gypsum is even and close to smooth. Therefore, there is no need to particularly level the surface. You just need to treat the gypsum base with a primer.
- Decorative plaster. The material is intended to create a finishing coating. Not intended for mounting on top of other finishes. You should not even try to glue trellises if the decorative mixture forms a relief surface after drying. Thick wallpaper on a non-woven or vinyl base will not be able to hide the relief of the finish.
Obviously, it’s better not to start gluing wallpaper without putty if the result is to get a perfectly smooth, predictable finish.
Otherwise, without puttying, the following problems may arise:
- Plaster tends to crack over time. Voids are formed, which lead to peeling of the canvases and even ruptures if the discrepancies are large.
- Thin canvases will show the rough material through, which will distort the overall appearance of the finish.
The most suitable plaster in this case is considered to be gypsum. After treatment, the surface turns out to be smooth, and in order for the wallpaper to stick firmly and for a long time, the hardened plaster will need to be primed. This achieves a reduction in liquid absorption.
Features of plaster
The modern market offers a wide range of both plaster solutions and wallpaper. All of them are very heterogeneous in their technical characteristics and texture. Most often, wallpaper is glued to concrete walls without plaster. To correctly answer the question whether it is possible to glue wallpaper onto plaster without putty or not, you should take a closer look at all available types of plasters and wallpaper. Plaster mortars can be classified according to several criteria:
- Composition of the mixture components.
- Application area.
- Purpose.
Scope and composition
According to the area of application, all plaster solutions are divided into compositions for external and internal finishing. There are increased requirements for plasters intended for finishing the external walls of a building. They must be resistant to ultraviolet radiation, withstand winter cold, summer heat and high humidity.
For interior work, compositions are intended that are less resistant to external influences - dampness and temperature changes. From the point of view of gluing wallpaper on plaster, it is the latter version of the mixtures, intended for interior decoration, that is of interest. The table shows the recipes for various plaster solutions.
The composition of the mixture for plastering interior spaces can include a variety of components. Quartz sand of various fractions, mineral additives, and decorative elements are used as fillers. Cement, gypsum, lime, clay, and polymer additives can act as a binding component.
The most common types of mortars are based on cement and gypsum. They can be made with your own hands at home, adhering to the proportions recommended by SNiP, or purchased at a hardware store in the form of a dry mixture.
Purpose
According to their purpose, all plaster compositions can be divided into the following groups:
Decorative plasters
Decorative compositions are ready-made or dry mixtures for finishing walls. They come in two varieties: textured and textured. In the first option, the wall surface is plastered in the usual way, and the decorative effect is achieved by giving the treated surface a relief with special stencil rollers, a sponge, a trowel, etc. Thus, “rain”, “Leonardo”, “fur coat” plasters, etc. are obtained.
Venetian plaster
Another type of decorative plasters is textured, the main feature of which is an exquisite pattern imitating polished marble, granite, amber, jasper, etc. This finishing material has another name - Venetian plasters, after the place of its invention. In addition to binding components, their composition includes a crushed fraction of natural minerals.
It is, in principle, possible to paste wallpaper onto decorative plaster if it is a Venetian mixture. The technology of its application provides for ideal smoothing of the surface, up to a glossy or matte shine. In this case, puttying the surface to level it will be completely unnecessary.
Before gluing wallpaper onto Venetian plaster, you should, on the contrary, take all measures to increase the adhesion of the base. If the walls are plastered with textured compounds, then it will be completely impossible to paste wallpaper on them due to their relief. It will also be very difficult to putty such plaster and the best way out in this case is to completely remove it.
The cost of decorative compositions compared to conventional plasters is very high, so using such mixtures as an underlying layer for wallpaper is simply not feasible from a financial point of view.
Leveling
This group includes mixtures intended for purely utilitarian purposes - leveling walls. They can be very different in composition, but most often there are mixtures where cement and gypsum act as a binder. Such plasters have a low cost, a wide range of applications and are easy to apply. You can also find polymer-based mixtures on sale - they are more expensive, but they are plastic and resistant to external influences. All leveling compounds are divided into base, starting and finishing.
Basic leveling plaster
Basic compositions are intended for rough leveling of walls that have large deviations from the norm horizontally and vertically. Such compositions are produced based on cement and filled with coarse sand or a fine sand-gravel mixture. As a result, a wall coated with base plaster has a rough-to-the-touch surface with numerous irregularities.
In this case, it will be simply impossible to glue wallpaper onto plaster without putty. Not only will their surface become grainy, but it will not be possible to achieve high-quality adhesion of the canvas to an uneven surface.
Finishing compounds are intended for processing relatively smooth walls and removing small surface defects: cracks, chips, potholes. Finishing plasters are also applied to surfaces pre-treated with base mixtures. Such mixtures consist of gypsum, cement or acrylic, to which a finely dispersed filler is added.
Dry gypsum plaster
They have a finer texture and in this respect are closer to putties than to basic plasters. Wallpaper can be pasted onto the finishing plaster provided that the surface is well leveled.
Gypsum compositions
Special mention should be made about plaster mixtures based on gypsum. This raw material is most often used in the manufacture of finishing compositions and allows you to obtain smooth surfaces. As a result, you can glue wallpaper onto plaster without putty or other leveling treatments. This binding material has one big disadvantage - it is afraid of dampness. As a result of its hygroscopicity, gypsum tends to absorb moisture and retain it. When applying a large amount of wallpaper glue, the plaster compositions become wet, lose their quality and can peel off from the wall. In this regard, the question often arises: is it possible to glue wallpaper onto gypsum plaster without first applying putty?
Textured
In contrast to a smooth texture that does not have much variety, textured decorative plaster proudly takes on noble rocks.
The use of such texture undoubtedly gives the living space a certain stately aplomb.
Decorative plaster in the hallway looks especially advantageous. Tenderness, warmth, comfort - what other words come to your mind when you look at such an interior in front of you?
Not an example, but a real revelation in the context of modern design art. The texture most closely resembles the skin of a crocodile that went to the next world a couple of hours ago. This option is most suitable for apartments and houses furnished in the Art Nouveau style.
Pleasant to the eye decorative plaster with a vertical texture that significantly expands the narrow space of the hallway. The wood texture significantly enriches the room.
The natural rocky structure in any of its manifestations - in tiles, plaster or any other type of material - always attracts attention with its impressive execution.
Another option for plaster in the hallway. A somewhat harsh imitation of stone blocks favorably mirrors glossy stretch ceilings, creating an impressive design composition. The owners of this room are definitely not afraid to experiment with texture and strive to move away from popular color schemes. Which in itself is not bad and at least arouses interest and respect!
The renovation is not yet complete, but its results are already clearly visible.
A striking example of how well ordinary structural plaster can be combined with other materials, for example, with decorative stone or plaster.
When and how can you stick wallpaper on plaster?
Some manufacturers of building materials indicate in the description of mixtures that their plasters do not require further putty. This statement is partly true. But still, the plaster coating is not a finishing layer, so it is advisable to use putty before gluing.
If you do not need to obtain a perfect finish, then you can hang wallpaper without putty. The result will not be durable or visually perfect. But the finishing will be able to hold out for a certain time.
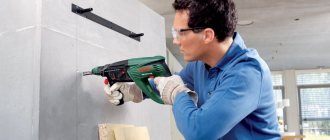
To stick canvases onto plaster, follow the algorithm below:
- Level the surface as thoroughly as possible. Attach coarse-grain sandpaper to a special holder or block. Start sanding until the surface is as smooth as it was originally.
- Treat the wall with a deep penetration primer to fill existing pores and strengthen it. Wait for the mixture to dry completely. Sometimes it may be recommended to do several primings. But as practice shows, there is no significant improvement from repeated impregnation of the base. But the consumption of the mixture, and therefore the cost of soil, also increases.
- Mix wallpaper glue and apply to the wall. Wait until it dries, then you can stick it on.
In some cases, before sanding, it is necessary to additionally smooth the surface with liquid plaster. As a rule, such work is required when the first layer has been applied according to the rule. Then the surface after hardening is not the smoothest. First you need to smooth out the unevenness and then clean it and cover it with primer.
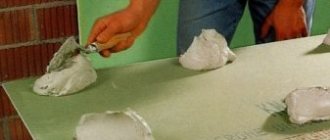
A little plaster mortar is prepared for smoothing. There is no need to knead a lot, since the mixture consumption is small. You need to achieve the consistency of thick sour cream. Mixing is done in a separate container.
To work, you will also need two spatulas - a small one and a wide one. The first tool is used to apply plaster to a wide spatula or directly to the wall. The second is needed to spread the mixture over the surface.
If there are noticeable protruding irregularities on the wall, then they must first be eliminated with sandpaper. Next, use plaster to level the areas that need it.
Wait for the time required for hardening, and then go over the treated areas again with sandpaper. This is how you finally get rid of unevenness.
You can ignore inconspicuous holes and depressions, 2-3 mm in size. Such defects will not greatly affect the finishing result.
Surface preparation
This is a necessary step before applying not only decorative plaster. The main task is the elimination of small and large defects. The surface is cleaned and brought to almost perfect smoothness.
It is worth addressing some important points. After studying them, the process of applying the composition will not cause any difficulties.
- No other work should be carried out in the premises. New windows and doors are installed, and ceilings and floors are finished. This must be taken into account so that nothing spoils the design during the application of the decorative coating.
- Insufficiently dense walls are treated with a restorative primer. This helps strengthen the surface and acts as a protection against dampness.
- To avoid cracks, it is recommended to putty the joints. Each layer is covered with deep penetration acrylic primer.
- Fine sandpaper is used for sanding.
- Each applied layer must be thoroughly dried.
For finishes with large relief, there are not many rules for preparation. Minor irregularities are allowed. Many formulations hide them without problems.
The surface material also affects the preparation conditions. For example, some coatings have many pores that will take all the moisture from the finished mixture. This will noticeably spoil the quality. Such pores need to be closed by applying several layers of primer on top.
What to do if there is no desire or opportunity to prepare the walls
- Even if you decide to glue wallpaper on unprepared walls, you should understand that in any case you need to clean the walls of all excess and prime them.
- The primer doesn't cost that much money, but thanks to it your wallpaper will stay firmly on the walls and won't peel off.
- The primer forms a good layer on which it is easy to stick wallpaper or apply any other decor.
- If you glue wallpaper to dusty walls, then most likely the wallpaper will come off in some places and you will need to re-glue it or re-glue it altogether.
Venetian
All the features of rocks are brilliantly conveyed by “Venetian” - perhaps the most popular plaster in recent times. It is universal and quite varied, so you definitely won’t get bored after making this choice.
Not convinced? Maybe it will turn out like this: one of the most beautiful projects with the “participation” of decorative plaster, distinguished by the balance of the depicted details and an extraordinary atmosphere. Well-placed light creates a beautiful illusion of gilding on the walls. Most ladies will appreciate it, I suppose.
Not everyone knows, but plaster can be painted any color you like. Apparently, the owners of this hallway are well aware of this and have already managed to choose the right color based on temperature and shade.
What is natural is not ugly. And we will even say more: it’s wonderful. Probably, this amazing naturalness of the dominant pattern is where the special appeal of Venetian plaster lies.
An elegant and aristocratic version of the hallway. The room is bright, cozy and not the least role in this is the plaster applied to the wall.
Advantages and disadvantages of gluing on plaster
- No need to spend money on buying putty.
- Reducing repair time due to the absence of the puttying stage, but the need to have a high-quality surface is important.
- There may be visual defects in the rough finish, so it is advisable to prepare the wall and not choose thin, light, transparent wallpaper for hanging. The best option would be textured thick dark materials.
- The plastered wall must initially be smooth, otherwise there is a need for additional smoothing.
- You will have to use a lot of primer to reduce absorption.
Repair work
Below are step-by-step instructions that will help you re-hang the wallpaper. That is, the finishing is already there, but it is old and needs to be replaced.
To work you need the following materials and tools:
- putty;
- plaster;
- deep-penetrating primer;
- wallpaper adhesive mixture;
- level or plumb line;
- container for kneading the mixture;
- an industrial mixer or a regular electric drill with a mixing attachment;
- a set of spatulas – small and large wide;
- roller or paint brushes;
- grater (sandpaper attached to the holder).
Surface preparation
- Removing old wallpaper or other covering. You need to wet it well with water, spraying liquid from a spray bottle, or treating it with a wet washcloth. Next, wait a quarter of an hour until the wallpaper is well saturated and soaked. Afterwards, removing the coating will not be difficult. The wallpaper will peel off in large pieces. Pry up the canvas with a spatula, then rip it off. It is important to remove everything without exception. Even small pieces left behind can cause bubbles on the new coating. The tiles are removed mechanically using a chisel and hammer. Oil paint can be removed with a spatula after heat treatment with a construction hairdryer, or with detergents.
- Detection of weak areas of the coating. Lightly tapping the hammer over the entire wall, especially over visible flaws. Unstable, weakly adhering elements are removed. The resulting cavity inside is coated with primer and wait until the composition dries. Then the missing pieces are covered up.
- The wall is cleaned of dust and dirt. Grease stains are removed with solvents.
- Previously installed metal parts (nails, screws, dowels, etc.) are completely removed and the cracks are sealed. You can also hammer the elements inside flush with the surface. Or cut it with a grinder. It is advisable to additionally paint all metal objects with regular paint. Painting is done to prevent corrosion processes.
- If the wall as a whole is very curved, then it is recommended to make an alignment. An excellent option would be to use the Rotband brand.
- After completing the above steps, the surface is ready for priming. The primer is applied in two layers, each of which is possible only after the previous one has completely dried. To reduce the amount of glue absorbed into the surface in the future, you can add a small amount of PVA to the primer. An alternative to primer can be diluted wallpaper glue.
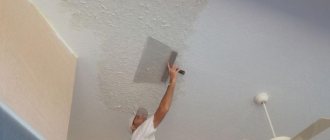
Puttying
- As indicated in the instructions, prepare the plaster mixture.
- Using a narrow spatula, the plaster is scooped out of the container and applied to a wide one. You can also immediately place the mixture on the wall.
- Using a wide spatula, moving from bottom to top, the solution is distributed over the wall in an even thin layer. The surface is not touched until it hardens.
- The wall is given perfect evenness. Processing is carried out with sandpaper, which is fixed on a block, or with a special construction float.
"Artistic junction"
Oddly enough, careless design visually blurs the boundaries of the finish, making it seem to flow into the boundaries of a material with a different texture. A good example is a fresco or painting: it can not be highlighted with a frame, but, on the contrary, the edges can be made “torn” and poorly processed. An uneven border of a stone finish will also look more harmonious against the background of wallpaper or a painted surface than a coating with clear contours.
Is it possible or not?
Basically, the construction team rents out their projects that do not have putty. Plastered walls - rough finish. Is it possible to glue wallpaper on them?
To answer this question, we need to consider the quality of the plaster used, as well as the satisfaction of the work. If the plaster is cement-based, you should not glue wallpaper without treatment. Coarse grain will interfere with the tight fit of the canvas, no matter how tight it is.
Gypsum plaster is also an incomplete base for wallpaper. There are reasons for this:
- The rough base absorbs moisture. The glue applied will not hold the canvas for long and it will soon fall off.
- The color of the plaster can show through the finishing material, thereby spoiling the appearance with dark spots.
- In most cases, cracks appear on the rough foundation. They are different in nature, but the consequences are the same: the wallpaper either tears in these places or comes off.
After such reasons, you can thoroughly answer the question - no. However, there are cases when you can glue wallpaper onto plaster without putty. You can also do this by doing some preparatory work.
When can you glue
When replacing an old decorative coating with a new one. That is, the old trellises must be removed from the surface. The surface is wetted, and then carefully, without damaging the rough base, removed with a spatula.
After this, the room is well dried and ventilated. Examine for the presence of cracks. When found, they are expanded, treated with a primer and covered with sickle tape. It will not give further discrepancy.
If there are metal objects (screws, nails) in the surface, they need to be processed. This is done with regular paint so that no rust remains.
After the solution has dried on the cracks, paint and all dust are swept away with a dry cloth or soft brush. The surface is coated with a deep penetration primer. It's better to do this twice.
After the work has been done, you can begin the gluing process.
When not to
In new buildings (apartments, houses), the walls and ceilings are often plastered with cement mortar.
The cement, when applying glue, will absorb all the moisture. Wallpaper will not stick to the surface. And if you wait for some time, gray spots will appear on the decorative finish and spoil the appearance.
Therefore, before starting the main process, it is necessary to carry out a number of works.
- Clean the base. Seal holes and cracks. Clean from dust.
- Coat metal objects with rust protection and the entire surface with primer.
- After which the walls are puttied.
- The last preparatory step is re-priming.
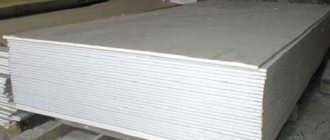
Often, cement walls are leveled with “dry plaster” - plasterboard. But, a number of works also need to be done with it in order to prepare it for gluing the canvases.
Understanding the design in the hallway - gallery of 15 more solutions
The hallway is the face of the apartment and the house. She sets the mood for every guest. We think that in the interior of the corridor, interior decoration with decorative plaster, as in the photo in the hallway below, will be useful for future use. Advantages over other coatings:
- High mechanical resistance to damage;
- Possibility of wet cleaning;
- The ability to expand space and enhance lighting levels.
We recommend using Venetian marble, mother-of-pearl or pearl finishes, “bark beetle” with a pattern that enlarges the room, or unobtrusive relief plaster. From the color scheme, choose light colors, but based on convenience - for particularly “dirty” rooms, it is preferable to make the apron from below dark.
In the aisle Two colors are combined In the hallway Beige Flat To match the cabinet With lighting Gray in the apartment Combinations of white In the corridor In two layers Plaster in the hallway Primary Thin layer