In construction and renovation, there are types of work that seem simple. But when you have to do them yourself, some questions constantly arise that cannot be solved at once. A good example: fitting a lock into an interior door with your own hands. The problems start from the very beginning: which lock to insert? It seems that any lock will fit any interior door. In fact, the different thickness of the door leaf dictates the choice of locking device. For example, only a small flat lock can be inserted into MDF panels.
Along the way, questions pour out like a cornucopia: at what height to install, what tool to use to make a cut in the door leaf, how to mark everything correctly, how to assemble the lock, where and how to attach the handle, etc. Let's try to answer all the questions below.
Preparatory work
Before you insert the lock into the interior door yourself, you need to perform several preparatory operations:
- remove the door from its hinges;
- carry out markings;
- reposition the lock tongue.
Removing the door from its hinges
It is easier to install a lock on a removed door. The operation is simple if you know what type of loops it is:
- removable;
- one-piece.
Therefore, removal work must begin with determining the type of loops. If they are removable, then the operation is carried out in the following sequence:
- the door opens 90o or more. It is important here that when lifting the door leaf does not rest against the door frame;
- decorative caps and overlays are removed from the hinges;
- loosen the adjusting screws, if any;
- a durable long object is inserted into the gap between the floor and the canvas: a pry bar, the handle of an agricultural implement, a crowbar, an ax, etc.;
You can remove the doors using a special jack.
- the canvas rises until the loops disengage.
It is better to do the work together - there is no risk of the door falling to the floor. Assembly is carried out in reverse order. Door leaf with one-piece hinges is easier to remove:
- doors open;
- Decorative decorations are removed from the hinges;
- Use a screwdriver to unscrew the screws from the jamb or door side.
Marking
Marking when inserting a locking mechanism is necessary for several reasons.
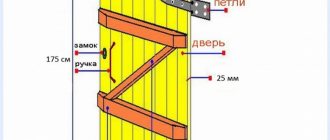
First, decide on the location of the lock. For a wooden door, it does not matter at what height the insertion will be made, but for doors made of MDF, the location of the lock is extremely important. It's hollow inside. To install the locking device, a special beam, small in length, is attached to the housing. Any attempt to drill a hole outside the beam area leads to damage to the canvas.
MDF door diagram.
Secondly, the holes for the handles must match the cutout for the latch.
Therefore, all marking work begins with determining the height of the handle: it should be within 90-100 cm from the bottom edge of the canvas. To do this, use a tape measure and a pencil to mark the horizontal axis of the lock on the canvas. Experts consider the optimal height to be 97 cm.
The location of the locking mechanism in height is determined.
Using a square and pencil, a horizontal line is drawn through the marked point to the edge of the door leaf, after which it is transferred to the end.
Using a square, the desired height is transferred to the end of the door leaf.
Further actions depend on the type of locking device.
Marking for a round lock. Let us immediately note that if you have a professional tool, a plastic template is attached to the horizontal line, according to which all operations are performed.
When doing the work yourself, a paper diagram template, which is almost always included in the package, will help with further marking. It bends and is applied to the end and side of the door. Marks are made with a sharp object for the holes to be drilled.
An attentive visitor will notice that there are two marks under the handle: 6 and 7 cm. This was done for different doors. For a wooden panel, the mark is placed further - the hand will not touch the box when opening/closing. For doors made of MDF - at a distance of 6 cm. The requirement is dictated by the size of the timber for the lock. In the castle itself, this approach is built into the design.
Template for installing a round lock.
At the end, the mark is placed exactly in the middle. If there is no template, it is not difficult to set 6 or 7 cm marks under the holes using a square along a previously drawn line.
The distance to the handle is measured.
Alternatively, you can attach a latch to the side of the door and mark the drilling location through the hole under the handle.
The location of the handle is marked.
Marking for a flat lock. There are no templates for the flat lock body. Here you have to do everything yourself, and slowly, to avoid mistakes. Marking is performed in the following sequence:
- at the end of the door is the middle. Marks are placed in several places;
- A vertical line is drawn along the marked marks. The intersection with the horizontal line (drawn earlier) will be the center of the locking mechanism;
- The lock body is placed on the end so that its center is at the crosshairs of the vertical and horizontal lines. A shift of a few mm down or up is not critical;
The boundaries of the body are marked.
- The bottom and top of the body are marked with a pencil;
- using a pencil and a square, the lower and upper boundaries of the mechanism are transferred to the side surface;
- There are points for drilling holes for the cylinder and handle. You can do this in two ways:
- place the body on the side of the canvas and mark the centers of the handle and cylinder with a pencil;
- Using a square, take the required dimensions on the body and transfer them to the door.
The locations of the latch and handle are located.
Marking by size.
Rearranging the lock tongue
Lock mechanisms can be right or left. This is determined by the position of the tongue: its beveled side should be in the direction of closing the door. Most manufacturers take this point into account and make it possible to change the factory design for a specific door by turning the tongue 180o. The operation is performed differently, depending on the manufacturer:
- USK. Using pliers, the pawl is pulled out of the body until the rectangular shape changes to a round one. After this, the tongue turns over in the desired direction;
- "BONAITI". Here the pawl is pulled out completely from the body and then placed on the desired side. But first you need to move the latch located next to the larva;
- "MORELLI". It’s even easier to change the location of the pawl at the locks: remove the lock and completely push the pawl into the mechanism body until it clicks. The tongue will pop out already upside down;
- MVM. The model has a little trick. You can change the position of the tongue when the lock is closed - the pawl is pulled out, turned over, and put back in place.
Tools and materials
To install the mechanism you will need the following materials:
- handles of any shape (round, in the shape of the letter “G”) – 2 pieces;
- cylinder mechanism with spring;
- fastening screws that connect the cylinder mechanisms;
- crossbars;
- sockets for closing cylinder devices – 2 pieces.
In addition to materials, the work requires a small set of tools:
- a simple pencil;
- roulette;
- drill;
- office knife;
- chisels at 0.1 and 0.2 cm;
- feather drill 2.3 cm;
- drill 0.2 cm;
- crown 5.4 or 5 cm based on the thickness of the door;
- masking tape;
- hammer.
If you don’t have any of the listed tools at home, you will have to buy more. Their cost is low, and they are always useful on the farm.
How to disassemble the door handle of a round type interior door
The method of dismantling round door handles for interior doors may differ depending on the design features of the fittings. The most convenient are products that have two tightening screws. In this case, it is easiest to dismantle it yourself. To do this, you need to unscrew the fixing elements and remove the mechanism.
However, there are situations that require great effort. Mechanisms that are more complex from a constructive point of view are dismantled in several stages. On modern interior doors, round parts equipped with a button and various decorative elements are quite often found. The function of such covers is to hide the mounting screws. How to remove the handle from the interior door in this case?
To remove the round handle, you must first remove the outer part of the device
In order to dismantle the handle with the button and decorative overlays, it is first necessary to remove the outer part of the mechanism, which is attached using a special button. Next, you need to eliminate the linings that hide the retaining elements.
Note! It is important to know that the buttons that help secure the outer part of the mechanism can also have a different design.
If the handle is damaged, it can be repaired. How to repair an interior door handle? First of all, you need to find out the nature of the damage. Based on this information, the necessary instructions are selected and the mechanism is rehabilitated. It is recommended that before dismantling the old handle, you determine its type and study the design features. To eliminate the round handle mechanism, experts advise reading the more detailed instructions.
Instructions for inserting the lock cylinder
Many people are interested in how to install locks when the fittings (handle) are installed on the door. You can insert a lock with a cylinder. They are rectangular in shape, but a standard set of tools is suitable for installation.
See the installation plan in the table below.
| 1. | It is necessary to draw a straight line along the end at the intended installation location. |
| 2. | We limit the height by placing the lock on the surface. |
| 3. | We drill holes close to each other using longitudinal lines. |
| 4. | Then you need to drill a longitudinal hole so that it fits the dimensions of the lock and remove the excess parts with a chisel. |
| 5. | We insert the lock structure into the prepared place, fasten the screws and use a stationery knife to cut the edges on the surface. |
| 6. | Then the lock is removed and the hole is picked up with a chisel. |
| 7. | Now you need to attach the lock to the door, use the tip to mark the place for the cylinder and trace the entire contour of the cylinder with a simple pencil. This is done on both sides of the doors. |
| 8. | The next step is to drill out a place for the larva, slightly wider than the marked outline. |
| 9. | Drill the holes for the screws with a drill with a diameter of 2-3mm, install the lock and attach the screws. |
| 10. | Fasten the cylinder in the lock, check the operation and install the covers on the screws. |
The counter part is installed in a similar way: the places of the retractable rail, decorative trim are marked and cut on the jamb, then holes for the rails and screws are drilled, the decorative part is secured and the functionality is checked.
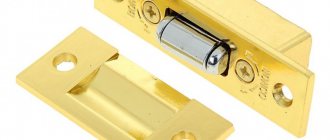
Espagnolette
This is also a kind of lock that is installed in door structures. Initially, such a locking device served as a fixation for double interior doors (it held one part), today such a latch is installed on doors to the bathroom and bathroom. The operating principle of the device is simple and clear the first time. Installing such a door locking device with your own hands will not be difficult even for those who have never encountered such work before.
This latch is a budget solution that allows you to protect premises from unexpected entry. Until now, such fittings are in demand among modern buyers. There are designer models of latches that are suitable for different stylistic solutions for interior design.
Latch for interior doors - budget model
Latch hole
The second stage involves drilling a hole for the latch. To do this, insert a pen drill with a diameter of 23 mm into the drill chuck and carefully make a recess perpendicular to the blade. There is nothing complicated here, you just need to make sure that the recess is even and then everything will be fine.
Standing or lying down?
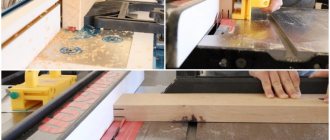
You need to know how your lock is disassembled and installed even before you approach the door with the tool. But let's get back to the topic. The first issue that is important for the quality of work that needs to be resolved is to remove the door from the hinges to insert the lock (to insert it “lying down”) and work in place (“standing”).
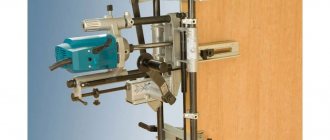
Experienced craftsmen, for whom time is money, who own power tools (see below), always work lying down. Those who are also experienced, but who do mortise locks manually from time to time, also prefer to work while lying down. In both cases, the speed, quality and stability of the work results more than pays for the time spent removing and re-hinging the door, see for example. video:
Video: inserting a door lock while lying down
A novice locksmith who intends to make money/earn extra money by cutting locks must also immediately get used to working while lying down, otherwise you won’t be able to fend off customer complaints. For the home craftsman, the “lying” method will be more convenient, firstly, when completely replacing a door with a jamb. Secondly, in the process of arranging and finishing a new house/apartment, because... The most tedious task of removing old doors is eliminated. But it is better to do a one-time manual insertion of a lock into an existing door while standing, see the video:
Video: inserting a door lock while standing
How to remove the door handle of an interior door (round with a button): detailed instructions
To dismantle such a round door handle, you first need to find the button. It is located on the inside. In some cases the button is below the level of the hole. It is worth noting that access to this element sometimes requires twisting the fittings. How to remove the round door handle of an interior door? The main thing you need to do at the initial stage is to gain access to the button. After this, you should press it with any suitable object, for example, a screwdriver. Then you can proceed directly to removing the door handle mechanism.
In order to remove the round handle you need to find the button located on the inside
Note! In some cases, it takes a lot of force to press the button.
Then the decorative element should be dismantled. Any metal element that has a small thickness, for example, a knife or a construction ruler, is suitable for this task. Using such an object you need to pry the cover and remove it. It is worth noting that some decorative elements have a special recess, which is used for quick removal.
In order to answer the question of how to disassemble the round handle of an interior door, it is recommended to study video materials on this topic. After removing the cover, access to the locking elements opens. They need to be unscrewed. This is how the round handle with the button is dismantled.
How to disassemble the handle of a push-type interior door
Lever handles for interior paintings are a more common option for fittings. They are found everywhere and are easy to install and operate. The design of pressure products includes two main elements (external and internal), which are attached to the central rod.
To remove the push-type handle, you first need to unscrew the screws
The operating principle of the push handles is based on a simple mechanism. Such fittings have a latch, which is located in the recess of the strike plate when the door is closed. In order to open the door leaf, you need to press the lever on either side of the door. Dismantling such mechanisms also includes several stages, as in the case of round analogues. How to disassemble the door handle of a push-type interior door?
In order to remove such a piece of hardware, you must follow the instructions. Such work can be done by any person who does not have special knowledge. First of all, you need to unscrew the screws, the function of which is to fix the decorative trim. This will allow access to the axial element. In such fittings it has four sides. On the Internet you can find a lot of materials that can answer the question of how to remove the handle from an interior door. Video and photographic materials allow for quick and competent dismantling of this element of fittings.
The next step is to remove the remaining part of the handle. After this, you can begin to dismantle the lining on the other side of the door leaf. The second fragment must be removed in the same way as the first. In this way, the push handle used in interior doors is dismantled.
How to embed a lock into an interior door: installing the counter part
In order for the door to be locked, it is necessary to install a strike plate on the door frame with a hole for the lock tongue. Installation of this element is quite simple.
The price of inserting a lock into an interior door depends on the type of mechanism. In any case, self-installation allows you to save money. The first step is to mark the area in which the striker will be located. This area must correspond to the latch parameters of the locking device. To do this, you need to close the door leaf and draw two lines on the lid, indicating the boundaries of the latch. It is also recommended to measure the distance between the upper edge of the latch and the corner of the door leaf. The obtained parameters should be transferred to the doorway.
Before starting work, you should check the accuracy of the installation of a door handle with a latch or other type of locking mechanism. The device must be level. Otherwise, there may be problems with opening and closing the door leaf.
Helpful information! As an alternative to mechanisms that have a standard latch, you can purchase a magnetic lock. It is characterized by operational reliability and noiselessness. Installing a magnetic lock on an interior door has its own characteristics, but if you follow the instructions, it can be done by a beginner.
Installing the lock strike plate is simple and takes minimal time
After marking the area corresponding to the latch, you need to attach the striker to the door frame. There is one important rule that will help to carry out proper installation of the response element. If the part will be recessed in the material of the boat, then in this case you need to outline its outline both on the inside and on the outside. In turn, if the striker will be located directly on the surface, then you should limit yourself to marking the internal contour.
After marking the striker plate, you need to make holes for the tongue and fasteners (screws). After this, you can begin installing the strike plate. At the end of the work, you need to close the door and check the size of the gap. If necessary, excess play can be eliminated very simply. All you need to do is bend the lock tongue on the strike plate.
Installing a lock on a door: choosing the type of locking mechanism
Design features are the main factor by which all locking devices used in interior walls are classified. Let's look at the most popular devices installed in interior doors.
Installing a mortise lock requires precision, but the mechanism is reliable and durable
Latch (regular). This type of locking device is the most widespread. Conventional latches are used everywhere in interior walls. Installing a lock on an interior door in this case is not difficult, which often attracts buyers. The peculiarity of this device is that its design includes a cylinder and a locking tongue controlled by a special mechanism. Most often, such locks are sold complete with a handle. Thus, in order to avoid mistakes during the installation process, it is necessary to study the instructions, which will answer the question of how to insert the handle into an interior door.
Latch with lock. The mechanisms that belong to this group are an improved modification of the previous type of locking devices. Their design has one more element - a latch. Its function is to hold the lock closed. Such products are ideal for interior doors.
Helpful information! Today you can find two types of latches equipped with a lock: push-button and lever. For use at home, it is recommended to pay attention to the second option.
Mortise mechanism. It is the second most popular among interior door locks. Installation into the canvas requires precision and care. Mortise devices are reliable and have a long service life. They are most often used for doors in personal offices and bedrooms. Unlike the previous type, these devices are opened using a key.
The process of installing a magnetic lock is quite complicated, so if you don’t have the skills, it’s better to turn to professionals
There are two types of mortise mechanisms. The first option provides the ability to unlock the door from both sides (key-key). In the second case, a combination is used that consists of a key and a turntable. In this situation, a separate insertion of the handle into the interior door is required. How to perform this operation? There are special step-by-step instructions for this.
Padlock. From an installation point of view, this option is the most acceptable. However, overhead devices do not meet modern safety standards. They can be easily damaged by mechanical action.
Magnetic lock. The cost of such devices is higher than the price of standard types of locking mechanisms. Their main advantage is quiet operation. That is why they are most often mounted on interior doors, which are intended for bedrooms and children's rooms. It is quite difficult to fit a lock into an interior door on your own. The cost of installing magnetic mechanisms depends on their design features and the type of door.
Level device. Such devices can provide good protection for the premises. They are opened with a key and are used not only for interior, but also for entrance panels.
Lever locks are quite reliable, so they are installed on both interior and exterior doors