Do I need to attach laminate flooring to the wall?
This question will undoubtedly arise from a person who learned about this finishing option for the first time.
Laminate has long established itself as an excellent decorative finishing material for floors, durable and practical to use. Laminate can be used to finish floors and walls in almost any room in an apartment or private house.
Laminated panels are increasingly being used for wall finishing, thereby displacing traditional finishing materials such as lining, MDF panels or conventional wall panels.
Advantages of using laminate for wall decoration
- European, as well as domestic, manufacturers put on the market environmentally friendly product that meets all modern safety requirements, so covering walls with laminate is quite possible.
- If you decide to use laminate for walls, then be sure that this material is durable , and if the operating rules are followed, it will last for decades.
- Using laminated panels of low class 21-31, you can save a lot. After all, such panels are inexpensive, but are designed for use as a floor covering, and they will not be demolished on a wall.
- The variety of textures and colors of this material provide a wide field of activity for designers when decorating premises.
- Doing the work of installing laminate flooring on a wall with your own hands is a simple task if you carefully read all the tips given in the article and follow them. Even a beginner can carry out repair work on his own.
Disadvantages of laminate when finishing walls
- The first disadvantage of laminate as a finishing material for walls is its susceptibility to moisture , which can cause the material to swell and lead to cracking of the outer decorative surface of the laminated panels.
- Another disadvantage is sensitivity to temperature fluctuations , especially high temperatures, which can spoil the attractive appearance of laminated panels.
Therefore, you should not install laminate on the wall of the kitchen or bathroom, since these rooms have high humidity and frequent temperature changes. Laminate on the wall of a balcony, basement or loggia is also not the best solution.
The microclimate of these rooms will be harmful to laminated panels and will destroy even the most high-quality and durable laminate. To decorate these premises, it is better to use traditional materials, such as lining or MDF panels.
Polyurethane foam
Polyurethane foam is a polyurethane foam sealant, a relatively new building material that has been very popular lately. And there are reasons for this. Typically, polyurethane foam is used for mounting and sealing door frames and window frames, for insulating distribution networks, sealing seams and cracks, and filling various voids. We can say with confidence that all repair and construction work related to sealing is carried out efficiently and quickly using polyurethane foam.
The high installation, sealing, heat and sound insulation properties of the foam were appreciated not only by professional builders, but also by home craftsmen. What happened before? Previously, cement and tow were often used for sealing work. First, it was necessary to dilute the cement with water in the required proportion, then mix the solution with tow, then fill the cavities or joints with the resulting composition. It is clear that such a process was lengthy and often ineffective. Now, one can of polyurethane foam is enough to easily get even better results. In this case, no mechanical devices are needed, because the foam itself penetrates into the most inaccessible places and after a few hours turns into a fairly hard plastic.
Polyurethane foam is sold in cylinders containing liquid prepolymer and propellant (propellant gas). The weight of the cylinder is 850 - 920 grams, with a volume of foaming agent - 750 ml. When the prepolymer is forced out of the cylinder, under the influence of air humidity and surface moisture, a chemical polymerization reaction occurs, i.e. solidification. As a result of this reaction, a rather rigid polyurethane foam is formed.
Compared to traditional sealants, polyurethane foam has a number of undeniable advantages:
1. The foam, expanding, fills all hard-to-reach cavities and joints. 2. Foam is a self-hardening material, so working with it is easy and simple. 3. Foam is a universal material, because more than a thousand options for its use are already known. 4. The foam is designed to work with all traditional building materials: wood, stone, concrete, plaster, metal, glass. The exception is synthetic compounds: polyethylene, polypropylene, Teflon, silicone and other “products” of the chemical industry.
When working with polyurethane foam, one important detail must be taken into account: since the volume of polyurethane foam increases two to three times when used, when installing window and door blocks it is necessary to install safety fasteners to prevent deformation of the structure.
Polyurethane foams come in one- and two-component types. They are produced under different brands and have different properties, so it is always possible to choose the properties of the foam to perform specific tasks. At the same time, there are universal indicators of high-quality polyurethane foam: 1. The foam must be elastic and adhere well to the surface. 2. The foam should not shrink significantly after complete hardening. 3. The foam should not crumble after hardening, especially in the cold.
Currently, polyurethane foam has occupied that part of the market that was previously dominated by traditional insulating materials: cement, cork, bitumen, mineral wool tapes, plaster and others. It has proven itself to be a universal modern sealant that fills cracks, glues surfaces, is waterproof, non-electrically conductive, and fireproof. All these qualities make it possible to widely use polyurethane foam during repair and construction work.
Which laminate to choose for wall decoration
Lock system
Adhesive laminate. This system does not have locks for fastening the panels to each other, so fixation occurs using glue. How to glue laminate to a wall you ask? Construction adhesive , for example, silicone-based or so-called “liquid nails” is applied to the end and back of the laminated board
Next, the next panel is laid and all the others are laid in the same order. Any glue that bleeds through the joints should be immediately removed with a cloth soaked in a solution of water and vinegar. The adhesive laminate has a small contact area with the surface on which it is laid, so it is rarely used when laying on lathing.
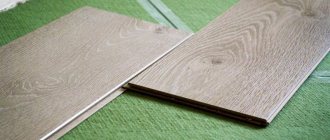
Tongue and groove laminate. This type of laminated coating has a fastening in the form of a tongue and groove lock , which does not need to be glued with glue, which allows you to get neat and dry joints.
When installing this type of covering, the panel strips are secured in the groove of the tongue using small nails or clamps. It should be noted that the fastening takes place on a wooden or special metal sheathing. The tongue and groove option is suitable for cladding walls, floors and ceilings.
Click laminate. This option has an improved tongue and groove system, which is a convenient lock for connecting panels together. When laying laminated boards with a click lock , the material is tilted perpendicular to the other panel by 20 degrees, then the panel is inserted into the grooves of the lock and easily snaps into place.
Clicky decorative laminate can be attached to the wall to a wooden sheathing using glue. This laminate has increased strength and resistance to deformation.
Price and strength class
To mount laminate on the wall, first of all you should choose a laminate according to the color and texture that will be used in the interior of the room. In most cases, one of the most important factors is the cost of the finishing material. True, you should not always save on this, since the quality of laminated panels directly depends on their price.
When covering walls with laminate, you can use a material of low class 21-31 , rather than 33-34 (high strength), which are used where high abrasion resistance of the coating is required. After all, laminate walls in the interior will not be subject to high loads, since they will mainly perform only a decorative function.
Therefore, by choosing an inexpensive finishing material for walls made from laminated boards, you can significantly reduce your renovation budget and at the same time get a beautiful room design.
You can buy laminate for walls inexpensively, but you should still take into account factors that may affect the performance of the facing material, for example, animals or children.
Let's summarize the criteria for choosing laminate for walls:
- Consider the intensity of the load that will be placed on the laminated coating during operation, so the quality of the coating is very important. If you have a pet that can damage the surface of a laminate wall with its claws, then you should not choose an inexpensive option that has low resistance to physical influences.
- Another important parameter is appearance , that is, the design with laminate on the wall should first of all please the eyes and bring aesthetic pleasure to the owner. The modern construction market is replete with laminated finishing materials of various colors and textures. You can choose from a variety of options that imitate different types of wood or even stone without any problems.
- The next parameter relates to the method of installing the laminate on the wall. One of which is to attach laminated panels to a frame made of wooden or metal slats. You can also glue laminated boards directly to the wall. But at the same time, the surface should be as smooth as possible.
Selecting a layout method
An experienced master will say: the correct finishing is laid at the design stage. It is not necessary to develop a professional drawing and draw up an estimate. A schematic image of the room is enough, which shows where the doors and windows are located. If you imagine the final picture, it is easier to choose a layout method.
In total there are over 50 styling options. We will not consider them all: it is unlikely that a finisher without experience will decide to use a complex method. It is enough to choose one of three basic methods.
- perpendicular to the window: if you arrange the slats so that the direction of the joining seams coincides with the direction of the sun's rays, the connections between them will become invisible;
- parallel to the window: the resulting shadow will emphasize the joints, but the room will seem more spacious;
- diagonally: the way the owners like it.
Usually the first option is chosen. It gives the impression of a monolithic floor. The second method is suitable for a long and narrow room: this way you can make it wider. In both cases, the laminate should be taken with a margin of 5-7%. The third method is optimal if the area of the room is small or you need to divide it into zones. In this case, the stock of material should be at least 15%.
How to lay laminate flooring on a wall with your own hands?
Methods for laying laminate flooring: glue or lathing?
In the case of the adhesive method of attaching laminate to the wall, the surface should be thoroughly prepared, since unevenness will have unpleasant consequences during operation. Firstly, it is not an aesthetically pleasing appearance of the wall, when the gaps of some laminated panels will protrude due to unevenness. Secondly, the cost of preparing the walls can cost a hefty sum, which is not very good for thrifty people who are used to counting their money.
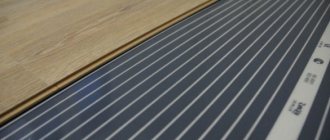
Which is better: heated floors or radiators?
Warm floorBatteries
The adhesive method is quite simple to implement and does not require special knowledge, which will allow you to install the laminate yourself. How to glue it to the wall, and what nuances may arise during the work we will discuss further? You can glue any type of laminated boards, and panels with a lock and without a lock at all.
Creating a lathing for laying laminated panels will be more profitable in the sense that you do not need to level the wall, that is, plastering or installing drywall to create a flat surface is not required. The lathing will allow you to insulate the wall with appropriate materials and provide additional sound insulation. Some manufacturers, aware of the growing popularity of wall decoration with laminated panels, offer special fastening systems for quickly creating convenient sheathing.
What tools are needed to install laminate flooring on the wall yourself?
- In addition to a small hammer and a level to check the surface for bevel, you will need simple tools such as a square, ruler, tape measure, and pencil.
- You will also need a hacksaw for wood, metal, or better yet, an electric jigsaw, which will greatly speed up and make the work easier.
- You will need a special wooden block (boss) for padding laminated boards and spacer wedges designed to establish gaps between the laminate and the ceiling-floor of the room.
To visually familiarize yourself with the process of laying laminate on a wall, a video (at the end of the article) with the stages of work will help you better understand the entire progress of the repair. For a person who has decided to cladding with laminated panels on his own, viewing the educational information is simply necessary, as it will prevent many mistakes and incorrect actions.
Tools and auxiliary materials
Depending on the locking method chosen, tools will be required. What you need to install laminate:
- Mallet - a wooden or rubber mallet.
- Square, tape measure.
- Markers. It is important to choose washable ones, especially for light shades of laminate flooring.
- Hacksaw or jigsaw. The latter is preferable, as it accurately cuts contours if you need to go around pipes.
- Wedges for maintaining technological gaps between the wall and the slats. This is required for linear coverage extensions.
- Scotch tape for laying the backing.
The base should be ready by then - a concrete leveling mixture is poured or plywood is laid. See how to level the base here.
Do-it-yourself laminate on the wall: how best to attach it + Photo Ideas in the hallway, living room and bedroom
There are many different materials for finishing the floor, for example, linoleum, parquet boards, carpet, floor boards can also simply be painted or you can still lay laminate on the floor.
Laminate is a floor covering, but inappropriate use of materials has always been an interesting solution in finishing.
In the following text we will talk about how to finish walls with laminate and how to attach this material to the wall.
Substrate
I think there is no point in singling out any type of substrate as being of higher quality - they are all quite good.
The cheapest foamed polyethylene fully satisfies all requirements. The only note is that you should not choose a substrate thicker than 2 mm, the floor on it will sag unnecessarily when walking. If there is a need to raise the level of the finishing coating, then it is better to use other materials, for example fiberboard sheets. The disadvantages of foamed polyethylene include slight subsidence over the years - 1-2 mm.
Cork backing does not sag, but is more expensive. By and large, it is no different from polyethylene.
A backing made of thin EPS sheets is also no worse. However, this material is very inconvenient for flooring: there are many seams and they all need to be taped.
Whatever underlay you choose, it is not necessary to spread it over the entire area - I spread it as I lay the laminate.
Wall finishing with laminate
In order to quickly finish walls, materials such as MDF or PVC panels are used.
Advantages of laminate for wall decoration:
Laminate is a more durable material for both types of panels. If PVC panels are easy to break with an accidental blow, then in this case the laminate can withstand greater loads.- If we compare laminate and MDF panels, the laminate is less hygroscopic, this is due to its denser structure and the fact that the back surface is protected by a polymer layer.
- Laminate is also attached to the wall because the finished wall is very easy to care for. This wall can be easily washed with water. But PVC panels are in a better position in this regard, because they are not afraid of the effects of chemicals.
Mounting laminate flooring on the wall has several more disadvantages:
Since laminate is a rather expensive finishing material, this is its negative quality.- Laminate is considered a heavy material, so the fasteners and the surface to which this material will be attached must be strong.
- The hygroscopicity of the laminate is slightly lower than that of wall panels
- To fasten wall panels, the lower protruding part of the groove is used; it is attached with self-tapping screws, but the laminate has click locks.
Preparing the base
As a standard, the base is considered sufficiently leveled if the differences do not exceed 2mm. by 2 m. I’ll add on my own behalf: laminate is not afraid of more significant changes, the main thing is that there are no sharp “steps”.
If laying is done on a screed, then the latter must dry (at least 2 weeks). There is no need to seal various sinks and local potholes - this is why laminate is popular in budget renovations.
Whether the base is wooden or concrete, it must be cleaned of local deposits of putty and other dirt (which is sure to remain after rough repairs).
Particular attention should be paid to the angles where the walls meet the floor: in 9 out of 10 cases, these areas are not treated in any way during the repair process, and are written off as “being covered with baseboards.” Therefore, the corners, as a rule, have beads and are rounded. I usually walk around the perimeter of the room with an old chisel/chisel and knock down the sagging.
The floor is thoroughly swept/vacuumed. If the base is very dusty, it can be primed with a deep penetration primer.
See also: “Screed for any floor covering”
Rules for attaching laminate to the wall
There are several rules for attaching laminate flooring to the wall.
- It is necessary to attach the laminate only to a solid surface; if, for example, you attach a sheet of drywall to a plastered wall and attach the laminate to the drywall, then this entire structure may simply fall.
- It is generally not worth attaching laminate to the wall in rooms where it is very humid. After all, rooms with high humidity are the bathroom, toilet, kitchen and they are finished with completely different materials.
Laminate is attached to walls only in rooms with moderate humidity. - Laminate does not require rigid fixation; it must be elastic. Also, other fastening methods should not prevent the panels from moving slightly.
- Fastening the laminate panel should not affect its lock.
Attaching laminate to the wall
For smooth surfaces
Gluing laminate panels onto plastered or plasterboard-covered walls using liquid nails. After all, the adhesive layer after drying will retain its slight elasticity and be durable.
There are several points:
- It is best to place a stop at the bottom for the first row of boards; this is necessary so that the boards do not slide under their own weight.
You shouldn’t push laminate boards into the lock through the boss, but rather insert them with a break and snap them into place, while pressing them against the wall. It’s best to hold the bottom board.- Laminate boards are assembled with offset transverse joints.
- For a wall of not a large area, you can assemble a laminate panel and glue it entirely; for a wall of a large area, this option will not work.
Mount for uneven surfaces
How to attach laminate to a wall that is not entirely level?
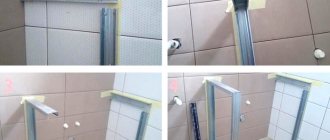
At a distance of no more than sixty centimeters perpendicular to the direction of the laminate board, a sheathing is made. The material for the sheathing can be a profile or a block of 40×40 millimeters.
After the sheathing has been built, the laminate boards are attached in the same way as on a flat surface. Also, laminate boards rested against a lath or profile, and they were also attached to liquid nails. Transverse joints must be bandaged.
Fastening with clamps
Without using glue, laminate can be attached to the wall using a clamp. Clamps are galvanized staples that are produced for fastening laminate flooring, lining to ceilings and walls.
There are two types of such staples that you may need and these are:
- Clamps with jagged protrusions are driven into the end of the board and secured with self-tapping screws to the wall or sheathing.
- Staples with a flat protrusion, they press down on the part of the laminate click lock that protrudes, thereby firmly fixing the laminate and without interfering with the connection with the subsequent board.
Let's look at how to attach laminate boards to the wall if it is impossible to install a clamp if the board is the last one in the row. But alas, in this case you will have to attach the laminate boards with glue.
Ordinary liquid nails are used as glue; they will securely fix the edge of the board, after which the corners are covered with a decorative plinth and corner.
We hope you found this article helpful. We wish you good luck, patience, as well as inspiration and strength!
Seam sealant
In general, I would recommend refraining from buying sealant, because often something that is closer in properties to glue is sold under the guise of sealant. It is not recommended to glue locks together; this can lead to unpredictable defects during operation. If the panels stick together, it will be extremely difficult to disassemble part of the covering to replace some boards without damaging the locks and edges!
Sealant is needed to protect locks from moisture. Some manufacturers impregnate locks with something like paraffin, in which case there is no need for sealant. This type of laminate is not difficult to recognize by picking the lock with your fingernail. If the locks are not impregnated, when installing even in a dry room, there is a risk that the floor will creak.
If you nevertheless purchased a laminate with non-impregnated locks, it’s okay, you just need to be more careful in choosing a sealant by contacting a competent sales consultant. Having purchased a sealant, you can test its properties by coating and testing two pieces of laminate. After a couple of days, separate them. If the lock opens freely, the sealant remains elastic and can be easily removed - everything is in order.
Alternatively, instead of sealant, you can use impregnation for locks and treat each panel with this solution before installation.
Installing a plasterboard wall on laminate
Andreyko If you are confident in the strength of the base under the laminate, then you don’t have to disassemble it. But if there is a possibility that the base will sag or sag, then it is better to install a partition without a laminate. To disassemble this is perhaps radical; I would make markings on the laminate, along the width of the partition, and cut them out with a hand-held circular saw.
The depth of immersion of the circle is adjustable, install a disk with a fine tooth and cut. Seryoga D-k It depends on WHAT laminate. And how they laid it, in the sense of where the beginning of the laminate was. There are types that are impossible to remove without damaging the locks. Besides, how is the partition attached?
If the profile is mounted in addition to the floor in the ceiling and walls, then what is the point of cutting out and disassembling the laminate? Two degrees of protection are enough (ceiling and wall) and your partition will not go anywhere. Don’t touch the laminate, it’s unnecessary.curt You shouldn’t attach the starting profile with dowels to the base through the laminate, the laminate will be rigidly attached to the fill and sooner or later it will come together like an accordion. I would advise you to attach the profile, draw 2 cm from it to the sides (the gap between the laminate and the profile is at least 1 cm + the thickness of the drywall) and cut out a strip of laminate with a chisel. The starting guide is attached to the floor, the gap to the laminate is 1 cm. According to the technology, the laminate should lie freely, without resting against obstacles. Neformal75 No, I prefer to disassemble it. If you cut in the middle, the question is whether the wall being installed will pass at the junction of the laminate boards, then on both sides you will still have to attach the laminate to the wall or floor. If the wall is attached to the laminate, over time it will deform and pull the rest of the floor structure or the locks will break. Yes, there can be a lot of jambs. With skillful hands, you can really disassemble it in about 15 minutes.
It will take half an hour to collect, taking into account the new cut. Question from a forum thread: You need to make a partition on top of the laminate. We decided that it would be made of plasterboard. Simpler, lighter, faster.
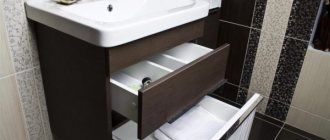
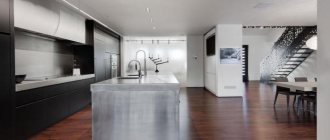
Do I need to remove the laminate before installation, or just put it on top and that’s it? If you can do without dismantling, then how? Traditionally, laminate is used to decorate walls in the hallway to the height of the panel. This coating is used to decorate part of the wall above the head of the bed in the bedroom, decorative panels are made from the laminate behind the TV in the living room, and niches are trimmed. The difference in shades of material in the same color scheme on the floor and on the wall creates an interesting effect.
Let's start with rooms where laminate flooring should not be laid on the walls. This is a kitchen, a bathroom, an uninsulated balcony, a basement in a country house. Changes in humidity and temperature will negatively affect the material, and it will quickly lose its appearance. Laying the panels can be done in various ways: herringbone, horizontal, vertical, and this is another big plus in favor of using lamellas for wall decoration. Despite numerous arguments in favor of this material, there are also disadvantages - quite serious problems may arise in the process of surface cladding, which we will discuss below.
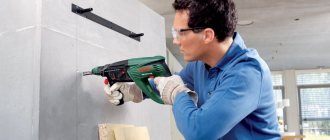
Laminate has high strength characteristics, which many analogues cannot match. For example, if we compare laminate and PVC panels, the latter can quickly break from an accidental blow to them, but laminate will withstand even a very strong blow. In addition, the material has a more attractive appearance and ease of installation. To cover a vertical surface with a newfangled finish, it is not at all necessary to invite an expensive company or construction team. You can save a lot on labor costs, since attaching laminate to the wall with your own hands is quite accessible even to a novice master.
Just watch a video on this topic, get acquainted with the technologies, choose your option, buy everything you need and stock up on tools. To work you will need the following tools: There can be many options. But they depend not so much on the installation methods as on the colors, technical characteristics, and texture of the material. The slats can be positioned horizontally, vertically, with the boards offset, or in a checkerboard pattern. Laminated products are used in one color and of the same quality, or they try to attach boards using various combinations and transitions.
That is, the fantasies of designers and customers are unlimited.
Outer row
When we have reached the final wall during the installation process, all that remains is to lay the last row. Usually the outermost row does not consist of the entire width of the panels - all of them will have to be sawn lengthwise.
Apart from the longitudinal cut, the installation is no different. The only issue is that it is not very convenient to join due to the presence of a wall. To apply mechanical force from the wall to the edge panel, a pry bar or large chisel is well suited; they are used as a lever.
Sometimes the last row is only 1-2 cm wide. You have to saw off a narrow strip from entire panels, this happens quite often. There is nothing negative about this.
It is more convenient to first assemble the outer strip along its entire length and only then carefully insert it into the locks of the previous row
The assembled last row may need to be tapped - this is done without a hammer, by inserting a pry bar or chisel into the gap from the wall. Usually this is enough. If you still need more force, I use the clamp from the kit and a hammer.
It is necessary to knock out locks at the last strip no matter how wide it is. When the strip is too narrow, it needs to be further trimmed from top to bottom (second part of the photo). Only then will the locks come together in the correct position.
It's time to end on this note. Today we did not discuss diagonal installation and installation without thresholds - in fact, there are no special differences, only nuances. Due to the resulting publication being too long, we will address these issues in future articles.
See also: Laying laminate flooring without thresholds throughout the apartment
Laminate on the wall
Fastening the laminate to the floor is carried out using appropriate locks, which successfully cope with their task if the slats are laid on a horizontal surface. The last row is extremely difficult to secure with clamps, so we attach it to the wall with special glue, sealant or liquid nails. It is also used in as cladding for individual parts of the interior, emphasizing a certain area of the room, for example: an apron in the kitchen or a TV area.
The clamp has three holes for fastening: two identical at the edges intended for fastening with construction clips, one in the middle for fastening with nails or self-tapping screws. Every year, laminate flooring has become increasingly used to decorate not only walls, but also ceilings, which provides an original and cozy look to the room, giving it originality and aesthetic warmth.
Formation of the first row
For an objective understanding, it should be noted that you can start laying laminate flooring from any convenient point in the room, even from the middle. However, in the vast majority of cases, this convenient place is the far wall without doorways.
It is more correct to choose a left-to-right layout for assembling panels; this will allow you to place “groove” type locks on already laid panels. Thus, assembly will be carried out by inserting the tenons of new panels into the grooves of already assembled ones - this is much more convenient.
For the first row, the required number of panels is assembled, connecting them together in transverse locks. There should be a strip from wall to wall. The last plank is sawed taking into account the gaps - the assembled row should have the necessary gaps on the left and right. Then the entire row is moved towards the starting wall, spacer wedges are inserted to form a gap.
Without a doubt, the first row will not be able to be aligned in a perfect straight line - there is minimal play in the transverse locks and therefore the panels may deviate from the straight line. To form a straight row (still not ideal), panels with overlapping seams need to be inserted into the longitudinal locks of our strip, like a second row, but without connecting the transverse locks. This temporary measure will help level the first row as much as possible and adjust the spacer wedges along the starting wall.
The rare wall from which installation begins has a perfectly flat plane, so the gap may vary, and in some places it may be unacceptable. Therefore, it is quite possible that the first row will have to be disassembled and the connection to the wall will have to be cut in some places. After sawing, the row is reassembled and leveled with additional panels, and wedges are inserted.
How to attach laminate flooring to a wall - advice from experts
Helpful advice! In rooms with high humidity, such as bathrooms and kitchens, it is not recommended to use laminate as wall finishing.
- Apply glue to the next board. When fastening in this way, you should not knock the boards through the boss. It is recommended to insert them into the lock with a slight bend, then snap and press. The bottom board should be held in place.
- We lay the boards so that the transverse joints in adjacent rows do not coincide.
This innovation is becoming increasingly popular, which is why many home craftsmen began to think about how to attach laminate flooring to the wall.
- At the bottom we install a stop for the first row of laminated boards to avoid them sliding under the weight of their own weight.
- Apply glue in a zigzag pattern to the first board, press it tightly to the wall surface and immediately check the horizontal level with a level.
As you know, laminate is a floor covering. But what kind of ideas do designers come up with to create a unique interior design? One of these original solutions was the use of laminate for wall decoration.
Myths of soundproofing
This phrase explains the reasons for numerous misconceptions that are firmly entrenched in the minds of ordinary people and, unfortunately, many builders involved in repairs. The latter often try to draw analogies between sound insulation and thermal insulation, although their physical processes are fundamentally different. And many do not even try to understand the essence of the soundproofing process and find scientific confirmation of their decisions, citing the ridiculous argument: “We have always done it this way.”
Useless materials for soundproofing:
The list contains materials whose use for sound insulation is useless!
Cork. Soundproofing
There are misconceptions that attribute strong sound insulation to cork. In fact, the sound absorption of the cork is very weak, which is easy to see by studying the graph:
The graph shows that the NRC index of the cork is 0.1, which is insanely low! Even ordinary thermal insulation such as URSA or ISOVER will have NRC = 0.3–0.4. Let us remind you that special sound-absorbing boards have NRC > 0.85.
Therefore, soundproofing with cork is impossible. There is no point in gluing cork to walls or as a filler in frame soundproofing cladding. Moreover, it makes no sense to cover the walls with cork in the hope of improving sound insulation!
Egg trays. Soundproofing
People have an original way to “increase” sound insulation - using egg trays. In fact, egg trays (the cork analogy) will not affect the soundproofing of a room at all.
Installation of laminate on walls and plasterboard floors
This type of fastening requires “liquid nails”. If you were going to put laminate on a regular wall, then you would have to first level its surface, but since the drywall itself is flat, we skip this step. This method will require a little more time and skill than the first, but the result will be more reliable and durable. The lathing can be used both on drywall and on a regular room wall. Laying laminate on drywall is quite a painstaking job, but if you really want to, you can cope with this task. We will tell you how to attach laminate flooring to a plasterboard wall. You need to assemble a shield from laminate panels and glue it to the wall.
The fastening grooves must be lubricated with sealant; this will prevent dust and other debris from getting into the cracks, and will also increase the durability of the coating. Leave small gaps at the bottom of the wall and cover them with aluminum angle iron. The seams must be elastic; the material cannot be fastened rigidly. Do you see any common features? These building materials harmoniously cover each other’s shortcomings, thereby creating a unique design with excellent characteristics.
This means that gluing laminate to drywall is not only possible, but also necessary.
How to treat the surface → Room decoration → How to choose the right paint → Surface treatment technologies → Leveling and finishing the walls → Selecting and applying a primer → Removal from the surface → Stretch ceilings and technologies → Reviews and testimonials
Features of locks
The vast majority of laminate flooring is available with two types of locks on the transverse edges: conventional and easily assembled (the so-called “Quick-step”).
Conventional locks are latched by connecting the ends at an angle and then lowering one of the panels. This type of flooring is assembled in rows: first, all transverse seams in the row are connected, and then the assembled row is snapped at an angle to the already laid canvas.
Easy-to-assemble panels are mounted one at a time: the longitudinal seam is connected at an angle, then the die is lowered and snapped into place with the previous one. This coating can be assembled either in rows or with a ladder.
There is information on the Internet that there are transverse locks of the “LOCK” type - they supposedly snap into place in the stacked position by tapping the row from the end. From my own experience and the experience of my colleagues, I can say that I have never seen such locks. It is quite possible that such castles exist (existed), but I am inclined to believe that someone wrote something stupid, and others simply stole it. Unfortunately, this phenomenon does occur.
Often, for panels with conventional locks, you can find similar nonsense in the attached instructions: a row is assembled without connecting the transverse locks, and then these locks are connected using a clamp and a hammer. However, in reality the design of the lock does not allow this. As a result, when trying to connect the transverse seams, either the locks or the place where the clamp stops break. This suggests that you cannot always trust the manual from the manufacturer, especially an inexpensive one.
In the above-described options, the longitudinal locks are connected in the same way: at an angle, followed by lowering. Laminate flooring with more complex locks is very rare. Mostly they are found in square dies, which are assembled without spacing subsequent rows. Such locks are assembled in the same way, at an angle with lowering, however, to snap the lock into place, you must lower the attached panel lower than the previous one. This can be done by placing a small gasket, a few centimeters thick, such as a square, under the already laid one.
The canvas with “complex locks” is assembled in separate panels: first the transverse lock is attached, and then the longitudinal one. Such locks do not fall apart when the row is slightly lifted to attach new dies.
Determine the direction of the light
The lamellas are laid parallel to the rays of light / education-web.ru
For laminate with chamfers, the direction of installation depends only on your preferences and the designer’s ideas. A coating without chamfers looks better when the slats are positioned parallel to the rays of light from the window. So the joints between the boards are almost invisible.
At the same time, laying along a wall with windows allows you to visually expand the room and is quite often used in narrow corridors and hallways.
Consider the drawing
bricoartdeco.com
Most types of laminate are produced with an arbitrary pattern, and it is unlikely that the lamellas will match one another. In fact, this is not necessary: this way the coating will look too artificial and will look like linoleum.
Some manufacturers have laminate with pattern selection. This is usually indicated on the packaging and in the instructions. To ensure the design matches, the boards must be used in order from one pack.
If you plan to lay the laminate flooring staggered, open three or four packages and take one lamella from each. This will make the drawing as arbitrary as possible.