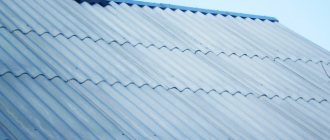
Insulation of a cellar in a garage
Insulation of a cellar in a garage should be carried out without fail. Not only the safety of the products, but the climate in the room itself will depend on this. After all, dampness will penetrate there too. As a result, fungus may begin to appear. It is best to do all the work during the construction stage. But if this has not been done, the work can be done later. True, this will be a little more difficult to do. Today we will look at the question of how to insulate a basement in a garage in detail. You will have the opportunity to watch photos and videos on this topic and choose the desired insulation option. Instructions for performing this work will also be provided.
How to choose insulation
There are several types of insulation on sale. They can be divided into 2 categories:
- Permeable. Allow water vapor to pass through or ventilate outside;
- Moisture resistant. Completely cut off the surface from contact with moist air.
The basement refers to underground structures. The depth of immersion in the ground requires reliable insulation of vertical and horizontal surfaces, otherwise mold and condensation will inevitably occur. The selection criteria will be:
- Vapor and moisture resistance;
- Strength;
- Ability to withstand temperature changes;
- Rigid form.
The optimal solution is to install penoplex. It is designed for use in conditions of high humidity and cold. Ordinary polystyrene foam is somewhat worse, since its production technology is rarely followed in full.
It is not advisable to use permeable types of heat insulators (mineral wool, expanded clay) as they will become saturated with moisture and stop performing their tasks.
Step-by-step work plan
The procedure for insulating a cellar in a garage is carried out in stages. First, you need to ensure waterproofing of horizontal and vertical surfaces (walls, floors, ceilings).
The most effective means are considered to be bitumen mastic and impregnation with special compounds. It is recommended to apply a layer of antiseptic to concrete walls to prevent the occurrence of unwanted microflora.
High-quality preparation will ensure the effective operation of the heat insulator and will not allow moisture to penetrate from the soil. Attempts to do without preliminary work lead to failures - the insulation gets wet, fungus appears. It is necessary to take into account that it is impossible to insulate only one wall, ceiling or floor. Installation of insulation is carried out on all surfaces, including the hatch and other elements.
Insulating the floor from freezing
Many owners prefer to insulate the floor with expanded clay. You can get the desired effect, but you will have to pour a concrete screed on top of the heat insulation layer.
Create a multilayer pack, which includes:
- Leveling sand bedding 5 cm;
- A layer of waterproofing film or geotextile;
- Filling with expanded clay 10-20 cm;
- Steam-waterproofing film;
- Reinforced screed 5-8 cm.
Instead of expanded clay, you can lay several layers of penoplex. It is not recommended to use one row of thick sheets, as moisture will gradually enter through the gaps and cracks. Insulating a garage floor is considered one of the most labor-intensive stages, since the work is carried out in difficult conditions.
What materials exist
The choice of consumables depends on the degree of soil freezing, the type of structure and the depth of groundwater flow.
Naturally, insulation materials must meet important requirements: maintain water resistance, heat and protect against fungal infection. Thermal insulators are different for walls, ceilings and floors.
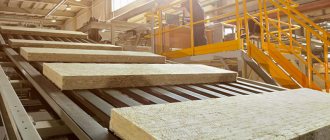
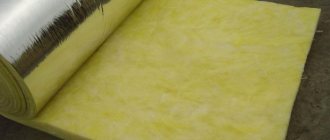
Mineral wool
Mineral wool is an excellent thermal insulation material that, in addition to everything, allows air to pass through. To insulate walls and ceilings indoors, you can use slabs of medium and soft hardness. This material does not burn and is easily attached to the surface.
Basalt wool, which has higher thermal conductivity and noise insulation properties, has proven itself especially well. It is important to remember that additional vapor barrier protection will be required to prevent moisture accumulation.
Expanded polystyrene
This is a high quality thermal insulation material that is perfect for a basement. It has high resistance to mold and the spread of rot.
Its important characteristic is almost absolute waterproofness. In addition, the material has a long service life.
Styrofoam
Often used for cellar insulation. It differs from expanded polystyrene in its manufacturing technology and higher vapor permeability. Has the following distinctive characteristics:
- does not allow moisture to pass through and does not change shape under its influence;
- weighs little and does not create additional load;
- affordable.
Reflective Thermal Insulator
New materials include reflective insulation.
In its production, special rolls are used, which, on the one hand, are made of foamed polyurethane foam, and on the other, of polished foil.
This insulation effectively saves room space, since its thickness is 3-5 mm.
Glass wool
Glass wool is used less and less today. But it has one undeniable advantage. It's cheap.
When working with such material, it is worth stocking up on protective gloves, and you also need to protect your eyes. It is necessary to additionally insulate with film or foil.
Warm plaster
This material performs both decorative and heat-insulating functions.
Plaster can be used as an independent raw material, or can be combined with other thermal insulators. In any case, it must be applied in a very thick layer.
Expanded clay
The floor in the basement can be insulated with expanded clay. This is an inexpensive option, very easy to use and effective. The thickness of the expanded clay layer depends on the expected load.
It is recommended to choose two types of expanded clay with fractions of 5-20 mm, this will protect the floor from subsidence. The size of the bulk layer should not be less than 10 cm.
Sand and crushed stone
The construction of sand, crushed stone and screed is also quite effective.
First we deepen and level the floor. The first layer is crushed stone, 10 cm thick, then sand, 5 cm thick. After thorough compaction, fill it with hot bitumen and make a reinforced concrete screed. This is a traditional and inexpensive option.
Application of polyurethane foam
Often a decision is made to insulate the basement using polyurethane foam. This material will not only protect it from cold and moisture, but will also prevent biological and chemical effects, which is very important for vegetable storage. Insulation with polyurethane foam involves some features during the work process. You will need:
- carry out surface preparation;
- make insulation, that is, apply a layer of insulation;
- if necessary, do finishing work.
Cross-section of polyurethane foam.
Preparation includes careful surface treatment. It is necessary to level the walls, lay all the necessary communications and provide ventilation in the garage and basement. After this, you can install the sheathing, which will later serve as the basis for shelves and racks.
The process of applying polyurethane foam is quite complicated, so it is better to entrust it to professional builders. To work with this thermal insulation material, expensive equipment and certain construction skills are required.
Professionals will be able to insulate your cellar quickly and will not make mistakes. In addition, most companies carry out such work with a guarantee. You can be sure that your basement insulation will function perfectly for many years. If you want to save money, you can complete the work on the basement yourself by finishing and furnishing it.
There are many ways to insulate a cellar in a garage. Using the recommendations, you can independently transform the basement in the garage into a functional vegetable storage.
How to make ventilation in a garage with a basement
DIY garage basement
Basement insulation with foam plastic
Astratek
The material astratek is a liquid consistency.
Advantages:
- Ease of use;
- Non-flammable and non-toxic liquid;
- Used in various rooms;
- Has water-repellent and weather-resistant properties;
- The internal area of the room is preserved;
- Complex coating forms are available.
About forced exhaust
It makes no sense to install a fan on the exhaust pipe of general ventilation for three reasons:
- effective selection and exhaust of air is carried out only when the unit is turned on;
- in the absence of the owner, the impeller of a switched-off fan covers at least 50% of the cross-section of the ventilation duct, the natural removal of moisture is greatly slowed down;
- electricity is consumed.
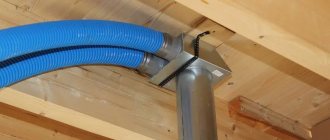
If you have converted a garage into a workshop, there is a reason to make a local exhaust device consisting of a suction hood, a duct fan and an air duct with a check valve. The cap is made from available materials (thin sheet metal 0.3-0.5 mm), the air channel is made from sewerage pipes Ø110 mm.
The petal valve and duct-type fan are selected to match the internal diameter of the ventilation duct - 10 cm. We will give a number of installation tips:
- The umbrella is placed above the source of air pollution (usually a workbench). The dimensions of the cap are 20 cm larger than the maximum dimensions of the source, the opening angle is no more than 60°.
- Try to hang the umbrella at a minimum distance from harmful emissions, taking into account the convenience of performing the work.
- Mark the shortest route for laying the air duct from the workbench to the outer wall of the building.
- Insert the valve and fan inside the sockets, having previously wrapped them with sealing material (foam rubber is a suitable option). Drill a hole in the wall of the ventilation duct and insert the power cable there.
- A check valve is installed at the outlet of the duct, a fan is installed within the room. Protect the outside of the air duct with a grille and mesh to block the path for birds and rodents.
Installation of a duct blower inside a plastic pipe d110 mm
Reference. The recommendations are not suitable for a garage converted into a paint booth, where the source of airborne contamination is distributed throughout the entire bay. In such cases, full forced ventilation is installed with air cleaning and heating, as is done in industrial premises.
Do not forget about the need for inflow - after turning on the fan, fully open the grille for incoming air. Otherwise, a working unit will simply overturn the draft in the nearest exhaust duct.
With a small umbrella weight, the last section of the air duct can be made rotary, which allows you to quickly move the hood to the next table. See the implementation of the method in the next video:
Insulating a cellar in a garage
The peculiarities of insulating a garage cellar include the fact that with normal thermal insulation of the garage, the basement is also insulated from the outside, which prevents freezing. The main difference from other rooms is that high humidity occurs in the garage cellar, and therefore it is important to have waterproofing.
Internal waterproofing of the room is most often used. There are differences when applying thermal insulation materials in a garage compared to other rooms. The most important thing is that there is an increased fire hazard in the garage, and therefore, when choosing and applying the material, you need to pay attention to the flammability of the insulation.
How to insulate a cellar in a garage is up to the owner to decide, but it is, of course, necessary to take care of its safety. In addition, you must remember to insulate all communications if they pass outside. And the electrical wires must be carefully insulated so that if moisture gets in, there is no risk of short circuiting and fire.
Installation nuances
It is not always possible to ensure air flow from the street, for example, in a box in a cooperative garage or built into a house. In such cases, the upper end of the supply pipe is led directly into the garage not far from the gate, and ventilation grilles are installed in them.
Advice! Grates should be placed away from internal locks and gate latches to prevent the garage from being broken into through them.
Scheme of natural ventilation without the supply pipe exiting to the street Source 1poclimaty.ru
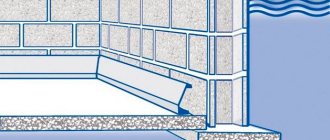
Insulation of the floor and foundation
First of all, you need to insulate the floor and foundation of the basement. For this, waterproofing is required. It will help with the rise of groundwater, which occurs in the spring due to melted snow. The most used floor and foundation material is concrete. Under the concrete base there should be a sand cushion, as well as crushed stone, and all this must be compacted as thoroughly as possible.
Then you can fill everything with bitumen, and then make a concrete screed on a reinforced mesh.
After the floor is poured with concrete and it hardens, you can leave it as is, or you can apply decorative material or additional sheathing with wooden beams.
We insulate the floor on the ground
Initially, the earthen floor is leveled with sand.
How to insulate the floor in a garage if it is based on ordinary, bulk soil? The work is carried out according to the following scheme:
- surface preparation;
- organization of a hydraulic barrier;
- installation of logs;
- laying insulation;
- second hydraulic barrier;
- fine coating.
Any insulation work will reduce the height of the room by 30-60 cm. To compensate for such losses, it is proposed to organize a pit, if the ceiling between the garage and the basement allows it.
Surface preparation consists of leveling the soil and compacting it. Uncompacted soil may sag over time.
This will disrupt the geometry of the insulating pie. It loses its integrity, and therefore its performance characteristics. Waterproofing prevents the penetration of moisture from the soil to the insulating material and frame. Polyethylene film or roofing felt can act as waterproofing. These are all budget options. The modern market offers geotextiles. It does not allow moisture to pass through, but does not interfere with air exchange. Regardless of the type, any hydraulic barrier is laid overlapping at the joints and on the walls. All joints are taped with construction tape.
A wooden or metal frame is installed on top of the hydraulic barrier. It is assembled from transverse and longitudinal beams. If it is a tree, then choose a beam 200 mm high and 100 mm wide. It must be soaked in antiseptic. Wooden beams at intersections are connected with steel corners. They will give the structure strength.
Thermal insulation is placed in the cells of the frame. Before you insulate the garage floor with your own hands, you need to calculate the required thickness of thermal insulation. This is easy to do based on building codes. Mineral wool slabs, polystyrene foam, and expanded polystyrene are used as thermal insulation. You can use spray insulation. Installation of the slab material is carried out by surprise and without internal gaps. The gaps between the slabs are potential cold bridges where condensation will accumulate.
Once the installation of thermal insulation is completed, the installation of the second layer of the hydrobarrier begins. It should not fit tightly to the insulation. There must be a ventilated gap between them. The waterproofing is fastened using a construction stapler. This is followed by a rough flooring made of 50 mm thick boards and a finishing coating.
We insulate the concrete base
Scheme of floor insulation in a garage on a concrete base.
How to insulate a concrete floor in a garage? The main thing here is to choose insulation with increased density and compressive strength. Only dense and durable insulation will withstand not only operational loads, but also the weight of the finished floor covering. Experts pay attention to C-25 foam and polyurethane foam. They have all the necessary characteristics. Also read: “Insulation for the garage: mineral wool, polystyrene foam, etc.”
The work is carried out in the following order:
- preparing and leveling the surface;
- laying insulation on glue;
- organization of waterproofing;
- laying fiberglass-based reinforcing mesh;
- rough cement-based floor finishing;
- fine coating.
The disadvantage of such insulation is the long maturation period of the cement stone. It is 28 days. During this period it is necessary to spray the cement.
Thermal insulation of the floor with sand
To insulate a bulk or traditional cellar, it is recommended to choose sand as insulation for the floor. It has a relatively low cost, but at the same time it has excellent heat retention qualities. To achieve the best performance, the composition is distributed evenly and covered with finishing or film on top.
When to close vents
The issue of closing and opening vents in winter must be approached individually. It all depends on many factors - on the temperatures inside and outside, on the difference between these temperatures, on the level of humidity, etc.
If it’s quite easy to monitor the temperature - you just need to buy an inexpensive thermometer and hang it on the wall, but to determine the humidity you will have to buy a more expensive hygrometer.
If this is not possible, you can navigate by the level of condensation formation.
Vents should be closed when there is a strong increase in humidity and/or a sharp drop in temperature. If drops of liquid begin to condense on the ceiling, this is a signal that the vents should be closed.
The main thing is to focus on optimal microclimate indicators.
Wall insulation
When insulating the walls of a garage basement, you need to pay special attention to various types of communications. Walls are most often insulated when the room should not be used for storing cans of preserved food, but, for example, as a billiard room or gym. Foam is best suited for this.
Before applying insulation, it is necessary to level the walls, cover all cracks, and also treat them with an anti-mold and mildew agent. The first step is to correctly size and cut the foam sheets. Material with a density of 25 is well suited for this. Then we fix the insulation to the wall using special glue. A screed should be applied on top of the reinforced mesh.
If the basement is very wet, then it is necessary to apply another layer of waterproofing, and a decorative layer on top. For this purpose, tiles or anything that will look elegant in the room is suitable, depending on its purpose.
It is very important to avoid unnecessary joints when installing thermal insulation. If there are cracks, then moisture will penetrate and heat will escape. If lathing is used to install thermal insulation, then all cracks and inconsistencies need to be filled with foam so that there are no unnecessary gaps.
What is the best way to insulate a subfloor?
Insulation is selected depending on the behavior of the basement at different times of the year.
The choice of material is also influenced by the following factors:
- Indoor humidity level;
- Availability of heating;
- Availability of drainage around the building;
- Purpose of the underground.
Construction stores offer thermal and waterproofing materials with various characteristics. The following are popular and available:
- Styrofoam. The cheapest insulation. It is distinguished by its lightness, resistance to rotting, moisture resistance, and low price. The combination of these qualities makes foam plastic the most popular material for insulating wooden houses. The disadvantage of polystyrene foam is that it attracts rodents, is fragile, is highly flammable and releases harmful chemical compounds into the atmosphere.
- Expanded polystyrene. A substitute for polystyrene foam, which is more durable and has a tongue-and-groove system for a seamless connection. The material is often used to insulate basements from the outside and inside.
- Polyurethane foam. A sprayed material that fills all cracks when applied to surfaces. Creates a completely sealed coating, does not burn, does not rot. Disadvantages of the material: high price and the impossibility of self-application without special equipment.
- Penofol. Flexible insulation. Provides decent thermal insulation. Fireproof and waterproof.
- Minvata. Soft insulation, suitable for use only inside absolutely dry rooms. Under the influence of moisture, mineral wool begins to rot and gradually decomposes.
- Expanded clay. The use of this bulk material is only possible for insulating the floor and protecting the foundation from the outside.
Ceiling insulation
When you insulate a basement ceiling, you provide heat to the garage floor. This will keep the garage in strong condition for many years. For insulation you will need a sheathing. It can be made from timber or a metal profile. Wood lovers should understand that before installation it must be protected from moisture with a special compound. When the base is ready, you can lay the insulation material. Be sure to install a layer of vapor barrier on top so that the floors in the garage are not damp due to the basement. The next step may be to secure a decorative material, such as plastic.
Ventilation
In order to maintain a normal balance between temperature and humidity, ventilation is required in every basement. The garage cellar is no exception. The ventilation system can be different, it is important that it exists and works effectively. It is advisable to install ventilation while the garage and basement are just being built, but this can be done later.
For a garage, ventilation is necessary not only because of the creation of a microclimate, but also because of the presence of exhaust gases and toxic substances, which, in the absence of an exhaust hood, will accumulate in the room, including in the garage basement.
Ventilation can be natural or forced. When installing natural ventilation, two pipes are required, which are at different heights. Sometimes it is enough to simply make holes in the basement to ensure sufficient ventilation.
For forced ventilation equipment, additional mechanisms will be required, which must be assembled strictly according to the manufacturer’s instructions. This complex includes fans that help draw air out of the room. In addition, immediately before the crop storage season begins, regardless of the availability of ventilation, you need to ventilate the garage, open the external doors and the cellar lid.
Basement heating Library
There is a basement in almost every apartment and private building. It is used for different purposes: laying pipelines and heating equipment, storing agricultural products, and converting it into a living space. Shops and offices are often located on the ground floors: rent here is cheaper.
Basement of a private house
However, if we are talking about the basement of a country house, then fresh harvests and pickles, as well as unnecessary things, are usually stored in it. To prevent anything from spoiling or rotting, you need to take care of the heating system in the basement.
The choice of equipment largely depends on the location of the basement: for a summer house and a garage you need to select different options. It’s worth starting from how much thermal energy you need for heating. Along with the basement heating system, it is necessary to organize forced ventilation, since there are no windows in the underground for natural air exchange.
Storage of agricultural products
To organize the storage of potatoes, carrots, beets and other crops in the basements of a private house or garage, as a rule, additional heating of the basement is not required - usually the proximity to the living rooms above is sufficient. Low temperatures are not scary, but the main thing here is not to let it get below zero.
If the underground freezes, heating the basement of a private house is necessary, otherwise the products will freeze. It can be organized in several ways, the most justified is connecting heat guns (fan heaters) or infrared heaters.
Bath, sauna, swimming pool
To create an additional source of heat, you can lay a warm floor, preferably a strip floor, it is more unpretentious and lasts a long time.
An electric heated floor is expensive if you use it constantly, but for temporary heating this option will be the best, because it is easy to install.
Isolated room
If you organize additional living space in the basement of a private house, you can use a stove or boiler to heat it. It makes sense to install the boiler not in one basement, but in the whole house; simply lay an additional pipe in the underground with a coolant, for example, water, if water heating is used.
Calculation of basement heating: a 25 kW boiler is installed to heat 60-180 sq. m area, 25-35 kW – 200-300 sq. m. For rooms up to 200 sq. m. A long-burning stove is also suitable. Heated floors can be used as additional heating.
Hatch equipment from the inside
The procedure for insulating a hatch is one of the most labor-intensive. We have to ensure that the lid is tightly connected to the shaft and carefully fill all the gaps. The main task is to prevent the entry of external air, which causes freezing, condensation and ice.
It is most convenient to work with hard materials, and the maximum effect is obtained from spraying liquid polyurethane foam. When installing the heat insulator, you should keep a can of polyurethane foam on hand to immediately seal any cracks found.
Many people prefer foamed polyethylene, which can be used to wrap the hatch shaft from the inside. This is convenient if the walls are made of wood - the material is secured with a stapler. Before work, you need to do thorough preparation - apply an antiseptic, abundant waterproofing.
DIY wooden door
Typically, wood is used to make the structure if the house has wooden flooring. When using this material, we make a so-called hidden hatch: visually the subfloor will be almost invisible.
IMPORTANT! Natural wood not only conceals the door in the floor, but also reduces its weight. Wood is often used for hatches under laminate flooring.
For the work to go quickly, you need to have all the necessary materials and tools at hand, namely:
- flooring boards;
- slats for sheathing;
- support bars;
- plywood sheet;
- screws, nails;
- drying oils;
- thermal insulation film;
- shock absorber, sash hinges;
- handles for the cellar hatch;
- chalk, pencil.
You can make the door yourself.
Consider making an entrance measuring 80 by 80 cm. With such measurements, the door should be smaller in size so that it fits well to the floor and leaves a gap of 5 mm. Next we follow the instructions:
- We make a “draft” of the flooring: you need to nail 4 beams for support.
- We cut out blanks measuring 79 cm from the floorboard.
- We take a plywood sheet and cut out a square 79 by 79 cm. A gap of 1 cm between the floor and the hatch is needed so that high humidity or sudden changes in temperature do not deform the door.
- To make the lathing for the inside, you need to cut the slats into 79 cm long sections.
- The last step is to coat each element with drying oil, which protects against moisture and fungus.
The design is made in several layers. The first layer is plywood with slatted sheathing. The second layer is thermal insulation to insulate the hatch. The third layer is the overlay of the board.
IMPORTANT! To make the basement door invisible, the top boards must be nailed parallel to the floor.
Metal door
Unlike wood, a metal hatch is more reliable and durable. This option is good to use when the basement is located in the garage. Again we stock up on everything we need:
- sheet steel 1 and 3 mm thick;
- corner 3-4 mm made of metal;
- loops;
- anchors;
- gas closer;
- foam or other insulating material;
- primer;
- rubber seals;
- other tools: tape measure, knife, screwdriver, welding and angle grinder.
To make the design correctly, we again refer to the instructions:
- We take a metal sheet 80 by 80 cm.
- We turn the workpiece over and weld the metal corner.
- Next you need to insulate the door.
- We cover the insulating layer with a sheet of steel 1 mm thick. The edges must be secured with self-tapping screws.
- Now you need to mount and weld all the parts of the cellar hatch. We are installing a frame at the entrance. We weld the parts of the steel angle.
- We fix the frame to the concrete using anchors.
- To reduce heat loss and protect the structure from damage, it is recommended to seal the protruding edges of the metal lining with gaskets.
- The cellar door is attached to the frame using reinforced hinges. To make it convenient to open the door, you need to equip it with a gas closer.
A steel hatch can be made both in the garage and in the house, you just need to cover it with wood or the material from which the floor in the room is made.
Access to the cellar under the tiles
Materials such as tiles are most often used in the kitchen. Therefore, if your basement is located there, you can make this version of the hatch under the tiles. Manufacturing this design takes less time than the two previous options. We will need:
- steel corner;
- steel sheet 3 mm;
- solution;
- tile;
- fittings
The work takes place in several stages:
- We cut out the bottom of the hatch from steel to the same dimensions as the entrance to the basement.
- We weld the corners, making sides. We attach reinforcement inside in the form of cells.
- We make the entrance frame of the basement from corners and fill it with concrete.
- We fasten the sash and support using reinforced hinges.
- Place the tiles on top of the previously mixed mortar.
Heating a cellar in winter: types of heating and arrangement of electricity
Heating a cellar in a country house area efficiently and effectively is not as easy as it might seem at first glance. This is especially true for those owners who want to grow plants or vegetables in the cellar, or if the room requires a person to stay in it for a long time. Heating the floors using a heated floor system will not be enough.
For heated rooms, owners often use a heater. They are quite inconvenient in a small cellar room, and moreover, they do not always solve the problem of heating the room. The solution to the problem could be the installation of a heating system, although this is quite a serious amount of work for the owner of a small underground space.
Loading …
Types of heating systems
Of all existing heating systems, two main types can be distinguished
Water heating at home
Involves the installation of radiators and a boiler, gas or electric.
Water heating heats the air using a boiler, and the main advantage of this system is the constant availability of hot water.
Stove heating
To heat your home with stoves, you need to make a stove or potbelly stove. This type of heating is the most economical in use and installation. Placing a stove does not require much space, unlike a boiler, the installation of which requires careful selection of the planned location.
The stove provides enough heat to heat a small cellar in a private house. Among the disadvantages of stove heating, one can note the arrangement of the chimney, in which it is important to calculate the required number of pipes and sufficient draft.
Calculation of cellar heating
When choosing boiler heating in a room, you need to accurately calculate its area. If it is large enough, from 500 square meters or more, the boiler power should be at least 40 kW. If you only need to heat a cellar in a private house, then only 25 kW is enough.
When heating with a stove, it is enough to decide on the type of heater, which can be a brick stove, a long-burning stove or a potbelly stove. If you choose a potbelly stove as the main means of heating, you need to take into account that it can heat a small space. If you need to heat large areas, you should turn to other types of stoves.
A long-burning stove can heat an area of up to 200 square meters. The power of such a furnace is calculated in the same way as boiler equipment. A traditional brick oven is a hassle-free alternative since there is no need to determine its capacity. In any case, when arranging a stove, the main thing is to correctly calculate the chimney and make a firebox.
The stove should be placed at the bottom of the house so that warm air can rise from bottom to top. If the house does not have a basement or cellar, the stove equipment is placed on the ground floor.
If a brick stove is made, the damper in it must be closed when the fuel has burned out and there is no flame on the coals. This will allow you to save fuel used and heat savings. If this is not done, then all the heat that comes from the coals will go into the chimney.
Installation of heated floors
In a living room, a heated floor can become an element of increased comfort in use. Warm floors are made when there is stove heating, since it is along the floors that cold air moves, which occurs in the ventilation system of the house.
When installing heated floors, it is important to provide high-quality thermal insulation and waterproofing of the foundation. For insulation you need to use mineral wool and polystyrene foam. Waterproofing is needed if in the area where the house is located, groundwater passes close to the surface and there is a danger of flooding.
Heating with electrical equipment
The use of electrical appliances for heating the cellar is one of the most budget-friendly options for heating a room. In order for the heaters to operate normally, it is important to make high-quality electrical wiring in the cellar and calculate the total power.
Electrical equipment can be used in a variety of ways, the main thing is to know its main types and features of their use.
Convector heaters
To heat a large cellar area or in the basements of a private house, it is better to use convector heaters. They can cope with the cold even when there is severe frost outside. Convectors are manufactured in different designs, which makes it possible to mount them both on the floor and on the wall.
The main advantage of this type of heaters is their ability to quickly heat a space, ease of installation, noiselessness, and ability to heat large areas. Among the disadvantages, it is worth noting the increased electricity consumption.
Oil heaters
Until recently, oil heaters were used more often than others. To start heating, it was necessary to heat the oil in the radiator, after which it began to give off heat into the space. The time spent on heating the cellar in this case is much higher than in the case of convector heaters.
Oil-based heaters are very cheap, easy to use, but quite heavy and have some restrictions when moving. The advantages include a long service life, noiselessness, low price and ease of installation.
Infrared heaters
This type of heating in the cellar is rarely used, since the device only heats those surfaces that are located directly in front of it. Thus, heating the air in the cellar will require a very large amount of time and electricity.
The main advantages of infrared cellar heaters are noiselessness, reliability and durability, safety during operation and the ability to quickly heat a certain area. Disadvantages include specific installation, the need for high ceilings and overheating during long periods of operation.
Selecting heating methods for a specific room
Heating a cellar in winter is a rather complex issue that must be approached with all responsibility. It is important to understand the environmental conditions in which you plan to make a cellar.
If this is a temporary home, cottage, or other similar structure, then a simple heater is quite enough. If people will be in the cellar for a long time, then it is necessary to make a more efficient heating system.
In this case, you need to install a stove or boiler. It is important to remember that for the installation of gas equipment it is necessary to allocate separate rooms, and all work must be carried out by special agreement with gas services.
responded with an error: The request cannot be completed because you have exceeded your quota.
Source: https://ProPodval.ru/mikroklimat/uteplenie/obogrev-pogreba-zimoj.html
Conducting communications
It is better to conduct pipelines, power cables, and other communications into the basement before insulation.
The cables must be pulled into a protective corrugated sleeve. Ventilation pipes are fixed to the walls or ceiling slab, ensuring the tightness of the passage areas.
After fixing the heat insulator, it is not recommended to lay communications.
Thermal insulation of the caisson
We are talking about separate storage facilities that are built on the territory of the plots for the subsequent storage of vegetables and preservation. To protect this building from frost, it is recommended to do the following:
- Carry out reliable work to insulate the room from the cold outside (this requires the use of dense soil).
- Create high-quality waterproofing, since moisture is often the main cause of freezing.
- Reliably protect internal structural elements from penetration of cold air through the walls.
- Also, if necessary, a special vestibule is created at the entrance, which contains a thermal insulating air cushion.
Previously, we looked at how to insulate a ceiling in a cellar, which is directly related to the heated building. It should also be clarified that when improving the caisson, it is necessary to do the same series of works, but choose denser materials for this.
Important. Gardeners and vegetable gardeners are often faced with the question of whether it is necessary to insulate cellar walls and other structural elements. Here an allowance should be made for the climatic conditions in the region, as well as the purpose of the storage facility. If it is necessary to maintain a comfortable temperature, thermal insulation is necessary. If low temperatures are required, then internal insulation is not always advisable.
What is condensate
To understand why water droplets form on the ceiling in the basement and what condensation is, consider two parameters - absolute and relative air humidity.
Absolute air humidity is measured in g/m3, relative humidity is measured in percentage.
The ability of air to hold steam depends on temperature - the warmer the air, the greater the mass of moisture it can accept, and vice versa. Therefore, with a sharp cooling of warm air, the value of its maximum humidity decreases, and the excess moisture contained in the gas before the temperature dropped falls onto cold surfaces in the form of water droplets.
Conditions required for water condensation
From the process described above, it follows that for condensation to form in a room, two factors must be present:
- the presence in the cellar of bases in contact with air with a sufficiently low surface temperature;
- the entry of warm air containing moisture into the basement.
The absence of exhaust ventilation contributes to water condensation, since condensate evaporating from surfaces is not removed outside and participates in a closed cycle of evaporation-condensation-evaporation.
Reasons for the formation of condensation in the cellar
Thus, drops of water on the ceiling in the cellar are formed for the following reasons:
- lack of insulation of enclosing structures;
- Each time the hatch is opened, a portion of warm air with a certain amount of steam enters the room, condensing on the cold base.
At the same time, moisture condensation on the ceiling can occur with varying intensity, depending on the time of year. For example, if there is an unheated room above the basement, in which in winter the air temperature may be even lower than in the cellar, then the flow of cold air down will not be accompanied by the formation of condensation. In summer, on the contrary, moisture condensation will be stronger, especially after rain, when the humidity of the warm air entering the cold cellar is especially high.
A warm cellar under the garage - is it possible?
To organize a warm cellar, it is not necessary to install a heating system there. It is enough to increase the thermal resistance of its enclosing structures and ceilings. How and how to insulate a cellar in a garage? Insulation work can be carried out outside if the building is still under construction. In a ready-made cellar, only internal work is possible. As insulation, it is most convenient to use slab material with a low moisture absorption coefficient and high strength. Polystyrene foam and extruded polystyrene foam fit these requirements. They are mounted on basement walls and under wet floor screed.
To reduce heat loss through the basement ceiling, the concrete floor in the garage is insulated using joists. Here, the thermal insulation material can be expanded clay (subject to its additional waterproofing), mineral wool, or polystyrene foam. More details about the organization of the insulating layer on the garage floor are described in the video:
Advantages and disadvantages
The work performed to improve cellars, as a rule, has a number of positive qualities, as well as some disadvantages:
- An optimal atmosphere for storing canned goods and vegetables will be constantly maintained inside the storage facility.
- You can protect the structure from freezing, which negatively affects the structural elements of the extension.
- Subsequently, it is possible to use the premises not only as storage, but also for other purposes.
- Thermal insulation will avoid periodic heating of the cellar space.
- After the insulation work is completed, there will be no increased humidity inside the storage facility.
- Thermal insulation will protect the storage from the penetration of rodents and other pests.
However, despite the positive aspects, there are also a number of disadvantages: the cost of comprehensive insulation is quite high, and a higher temperature will be regularly maintained inside the cellar. In addition, when performing cladding, the usable area inside the storage facility will be significantly reduced.
Important. Before proceeding with thermal protection of the basement, it is necessary to understand the feasibility, since if the structural elements do not freeze at excessively negative temperatures, then performing this work will be impractical.
Common mistakes and useful tips
Before insulating the basement in the garage, it is necessary to carefully level the surfaces of the walls, floor and ceiling. Some people neglect this process and make a big mistake. After all, most coatings are applied to a hard, flat surface using anchors or adhesive mixtures.
Leveling walls with plaster
For leveling, plastering is most often used, with the help of which:
- the durability of the installation is ensured;
- all inaccuracies in the structure are eliminated;
- surfaces acquire the necessary hardness.
Another common mistake is poorly thought out electrical wiring. Before plastering, it is imperative to lay a cable or wire for further installation of switching devices and lamps. The open installation method, even in corrugated plastic or metal pipes, is still undesirable due to the fact that the room has high humidity.
Important advice! A dark and damp basement is perfect for the growth of various types of fungi. Before insulating the walls and ceiling in the garage cellar, they need to be primed.
Nowadays there are many different materials on sale for this purpose with antibiological additives that inhibit the development of mold and bacteria. In addition, primers contribute to the non-flowability of the plaster and its long-term preservation.
If the basement has just begun to be built, then insulation is carried out from the inside and outside. This process is complex and costly in time and effort, but necessary. The cellar is dug around the perimeter and a layer of roofing material or bitumen-based material is laid.