/Repair/Plumbing/
So, you bought a faucet to replace an old one or to equip a sink with a new set and decided to take on the installation yourself. On the one hand, connecting and installing a faucet on the sink with your own hands is very simple - anyone can do it. On the other hand, even having some experience, but not knowing the basic rules, you can do the work poorly or completely ruin the product, for example, by knocking off the thread, bending the connections, etc. Another reason why you still have to contact a plumber is this is the lack of a set of plumbing tools. But this problem is completely solvable, because you can always ask your friends for something.
We tried to explain as clearly as possible how to install a faucet in the kitchen with your own hands, reliably and correctly.
List of required tools and spare parts
Before you begin installing kitchen plumbing with your own hands, you need to prepare and purchase everything you need. You will need:
- FUM sealing tape - it’s better not to use flax tow, as it swells with water, and then it will be difficult to remove the liners;
- Open-end wrench 10 or 11;
- Tubular wrench – needed to tighten a hard-to-reach nut when installing the faucet to the sink;
- Installation kit - it should contain rubber O-rings, that is, half washers (2 pcs.), one horseshoe-shaped metal half washer, a stud (1 or 2) and a nut. This set is included with the mixer, but if you wish, you can buy a thicker and stronger O-ring, since manufacturers do not always include high-quality gaskets in the kit;
- Pliers, a small wrench, a screwdriver - sometimes these are also needed;
- A rag, a basin and a flashlight will also come in handy so that you can see everything;
- And finally, the main thing - 2 plumbing connections - are included in the kit, but it is better to buy others, since the factory ones are often short and made of silumin;
Perhaps it’s worth paying attention to the eyeliners. Keep in mind that:
- The eyeliners need to be of such length that they do not break, but bend in the form of a semicircle, that is, they should not be too long or, conversely, short when tight. The most common length is 86 cm;
- If the factory eyeliner is too short, then it is better not to try to extend it, but to buy a new one;
- In addition, do not buy silumin hoses, especially if you bought a silumin mixer - at least the connections should be reliable;
- Installation of flexible hoses is easier than connecting rigid ones, but they are considered less reliable, so it is better to install them together with tap taps;
- The set of eyeliners must include gaskets;
- Replacing an old faucet in the kitchen most often involves replacing the old connections, because they also wear out.
How to choose a kitchen faucet?
On sale you can find a huge number of different options for mixers, which differ in design features and materials of manufacture.
Previously, most products were made of durable metal, and they were wear-resistant. Now cheaper and lighter alloys, such as silumin, are often used in production.
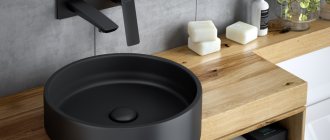
The silumin mixer looks nice, but is not reliable
Such designs will definitely not serve you for many years, but at the same time they have a minimal cost. Installing a cheap faucet is dangerous, because it can suddenly leak when the residents are not in the apartment, which is fraught with big problems.
This is why experts recommend purchasing high-quality products, despite the fact that they have a higher price. You can distinguish a reliable mixer by its weight - any brass structures are an order of magnitude heavier than silumin ones.
Table No. 1. The most popular faucet designs.
| View, illustration | Description |
| With one lever (cartridge) | The mixer is designed in such a way that there is a cartridge inside it. When the lever is lifted, the valve opens and tap water flows. The water temperature changes by manually turning the lever to one side. Such a mixer is unsuitable if a flow-through water heater with the ability to change the temperature regime is installed, since it is impossible to smoothly adjust this lever. Otherwise, this type of mixer is convenient for the kitchen, because it can be operated with one hand, which is extremely important during the cooking process. |
| With two valves | This design has been used for a long time, so of all the possible options it is the most practical. In this case, shut-off valves are attached to individual channels, and to supply water you will need to open one of the valves (from either side). It is worth noting that this design consumes much more water compared to the previous option. |
| Sensory | This is the most modern type of design. The sensor is triggered by hand movements, due to which the magnetic valve opens and water is supplied. This is very convenient for the housewife, because she doesn’t have to dirty the tap with dirty hands. However, such a product has two significant disadvantages. The first is high cost. Secondly, the mixer will not function without electricity, and if the lights go out, it will not be possible to turn on the water. |
With retractable watering can | This type of faucet will be needed only if the housewife needs to wash a large amount of dishes every day (if she has a large sink). In other cases, its installation will be unprofitable. |
When purchasing a mixer, you should pay attention to the following nuances:
- Sink dimensions. Based on the size of the sink, you should choose the optimal length and height of the tap. So, according to the standard, the stream of water that comes out of the tap should fall into the middle of the sink. The height of the spout should be positioned in such a way that the mixer is comfortable to use. However, the jet cannot be too high, otherwise the water will only splash on the sides along with greasy drops from the dishes.
- The location of the recess for installation and its diameter. To avoid having to enlarge the hole in the sink, you should choose the appropriate flange size. If you have an atypical hole, you will need to purchase an adapter.
- Rotate the tap. The choice of the optimal option will depend on the number of sinks. So, if there is only one sink, then a 90-degree turn is sufficient. If you have two sinks, it is better to choose a mixer with a 180-degree rotation.
- Appearance of the product. For many, this nuance is of great importance, because the mixer must be combined with the sink. If desired, you can purchase chrome or matte products, or to match the color of the sink itself.
The modern market offers faucets to suit any kitchen design
Basic criteria for choosing a kitchen sink
Step 1. Dismantling the old mixer and preparing for installation
Before installing a faucet in the kitchen, you need to turn off the water (there is no need to turn off the riser) and, just in case, put a rag on the bottom of the sink so that small parts do not fall into it, and large parts do not damage it.
Of course, replacing a kitchen faucet requires dismantling the old faucet. To do this you need:
- First, disconnect the old hoses from the cold and hot water pipes by hand or with an open-end wrench. Do not forget to place a basin under them and drain all the remaining water, after which the threads of the pipes must be wiped clean.
- Then, using a tubular wrench, you need to unscrew the clamping nut on the stud (or two studs), which secures the faucet to the sink (right under it). When you unscrew this nut, the metal half washer will also come off.
- Now you need to pull out the mixer along with the hoses from the sink hole. Well, that's all, you can proceed to the next step.
Installation errors and ways to prevent them
When installing yourself, you should avoid common mistakes:
- Kinking of hoses.
- Water leaks after the process is completed. To eliminate this problem, rubber gaskets, linen seals and FUM tapes are used.
- Excessive tightening of nuts at the junction of the pipeline and hose. Gaskets will also help here, and docking work must be done manually, slightly tightening with a wrench.
Following the above recommendations will prevent incorrect operation and premature failure of the equipment.
Mounting the device on a wall
Installing a faucet into the wall is a rather original solution for the kitchen interior. In this case, the crane will occupy a minimum of working space. Appropriate cutouts are first made in the tile or wall through which the connection will be made.
This type of installation looks quite aesthetically pleasing. In some cases, the pipes from the wall are brought outside, but this option is detrimental to the interior of the kitchen; it is better to hide all the pipes behind the wall.
Wall mounting does not require the use of flexible hoses. The main difficulty is to remove the pipes and cover them behind a layer of finishing
Installing the mixer on the wall requires appropriate water supply with the elements for connection to the outside. The connection method is the same for iron, plastic, copper or metal-plastic pipes, with the exception of the use of adapters and fittings.
The connection method is also not affected by the type of mixer (valve, cartridges, etc.). A prerequisite is the selection of a wall-mounted mixer, the design of which involves installation in the wall.
For installation on iron pipes, tees and angles are used. If the axes of the connectors for connecting the mixer coincide with the axes of the pipes, then it is enough to use couplings. To connect to other types of pipes, special fittings are used, which are also called water sockets.
Features of wall-mounted mixers
These models can be mounted at any height. Faucets are available with flexible and rigid spouts. Flexible ones have many position variations that allow you to perform any task in the kitchen. Products with a rigid spout require limited travel and rotation of the mixer.
The design of wall-mounted faucets is varied, as are their external design features. The photo shows a chrome-plated device with a flexible spout and aerator
For most kitchens, wall-mounted models are a fairly convenient and practical solution.
Connection sequence
First you need to screw on the eccentrics that connect the mixer to the pipes. To avoid increased condensation formation, the distance between the pipe axes should be 150 mm.
Most wall mixers are produced with exactly this distance between the eccentrics. You need to wrap tow (linen or synthetic) around the threads.
Threaded connections wrapped in tow or linen thread and then treated with sealant last longer and do not allow water to pass through
Next, screw the faucet nuts onto the eccentrics and install the decorative screen (overlay). It is carefully screwed on by hand, as it must fit snugly to the surface of the wall.
If the gap is no more than 5 mm, then you can disconnect the mixer and cut the eccentrics to the appropriate length. The decorative panel hides all imperfections on the wall.
Next, you should install the gaskets, which are included with the mixer and can be made of silicone, paronite, rubber and other polymer materials.
Gaskets are inserted into the housing nuts, ensuring a tight fit to the eccentrics. For maximum density, there should be no cracks on the eccentric. An uneven cut surface can be sanded with sandpaper.
The last stage is tightening the nuts: first with your hands, and when your own efforts are no longer enough, you need to tighten the connections with an adjustable wrench. The efforts should not be excessive so as not to damage the threads.
Preparatory work
Before installing the faucet, it is not necessary, but it is advisable to flush the entire plumbing system. The point of this procedure is to clean the pipes from scale and small metal particles adhering to their walls.
It is especially important to flush pipes in new buildings
Preparation for installing the mixer is as follows:
- It is necessary to block the access of water through the central riser
- Secure the workplace in one of two ways: either connect the hoses to the place where the mixer will be installed and lead them into the toilet, or unscrew the siphon elbow and drain the water into the sewer pipe.
- You should use the valves to release water from the central riser a couple of times.
- With the valves open, drain water from all plumbing fixtures.
- Install filters for mechanical water purification. Their installation location is immediately behind the central hot and cold water valves.
Theoretical knowledge
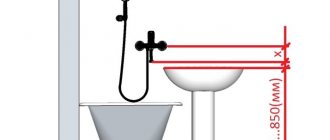
In most cases, bathrooms already have female end fittings for . If you do the wiring of highways with your own hands, consider the following important points:
- The axes of the hot and cold water supply inlet fittings should be installed at a distance of 15 cm from each other.
- Hot water is supplied from the left, and cold water is supplied from the right.
- It is most convenient to use a mixer installed at a height of 15-20 cm from the bathtub and 60-80 from the floor level. Therefore, it is best in this position.
- Recess the inlet fittings into the wall. This must be done in such a way that when laying the tiles on the wall, the ends of the fittings are located flush with the front side of the ceramic tiles. Thanks to this, you can hide the connection points of the plumbing fixture behind decorative cups.
It is best to use plastic pipes for plumbing. They are cheaper and more practical than steel and cast iron products, and even a person without experience can cope with welding such pipes.