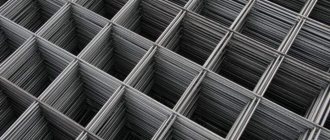
- Metal grid
August 7, 2019
3888
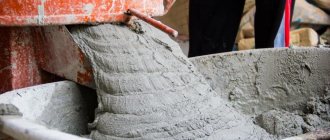
When laying floors during renovation or during the construction of a new building, leveling of the floors is always carried out at the final stage. As a result, the top layer becomes more neat and even. To give the surface strength, you need a floor screed mesh of various geometric sizes; it is used for high-quality reinforcement.
Reinforcing mesh for floor screed has many applications. But its main industry is construction.
- It can be used when arranging ordinary floors in non-residential industrial buildings
- When installing a specialized heated floor in a modern apartment or country house.
Installing a reliable screed mesh can significantly increase the service life and make the floor almost eternal.
You should choose and purchase the screed mesh correctly. It must be of proper quality. If the material is chosen incorrectly, the floor will quickly begin to deteriorate, and you will have to repeat the floor leveling procedure. This is a waste of time and money.
In this article we will look at the main features of choosing a mesh, as well as the correct laying technology.
Reinforcement of floor screed - when necessary
Reinforcing the concrete mixture with reinforcement is done to create a strong structure that is resistant to tension, compression or bending. For this technology, different working methods, materials and tools are used, based on operating conditions and the characteristics of the building. The finishing coating is laid after pouring the rough base.
This method performs the following function:
In residential premises, a similar measure is not used, since the slabs are covered with a 30-40 mm layer of mortar, which levels them. In this case, reinforced concrete floors account for a significant portion of all overloads.
Reinforced cement-sand screed is required for:
Important! The moving base must be reinforced, as it is prone to bending and stretching, compromising the integrity of the coating.
Reinforcement is more often used when installing rough and multi-layer structures, when pouring self-leveling floors and to reduce mortar consumption. In construction work, meshes made of metal, fiberglass, polymers, and fiberglass are used. When choosing an option, the requirements of design documentation and operating conditions are taken into account. Calculations are made according to GOST and SNiP.
Advantages, what is the difference from a conventional screed
A subfloor made without reinforcement and a reinforced one differ not in appearance, but in the presence of an additional layer in the form of a mesh made of different materials.
Screed reinforcement affects:
Additional Information! All requirements for the composition of solutions and stages of work are specified in regulatory documents (SNiP, VSN, MDS).
Features of the technology
Reinforcement is a method of increasing the load-bearing capacity of a structure. Particles of more durable raw materials than the main building material are introduced into the surface. Most often, concrete is reinforced, which collapses when dried out, under heavy loads or due to sudden changes in temperature (humidity).
Reinforced screed differs from conventional screed by the presence of additional reinforcing parts inside. The reinforcing structure is ideal for rooms with uneven floors. Using the technology, it is possible to quickly and easily distribute the solution over the surface, and the inclusions will withstand the mass of building material without deformation.
The floor is reinforced with a screed to prevent subsidence under the elastic base. Reinforcement is not necessary for hard surfaces or thin (up to 6 cm) screed. Technology is required for:
- insulation of any type;
- soil prone to swelling (sand, gravel);
- hydro-heat and sound insulation;
- rough floor along joists.
Additional elements take on the compressive effect, protecting the concrete from natural shrinkage. If a floating or composite structure is made on the floor, then reinforcement must be used. The inclusions neutralize bending loads.
Reinforcement materials
The technology is used for wet and semi-dry screed. Meshes made of metal, plastic, and fiberglass are used as reinforcement. They are placed at the bottom of the structure, but do not come into contact with the subfloor.
To prevent the appearance of cracks during shrinkage, the requirements for reinforcement should be taken into account:
Fiber is also used to strengthen the base.
Metal grid
Refers to the most durable method of reinforcing a concrete floor. It is made from steel wire 3-6 mm thick, fastened by twisting or welding.
This design ensures even load distribution. It is used as part of thick ties that are subject to significant pressure: in industrial and warehouse premises, shopping centers. When constructing private houses, technology provides a guarantee for the entire service life of the building. In terms of prices, this is the most expensive method of strengthening a concrete mixture.
Note! The strength of the base increases when using a mesh with small cells.
Plastic mesh
Reinforced screed using this material is possible in premises that experience light loads: apartments, small offices, private houses. The plastic does not deform from mechanical stress, stretches and does not damage the screed during the shrinkage of the house.
Advantages of polypropylene mesh:
They are produced in rolls 1-4 m wide and up to 50 m long. Installation is similar to metal fittings.
Fiberglass mesh
Made from aluminoborosilicate glass. Small cells have a square cross-section.
Performance characteristics are similar to plastic.
The disadvantages include:
Additional Information! This material is impregnated with substances that make it resistant to alkalis.
Fiber reinforcement
Fiber fiber is bulk fibers (6-20 mm) made of basalt, glass, polypropylene, steel, which are placed in a solution and thoroughly mixed in a concrete mixer for uniform distribution within the mixture. They prevent the occurrence of microcracks during shrinkage and increase the impact strength of the screed. Form multidirectional reinforcement.
Disadvantage: Inability to withstand high bending and tensile stress.
| Type | Application |
| Metal | In cases of increased load |
| Glass or polymer | A lightweight version of the screed, as it is light in weight |
| Basalt | With frequent exposure to chemicals, precipitation |
Note! Fiber most often strengthens the concrete mixture. But it does not have all the characteristics of a reinforcing mesh.
Plaster mesh: how to choose and attach to the wall
Plaster is rightfully one of the best ways to level vertical surfaces. When properly produced, this finish retains its quality for many years. However, only if all its components are held firmly and securely on the wall. And such a product as plaster mesh allows you to ensure such reliability.
What is a plaster mesh?
The main property of this mesh is wall reinforcement. This element can be mounted on a brick or concrete surface. Its presence allows the layer of material to be distributed more evenly and securely fixed on the wall surface, without falling off even under strong external influences. In this case, the mesh is especially important when a thick layer of material should be placed on the wall, as is often done to level the surface and hide flaws in concrete.
Types of plaster mesh
Today there are several types of this element on the market, divided according to their façade methods, manufacturing materials, and cell parameters. Some of them are used for outdoor work, and some are used indoors. Here are the main types:
- Masonry mesh. It is used for brickwork and has cells with a diameter of 5 millimeters. It is made on the basis of polymer substances;
- Stelox mesh. Versatile due to its chemical resistance and physical strength due to fiberglass. The cell diameter is 5 millimeters;
- Station wagon. The manufacturing material is polyurethane, the cell sizes can be 6x6, 13x15 or 22x35 millimeters;
- Armaflex. It is made of polypropylene, but differs from the usual mesh by reinforced nodes. Able to withstand large layers of plaster. Actually, it is precisely in these works that it is used. The cell dimensions are 12x15 millimeters;
- Plurima. A material used for both external and internal work. It is made on the basis of polypropylene and has small cell sizes - 5x6 millimeters. Can be used for both interior and exterior finishing work, and is resistant to chemicals;
- Syntoflex. Polypropylene mesh with cell sizes of 12x14 and 22x35 millimeters. Can be used for all types of work;
- Metal mesh. Particularly durable, based on steel. Some models can be used exclusively for interior work, while others, galvanized, are universal. The cell sizes in such grids can be very different.
Rules for choosing plaster mesh
First of all, when purchasing this reinforcing material, you must clearly understand in what work you will use it, and whether it is needed at all. Based on this, technical characteristics are selected. But regardless of the direction of use, such a mesh must meet several criteria, for which certain tests can be carried out. General selection rules:
- If the plaster layer is less than 20 millimeters, then the mesh may not be used at all;
- If the thickness of the plaster exceeds 3 centimeters, then only a metal mesh will do;
- With a thickness of 2-3 centimeters, fiberglass mesh would be the ideal solution;
- Plastic mesh is designed for working with gypsum plasters. In the case of using cement or other analogues, its use is not recommended;
- When plastering the base, as well as leveling the wall for subsequent laying of tiles, you can use a fiberglass mesh.
Important! If the height differences on the wall are more than 5 centimeters, then the ideal solution would be to abandon plaster and install the same gypsum boards or other panels on a pre-assembled frame. If we are talking about the ceiling, then you can use suspended or tensioned versions of the latter.
Testing quality
If time permits, purchase a small piece of mesh and test it for alkali resistance. To do this, you need to place this network in an alkaline solution for about 25 days, and then try to break it. If you notice a strong decrease in tensile strength, then it is better to look for other options. In addition, you can crumple the product into a ball, and then monitor whether it returns to its original shape. If yes, the mesh is of high quality.
Important! The above tests can be avoided if you buy the mesh for plaster in trusted places, where you can have no doubt about the quality of the product being sold.
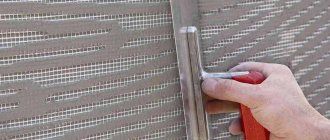
Installation of fiberglass plaster mesh
In order to properly fasten fiberglass mesh to concrete or other surface, you need to start from the top, securing the material with self-tapping screws to the upper cells. Moving down, we will fasten around the perimeter, which should be enough. When applying plaster, the mesh itself will adhere well to the surface.
When laying two nets nearby, it is necessary to make a slight overlap. Remember that you need to measure the material so that its pieces are as large as possible. A solid mesh reinforces better than one divided into fragments.
Important! Try to position the mesh in such a way that after applying a layer of plaster, the material is recessed into its surface at a distance of about half a centimeter. This will ensure the highest quality reinforcement.
How to properly attach metal mesh
- The latter must take on much more pressure, so its fastenings must be made as reliable as possible. The process itself is divided into several stages:
- Installation starts from the top. The pre-degreased mesh is attached to the top row of cells using self-tapping screws along the entire length of the wall. In this case, mounting tape or washers are placed under the caps of the fastening elements so that the mesh does not fly out later;
- In the case of concrete or brick walls, holes are pre-drilled into which plastic dowels are inserted. The holes themselves must be drilled in a checkerboard pattern with a spacing of about half a meter;
- The mesh sheets must be installed with an overlap, the thickness of which is approximately 8-10 centimeters. You must try to position the fasteners in such a way that they pull the mesh very tightly, like a string. Otherwise, under the weight of the applied plaster, sagging will begin to appear, which in turn will lead to the formation of voids and a decrease in the quality of the finish;
- Plaster beacons are placed on the installed mesh.
Important! Before attaching the mesh to the wall surface, the latter must be completely cleaned of dust and dirt.
Conclusion
In general, any plaster mesh is attached to the wall without any serious requirements for the experience of the installer. At the same time, even a person who has never done anything like this before can fill it. But in some cases, throwing material over such a reinforcing coating can be carried out in two stages. Moreover, the second one should be carried out only after the first layer has dried.
How to properly reinforce a concrete or cement-sand screed
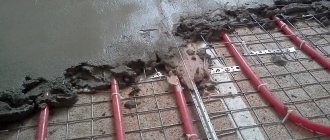
Metal mesh is often used in construction work. It is located in the thickness of the structure. The reinforcement is raised 1-2 cm from the base, installed on plastic stands (rubber, plasterboard). This strengthens the screed from the inside.
Strengthening the floor contributes to:
Stages of work, step-by-step instructions
Compliance with the sequence of the procedure for reinforcing the floor screed will provide it with the declared strength. Procedure:
The topcoat can be laid 28 days after installation of the subfloor.
DIY cement-sand mortar for floor screed
How thick should a house floor screed be?
How to properly reinforce a strip foundation
Source
Mesh for reinforcing floor screed
Candidate of Sciences, permanent expert of the site, a real, and not abstract (unlike other resources) person.
When getting acquainted with materials about floor construction, many visitors to construction sites for the first time encounter the recommendation to reinforce the screed. The editors of the StroyGuru website decided to clarify this issue and introduce home craftsmen to types of reinforcement, materials for its implementation, features of the process, as well as cases when reinforcement is required.
hypoallergenic dogs for children and apartments
First, let us briefly recall what a screed is and what functions it performs. This will allow you to understand the meaning of reinforcement.
What is a screed
A screed, in simple words, is a layer between the ceiling (subfloor) and the external final finish (floor). At the same time, its structure must be monolithic so that the floor covering does not sag or deform. You can obtain a monolith using the DSP. However, concrete is brittle under high bending loads. To ensure that the screed does not crack or crumble over time, reinforcement is used.
What is reinforcement
Reinforcement refers to a method of increasing the strength characteristics of a product by introducing high-strength materials into the structure. Two types of reinforcement are used for screeds:
The latter type of reinforcement successfully replaces the traditional one, and in some cases surpasses it. Difficulties arise only when introducing fiber into the composition of a dry mixture - it is time-consuming and labor-intensive. You can't do it with your hands. Small mechanization is needed. For those who are interested in the method, we recommend watching the work “Floor screed with fiberglass.”
Functions of screed reinforcement
Reinforcing the screed with mesh allows you to:
To reinforce the screed, you can use a mesh of:
Metal fittings
Metal fittings are made from galvanized low-carbon binding wire of the VR-1 grade. Its diameter is in the range of 2-6 mm. The connection of longitudinal and transverse rods is carried out by welding or binding, resulting in square cells with a side of 50 to 200 mm.
In this case, the size of the squares affects the scope of application of the reinforcement:
The thicker the rod and the smaller the side of the square, the higher the strength characteristics of the concrete, and vice versa. Available for sale in rolls or sheets.
Metal as reinforcement has several advantages:
There are two disadvantages: susceptibility to corrosion in the absence of a protective layer of zinc and cold bridges are formed if SNiP is violated during the installation process - it comes into contact with the wall.
Plastic fittings
The plastic mesh for floor screed is made of polypropylene. Its main advantage is its high elasticity, which is important when installing floors in apartments of new buildings - buildings shrink in the first years. Metal and fiberglass may not withstand and break; plastic reinforcement copes with its functions perfectly - it can withstand transverse and longitudinal loads. Available in rolls.
Specialists and experts do not note any shortcomings.
Fiberglass reinforcement
The mesh for the screed made of fiberglass (fiberglass) refers to composites, where the reinforcing fiber is coated with an anti-corrosion layer of polymers. The structure is clearly shown in the photo.
For information: basalt reinforcement has the same structure, where basalt thread is used instead of glass roving.
Produced in accordance with GOST 31938-2012, which provides for the use of fibers of different thicknesses (2.5 mm and 3 mm) and cells of different sizes: 50x50 mm and 100x100 mm.
It goes on sale in rolls. According to many builders, this is the best option for individual housing construction, because... has an advantage over metal and polypropylene according to such criteria as:
Other strengths include:
High temperatures are contraindicated - they are destroyed at +200 o C. If the protective layer is damaged, the fiber in such places dissolves under the influence of an alkaline environment in about 5 years.
Basalt reinforcement
Basalt reinforced mesh for screed is similar in its characteristics and structure to fiberglass reinforcement. Only the core is made of untwisted basalt thread.
This mesh is popular among builders not only because of its low price, but also its high manufacturability, because:
According to reviews from home craftsmen, this is a modern, convenient material for screed reinforcement.
Warm floor
When installing heated floors, reinforcement with cement-sand or concrete screed is mandatory . This is required by SNiPs, and even an individual developer must understand the need for the operation.
The fact is that for a heated floor to work effectively, you need reliable thermal insulation. Most often these are polystyrene foam boards. Heating elements are placed on this layer and filled with solution. Such floors are susceptible to temperature changes, and the reinforcing elements prevent the appearance of cracks on the surface.
A heated floor screed without reinforcement will not last long. The best option for strengthening heated floors would be combined reinforcement - metal or polypropylene mesh and fiber.
A flat floor is a prerequisite for high-quality installation of all modern coatings - laminate, parquet boards, linoleum, ceramic tiles. The concrete finishing coating is excellent for leveling the base. But concrete and mortar are considered fragile building materials and can be destroyed under the influence of mechanical loads and temperature changes. The last one is an important question. Modern technologies make it possible to install heated floors by introducing heating elements into the thickness of concrete and “hiding” utility lines.
Reinforcing the screed with metal, plastic, fiber improves the performance of the concrete floor, it becomes resistant to various types of influences. The reinforcement prevents the formation of cracks, the surface is smooth and even, and resists thermal loads.
Popular manufacturers
Mesh for screed reinforcement is produced at many enterprises. The most popular among them:
Armplast produces fiberglass reinforcement for heated floors. The light weight of the mesh and the size of the cells allow it to be used for plastering work. Product advantages:
Tenax specializes in the production of polypropylene fittings. The product is characterized by increased strength and flexibility. It does not deform when the screed shrinks, has high resistance to aggressive chemicals, and is easy to cut. According to experts, plastic mesh is the best option for a 7-8 cm thick screed when installing electric or water floor heating systems.
"Gridex". The company supplies construction organizations and retail chains with basalt reinforcing materials. Product Features:
"LenStroyDetal". The company welds metal mesh for the screed (mesh size 100x100 mm) from galvanized rods with a diameter of 4 mm. Galvanizing steel significantly increases the service life of the metal inside the alkaline environment of concrete, and with it the screed.
Recommendations from experts
It is possible to obtain a high-quality and reliable wall only if you follow advice from experts:
- Alignment. The walls should be carefully leveled. The level is checked using a plumb line or laser. The better the work is done, the better the finishing is.
- Taking into account the characteristics of materials. Compatible materials should be selected. Aggressive solutions are capable of dissolving the reinforcing structure.
- Taking into account the maximum load and possible shrinkage of the building. In the case of new buildings and facades that are severely deformed, it is recommended to use metal reinforcement.
- Final revision. Plaster is not a finishing coat. To give it decorative properties and prepare it for subsequent finishing, it requires sanding and sanding.
Experts recommend that you always sand the walls after applying plaster.
Reinforcing mesh is a necessary element for rough finishing of house facades and walls in new buildings. Its correct fastening and adherence to the technology of applying plaster allows you to create a reliable and strong coating that will last a long time.
Sources
- https://mirbetona.info/finishing/setka-pod-shtukaturku
- https://1beton.info/shtukaturka/setka-shtukaturnaya
- https://PoShtukaturke.ru/steny-vnutri/shtukaturka-vyravnivanie/oshtukaturivanie-sten-po-setke.html
- https://1pofasady.ru/shtukaturka/setka-dlya-shtukaturki-sten
- https://DekorShtukaturka.ru/instrumenty/setka-dlya-shtukaturki-sten
- https://oshtukaturke.ru/raznovidnosti/armiruyushhaya-setka
- https://arbolit.org/sovety/tehnologiya-vypolneniya-shtukaturki-po-setke.html
- https://1pofasady.ru/shtukaturka/tehnologiya-shtukaturki-fasada-po-setke
How to use it correctly
The screed reinforcement technology step by step is as follows.
Step 1. Determine which mesh to use for floor screed: its type, thickness of wire or fiber, cell dimensions. We remind you that with heavy loads on the floor or screed on the ground, the thickness of the reinforcement should be greater and the cell size smaller.
Step 2. Choose quality fittings. The wire should not have areas damaged by corrosion, no oil stains, welding should firmly grip the rods together. The mesh made of propylene and composites should not contain cuts or damage to the protective layer.
Step 3. The base for pouring the screed is prepared: the surface of the ceiling is repaired, hydro- and thermal insulation work is carried out, and a damper tape is attached to the wall. Details of the process can be found in the article “Preparing the floor for pouring screed.”
Step 4. A reinforcing mesh is placed over the prepared surface. It must be laid in strictly parallel strips, overlapping, but not more than 15 cm. The mesh should not reach the entire perimeter of the wall. The gap is 3-4 cm.
kitchen for a small room photo options
Step 5. The laid mesh rises 1-2 cm - it should be placed in the lower third of the concrete. To hold the reinforcement in a suspended state, improvised materials can be used: pieces of brick, pipe cuttings or factory-made stands. The options are shown in the photo below.
Step 6. Using a level, the horizon of the laid mesh is checked. If necessary, adjustments are made.
Step 7. The solution is prepared and the screed is poured.
There is a nuance when reinforcing with polypropylene mesh. Here they carry out preparatory work, pour a small layer of mortar over the entire surface of the floor, after which they spread the mesh and press it into the screed. After gaining strength, the first layer is poured with a second, finishing layer.
Technology of plastering walls on a grid
The technology itself is quite simple and if you have at least minimal experience, the process takes very little time. The main thing is to do everything in strict sequence in order to get a truly high-quality processing result.
Preparing the walls
First of all, it is necessary to prepare the surface of the walls for further treatment with plaster. Some may think that if a mesh is used, this stage can be skipped, but in fact this is not the case and preparation should never be skipped.
- First, the wall must be freed from the old coating. Everything is carefully removed so that the surface is perfectly clean.
- Then you need to try to remove the dust as efficiently as possible. If there is fungus or mold on the surface of the wall, each affected area is carefully treated using a special metal brush.
- Only after this can you begin to treat the walls with a primer. Due to this, the quality of grip will be several times better. The base will be more durable, and in the future the risk of mold, mildew or corrosion will be much less.
It is very important to approach this stage responsibly, because the final result will largely depend on how well the facade surface was prepared.
In some cases you can’t do without a mesh
Reinforcing screeds is a somewhat labor-intensive and financially expensive process. It is better to fill the screed without a mesh. But there are situations when it is impossible to obtain a concrete layer leveling the base with a long service life - it will crumble a few years after the installation of the floor.
Attention: when pouring a 3-4 cm thick screed onto a reinforced concrete floor, no tensile loads leading to deformation occur in the leveling layer. Therefore, reinforcement is not performed in such cases.
Options for plastering walls
A very important stage in finishing the facade is directly plastering the surface of the walls. It is necessary to approach this process as responsibly as possible, because the final result largely depends on it. Plastering walls on a grid should be carried out in several stages. At each stage, one layer of the solution prepared in advance will be applied.
Experts recommend doing two, or better yet, three layers of plaster. It is worth choosing the number of layers taking into account what kind of surface will be processed. The very first layer of finish must be applied by “spraying”. That is why, when preparing the solution, it is worth remembering that its consistency should be similar to fairly liquid sour cream. When the solution is ready, it must be applied to the wall surface using a special trowel. It is worth noting that this can be done in any order, whichever will be most convenient in each individual case. Of course, the solution can be spread on the surface of the wall, but the first method will take much less time. Then the mixture is leveled using a spatula. The thickness of the first layer should not be more than one centimeter.
When the first layer is completely dry, you can begin the second stage of plastering the surface.
To do this, make a thicker solution that will resemble dough. It is applied to the walls using a trowel and then leveled using a rule. It must be pressed against the installed beacons and carefully inserted from the bottom up. This layer must completely cover the mesh that was used for reinforcement. When the solution has set well enough, it is necessary to carefully pull out the profiles, and carefully seal the grooves that remain after them with the solution.
The last stage is leveling the surface of the walls. To do this, a fairly liquid solution is made, which must be applied to the walls in a circular motion with a trowel and thoroughly rubbed over the surface.
Installation of beacons
In order to properly install the beacons, you will need to use a building level. It must be set so that the outer profile is in a vertical position. Then the profile needs to be secured using two self-tapping screws. After this, the lighthouse is fixed by using a small amount of gypsum mortar. Only after this can you begin to place a beacon on the other side of the wall. In order for all profiles to be in the same plane, a thread must be stretched between the outer guides. After this, you can install all other beacons. It is worth paying attention to the fact that they should be set so that the distance is less than the length of the rule used.
Reinforcing mesh
Products found: 23
Available from pick-up warehouse
Often searched for: VR-1; Product type: Masonry mesh; Application: For blocks, For bricks; Material: Steel; Cell size: 50x60; Diameter: 3; Steel type: Black; Length: 2; Width: 0.5; Packing: In sheets;
Available from pick-up warehouse
Often searched for: VR-1; Product type: Reinforcing mesh; Application: For sidewalks, For roads; Material: Steel; Cell size: 100x100; Diameter: 3; Steel type: Black; Length: 2; Width: 1; Packing: In sheets;
Available from pick-up warehouse
Often searched for: VR-1, Galvanized; Product type: Plaster mesh; Application: Facade; Material: Galvanized steel; Cell size: 20x20; Steel type: Black; Length: 15; Width: 1; Packing: On a roll; Galvanized: Yes;
Available from pick-up warehouse
Often searched for: VR-1, Galvanized; Product type: Plaster mesh; Application: For interior work; Material: Galvanized steel; Cell size: 25x25; Diameter: 0.8; Steel type: Black; Length: 25; Width: 1; Packing: On a roll;
Available from pick-up warehouse
Often searched for: VR-1; Product type: Masonry mesh; Application: For bricks, For blocks; Material: Steel; Cell size: 50x50; Diameter: 4; Steel type: Black; Length: 2; Width: 0.5; Packing: In sheets;
Available from pick-up warehouse
Often searched for: VR-1; Product type: Reinforcing mesh; Application: For sidewalks, For roads; Material: Steel; Cell size: 100x100; Diameter: 4; Steel type: Black; Length: 2; Width: 1.5; Packing: In sheets;
Available from pick-up warehouse
Often searched for: Galvanized, VR-1; Product type: Plaster mesh; Application: Facade, For interior work; Material: Galvanized steel; Cell size: 10x10; Steel type: Black; Length: 10; Width: 1; Packing: On a roll; Galvanized: Yes;
Available from pick-up warehouse
Often searched for: VR-1, Galvanized; Product type: Plaster mesh; Application: For interior work; Material: Galvanized steel; Cell size: 10x10; Diameter: 0.6; Steel type: Black; Length: 15; Width: 1; Packing: On a roll;
Available from pick-up warehouse
We will deliver to construction centers
when ordering before 23/09 until 23:06
Often searched for: VR-1; Product type: Reinforcing mesh; Application: For roads, For sidewalks; Material: Steel; Cell size: 100x100; Diameter: 5.5; Steel type: Black; Length: 2; Width: 1.5; Packing: In sheets;
Available from pick-up warehouse
Often searched for: VR-1, Galvanized; Product type: Plaster mesh; Application: For interior work; Material: Galvanized steel; Cell size: 25x25; Diameter: 1.4; Steel type: Black; Length: 25; Width: 1; Packing: On a roll;
Available from pick-up warehouse
We will deliver to construction centers
when ordering before 23/09 until 23:06
Product type: Reinforcing mesh; Application: For bricks, For roads; Material: Steel; Cell size: 50x50; Diameter: 1.6; Steel type: Black; Length: 25; Width: 0.5; Packing: On a roll; VR-1: No;
Available from pick-up warehouse
We will deliver to construction centers
when ordering before 23/09 until 23:06
Product type: Masonry mesh; Material: Basalt roving; Cell size: 25x25; Length: 50; Width: 0.37; Packing: On a roll; Tensile strength: 50/50 kN/m; Mesh thickness: 2; Composition: Basalt roving; Country of origin: Russia;
Available from pick-up warehouse
We will deliver to construction centers
when ordering before 23/09 until 23:06
Often searched for: VR-1; Product type: Reinforcing mesh; Application: For sidewalks, For roads; Material: Steel; Cell size: 100x100; Diameter: 5; Steel type: Black; Length: 3; Width: 2; Packing: In sheets;
Available from pick-up warehouse
We will deliver to construction centers
when ordering before 23/09 until 23:06
Often searched for: VR-1; Product type: Masonry mesh; Application: For bricks, For blocks; Material: Steel; Cell size: 50x60; Diameter: 3; Steel type: Black; Length: 2; Width: 0.35; Packing: In sheets;
Available from pick-up warehouse
Often searched for: VR-1; Product type: Reinforcing mesh; Application: For roads, For sidewalks; Material: Steel; Cell size: 150x160; Diameter: 4; Steel type: Black; Length: 2; Width: 1.5; Packing: In sheets;
Available from pick-up warehouse
We will deliver to construction centers
when ordering before 23/09 until 23:06
Often searched for: VR-1; Product type: Reinforcing mesh; Application: For sidewalks, For roads; Material: Steel; Cell size: 100x110; Diameter: 4; Steel type: Black; Length: 3; Width: 2; Packing: In sheets;
being on the roof of a skyscraper in a dream
Available from pick-up warehouse
Often searched for: VR-1; Product type: Masonry mesh; Application: For brick; Material: Basalt roving; Cell size: 25x25; Length: 50; Width: 1; Packing: On a roll; VR-1: Yes; Tensile strength: 50/50 kN/m;
Available from pick-up warehouse
We will deliver to construction centers
when ordering before 23/09 until 23:06
Often searched for: VR-1; Product type: Masonry mesh; Application: For bricks, For blocks; Material: Steel; Cell size: 50x50; Diameter: 2.5; Steel type: Black; Length: 2; Width: 0.64; Packing: In sheets;
Available from pick-up warehouse
Often searched for: Galvanized, VR-1; Product type: Plaster mesh; Application: For interior work; Material: Galvanized steel; Cell size: 10x10; Diameter: 0.5-0.6; Steel type: Black; Length: 30; Width: 1; Packing: On a roll;
Available from pick-up warehouse
We will deliver to construction centers
when ordering before 23/09 until 23:06
Often searched for: VR-1; Product type: Reinforcing mesh; Application: For bricks, For roads; Material: Steel; Cell size: 50x60; Diameter: 2.5; Steel type: Black; Length: 15; Width: 0.5; Packing: On a roll;
Suggestion from the editor
It is hardly worth using granite or marble samples that are characterized by increased weight as tiles. We recommend using very well-proven clinker tiles on plaster, the detailed laying technologies of which have been worked out on any surface.
Multilayer scheme - from brick to tile
The layout of the tiles, when there is plaster underneath, looks like this:
- 1 – penetrating primer, corresponding to the nature of the rough surface;
- 2 – glue for fixing insulation boards;
- 3 – insulation board, we recommend using mineral wool basalt boards, although the list of quite worthy options is very large, including even foam chips;
- 4 – dowels for fixing the insulation; note, you should not rely only on glue, more reliable fixation is also necessary;
- 5 – mesh-reinforced plaster;
- 6 – primer to increase the adhesive properties of materials;
- 7 – adhesive composition;
- 8 – clinker tiles.
Steel mesh for floor screed
Still have questions? +7-985-997-90-97 +7-906-771-37-27
The main purpose of the metal mesh is to distribute the load throughout the thickness of the mechanized screed
, increase its strength and thereby reduce the risk of subsidence, cracks, potholes and any other deformations. The mesh wire rods absorb tensile stresses and protect the floor structure from damage during bending and tension. Accordingly, the load-bearing capacity of the screed increases.
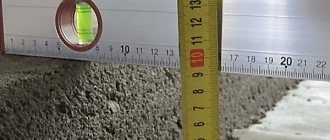
When reinforcing, the mesh is placed inside the screed - in the lower third of its thickness. In this case, the mesh must be raised above the subfloor in order to fulfill its role in the body of the screed, and not outside it.
Installation of screed on a wooden base
Only a loose screed is installed on a wooden floor. To create it you will need a thick polyethylene film, M350 cement, plasticizer and good river sand.
- First of all, all cracks are sealed with epoxy putty, and the joints of the boards are thoroughly sealed with silicone sealant. After 5 hours, the floor is covered with a moisture-resistant primer.
- If you want the floor to last in the bathroom for as long as possible, then you should add some plasticizers to the cement mixture; they will give the screed strength and some plasticity.
After pouring, it is important to let the floor dry for 2-3 days, then you can start installing the tiles.
We hope that this article will help you in arranging a screed for tiles. We wish you success in your work!
Purpose of the steel mesh in the screed:
The purpose of the steel mesh in the screed is to resist bending under static and dynamic loads on the floor.
In what cases is it necessary to use steel mesh in a layer of semi-dry screed:
Steel mesh is also required in the following types of floor construction. Floating screeds with underlying layers more than 15 mm thick with a screed layer of 40 mm or more.
If the screed is placed on a rigid, stable base in one layer, then there is no need to use steel mesh; polypropylene fiber is absolutely ideal and must be used as micro reinforcement.
Waterproofing
Carry out waterproofing according to the instructions:
- First of all, clean the base from debris and fine dust - then prime it well.
- On both sides, timber or profile pipes should be installed in the shape of the letter “T”, which will form a lighthouse. The beacon must be placed exactly at the level of the screed. If you intend to leave them in the screed in the future, then it is important to impregnate all elements with protective compounds that prevent rotting. Metal beacons will need to be treated with compounds to protect against corrosion.
- Then mastic is applied to the slabs for waterproofing; you can take a rubberized material that will be fused together using a burner.
Where the use of steel mesh is necessary
Options and sizes:
A distinctive feature of the mesh for reinforcement are small notches located in increments of 2-3 mm over the entire surface of the wire. Such notches are designed to increase the adhesion of the mesh to the concrete mortar.
Special metal mesh for reinforcement is made from VR-1 steel wire connected by spot welding. Wire diameter – from 2.5 to 6 mm.
The wire in the reinforcing mesh forms square or rectangular cells of different sizes - from 50 mm to 200 mm. The smaller the cells, the more metal used in the mesh, and accordingly, the higher the strength of the reinforcement. The most popular meshes are made from wire with a diameter of 3 mm, with square cells with sides of 100 mm, 150 mm, 200 mm.
Nets are supplied in rolls or cards (sheets). Rolls are easier to transport, but only a mesh of thin wire no more than 2-3 mm thick can be “twisted” in this way. The standard width of such rolls is 1-1.5 m, the length reaches 25 m. The main part of the reinforcing mesh is produced in cards with dimensions of 0.5x2 m, 1x2 m, 2x3 m, 2x4 m, etc.
Metal plaster mesh: features of use
The use of reinforcing mesh when carrying out plastering work has recently become mandatory, and most often a metal mesh is used for this, which will be discussed in this article. Metal plaster mesh must have the appropriate certificate, otherwise the work performed will not comply with GOST, and if we talk about the construction or finishing of public facilities, then this requirement must be met.
Types of grids
In fact, metal mesh for plaster is a concept that gives practically no idea about this material. Today you can find a huge variety of metal mesh, many of which have additional protection from moisture and active alkalis, which are found in abundance in cement and mixtures based on it.
Insulated metal mesh for plaster can also be of several types, and differ in insulating material by:
Of course, the price of such a mesh is slightly higher than that of a simple metal mesh, but it does not corrode and, accordingly, rusty streaks will not appear on the wall in a few years.
Important! In no case should galvanized mesh be cut with a grinder, since when it is cut, the protective coating will completely burn out, and this is where corrosion will subsequently begin.
- Metal mesh for plaster, coated with plastic, is in no way inferior in quality to galvanized mesh. But only if we are not talking about cement mixtures, which are alkaline and simply corrode plastic over time.
- Of course, modern technologies do not stand still, and today there is plastic that is resistant to active alkali, but even this loses its properties after just a few years.
- For clarity, you can conduct a small experiment: we take a piece of mesh covered with plastic protection and place it in a cement mortar for several days, after which we take it out and look - low-quality material will begin to peel off the metal in a few hours, but nothing should happen to high-quality plastic .
Rabitz
This mesh cannot be fully called plaster, and many of us know it better as a material for fences or temporary fencing.
Essentially, this is a lot of wires woven together, but not secured in any way. This production method can be considered both a plus and a minus, since the chain-link mesh can be rolled into small rolls, which is convenient for transportation, but at the same time, it can be difficult to unwind.
The chain-link mesh can be either simply metal or with a protective coating in the form of plastic or zinc.
Advice! Always ask the seller for a certificate for metal plaster mesh, especially if it is coated with zinc, since many careless manufacturers often use substitutes instead of expensive zinc, which are of worse quality, but you cannot tell them apart at a glance.
As you can see, chain-link has several more disadvantages than advantages, and builders know this, so many try not to work with this material, preferring simpler and more convenient competitors.
Notching
Like chain-link, this mesh cannot be fully called plaster, since its original purpose was different, but builders quickly saw all the advantages of the material, and today it is a very popular material with a number of positive qualities and characteristics.
By the way, expanded metal mesh for plaster is a common name, since in fact, it is labeled with the abbreviation TsPVS, which means all-metal expanded metal mesh.
The name fully describes the production process of this material. That is, first, the guillotine makes slits in the steel sheet at a certain distance. After which the machine pulls out the sheet, and thus cells of the same size are obtained.
Despite the apparent simplicity of production, it is unlikely that you will be able to make a CPVS with your own hands even from a very thin sheet, since this will require perfect precision in cuts and enormous drawing force.
- This is the heaviest mesh, since even the thinnest sheet of metal weighs several tens of kilograms, and this must be taken into account when attaching it to a wall built of hollow brick.
- Expanded mesh does not come with plastic insulation, and after applying zinc, its cost increases several times.
- All-metal mesh is very difficult to bend into rolls, and is most often sold in sheet form, which is somewhat inconvenient for transportation. If it is nevertheless rolled up, then the mesh gets used to this position and it will be very difficult to give it its original even shape.
- Very high tensile strength. It is almost impossible to tear the expanded mesh.
- The density of the mesh allows plaster of any thickness and weight to be applied to it.
- The segment can be attached in only three or four places, and the whole process happens very quickly.
- Due to its strength, perforation can be used not only for plastering walls, but also for making concrete screed or road surface.
Welded
Today, welded metal plaster mesh is rightfully considered the most popular and sought-after material among builders and customers. Price and quality are ideally combined here.
In addition, the welded mesh can also be zinc coated and is very tear resistant.
Advice! When buying mesh in a store, to make sure of its quality, you just need to selectively move a few wires; if at least one connection comes off, perhaps the same thing will happen to the entire roll, which means you should look for another manufacturer.
- The mesh in rolls takes the shape of an arc, and the thicker the wire, the more difficult it will be to give the mesh an even state.
- The resistance welding used in the production of welded mesh may come off.
- Welding areas are the most vulnerable to corrosion, and even zinc can begin to rust here.
- The smaller the mesh size, the thinner the wire, and the more places to weld, which means the more likely it is that the weld will begin to break and rust.
- The light weight of the mesh does not create additional load on the walls.
- If it is necessary to plaster metal surfaces, such a mesh can simply be welded to the base.
- The wire can simply be cut with metal scissors, and you won’t need a grinder or jigsaw.
- A huge selection of meshes that can be selected even for the most specific tasks. It can differ both in the size of the cells and in the thickness of the wire, and these two factors can be any.