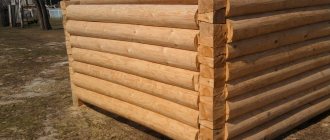
When installing a fence or power lines, it becomes difficult to figure out how to dig a hole for the post so that it stays firmly in the ground. Let's look at what calculations need to be made so that everything holds up well. Let's decide to what depth in what soil it is necessary to dig holes. Let's find out which tool is suitable for a certain soil and how to use it correctly. We will also learn how to make it easier to work with hand tools if the ground is too dry.
A motor drill is the easiest way to make holes Source ytimg.com
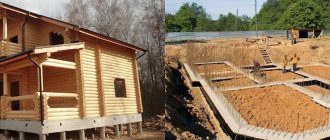
Digging the foundations yourself: main features of the work
If you decide to dig the foundation for a house yourself, remember and follow the following important requirements:
Scheme for correct foundation excavation.
- all work must be carried out only in accordance with a correctly drawn up project, developed specifically for your specific home and for construction on the site of your choice. Other people's advice and experience cannot replace the qualified work of an experienced design engineer;
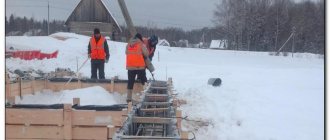
- All work on digging a pit, installing a concrete base, performing backfill and further erection of walls must be carried out continuously. If you cannot afford to build a “box” of a house during one summer season, it is better to postpone construction;
- any foundation for a house must be protected from contact with moisture in the ground and from surface and ground water. For this purpose, high-quality waterproofing is arranged;
- When carrying out work by builders, it is necessary to ensure strict and strict adherence to the project, and not to agree to simplifications and design changes, even if such changes promise significant cost savings.
To mark the future foundation, pegs are used, between which a thread is pulled, then the excavation of the foundation begins.
The foundation for a house is the basis of your future home. If you decide to dig a pit yourself and carry out further work, remember that only you bear full responsibility for the future fate of the house.
If you decide to dig the foundation yourself, prepare the simplest tools for this:
- shovels;
- spades;
- thrombus agents;
- wheelbarrows for removing soil;
- pegs;
- roulette.
Preparing the material
When the inspection pit in the garage is ready at the project stage, you should take care of the building materials.
What building materials will be needed:
| Purpose | Materials |
| For wall reinforcement | metal grid; steel corners for structural reliability, they are welded into a frame and attached to the pit from above and around the perimeter; steel rods, they are used to connect the mustaches in the frame. |
| For pouring walls and floors (if the pit in the garage will be made of concrete as a monolith) | cement (PC grade 400), crushed stone, sand (coarse and without impurities). |
| To line the walls with bricks (if you decide to save money) | You can use used bricks - it will be cheaper, but for a hole in the garage this is not important. It is also advisable to reinforce the masonry - 6-8 mm reinforcement in the seam and/or masonry mesh. If desired, the walls can be plastered. |
For this you will need roofing felt and clay.
domk, a garage owner at GSK with 25 years of experience, believes that if groundwater rises above the floor level, then no waterproofing layer will protect against it.
All 80 garages of our GSK, located on quicksand, suffer from this. Only one person won: he laid a trough of waterproofing on a concrete base, a screed on top, and on the sides too (the slate formwork remained). I myself made two attempts to escape. I couldn't. As a result, I drilled an 11 cm hole in the floor, drilled a well (after a meter there is already water, which rises in the spring) and drove a sewer pipe into it.
Now the water in the forum member’s garage comes easily, but leaves just as easily. Someone is pumping out water. As an option, you can make a global drainage - says domk - or a caisson (expensive and labor-intensive). He “has humbled himself and lives in harmony.”
Also, the inspection pit in the garage needs ventilation. Many people make an exit from the pit into the ventilation of the entire garage. But you can also make a separate ventilation pipe.
Methods for pouring and methods for saving the foundation of a house
Depending on the use of your own labor, you can pour the foundation in three ways:
- Lay the foundation yourself, using only your own labor. This is, of course, a labor-intensive process, but not so much that it cannot be handled on your own. Ideally, 2-3 people will cope with all stages without much effort.
- Partially use someone else’s labor for some stages of pouring the foundation. This method is most common when building houses on your own; it involves the use of hired workers during particularly difficult stages of work. This will allow you to save on your own labor, but financially it will be a little more expensive.
- Entrust the pouring of the foundation for the house to professional workers. This is the most expensive method of pouring, but in this case you will not have to do anything except come to the site and control the process of laying the foundation, because even professionals sometimes do not adhere to strict technology for their own benefit.
Tips for saving on foundation
- If you hire workers to perform individual stages of pouring the foundation for a house, then you should take into account that the most expensive stage is digging the soil and pouring concrete. If we talk about digging, then it’s up to you to decide whether this is a labor-intensive process and whether it’s worth saving on it. Well, you can save a decent amount on pouring the foundation if you invite a friend to help. In fact, pouring concrete is a dirty, but not very complicated process, which two or three people can easily handle in half a day, saving about 500 rubles each. from a cube of concrete.
- With a strip foundation, you can save on deepening; if you have a not heavy and small house (wooden, for example), then instead of a deep one, you can make a shallow strip foundation.
- You can save money on a slab foundation by making it thinner, but with stiffeners. I talked about a slab foundation with stiffeners in my previous articles.
- When laying a columnar foundation, you can only save on labor, because it is already the least stable compared to its brothers.
- In some cases, fiberglass reinforcement and its use will allow you to save a little on the foundation.
Rules and requirements for the construction of an inspection pit in the garage
Today we’ll talk about how to make a viewing hole in the garage. For many car enthusiasts, this is a necessary element of a garage building, so many of us try to save money, which is why we carry out some preventive maintenance work related to the car ourselves. It should be noted right away that despite the apparent simplicity of the design of the inspection pit, it is not so easy to build it. Therefore, most garage owners prefer to invite experienced craftsmen to ensure a guaranteed high quality of the final result. But in order for the guarantee to be one hundred percent, you need to know the technology of constructing a garage pit yourself. Therefore, read the article, remember everything, and this will be a guarantee that the experts will not deceive you.
Inspection hole in the garage Source drive2.ru
Site marking
In cadastral documents, marking data is recorded using the JPS device. Using a level on the site, zero points are determined. Markings are made according to established requirements. The distance to a residential building does not exceed three meters, to outbuildings – one meter.
A full list of norms and rules is stated in the document “Planning and Development of Individual Housing Construction Areas.” A rectangular plot is the most convenient option for the appropriate use of the property.
You will need twine, tape measure and a square. According to the project, the first stakes are driven in. A cable or fishing line is pulled along the perimeter between the marks. The optimal distance from the facade is 5 meters. Dimensions can be adjusted depending on the material used.
The sides are measured, then the diagonals are checked. After hammering in the pegs, a control measurement of the diagonals is made. At a distance of the planned width of the foundation, the second cable is pulled. They dig a trench along it.
We move the septic tank
Sometimes it happens that the septic tank needs to be moved. There are many reasons for transfer. In this case, you have to dig a new hole, and, on the contrary, dig up a septic tank from the old place. This is the moment when it is impossible to use technology. Everything is done by hand.
You should know that the distance between the previous installation location of the device and the new one should be 5 meters or more. For a very simple reason: after you dismantle the structure, the soil will become very loose. Therefore, the walls of the new pit may be pressed through due to this. And the walls will have to be reinforced. And this is an additional cost of money and time.
Foundation width and depth: what do you need to know?
Scheme of a monolithic reinforced concrete strip foundation.
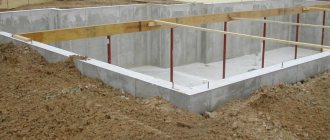
Most foundations erected in low-rise construction belong to the strip class. The most common type of foundation is monolithic reinforced concrete strip foundations. The main parameters of such a foundation are: strip width and laying depth.
The width of the tape is determined in accordance with the width of the future walls. With the depth to which you need to dig the foundation, everything is far from so simple. Some developers rely on the experience of neighbors, i.e. The depth of the tape for the house on the neighboring plot is the same as the depth of the foundation laid in their own area. When there are no areas with buildings nearby, the depth of construction is determined on the advice of the construction workers. Quite often, in order to save concrete, a sand-gravel or gravel cushion is poured into a dug pit or trench.
As for the reinforcement, in the absence of a design, builders usually simply limit themselves to a few steel rods thrown to the bottom of the pit. The process of installing a strip base ultimately looks like this: a trench is dug, half filled with gravel, scraps of reinforcement are thrown onto the gravel, and the whole thing is filled with concrete. As a rule, the width of such tapes is 40-50 cm.
To understand what is wrong with the technology described above for constructing strip bases, you need to take a closer look at each point.
The laying depth and width of the tape are calculated during the design process of the house, and depend on the load on the base.
First of all, the laying depth and width of the tape are by no means determined at random. These parameters are calculated during the design process of the building and depend, first of all, on the load on the foundation and soil conditions. In the case of construction on solid soils, a tape of small width will be sufficient under the base of a concrete foundation. And vice versa, if the bearing capacity of the foundation is insufficient, even a fairly wide tape will not save the house from tilting and significant settlement.
A gravel or sand cushion is placed under the foundation to ensure uniform transfer of load from the belt to the soil. In the process of developing a trench manually or with an excavator, its bottom becomes uneven. For leveling, sand or gravel is used, which must be compacted during installation. If the sand and gravel are not compacted, then over time they will certainly settle and voids will appear under the foundation.
For the same reason, the cushion is rarely made thicker than 15 cm. In some cases, in order to replace weak soils under the foundation of a house, backfilling with sand and gravel mixture is performed. The thickness of such a pillow can reach 1 m or more. However, it is arranged only in cases of extreme and urgent need. Such a pillow is compacted in layers. For this purpose, vibrating platforms or vibrating rollers are used. If you poured 50 cm of sand and gravel mixture into a pit or trench at once, then even a massive roller will not be able to compact it efficiently and correctly. Therefore, do not expect that the front loader doing the dumping will be able to compact such a bed simply by driving over it a few times.
The strength and reliability of the foundation of a house depends on the reinforcement of the concrete base; the main thing is to correctly position the rods in the body of the concrete structure.
Its reliability and strength directly depend on how well the reinforcement of the concrete foundation under the house is done. The thing is that when the foundation is unevenly loaded or settles, tensile stresses appear in it. In any reinforced concrete structures, it is the reinforcement that is responsible for the perception of tensile loads. Concrete only works in compression
As a result, it turns out that if very strong concrete was used to construct the tape, but sufficient attention was not paid to the quality reinforcement of the foundation, then after the construction of the house, cracks may begin to appear. And foundation cracks, in turn, will certainly cause cracks to appear in the overlying structures
That is why it is very important not only to add reinforcement to the concrete, but also to select the correct diameter and correctly position the rods in the body of the concrete structure
How to seal seams: mine waterproofing
When the well is completely drilled and the rings are all in place, they need to be waterproofed from the inside.
If it will be carried out in wet soils, then coating compounds are recommended. For example, you can use bitumen mastic. She must treat the outside of the rings. This will significantly extend their service life. The joints are additionally coated from the inside.
Concrete shafts are often wrapped with roll insulation, such as dense polyethylene, as waterproofing. Film is much cheaper. However, it is used exclusively from the outside. You need to quickly dig around the rings in a circle and wrap them with film.
Important ! The film will last for several years if you buy a durable one with reinforcement. But it is better to allocate a budget for coating insulation.
Some summer residents resort to additional waterproofing by making a clay castle. This is especially true if clay rises to the surface when digging. It can be used by filling the well from the outside.
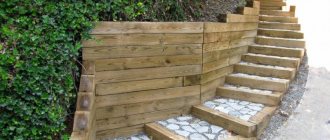
Necessary actions when constructing a trench manually
Remove the turf from the area before digging trenches.
In accordance with the design dimensions, mark the area, and do not forget to add an external 0.2 meters to the width. Marking begins from the corners. They drive in reinforcement or stakes, tighten the fishing line and, checking the degree of the angle, determine the length of the walls. After marking, everything is measured again, including the diagonal size.
When marking the strip foundation, it is necessary to determine the lowest level of the perimeter. This is easy to do using a water level. A drainage system is installed at this point.
So, having marked the area for digging, but before you start digging the foundation manually, you must:
- clear the construction site of any objects, as well as tree roots;
- remove the turf along the inner perimeter of the foundation;
- move the top fertile soil layer into the garden;
- determine a location for dumping soil from the trench.
When digging a trench, throw the soil 1.5 m from the hole
The soil is thrown at a distance of up to 1.5 m from the edge of the pit. They start digging from the outer perimeter, then dig transverse trenches under the base for load-bearing walls. If necessary, compact the bottom of the trench, fill it with water, add a sand cushion and compact it again.
After this, waterproofing material is laid or formwork walls are installed to prevent collapse of the trench walls.
Some practical tips:
- It is not recommended to dig a foundation pit for an extension, removing soil from under the adjacent foundation of the finished building.
- When installing a drainage system, expand the trench taking into account the diameter of the pipe, adding 20 to 30 cm to the value.
- In loose soils, it is worth digging a trench in a trapezoidal shape with an expansion towards the top. In this case, the calculated width must correspond to the bottom of the trench. For details about marking the foundation and digging a trench, watch this video:
Laying sewerage using the HDD method
The installation of sewerage without a trench using the HDD method is becoming increasingly widespread.
Quite often there are comments that, despite their advantages, special HDD equipment is too heavy and massive. To transport it, it is necessary to use trailers and trawls, which prevents the installation from entering areas with limited space. This applies to cottage villages, areas with dense urban development, and areas with an abundance of communication lines.
However, this obstacle has long ceased to be significant, since there is HDD technology with minimal dimensions. The installation is moved using a car tow truck. Sewer installation using the HDD method in cramped conditions is carried out using modern super-precise locating equipment. Laying of sewer pipes occurs in accordance with all established rules, observing the required slope and without any harm to communications already laid in the neighborhood.
Choosing a location on the site
The construction site must ensure the safety, durability of the building, and ease of use.
Simply put, the house should not create discomfort for you and your neighbors. To ensure this, just follow a few simple tips:
It is better to build on a plain or a small hill, avoiding lowlands and steep slopes on which the foundation will be washed away by water. The shadow from tall buildings should not block your and your neighbors' green spaces, gardens, and vegetable gardens - this will have a bad effect on the condition of the plants. The house must be correctly oriented to the cardinal directions so that sunlight evenly illuminates the rooms. On large plots, it is important to think in advance about the convenience of driveways to the house, as well as its connection with household buildings and other household elements. The location of the house should not interfere with existing and planned utilities (water and gas pipelines, sewerage, power supply networks). The house will be much more comfortable if the view from the windows is not blocked by trees, terrain elements and other buildings.
Some nuances of choosing a location for the foundation are dictated by the features of the project. First of all, this is the shape and estimated weight of the building. On gentle slopes it is possible to build wide low-rise buildings, but not narrow and high buildings.
Planning the construction of an inspection pit
There are two situations
when building a hole in the garage:
in a building just under construction
;
in an already exploited
.
The first option is simpler, because nothing prevents you from digging up the soil to the size of the intended structure. To do this, you can even use the services of an excavator, thereby speeding up the process itself and avoiding labor-intensive excavation work.
But both situations happen often, so let's deal with them separately. But first, let’s talk about the size of the pit in the garage for a car.
Excavation procedure (vertical layout)
Depending on the foundation on which the house is planned to be supported, a foundation pit or trenches are made. When determining the size of the trenches, it is necessary to take into account that the width of the excavation consists of the following values:
- foundation strip of the house - the dimensions are indicated in the project, on the ground the structure is indicated by three cords (outer, inner surface, wall axis);
- footing – at least twice as wide as the tape (increasing the size of the trench in both directions by the same distance);
- drainage - wall drainage is 1.6 - 4 m from the outer edge of the tape; for the axis of the ring drainage, the distance is calculated individually;
- trench sinuses - must provide access for workers when concreting screeds, installing formwork, applying roll, coating or plaster waterproofing to the side faces of the strip foundation after stripping (0.6 m minimum on both sides), insulation.
Thus, in order to dig trenches for a columnar or strip foundation, you need to take into account the standards of SP, fire safety, SanPiN. It is necessary to provide access to the sinuses of the workings for workers to carry out construction operations.
Good publicity
Executive photography
To ensure quality control of the work performed and take into account its volume, an as-built survey is carried out. This procedure identifies inconsistencies in the project with the work done , as well as violations.
After analyzing the diagram, specialists can correct deviations from the norms, as well as find their cause. An as-built diagram of the pipeline trench is drawn up before the start of excavation work.
What information does a geodetic survey of a pipeline trench contain:
- depth along the entire route;
- width along the bottom and edge;
- azimuthal direction of the ditch.
Particular attention is paid to as-built surveying if the site involves the laying of a large number of utility networks.
First, design documentation and approved drawings are reviewed. Then surveying equipment is selected. At the next stage, field work is carried out: horizontal surveying is done, as well as leveling. Then the final diagram is built in the geodetic chamber.
How to quickly dig a trench for a foundation
Any home starts with a foundation. You can hire specialists who will dig a trench or foundation pit, according to the project, or you can evaluate your strength and cope with the excavation work yourself.
In the article we will describe how to dig a trench under the foundation correctly, what you should pay attention to, to what depth it is necessary to dig holes depending on the type of soil
Preparing a foundation pit with your own hands
Digging a foundation pit for a residential building with your own hands
What shape and size should the pit have? How to organize work correctly and what to pay attention to?
When is the best time to start building a foundation pit?
First of all, you should decide on the start time of excavation work.
Of course, in conditions of extreme necessity, foundation trenches are dug throughout the year, however, in accordance with the basic rules and regulations of construction, it is better to dig a foundation pit in the fall or summer.
What are the benefits of these particular time periods? The answer lies on the surface; during the autumn and summer months the soil is usually very soft and easy to dig.
So, carrying out work in the summer or autumn is a real saving of finances, time and effort.
If work on preparing a pit for the foundation is scheduled for autumn, it is better that it is the first part of autumn, and not the end of October or November - at this time the process of soil freezing may begin, which will undoubtedly affect the progress of work. In addition, the second half of autumn is characterized by large amounts of precipitation, which will also be a negative factor.
Regardless of the weather in which we start digging a pit, we should not forget about safety.
The walls of the trench tend to crumble, so it is necessary to take care in advance of their reliable fastening.
You should work at the bottom of the pit with the utmost care; it would be a good idea to stock up on special clothing and even helmets.
About the development of a foundation pit
The option for developing a trench for the foundation depends on the design and depth of the foundation. In cases where we are talking about shallow foundations, it is quite possible to develop the soil on our own.
If we are talking about a deep foundation (for example, for houses with basements or basements), then we cannot do without the use of special equipment.
Digging technique
Drilling is performed using several technologies:
Let's take a closer look at these types of wells.
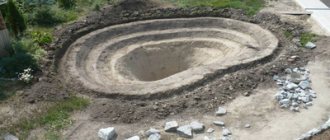
Open
You can dig a mine in an open way. To do this, dig a hole of the required depth. The diameter of the shaft should be 20 cm larger than the diameter of the reinforced concrete ring. After lowering the concrete products, they must be connected to each other. The joints are also sealed. The resulting space between the walls of the shaft and the ground is filled with earth.
Closed
A summer source can be made in a closed way.
Before digging a well, it is necessary to prepare a hole in the ground up to 2 m deep. A reinforced concrete ring is carefully inserted into it. As it deepens, the installed co-construction will gradually sink down. The second, third rings and so on are carefully mounted on top. The latter should rise above the soil level.
Important ! As new rings are installed, all joints must be sealed.
Construction using this method requires certain skills.
Shakhtny
A shaft that should be strengthened to prevent soil from collapsing. Previously this was done using logs. Currently, the shaft or shaft is reinforced with concrete round rings. As a result, the source is protected from wastewater and pollution.
Tubular
Digging a well yourself using tubular technology is difficult. This method is suitable when the aquifer is located fairly close. Moreover, special equipment is used for digging, which costs a lot of money.
Features of digging technologies
Each of these digging techniques has its pros and cons. Various financial investments are also required. When digging openly, special equipment is required, which already increases the price of the entire project. In the case of closed technology, the cost of work will be cheap, since only the costs are required for the delivery of reinforced concrete rings. You can install them yourself as you go deeper.
How to dig a trench under a strip foundation
We can confidently call those people who make the difficult decision to build a house on their own heroes heroes. Considering the fact that the vast majority of Russians are people with not very high incomes, building a house with their own hands is almost the only opportunity for them to improve their living conditions. In the primary and secondary real estate markets, the cost of housing is very high, and taking out a mortgage is a serious step, as there is a threat of falling into credit bondage with banks. But if the brave souls have already decided on individual construction, then naturally they need to start with the foundation, which can be completely done on their own, without the involvement of professional builders.
Before starting construction, when you already have a ready-made project for the future house and all the necessary permitting documents, then before proceeding to the primary stage - laying the foundation, you should prepare the site for it. To do this you need:
- Plan the site;
- Make a breakdown for the foundation.
It is important to remember that the foundation of a house is its foundation. Any mistake when laying it will cause a lot of problems in further construction.
Therefore, the breakdown of the foundation perimeter must be approached with special care. It is better to do this with the involvement of a professional surveyor, who, using instruments, will draw the correct angles and lay down the necessary dimensions. Mistakes are unacceptable here, since after the foundation is poured, correcting mistakes will be extremely difficult and expensive...
During subsequent work on digging trenches for the foundation #8211; you can do it on your own. It is not difficult, although it requires significant physical effort. You need to know that surveyors divide the building along center lines. And in order to avoid any mistakes in laying the foundation, it is necessary to correctly calculate the width and depth of the trenches under it.
The trench parameters are calculated based on: The planned thickness of the foundation walls. For a one-story house, the thickness of the load-bearing perimeter of the foundation is sufficient at 40 centimeters. Under the partitions - 30 centimeters. Trench depths. Determined depending on the nature of the soil. If the soil is sandy, then the depth of the trench must be provided up to 0.5 meters. For clay soil, 35–40 centimeters is sufficient. Trench widths. It is calculated based on the thickness of the foundation + the thickness of the formwork + a reserve gap for maneuver of 10 - 12 centimeters.
Don't forget that professional designers indicate building dimensions along center lines. This must be taken into account when laying the trench. The calculated trench width should be divided by 2 and the result obtained should be transferred to the construction site to the right and left of the center line, laid out by the surveyor using a device. When all the dimensions of the foundation are marked with pegs on the ground, you can start digging trenches. As an option, an excavator is involved in this process, but in this case it should be remembered that the excavator removes much more soil from the trenches than is done with manual work. There may be a problem with disposal of excavated soil. And even after an excavator, the trenches have to be brought to condition manually. And no less time is spent on this than on actually digging trenches by hand.
After completing the above work, you can begin installing the formwork under the foundation. But this is a topic for another conversation...
Correct operation of the inspection pit
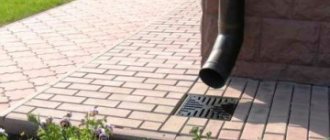
Many car owners are familiar with the problem: in rainy weather, a dirty car is parked in the garage, and all this ends up indoors or, even worse, straight into the inspection hole. On this occasion, FORUMHOUSE user Smith2007 gives his suggestions.
Slope the floor in the garage “towards the inspection hole” (with an envelope). Along the perimeter of the structure there is a ditch 4-5 cm wide and 2 cm deep (lay it with tiles). Then drill channels with a long 40 mm drill from the bottom of the groove down into the inspection hole. The outlet of the hole will be on the wall of the inspection pit. Make several such channels, from 5 to 8 pieces. Insert sewer pipes into the resulting holes, which are connected horizontally (almost at the floor or slightly higher with a slope). At the bottom of the structure, make a recess for a 10-20 liter container, and place the entire drain into it. You can install a drainage pump in the container, which is turned on as the container fills to pump out water.
Forum members suggested that the system would become clogged with sand and other debris. Therefore, it is better to simply cover the pit with a shield, making a small convenient side around it, and organize the floor so that everything flows out.
But here another problem is possible: if you slope outward towards the gate, then during frost water will accumulate and freeze at the bottom of the gate - either inside the garage or outside.
Make a ladder like this out of tiles, shallow and sloping. Just not along the perimeter of the pit, but along the perimeter of the car. And clean the dirt by hand. Well, or if your system is cloudy, with a drain and a container, then wash off the dirt from the floor with a hose every day.
Vzik plans to install a tray in the garage with a sand trap and water drainage into a filter well. Then you can wash both the car and the garage.
Inspection hole in a finished garage
Forum member Las9w tells how he built an inspection hole in the garage with his own hands.
- I dug a hole.
- Waterproofing with roofing felt/rubimast type material.
- I laid out pieces of concrete cut from the floor of the garage on the floor of the pit and covered it with sand a couple of centimeters up.
- The floor was concreted (5-10 cm of concrete).
- I lined the walls with bricks with mesh reinforcement every 3-4 rows.
- The remaining space between the roofing felt and the wall of the pit was filled with previously dug earth with a tamper.
fidel1970 advises laying the walls of the pit in one brick (“it’s more reliable, and it’s easier to make niches for tools and lighting”), and lining the top with a metal corner. The forum member also recommends filling the space with clay instead of earth.
Let's summarize: an inspection hole in a garage can be made with your own hands by both an experienced craftsman and a novice in the construction business. The main thing is to correctly assess the characteristics of the soil and follow the technology.
Watch the video in which a specialist advises how to waterproof a cellar in a garage. The garage can be combined with a carpentry workshop - carpenter Alexander talks about just such a solution. Read useful solutions for owners of country transport. And in this forum thread you can follow the construction of a frame garage.
Technology
There are rules that must be followed at the site when laying a pipeline in a trench:
To lower pipes into trenches, special pipe-laying cranes are used.
Before laying, they are rejected: all pipes with defects cannot be laid in the trench. Prepare the base; if necessary, strengthen the walls. Using a pipe-laying crane or manually, if the diameter allows, pipes are laid. Sometimes vertical panels, horizontal purlins, and spacer frames are used.
Features for HDPE pipes
A sand cushion should be placed at the bottom under all polyethylene pipes . This is a mandatory requirement that must be observed according to technology. The pillow should have a height of 10 to 15 cm. It is not compacted, but should be as even as possible. If the bottom is smooth and soft, then a pillow is not required.
The pipes are connected by butt welding. Before installation, the entire system is checked for leaks. The minimum laying depth must be at least 1 meter.
If other communications are laid nearby, the distance from them to the HDPE pipe should be such that repairs to the networks do not affect the polyethylene pipe.
Briefly about the main thing
Construction of a well is a labor-intensive and costly process. In order for the costs to be recouped and the owners to have access to clean drinking water for a long time, it is necessary to carefully choose the place, time and digging technology.
To dig a well on your own, without using equipment, choose a shaft structure. A shaft of suitable depth can be obtained by two methods, open and closed. The first method involves preparing a shaft and then lowering reinforced concrete rings into it. In the second case, the shaft is deepened while tiers of rings are simultaneously built up. In both cases, a sand and gravel bottom filter is installed.
What it looks like: harvesting parsnips and planting winter garlic
The situation is as follows: parsnips have been removed from the garden bed, and we are planning to plant garlic in its place. Neighborhood rules are observed - this is an important point and cannot be missed.
Autumn digging of ridges
Parsnips have long roots. To get the crop out of the ground, you need the help of a shovel. We act carefully. We drive a shovel into the ground near the parsnip and make a slight movement - you should hear the sound of roots tearing. We take out the shovel vertically, without disturbing the layers of soil, and pull out the parsnips. We receive a harvested crop and a conditionally dug garden bed. Please note that the soil is practically not damaged during the process.
Just for fun, you can check the degree of softness of the soil after this method of growing and harvesting. After three years, without digging, a thin twig easily penetrates the ground to a depth of 70 centimeters!
Now it's garlic's turn. Using a flat hoe, we slightly loosen and at the same time level the ground. Touch the top 3–5 centimeters, no more. Use a peg to make holes for the garlic cloves, place them in places and sprinkle. Work is done.
All that remains is to cover the beds with parsnip tops. Under natural conditions, it would remain lying on top of the ground - no need to break the rules. In spring, the soil under the leaves will be soft as feathers.
How to prepare the soil for planting vegetables
After the first processing of virgin soil, you cannot immediately begin cultivation. It is necessary to further prepare the land. If the soil was processed using machinery, then weeds are not selected from it, as with manual digging, but are plowed up along with the soil.
After plowing with a walk-behind tractor or
To improve the structure of the soil and saturate it with useful microelements, green manure plants (mustard, lupine, oats, rye, alfalfa) are planted. When the greenery grows, it is mowed and additional digging is carried out using machinery or manually.
Winter crops are planted in winter. In early spring, after the snow melts, the third plowing is carried out and the plot is planted with garden crops for the first time.
After manual digging
When cultivating the land manually, you can use the previous method, but more often they do it differently. The land freed from turf is treated with herbicides to kill weeds. Then sprinkle with peat, humus or sawdust and dig, mixing everything.
A week later, the soil is fertilized with complex mineral fertilizers: potassium sulfate, ammonium nitrate, nitrophoska, superphosphate and dug up a second time. The land becomes suitable for use as a vegetable garden.
Organic farming and soil cultivation features
Organic farming is based on respect for the land.
Proper, reasonable management of the land will help preserve and increase soil fertility. That is why supporters of organic farming adhere to the following principles:
- The loose layer should be no more than 5 cm. Digging and plowing are prohibited. If you dig up the soil for 2-3 years, you will notice its enrichment with oxygen. The activity of microorganisms is manifested, the root system of plants extracts nutrients more easily. But then a decline occurs, and the soil becomes poorer: the amount of humus decreases and its structure changes
- Carrying out mulching. Beneficial microorganisms and worms are activated under a layer of mulch, moisture is retained, a soil crust does not form, and the earth does not overheat on hot days.
- Revitalizing the earth by feeding living fauna with compost, green manure, and organic compounds that penetrate into the deep layers during watering, nourishing the roots of plants. For irrigation, trenches are dug along the beds.
- During gardening work, the introduction of preparations containing microorganisms. This technology was developed by Japanese scientists and has been successfully used for 15 years. Beneficial microbes and fungi introduced into the soil begin to actively divide, suppressing pathogenic microflora and bringing organic matter into a form accessible to plants. Effective microorganisms significantly increase yield. It's easier than waiting for them to gradually reproduce
- Crop rotation is important so that part of the land is “fallow”, and in other areas there is a change of crops. This is necessary to avoid the accumulation of pests and diseases in the soil that parasitize a specific plant family.
Organic farming
Organic farming involves slight loosening of the soil. This is necessary to enrich it with oxygen, trim weeds and prepare it for planting. The rest of the work is completed by worms and microorganisms: they loosen and process nutrients, converting them into a form accessible to plants.
Flat-cutting as a soil care option
Loosening the soil with a flat cutter
In organic farming, a shovel is not needed; a flat cutter is used, which goes underground and loosens it without digging up. This tool is needed not only in spring. It is perfect for killing weeds throughout the season.
A sharp flat cutter is used:
- with surface tillage to a depth of 5 cm
- when creating beds
- for destroying excess shoots and raspberry cuttings
- while hilling potatoes
- for removing strawberry whiskers
- when cutting furrows for sowing seeds
- for thinning densely sprouted seedlings
The miracle flat cutter will help loosen the soil under cucumbers that have a shallow root system. But it is impossible to dig up an overgrown area that has not been cultivated for a long time and the turf has already formed.
A dull flat cutter is recommended for land plots overgrown with weeds. Weeds caught under the blade of the tool are not only cut, but also uprooted. At the same time, the soil ecosystem remains intact and does not suffer from external interference. Flat-cut weed removal is carried out throughout the summer. It won't do any harm at the dacha in the fall.
How to increase soil fertility? TOP 8 environmentally friendly options +agricultural methods | +Reviews
Quotes again
A little about recommendations from dacha magazines. One of the readers says that for carrots she digs up the beds twice (in autumn and spring), applies humus and mineral fertilizers. The gorgeous harvest from the photo above was grown contrary to all these rules. And not for the first time, not by chance, but year after year.
It is known that carrots came to us from the Mediterranean. It was originally grown on cultivated former peatlands, so heavy soils are not suitable for it. In beds formed with virtually no outside participation, the root crop feels great. Need proof? – Go back to the photographs.
More about the rules of cultivation in the next video.
https://youtube.com/watch?v=PUAfcAUVnZc
When is the best time to dig up a vegetable garden - timing
Experienced gardeners note that digging up soil in the garden in the fall is much more useful than in the spring. With this procedure you can quickly get rid of many problems. This is especially true in regions with dry soil.
This technique is called “fall plowing”. After it, the overturned weeds freeze and die. If you dig up your garden in the spring, the weeds may germinate again. Therefore, it is recommended to dig up the soil in the fall every year. This will allow you to achieve maximum results.
In the fall, you can not only dig up the garden, but also add compost, humus or manure to the soil. In gardens where crops often suffer from Colorado potato beetles, mole crickets, wireworms and other parasites, digging allows you to eliminate their larvae. To do this, the soil needs to be turned over to a depth of 20-25 cm.
In this case, it is necessary to take into account the timing of processing the site in the fall. The timing for this may vary in different regions. Everything depends on weather conditions. The general approach is this: you need to dig up the ground as late as possible in the fall, before the first heavy rains and frosts.
After harvesting, you need to chop the tops, distribute them in an even layer on the surface of the soil and dig up the soil manually or using a special tool (light digger) or equipment (motoblock). It is recommended to schedule the procedure for October-November as long as the temperature outside is above 0°C.
Digging the soil in the garden in the spring will have a beneficial effect on the yield of vegetables, as it becomes loose and saturated with oxygen. The time it takes to dig up the soil in the spring also depends on the weather conditions of a particular region. You need to dig up the soil in the spring no later than a week before planting vegetables in the garden. Unlike in autumn, in spring you can dig up the soil in the garden shallowly (up to 10cm).
Installation of sewer pipes
When the level of laying the sewer pipeline is established, you can proceed to installation. The task itself is simple, but quite labor-intensive and requires precision.
First you need to dig a hole of the required size. As mentioned above, it can be made narrower, but not too narrow, so that it would be convenient to lay sewer pipes in a private house in the future. The bottom of the pit must be covered with a cushion of sand and clay. This is done for thermal insulation and shock absorption of the pipeline.
If necessary, it will be possible to further insulate the structure using appropriate materials. Insulation of sewer pipes in the ground is required, for example, if it is impossible to dig a trench of the required depth. In this case, mineral wool or similar materials are perfect for insulating the heat pipe.
Free cavities must also be filled with sand and clay. It is prohibited to use previous soil to bury the pipe. For this task, a mixture of sand and clay is again needed. When the pipe is completely filled, you need to compact the top layer. This will avoid deformation of the pipeline during operation.
As mentioned earlier, inspection wells must be placed at the turning points of the highway. They are used to clear blockages and also monitor the condition of the sewer pipeline. To construct the walls of manholes, it is recommended to use reinforced concrete rings; broken bricks are also suitable for this task. Their sizes depend on the level of the sewerage system.
Correctly determined depth of sewer pipes in a private house, as well as compliance with all regulations, can guarantee the maximum service life of the sewer pipeline in a private house. This approach will allow you to avoid any problems during operation, and household wastewater will be discharged without difficulty.