For any residential building, the attic space is a necessary part. Essentially, the attic is a cushion of air that prevents heat from escaping on cold winter nights and heat from entering in the summer. In addition, the attic is often used as a warehouse for things, and the storage is wonderful, because only in the attic it is so dry and light that it is not at all comparable to a basement. But if there is such an opportunity, do not miss it: today all over the world it is fashionable to organize wonderful dressing rooms, laundries, and even personal offices in the most ordinary cramped attic. But then all your household will go up to such rooms a little more often than to an ordinary attic, which only accumulates dust. Therefore, you will need to install a staircase that is stronger than a folding or attached one - preferably a generally stationary one (for example, a screw one).
It should also be taken into account that when using such a staircase and going up to such a room, a person will most likely carry something else in his hands, and therefore, at best, only one will be free. And then it will be difficult to climb up and down particularly steep folding stairs. Therefore, in this article we will understand in detail how the installation of attic stairs of different types occurs and how to cope with all this yourself.
What is an attic ladder?
Modern attic stairs in all their varied forms differ from interfloor stairs in many ways:
- The first is loads . Naturally, any person from home goes up to the attic much less often than, for example, to his bedroom on the second floor. Therefore, attic stairs are always designed for relatively small and infrequent loads.
- The second point is design . It is customary to make the stairs for the attic simpler, since this element of the interior is usually not visible to guests. And therefore you won’t find beautiful balusters or spectacular lighting in it.
- And the last point is the material from which attic stairs are made. As a rule, this is not expensive wood or strong iron, well, not red cedar or glass.
Here are the types of modern attic stairs that are actively promoted by the market:
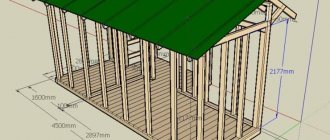
Types of bathhouse porches, construction
In the description for construction, we do not indicate any dimensions, either for the finished porch or for building materials. You can calculate all these parameters yourself after creating the project.
Types of bathhouse porches
As mentioned above, the most popular porches for bathhouses are wooden. And here there are two design options. The first is when the extension is located with a bathhouse on the same foundation and under the same roof. It is included in the drawings at the planning stage of the main building. The following photo of a porch for a bathhouse is a typical example of such a design.
Porch for a bathhouse. Photo of the extension located on the same base as the main structure
And the second option is an attached porch. It has its own foundation, not connected with the bathhouse, and the presence of a visor here is optional. The building itself can be very small, two or three steps, or quite extensive, covering the entire wall. The foundation can be slab, strip, or columnar, depending on the scale of the extension. The photo of the porch to the bathhouse, which you can see below, is quite spacious, standing on a columnar foundation.
Porch to the bathhouse. Photo of a self-built extension
About designing a porch and preparing for its construction
First of all, you need to draw a sketch of the future structure. Then we decide on the exact dimensions. To do this, you first need to measure and draw the bathhouse itself on paper. Then we mark the location of the front door and windows, if it is assumed that the extension will cover the space below them.
Based on the available data, we calculate the optimal parameters. Next, you need to “disassemble” the porch into individual elements, and draw each of them separately. We set the dimensions everywhere, and also write down all the nuances of installation and types of fastenings.
How to build a porch for a bathhouse: each element must be outlined separately
Construction of a porch for a bathhouse
We dig foundation holes to a depth of 50 cm and shape them so that they expand towards the bottom. Next, fill each hole with a layer of crushed stone, approximately 20-25 cm, and fill everything with a cement-crushed stone-sand mixture. Cover the foundation thoroughly with cellophane and leave it until it hardens. This usually takes about a week and a half.
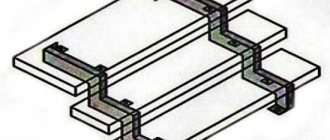
After the concrete has hardened, you can continue building the porch for the bathhouse. And the next stage is the installation of supports for the site. They can be mounted to the foundation in different ways, including using ready-made fasteners, which can be purchased in advance at hardware stores. You can see one of them in the upper left corner of the following picture.
Do-it-yourself porch to the bathhouse: columnar foundation
We assemble the platform frame on the ground: first the frame, and then the lintels inside it. The latter are attached using steel corners, and should be located approximately every 70-80 cm. If the porch is small, no more than one meter in length, then jumpers will not be needed.
How to make a frame for a platform: installation of frame and lintels
After the frame is secured to the supports, you can begin preparing the site for installing the flooring. To do this, a sheathing is made on the surface, which runs across the lintels. We adjust the length of the sheathing elements so that their joints are exactly in the middle of the support board.
The sheathing of the bathhouse porch acts as a substrate for the floor covering
We assemble the flight of stairs to the bathhouse in the following order:
- We put the stringers in place, and do not tighten the fasteners completely.
- Using a level, we check the position of the stringers; if everything is fine, tighten the fasteners completely.
- Install the first step riser from below.
- Now you need to attach the tread.
- Next is the next riser, etc.
How to attach a porch to a bathhouse: installation of stairs
The construction of the porch for the bathhouse is almost finished. All that remains is to install a canopy over the platform and fences for it, as well as railings on the stairs. The simplest option for a canopy is to purchase a ready-made polycarbonate canopy. You can either build railings and fences yourself - from wood, or order ready-made ones from it. Decking boards are best suited for flooring.
Small polycarbonate visor
Important: after constructing a wooden porch, it is necessary to treat all its surfaces. First we cover everything with an antiseptic composition, and only then with varnish or paint of the selected color
How to design a staircase with an attic?
You can build or construct wooden attic stairs at any time. And most often they do this, creating a project already at the final stage of construction, so that the staircase itself fits perfectly into the existing interior design and suits its style. Naturally, it will be easiest for you with lightweight folding structures that hide behind the hatch in the ceiling: they do not need any space at all except their dark niche directly above the hatch.
But it is better to design extension and stationary stairs in advance. It is especially important to pay attention to such points as how much space one staircase will take up and how convenient it will be to use.
The rule is quite simple: the more exotic and unusual the staircase in the project you have chosen seems, the more difficult it will most likely be to manufacture, inconvenient to use and, on top of that, it will cost you more.
- Parameter 1. So, if you decide to choose an attic staircase project, pay attention to the following technical characteristics. The height of your hatch opening will depend on the height of the ceiling in the house, and this, in turn, determines the angle of inclination of the stairs. But, be that as it may, in any case, the steps will be located strictly horizontally.
- Parameter 2. The next step is to calculate what load such a ladder can withstand. Typically, the standard design is designed for 160 kilograms. But keep in mind that if there is a person in your house heavier than 130 kilograms, which is not uncommon today, then design the staircase itself to be at least 200 kg. For the simple reason that this person, going up to the attic, can hold some other weight in his hands - for example, a box of old things.
- Parameter 3. And the last parameter that should be calculated is the thickness of the thermal insulation layer, on which the tightness of the attic hatch will depend. The attic hatch itself is usually made with dimensions of 60-70 by 120 centimeters.
So, regarding the calculation of a stationary staircase, remember these points: in order to go down and up it safely, the height of the step should be designed from 15 to 18 centimeters, and the width from 30 to 60 centimeters. Do not make the width of the entire flight of stairs 60 centimeters.
Further, the most popular tilt angle is 45 degrees and it is also the most comfortable. Of course, the staircase to the attic is not used as often as we do to the living floor, so it may be even steeper. But still, most often, manufacturers of stairs make them so inconvenient only for the sake of saving building material, but why do you need it? Of course, this rule does not apply to spiral staircases, which, for all their beauty, are always steep.
Calculation of staircase size
The basic calculations take into account the distance between the floor levels of the first and second floors. The height of the ceiling and the thickness of the materials used to finish the floor on the upper floor are added to the ceiling height.
Next, the appropriate slope of the structure is determined, which ranges from 22 to 38 degrees. The higher it is, the less space is needed for its installation.
Determining the number of steps: the distance between the floors of the first and second floors is divided by the standard lifting height - 16 cm. The resulting value is rounded.
Example: the distance between the floors is 285 cm, the rise height is 16 cm. Total: 285 / 16 = 17.8 (18) cm. The finished structure should consist of 18 steps.
Determination of the lifting step: 285 / 18 = 15.8 cm. This is an acceptable value for a person of average and above average height.
The resulting dimensions of the steps for the stairs are checked using the following formula: lifting step × 2 + step width.
Example: step - 158 mm, step width - 320 mm. Total: 158 mm × 2 + 320 mm = 636 mm. The value corresponds to the norm in the range from 590 to 655 mm.
Otherwise, it is necessary to correct the sizes of individual elements.
The minimum permissible width of the staircase structure is 0.8 m, the standard is 1 m.
After making all the calculations and obtaining the finished dimensions of the structure, you can select materials, prepare tools and begin making your own stairs.
Installation of load-bearing elements
So, let's talk separately about the load-bearing elements of the attic staircase. So, usually, these are stringers and columns for wooden stairs, or slab stringers for reinforced concrete stairs.
If the angle of rotation of the staircase is more than 360 degrees, then we are talking about circular staircases. These were most popular in medieval times. They already have a central chair placed as support. The main advantage of such stairs is their compactness, so it’s very comfortable to climb them. Especially if a person’s stationary stairs themselves differ from each other in the type of load-bearing elements, which are children and sleepers, racks, large stringers.
We design and prepare the installation of attic stairs:
- Step 1. First of all, you need to determine the dimensions of the opening in the ceiling for the future staircase and the distance between the attic floor and the floor of the living space. This will help you accurately calculate the number of steps.
- Step 2. Next, think about what the twist angle of the spiral staircase will be. According to the rules, when walking a full circle along such a staircase, you must end the movement at the same horizontal point where you started it. Please note that if the staircase to the attic is installed in the middle of the room, then everything will be easy to calculate, but if you are going to place it in the corner, make sure that when you exit the staircase you do not run your nose into the wall. It is also important that you do not hit your head on the attic structure when climbing stairs.
- Step 3. It will not be difficult for you to calculate the required number of steps. To do this, divide the height of the residential floor by the number of rises and see what parameters are obtained for the height and width of the step, and how well they correspond to the standards. After all, you should be comfortable going up and down such stairs, just like everyone else at home. Therefore, the deviation from the norm can only be small.
If you are unable to design a whole number of steps, you will have to either make the floor higher or change the height of the very first step. And the last way is to make some step wider, which will not affect the convenience in any way. After all, the steps of a spiral staircase run on top of each other and one of them simply runs deeper inside under the top one.
The height of the room directly below the attics should be 2 to 3 meters. This is the only way to install the staircase with a comfortable angle of inclination (which is 45°). Typically, finished staircase structures have from 10 to 15 steps, and the height between them is 18 and 15 meters. In fact, it is just between two and three meters when unfolded.
What fasteners and materials are needed?
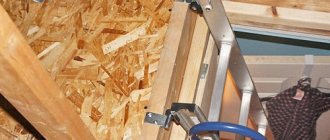
As for the main material, a wooden staircase will be the most affordable, but here it is important to pay special attention to the strength of the fasteners. To make such a ladder, you will need two long and two short bars, as well as a piece of plywood 10 millimeters thick.
Let's take a closer look at this point. All designs that help open a staircase with a hatch at the bottom differ only in the presence of additional mechanisms and shock absorption. The shock absorption, in turn, makes it easier to close and open the stairs. And you can buy all the necessary hinge elements at any store. But simple metal strips drilled in several places are quite suitable for constructing such a staircase, and the most expensive thing for arranging a staircase is an aluminum sliding system.
Simple and practical fastening:
More complex system:
But what are the requirements for fastening the entire staircase? The first is the ability to withstand the weight of the entire structure, as well as the weight of the person who will climb and descend along it. And not only the static loads of a person standing on it with his certain weight, but also dynamic ones, which are much greater than static ones. For example, a person stumbled and suddenly stood on a lower step, or staggered and leaned on the stairs with all his weight, but abruptly and suddenly.
And finally, we note the ability to easily control the structure. As you understand, such a ladder weighs a fair amount and it is important that you then make sure it is easy to open. And when closing, you will have to lift all the weight at once, so provide special springs that will make the whole process easier for you over time - you will be grateful for this trick.
Mobile stairs: to save space
For each of these options, there is a different technical solution for attaching beams to walls, which are made of different materials. Remember that the design of the staircase affects both the conditions of its operation and its appearance - how aesthetically pleasing it will be and how comfortable it will be for you to use it. For the attic, depending on its functionality, stairs are installed closed and open, spiral and straight, marching and attached, with winder steps and combined, especially when it comes to an insulated attic - attic.
So, here are the attic stairs offered on the modern market today: folding-retractable, with a wooden base and metal steps, wooden steps and a metal base, completely wooden and completely metal. We advise you to take pine or spruce as wood for such a staircase - they work better in tension.
An extension ladder is the easiest option
You can install a wooden staircase at the stage of finishing work - this is the most ideal time.
Folding or folding ladder: saving space
A separate type of ladder is a folding ladder. It consists of three sections, which are secured to each other with special clamps. We can say that this is the same stepladder, only cut into three separate parts.
External stairs: cold and slippery
There is another type of attic ladder that is not often remembered - these are external stepladders. Usually they are very long and coated with special anti-corrosion paint, and in this case the traditional hatch clamps have already been replaced with guide elements.
The only significant disadvantage of such stairs is the need to use them outside the living space, and therefore in winter they can be unpleasantly cold to the touch.
Interfloor staircase in the bathhouse
For quick access to the attic, attic or second floor, a separate staircase is provided in the bathhouse.
When choosing and installing a structure, the following factors should be taken into account:
- The staircase to the second floor must provide reliable ascent and descent from the lower floor to the upper one. The right solution would be a traditional staircase made of marches of a suitable design.
- To save space, the exit from the stairs is made along a free wall.
- If the rooms on the second floor are rarely used, then it is more profitable to install attic ladders of a retractable or folding design.
- A turning and spiral staircase in a bathhouse to the second floor is less practical and functional for permanent use, but in a small building it will save usable space. In this case, the design can have various modifications, the main thing is to take into account the dimensions of the bath.
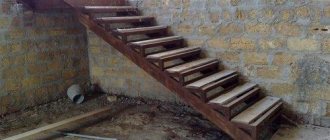
Stationary stairs: for frequent visits to the attic
A stationary staircase, even for a non-residential attic, is not wasteful at all. Often, literally two or three years after moving into a new house, such an attic is converted into a technical one, for storing things or as a full-fledged storage room. And now, imagine how inconvenient it will be to carry the same three-liter jars of preserves upstairs, barely keeping your balance on a fragile folding ladder. Therefore, if you have plenty of free space, it is better to immediately install a normal stationary staircase - a marching or spiral staircase.
So, the simplest option in terms of installation work is a staircase with one flight, straight from the floor to the ceiling of the attic. It takes up, of course, a lot of space and has its limit of only 18 steps. And therefore, if you do not want to load the entire space under the attic with it, add turns or bends, and the staircase will turn out to be U-shaped or L-shaped.
If the angle of rotation is 90 degrees, this is a quarter turn, and if it is 180 degrees, this is a half-turn staircase. And connect the marches with intermediate platforms or winder steps.
For wooden attic stairs, steps are installed in two main ways:
- The first method: with mortise steps, where the risers are inserted into special grooves, and the stringers are tightened with puffs so that they do not diverge.
- The second method: overhead steps. These stairs have jagged stringers, on the upper side of which the stepped shape is secured under the steps with a horizontal cut.
Of course, if the entrance to the attic is in a room where the stairs will not be an eyesore, it is better to install a stationary option. In practice, such a staircase is always more convenient and safer.
Cantilever staircase in the wall: for weightlessness
Cantilever staircases are distinguished by the fact that their steps can be mounted on the wall at one end, and rest on the central pillar with the other. But this is only possible in a reinforced concrete structure, because a wooden staircase cannot be pinched with just one end in the wall - it is completely unreliable. Indeed, in this case, strong tension will act on the steps, and they may simply not bend. And it is almost impossible to secure one edge of a wooden step so rigidly to the wall.
The cantilever staircase also does not have load-bearing beams, and one side of its steps is embedded in the main wall.
Staircase on stringers: for ease and practicality
A staircase with stringers assumes that the ends of its steps will rest on special supports that are laid between the ceilings of the attic and the floor of the first floor.
If the space between the steps is closed with risers, then such a staircase is called closed. If there are no risers, it is an open staircase, and this is what is most often built for the attic. It’s not for nothing that its second name is attic stairs.
Stringers are inclined beams along which stair steps are laid. The stringers themselves can be straight or rounded. Usually they place two stringers on the sides and one in the center.
Here is an example of installing an attic ladder on one stringer:
And here is an example of a two-flight staircase on a metal frame:
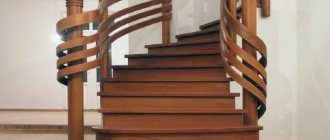
Spiral staircase: for style and design
Spiral staircases appeared as a type in medieval castles. Their main secret was not at all in beauty or grace, but in the fact that the ascent was carried out clockwise, and during the siege of the castle, the defenders could inflict a stronger blow on the enemy, and in general had many advantages during a fight on such stairs.
But for the installation of spiral attic stairs it is difficult to come up with something better than wood. Here the steps rest on a central table or in the middle part of the steps are firmly connected to each other with bolts, like in modular stairs. Then the steps themselves form a composite contour:
Keep in mind that the spiral staircase has a different slope in different places: it always becomes steeper towards the center. And to partially reduce this inconvenience, the steps of spiral staircases are usually made without risers at all, so that the foot can still go a little under the step itself.
Now let's take a closer look at how to correctly calculate a spiral staircase before installing it:
Now we are preparing an opening in the attic floor for the spiral staircase. It must be designed at the design stage of the entire house, at the very beginning of construction.
If this has not been done, you will have to cut it out in which the ceilings are located. And know that the shape of the opening to the attic can be square or round; it is only important that the size of the opening is larger than the parameters of the staircase itself, at least 10 centimeters from each height.
And here is a spiral staircase with a central support under the steps:
Spiral staircases have both pros and cons. Among the advantages, we highlight such advantages as saving space in living quarters and the ability to fit a spiral staircase into a circle on the ceiling.
Ladder on bowstrings with special ties
The next type of stairs in their design is almost no different from the most ordinary children's stairs, which are most often found in ordinary courtyards of houses. The only difference is that here the rolling material is steps.
And the structure itself also represents an interfloor platform and is supported by racks or attached to the wall to reduce rotating loads. The upper and lower fastening points of the stairs are either bolted to the attic floor beams or also supported by racks.
Bowstrings are inclined beams to which the steps are attached from the inside from the side. And so that the bowstrings do not diverge, they are secured with special ties.
And a simpler option without risers:
Stairs on rails: for a special effect
There is no special fastening system and no load-bearing beams, and the fixation itself is carried out using metal bolts. Such bolts, usually decorated, fasten the steps to each other at the top and base of the entire structure. Therefore, it seems that this attic staircase to the attic seems to float in the air - it looks so impressive.
Next: Make sure you have an anti-slip rubber or carpet pad to ensure you can safely walk down the typically steep attic stairs. There is also another point: the shorter you make the stairs to the attic, the more attention you will have to pay attention to the railings so that everything is comfortable and durable.
When installing stationary stairs for the second residential floor today, quite a lot of materials are used: from concrete to glass. But when it comes to the attic, there are usually only two options: wood or metal. Or their combined types, when the bowstrings are made of metal and the steps are made of wood. That is why modern attic stairs are most often installed with an inclination angle of 65-75 degrees.
And now about how to install an attic staircase with winder steps instead of inconvenient flights of stairs. These are steps that are arranged in a circle and look like a trapezoid or triangle. Their tread width changes from one edge to the other. If there is very little space for arranging such steps, then they use those called “goose step” or “sambo”.
Such steps are laid alternately: first steps with a wide right edge, then a wide left one. When walking on such stairs, it is important to start the correct movement with the right foot, hence the name. But we note that such a staircase often causes discomfort, although only at the beginning.
Stairs whose steps lie on two stringers are double-circuit stairs. These differ in that the ends of their steps are not pinched tightly.
If the attic space of your house does not allow you to arrange a living room or at least a library there, there is no point in building a stationary staircase for it - it’s just extra money spent.
Stages of design and installation of a staircase of three sections with a hatch
Any work must begin with a project. Determine the height of your future staircase, taking into account the height of the ceiling and a slope of 60-70 degrees. It is also worth accurately measuring the attic passage and drawing a corresponding diagram. The drawing must contain the following information: length of the staircase, angle of inclination, height of the ceiling of the room, dimensions of the passage and attic hatch, width of the flight, number and dimensions of sections, number, distance and dimensions of steps.
I. Preparation of the drawing
At this stage, the design is calculated. The length of the stairs is easy to calculate. We use a simple mathematical formula: D = B/, where α is the selected angle of inclination, B is the height of the ceiling. So, with a ceiling height of 3 m and an inclination angle of 60 degrees, the length of the staircase will be 3/0.867 = 3.46 m. Craftsmen advise adding a few centimeters to the resulting figure in order to then more accurately measure and cut the required length:
Next we make the attic hatch:
The dimensions of the hatch should be slightly smaller than the opening itself. For the calculation, 6-7 mm is left on each side of the door.
We calculate the length of the sections according to the following scheme: the first section is the length of the hatch minus 10%; second section – length of the first section minus 10%; third section - the sum of the lengths of the first two sections is subtracted from the total length of the stairs.
Now you need to transfer the calculations to paper and begin preparing the necessary materials and tools.
II. Selection of materials and tools
To implement the project, you need to prepare carpentry tools: tape measure, chisel, hacksaw, screwdriver, welding machine (or capital connections for a metal frame), square, hacksaw, clamps, wood glue, masking tape, electrodes, wood glue.
The main materials that we will need: 50x50 mm bars for finishing the hatch (about 4-5 pieces); two boards for the bowstring 100x25 mm long, equal to the selected length of the ladder; board for steps 100x20 or 100x25 mm; plywood or material with similar characteristics (one standard sheet is enough for the hatch door); plates and angles for opening and hinges; nuts, bolts, screws, washers, etc.
III. Making a hatch door
Step I. Prepare the bars for the hatch.
At the ends of the beams, make cuts and grooves to tightly connect the structure into a regular triangle using assembly glue and fasteners. Protect the corners of the frame with temporary plywood plates to prevent the rectangle from moving.
Step II. Attach a sheet of plywood of the appropriate size to the base of the bars.
Now you need to try on the hatch to the passage to the attic. It should be 6-7 mm smaller on all sides.
Step III. Provide a lock for the attic door.
This can be an automatic mechanism, or a very ordinary latch, which can be opened with a pole with a tip.
Step IV. We install hatch opening/closing mechanisms.
If you don’t want to buy ready-made mechanisms, you can make them yourself. There should be two fastenings - left and right. For work, purchase a 4x20 mm steel plate and a corner. The photo shows a drawing of the left fastening part. The right one is performed in a mirror image. Dimensions are given arbitrarily. For more accurate calculations, consider your parameters. Before fastening, be sure to check the mechanisms in operation:
IV. Assembling the stairs
You can always order a ready-made sectional staircase from the craftsmen, which you can fasten according to the finished scheme yourself. But if you decide to complete the work yourself, you can assemble the stairs from prepared materials.
Step 1. Mark on the strings the places where the steps will be installed.
To do this, mark each part with a pencil, according to the selected angle of inclination of the stairs and the previously made calculations. Now press the ends of the boards tightly together and secure them with masking tape. This is necessary to drill through holes at the junctions of the sections. Drill a hole for the hinge with a diameter of about 25 mm at the junction of the first and second sections. Next, you need to remove the tape and turn the boards over, fastening them again. Now we drill a similar hole at the junction of the second and third sections:
Step 2. Cut the bowstrings along the marked lines.
Next, grooves for the steps are made on the inside of the bowstrings using a chisel. The depth of the grooves must be at least 5 mm (this should also be taken into account at the first design stage). The lower section of the bowstrings should be beveled according to the angle of inclination of the stairs.
Step 3. We cut the steps according to the markings and attach them to the left bowstring.
We put the steps on glue and secure them with self-tapping screws. We attach the right bowstring and also fasten it with self-tapping screws.
Step 4. Attach the hinges for the sliding mechanism of the stairs.
Hinges, like hinge mechanisms, can be bought in a store, or made independently from metal tape. We need eight strips of metal (you can use leftovers from the door mechanisms). Weld small pieces of the same strip to the four strips. We drill two holes in each part (for fastening and hinge). We connect the hinge with the hinges. Now we join the cut sections and attach the hinges so that each hinge fits into the groove (25 mm holes drilled before cutting the sections). We fasten the loops on the bowstrings:
V. Final assembly
Now the top of the finished ladder needs to be secured to the hatch, having first checked the operation of the hinge mechanisms. The staircase should also be checked after installation. After making sure that all parts are in good working order and functional, open the steps with varnish:
And one more step-by-step installation guide:
You can insulate and seal the hatch using foam rubber or construction wool. The edges of the hatch should be covered with rubber sealant tape.
That's it, your staircase with hatch is ready! This is exactly the option that is completely feasible “with one helmet.” We wish you fast and easy work.
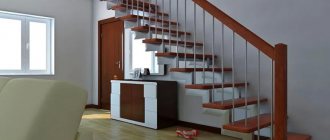
The most ingenious ideas for attic stairs
And now two pleasant bonuses: how to make excellent shelves under a nondescript attic staircase or turn the entire staircase niche into a wonderful library!
We will tell you how to make such options in other articles. In the meantime, if you still have questions, ask them in the comments!
Manufacturing technology for bath stairs on stringers
Installation of steps on stringers is carried out on a special protrusion of a wooden profile, and therefore requires minimal carpentry skills. Work on assembling the structure is carried out as follows:
- A template is prepared from cardboard for the future step of the required size and slope.
- Stringers are made of dense wood.
- To connect the stringers with the ceiling, notches and markings for the step template are applied along the edges.
- Protrusions are made according to the markings and carefully cleaned with a grinding tool.
- An additional recess is made for fixation to the beam, and metal supports are installed.
- The beam is fixed using anchors strictly along the line of the lowest step.
- Installation of stringers at an angle, additional fixation with anchors.
- Production of steps from boards with a thickness of 3.5 cm, risers - from 2.5 cm. Careful grinding of blanks.
- The lower part of the stringer is treated with wood glue to fix the risers.
- Additionally, each part is fixed with self-tapping screws, and steps are mounted.
- Finally, railings with decorative elements are installed. The handrails are fixed in compliance with the general slope of the stairs.
Schemes of stationary type structures
Technical capabilities require some knowledge of mathematics and trigonometry. Usually, for the manufacture of such structures, it is important to contact professionals. Taking into account the width of the required opening for this option, it is important to consider heating in the attic. Otherwise, the massiveness of the hatch will cause inconvenience, and its absence will reduce the energy savings of the house. Heat from the house will go into the chimney. Despite the apparent simplicity of the designs, the drawings of the stairs are drawn up taking into account the nuances of a particular type. With patience and attention, you can make convenient structures for moving.
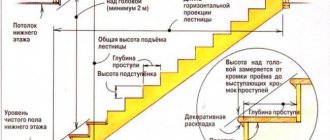
Description of the staircase design.
Stairs to the attic.
As a rule, any staircase is a compromise between convenience and safety, on the one hand, and the space occupied in the room, on the other.
For information: the most convenient and safe staircase has the following parameters: Tilt angle – no more than 45°, Rise amount 17 – 20 cm, Tread (step) width 30 – 35 cm.
Obviously, it is problematic to place a staircase with such characteristics even in a residential area, since the layout dimensions often dictate other parameters. So the designer has to rack his brains, making the staircase broken, semicircular, spiral...
In the bathhouse, due to the lack of space, the restrictions are even stricter. However, the stairs should still be as comfortable and safe as possible for both descent and ascent.
I won’t say that I managed to solve this problem to the end, but, in principle, the stairs in the bathhouse turned out to be quite convenient. And such a design can be recommended in such cases.
So, in order.
The staircase is made from sawmill waste - from “slabs” - side boards remaining after cutting the logs into boards.
Large slabs with a convex part thickness of 5–8 cm were used as sidewalls.
For the steps, a slab of smaller thickness was used, and the convex side was made flat using an electric jointer.
As sidewalls you can use a board with a cross-section of 6 - 7 cm by 20 cm, and as steps - a board with a cross-section of 4 - 5 cm by 22.5 cm.
The steps (treads) are shaped so that, despite the steepness of the stairs, you can stand with your entire foot during the descent.
Step dimensions: Thickness – 5 cm, Length – 50 cm, Width of the wide part – 22.5 cm, Width of the narrow part – 17 cm
The figured bend of the steps is cut out with a jigsaw. To prevent cracking of the figured protrusion, a screw with a diameter of 6 mm and a length of 100 mm is screwed into the edge of the protrusion.
The base for the steps are bars with a cross section of 5 cm by 7 cm, each of which is screwed to the sidewall with three screws with a diameter of 6 mm and a length of 100 mm.
The steps are screwed to the bars with screws 5 mm in diameter and 90 mm long.
The lower step is made without a figured cutout.
Staircase in profile.
Ladder. Angled view.
The stairs are quite steep. For rational use of space, a clothes hanger is placed under the stairs. Firewood for kindling is stored at the very base.
Attaching the ladder to the box.
In order for the ladder to stand rigidly and not move back when moving along it, the top of the ladder is screwed to the hatch box with screws 6 mm in diameter and 200 mm long.
In all staircase elements that are attached to something with screws, holes with a diameter equal to the diameter of the screw are drilled to allow the screws to pass freely through the attached element.
In order to avoid resting your head on the ceiling when climbing the stairs at full height, the hatch box is made long. Internal dimensions of the box: width - 60cm, length - 115cm.
Staircase dimensions: Sidewall length – 262 cm, Rise height (vertical distance between the upper landings of adjacent steps) – 23 cm. Staircase width – 59 cm. Area occupied by the stairs – 145 cm by 59 cm.
The sequence of manufacturing and assembling the stairs:
1. Preparing the sidewalls. We remove the bark, then trim the edges so that the width of the sides is 20 cm.
2. Preparation of treads (steps). We cut pieces 50 cm long and use a jigsaw to make shaped protrusions according to the template.
3. Preparation of bars. We cut bars 25 cm long with a section of 5 cm by 7 cm.
4. Place two side panels next to each other and mark the future steps on one of them. On the second we make exactly the same markings, but in a mirror image.
5. According to the markings, screw the bars to the sidewalls. We saw off the pieces protruding beyond the dimensions of the sidewalls.
6. Install the sidewalls.
7. We screw the lower and upper steps to the bars with screws.
8. Attach the top of the ladder to the hatch box.
9. We install the remaining steps.
Was the information published on this site useful? You can thank the author for the work done!
Did you find the information published on this site useful? Here you can thank the author for the work done.
Primary requirements
The attic staircase is a risk area, so it must meet the following requirements:
- The installation of an attic ladder is based on compliance with safety regulations. Ascents and descents must be non-hazardous, which requires handrails and railings.
- If instead of a door there is a hatch for entering the attic, then its size should not create unnecessary inconvenience, especially for the elderly.
- The structure must be strong enough to withstand a weight of more than 200 kg. The tilt angle is standard: 60–70 degrees.
Design drawing of an attic staircase with dimensions
- If it is wooden, then the structure should be coated with a fire-retardant compound.
- It is preferable that it is not in the kitchen or any other room, but in the corridor or hallway. Moreover, they install it not in the middle of the room, but near the wall itself, so that it interferes with the inhabitants of the house as little as possible.
- The optimal width is 80 cm, and the steps are at least 65; the height of the latter can be adjusted depending on the height of the predominant number of residents of the house.
- If the attic staircase has a hatch, then its standard dimensions are 70 x 120 cm. If the attic is not heated, it is well insulated.