Buying a high-quality cabin is not a problem. Manufacturers offer a large number of models of various purposes, sizes and performance levels. This can be a simple structure to store materials or a small building that is fully prepared for habitation. However, the cost of such cabins is very high.
The ability to handle tools, plumbing and construction skills will allow you to make a change house with your own hands, and its cost will ultimately be several times lower than the options offered on the market. The frame is assembled from profiled metal; the outer cladding is best made from sheet metal or wood boards.
After completing the assembly of the load-bearing structure and securing the external cladding, it is necessary to carry out work on insulating the cabin premises. This will allow the room to be used for living in winter, and in summer the presence of insulation can protect against heat.
How to equip it correctly
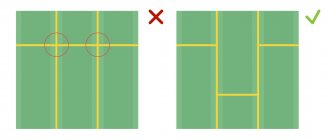
The arrangement of the cabin depends on the size and layout of the structure.
To make your house comfortable, you need to use useful squares wisely. Small-sized one-room modules will become a functional studio. In large rooms, you can install a partition in the bathroom area. A veranda and a small porch will add comfort. Cabin designSource yandex.by
Options for cabins consisting of two blocks connected by a vestibule are considered convenient. In one zone there is a bedroom, in the second there is a kitchen-dining room and a storage system. Instead of a large bed, you can take a transforming sofa, and instead of a closet, a tall, spacious chest of drawers. A shoe rack and a hanger are installed in the hallway.
Residential change houseSource bytovok-arenda.ru
In small-sized cabins, compact furniture is used. The sleeping place is located on the short side of the rectangular “trailer”. The ramp bed is a convenient design, in the inner drawers of which you can store bed linen and things. Low shelving combines the function of seating.
Tiny change houseSource yandex.ua
For a family with a child, designers recommend using bunk beds in the cabin. The sleeping area is located on the top floor; a storage system or table is installed below. If the building is high (more than 3.5 m), then the bed is placed in the attic. To avoid stuffiness, forced ventilation is installed.
The disadvantage of change houses is low ceilings and limited space. Large windows will help correct this deficiency. Designers recommend enlarging the openings or installing sliding glass door blocks on the entire wall. Natural lighting and the absence of a partition visually make the “trailer” larger.
The kitchen takes up all the free space in the shed. Full-size cabinet furniture, 0.6 m deep, often does not fit into the limited squares of the temporary shed. Instead of a large set, narrow pencil cases are used, which are placed in the corners. Instead of a full-fledged table, a folding model or a bar counter is appropriate, and stools instead of chairs.
If the shed does not have enough space to store items, then purchase 2-in-1 furniture. A narrow sofa (bench) combines functions with a cabinet. Modular options that are easy to move around the room are appropriate. Small items can be hidden in containers. Boxes are often used as chairs.
Miniature houseSource yandex.ua Convenient change houseSource yandex.ua
When there is a lack of free space, unnecessary interior items add a feeling of clutter to the design. Oversized furniture and options with voluminous decor are contraindicated in the room. It is better to furnish the rooms in a minimalist style. Instead of cabinets, shelving will help to visually unload the space.
Country house designSource 4archive.org Cozy roomSource yandex.ua
Interior of individual roomsSource yandex.ua
Modules with all amenities are a popular option that is often used on the site. A properly designed temporary shed will turn into a miniature comfortable house. In order for the structure to last for a long time, it is necessary to decide on the layout, external and internal decoration.
Video description
The construction of a house from several cabins is clear:
If a house of two cabins will be used by only one or two people, then it is advisable to heat only one cabin, and use the rest of the space exclusively for economic purposes.
A house of two cabins with a common gable roof Source assz.ru A house of two cabins with an open terrace in the middle Source tipicyw.pw
What can it contain?
Externally, the change house resembles a small house with different layouts. The premises contain oversized furniture for relaxation and cooking. If you properly distribute the usable area, you can equip a bathroom. Often the building is placed next to the main cottage, turning it into guest apartments.
Arrangement of a change houseSource nikasdom.ru
Comfortable parameters of residential premises - 18 square meters. The dimensions of the modules can vary from 6*3 m to 7*3 m, height - from 2 m. The standard layout includes two rooms, a bathroom and a kitchen. Between the zones there is often a small dressing room-corridor.
Convenient change houseSource freelance.ru
The dimensions of technical buildings are from 6 to 14 m2. Traditionally, a block contains one room, which can be divided by partitions or ordered with ready-made walls. Multi-room models have an entrance and window for each area. Standard height is 2.5 m.
A separate cabin will become a convenient bathhouse. The minimum size of the “trailer” is 12 squares. A boiler is needed to heat the liquid, and a sewer system is needed to remove dirty moisture. Wooden benches and containers for cold and hot water are installed in the washing department. In the room you can put a massage bed and a shower. Depending on the size, the steam room can accommodate 2-3 people.
It’s easy to set up a summer kitchen in a change house. A separate 10 m2 “trailer” will accommodate a full-fledged work area with an “island” and a set of furniture. Electricity, water and sewerage are supplied to the structure. To keep the room from getting hot, you need forced exhaust.
Medium-sized modules (11-12 squares) are equipped as a utility block. The design is convenient for storing garden tools. To increase capacity, ceiling racks are needed. The premises are often converted into a food warehouse. Perishable food requires a refrigerator and an electricity supply.
Change house with bedroom and kitchenSource yandex.ua
Compact buildings of 2*3 m will become a full-fledged bathroom. In the premises you can place a bath (shower stall), a sink, and a toilet behind the partition. If the family is large, then the toilet should be equipped with a separate one. Each zone has a separate entrance. The boiler is installed next to the washbasin or in the corner.
Do-it-yourself insulation
In some cases, the procedure can be done independently. No special skills are required for this; even a person unrelated to construction can fix the insulation. However, the main subtleties should be taken into account.
Thermal insulation outside
The sequence of work is very important, because it determines whether the insulation will go well and whether additional costs will be required. As for the outside, the first step is to strengthen the vapor barrier. This can be plastic film, foil and other materials. The main condition is ventilation of the facade. On an excessively smooth surface, slats can be fixed vertically, and they will hold the vapor barrier material.
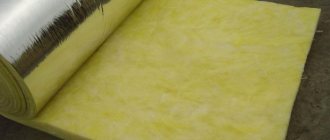
Next, the insulation itself is installed directly. Most often, the choice is made in favor of mineral wool or fiberglass. To reliably protect the room from the cold, it is enough to lay the material in 2 layers, each of which is about 10 centimeters thick. If you plan to live indoors during the winter, an additional layer will be required.
There is no need to fasten mineral wool in any special way. It holds perfectly on vertical slats. There should be no cracks or continuous joints.
Thermal insulation inside
This stage is no less important than the previous one. Each owner decides individually how to insulate the room inside. Very often preference is given to cotton material. This is due to its safety and environmental friendliness. However, it cuts very poorly, which can take a long time during installation.
In some cases, you can use the same materials that were chosen for the exterior.
Thermal insulation using penofol
In order for the material to efficiently perform the functions assigned to it, it should be secured in solid parts. This will help reduce the number of joints. A special tape is used for gluing. This will help ensure a tight seal. It is necessary to insulate not only the walls, but also the floor and ceiling. There are no significant differences in the technology of work. After the work is completed, you should arrange the room inside.
To do this, drywall is laid on top of the heat insulator and secured with dowels and screws. You can also use fibreboards. The decorative finish itself can be varied, and its principles are based solely on the preferences of the owner.
Floor insulation
The work is performed in the following sequence:
- If the trailer does not yet have a rough flooring, it needs to be nailed down. Then you need to clean its surface from debris and dry and bend the protruding nails.
- The next step is laying waterproofing. It protects the structure from moisture penetration from below and maintains its reliability. The waterproofing is fastened with a construction stapler with joints of at least 20 cm. To make it more reliable, they are additionally glued with tape.
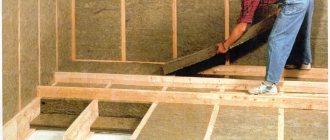
- The gaps between the lags are filled with foam plastic or mineral wool. The minimum permissible layer is 10 cm, and the recommended layer is from 15 to 20 cm.
- All existing gaps between the thermal insulation boards are filled with foam. It expands as it dries; if excess product comes out, it is carefully cut off with a knife.
- Penofol is laid on the base of the floor in the trailer - a material that retains and effectively reflects heat in the room. The joints are connected with special construction tape to a metallized surface.
- The final stage is attaching the finishing floor covering. For these purposes, oriented strand boards and moisture-resistant plywood are usually used. Such materials can be additionally painted or covered with linoleum.
Ceiling insulation
A significant part of the warm air rising upward is lost through the ceiling, so its insulation is a necessary step.
- A waterproofing material is laid on the outside to protect the roof sheathing.
- Thermal insulation slabs are laid in the spaces between the beams and secured using thermal insulating adhesive or polyurethane foam.
- Penofol is laid.
- A lining or sheet decorative material is attached.
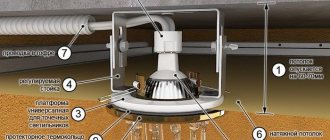
To avoid heat loss through the windows of a trailer insulated for the winter, there are two options to choose from:
- Install a third glass into the frame of a regular wooden window with two glasses;
- Replace standard windows with efficient metal-plastic double-glazed windows.
Requirements
The main function of the material is to make the room temperature comfortable for year-round living. Accordingly, certain requirements are imposed on it. Even at high temperatures, it is necessary to exclude the possibility that the insulation will catch fire with an open flame. It must be compatible with the frame. The wear-resistant qualities of the material must be at a high level to ensure a long service life.
In addition, if it is planned that the premises will be intended for permanent housing, the products must be completely safe for people, their life and health.
Heating of the cabin
Heating of the cabin in the cold season is done using devices without open fire.
These are mainly oil radiators, furnaces with closed fireboxes and heat guns.
- Heat guns are compact and powerful devices. There are electric, gas, water, infrared, diesel and universal multi-fuel options.
- The lockable oven is safe and economical. It is equipped with a protective casing that improves the conversion of warm air and eliminates thermal radiation inside the trailer.
- The oil radiator uses energy sparingly and has a horizontal position sensor that turns off the device if it falls.
Proper insulation of all elements of the trailer will create comfortable conditions for staying in it in winter.
Part 2
I have a kind of frame structure, popularly called a “change house”, but I proudly call it a “house”, with 50 mm insulation. Arriving at the dacha in the spring, it became clear to me that it would be impossible to stay overnight in the house. The temperature, even after intensive heating attempts, did not rise higher than 15 degrees. Cold walls, icy floor... The wood didn't heat up at all. It was decided to stop this outrage with minimal effort and resources.
By asking the same happy owners of cabins and searching on the Internet, I decided on foamed polyethylene as the material for insulation.
Foamed polyethylene is a sheet (roll) combined heat and sound insulating material. Available with foil sides and without foil. They say it reflects radiant energy and works even faster and more efficiently
It didn't matter to me, below you will see why
So, the insulation process with explanations:
We bought 5mm polyethylene foam at a hardware store. several rolls, furniture stapler + staples, tape, utility knife. The amount of polyethylene was calculated along the internal perimeter of the cabin, along all walls, floor and ceiling. Well, in terms of the capacity of the machine, of course.
polyethylene
a roll of polyethylene another roll
front of work, room 2x2x2 meters
The insulation is cut into strips to the height (or length) of the walls and attached with a stapler. I did it overlapping, it’s easier and faster.
As you can see, I made the foil side outward. Simply because I have a hard time imagining how to be in a sparkling silver room like a Christmas tree. Radiant energy didn’t inspire me, to be honest.
Sheets on the wall I also made allowances on the floor and ceiling, turned the corners and nailed them with a stapler. I did not cut the sheets in advance, but directly on the floor already nailed the sheet on the floor. Those. I made it from top to bottom from a whole roll.
Floor-ceiling I'll explain why
The most important thing is to remove drafts from the cracks between the boards and prevent warm air from escaping from the room. Therefore, I did it to be sure and, again, quickly. After all the work with polyethylene is done, it must be taped along the seams
To leave as few places as possible for warm air to escape
After all the work with polyethylene is done, it must be taped along the seams. So that there are as few places as possible for warm air to escape.
This is how we glue it
Walls Floor
The most difficult thing to do is the ceiling, the material falls down, it’s hard to hold with your hands. You also have to attach it with staples and try not to twist it. I didn’t dare tape off the wiring and lamps and left a strip.
kitchen ceiling
I hung straw blinds on the wall in the room, and placed two carpet runners on top of the polyethylene floor. In general, it is customary to cover this polyethylene with something, i.e. the floor is hard covering (plywood, laminate), the walls are plasterboard or something similar. Everything is simpler and simpler for me, I didn’t hide anything. By the way, it’s not that easy to damage it and you can’t pierce it with your finger unless you try hard.
Result of use by season:
- The room temperature rises after turning on the heater in 15 minutes from 15 degrees to 24 °C. And it stays like that until you open the door.
- Polyethylene takes the temperature of the room, blocks heat from escaping outside, and does not allow drafts to pass through. Both the floor and walls heat up very quickly.
- If you remove heat leakage from the windows and front door, the result is excellent! When the outside temperature is 10 °C. at night, in the change house it was 20 ° C in the morning. and in a room with a heater at a minimum - 24 ° C. (without interior doors, which I removed).
This is a very good result of insulation, because without insulation, heating the room at full power and with the door closed, it was 20 ° C, and where there is no heater, the temperature was 12-15 ° C.
Thank you for your attention, I hope my experience will be useful. If you have any questions, please ask
Related works
Additional insulation of not only the ceiling, but also, just as important, the floor and walls will help reduce heat loss and, as a result, reduce the cost of heating the cabin. Professional builders also recommend sealing door and window fillings, through which a significant amount of heat is also lost. Only a comprehensive solution to the problem of insulation will lead to the achievement of the necessary energy efficiency and guarantee a positive final result.
Characteristics and types
The flexible hose for connecting plumbing is a hose of different lengths made of non-toxic synthetic rubber. Thanks to the elasticity and softness of the material, it easily takes the desired position and allows installation in hard-to-reach places. To protect the flexible hose, there is an upper reinforcing layer in the form of a braid, which is made from the following materials:
- Aluminum. Such models can withstand no more than +80 °C and retain functionality for 3 years. At high humidity, aluminum braiding is prone to rust.
- Of stainless steel. Thanks to this reinforcing layer, the service life of the flexible water line is at least 10 years, and the maximum temperature of the transported medium is +95 °C.
- Nylon. This braid is used for the manufacture of reinforced models that can withstand temperatures up to +110 °C and are designed for intensive use for 15 years.
The fasteners used are nut-nut and nut-fitting pairs, which are made of brass or stainless steel. Devices with different permissible temperatures differ in the color of the braid. Blue ones are used to connect to a pipeline with cold water, and red ones for hot water.
When choosing a water line, you need to pay attention to its elasticity, reliability of fasteners and purpose. It is also mandatory to have a certificate that prevents the rubber from releasing toxic components during operation.
Features of gas connections
When connecting gas stoves, water heaters and other types of equipment, flexible hoses are also used. Unlike water models, they are yellow and are not tested for environmental safety. For fixation, end steel or aluminum reinforcement is used. There are the following types of devices for connecting gas appliances:
- PVC hoses reinforced with polyester thread;
- made of synthetic rubber with stainless steel braid;
- bellows, made in the form of a corrugated stainless steel tube.
The Santekhkomplekt holding offers engineering equipment, fittings, plumbing fixtures and devices for connecting them to communications. The assortment is represented by products and materials from well-known foreign and domestic manufacturers. Discounts apply for bulk purchases, and product quality is confirmed by standard certificates. For information support and assistance, each client is assigned a personal manager. The ability to arrange delivery within Moscow and to other regions of the Russian Federation allows you to quickly receive the purchased goods without unnecessary hassle.
Upon completion of the technological and production tasks associated with the arrangement of a sewer system in an apartment building, industrial building, as well as in a private household, it is necessary to test the involved system using the forced flow method. This task is used to identify possible defects or improper installation of the entire involved sewerage part, and the test report for internal sewerage and drainage systems will be material evidence of the work on acceptance of the facility.
A visual inspection should be accompanied by inclusion in the test report of internal sewerage and drainage systems according to SNIP, which is currently represented by the current regulations of the “D” series appendix, which corresponds to SP 73.13330.2012 “Internal sanitary systems of a building”, recently a new one has been applied updated working edition according to SNiP 3.05.01-85.
The change house belongs to the category of temporary technical structures that are installed at the site of construction work and serve to store various equipment, construction materials, as well as to locate working personnel there. As a rule, construction is carried out during the warm season. Then it may not be insulated. But if construction is delayed and moves into the winter, then it’s worth thinking about insulating the cabin.
After the construction of any objects is completed, the change house is most often dismantled due to its uselessness. But enterprising land owners often adapt it for other purposes.
After a little improvement, it can turn into an excellent bathhouse or a good country house, barn or other utility room. This is where the need for insulation of such a structure arises. Metal and wooden cabins are usually insulated from the outside and from the inside. We will consider these questions in more detail.
Do-it-yourself insulation of a cabin
Owners sometimes carry out thermal insulation of their cabins themselves. A simple insulation technology allows even an inexperienced person to correctly attach the thermal insulation material; the main thing is to follow the main points and first consult with an expert.
Thermal insulation of the cabin from the outside
In order for the insulation of walls to be successful and without additional costs, the owners carefully monitor the sequence of work carried out. Thermal insulation of the outer side of the outbuilding begins with the installation of a layer of vapor barrier material. For this purpose, materials such as polyethylene film, foil and others are used.
The main task of the vapor barrier layer is to ensure maximum ventilation of the façade of the building. If the surface for installation is too smooth, fasten the slats vertically, with their help the vapor barrier material will be held in place.
Now we begin to install the thermal insulation. Experts recommend using mineral wool or fiberglass products. For optimal protection of the building, two layers with a thickness of 10 centimeters each are enough, although when insulating a cabin for living in winter, an additional layer is fixed. Mineral wool does not need special attachment to the main surface: due to its rigidity, the slabs fit tightly to the vertical slats. Gaps and continuous joints are not allowed between them.
A special film is mounted on the heat insulator to provide waterproofing, which will prevent moisture from getting inside. The waterproofing material is secured using a furniture stapler. The film is overlapped by 10 centimeters to ensure maximum protection, the joints are sealed with special tape.
Internal thermal insulation
The next stage is insulation of the interior of the cabin. Each owner of an outbuilding chooses the methods of insulation independently. Cotton insulation is common among insulators for internal thermal insulation of utility buildings. It is environmentally friendly and safe. This material is difficult to cut, so the work will take quite a lot of time. Some owners use thermal insulation materials similar to products for external insulation.
When installing insulation, it is important to remember to install vents to quickly remove condensate that forms. Vents are located at the top and bottom of the wall. To enhance thermal insulation, the insulation is covered with a special material - penofol.
Its surface creates a “thermos effect”
To enhance thermal insulation, the insulation is covered with a special material - penofol. Its surface creates a “thermos effect”.
Thermal insulation using penofol
To carry out high-quality insulation, penofol is fixed in solid parts, which significantly reduces the number of joints between pieces. All seams formed are carefully sealed with special tape to ensure maximum tightness.
To ensure maximum heat conservation, experts advise insulating the floor and ceiling. The whole process is similar to thermal insulation, which was described earlier. After finishing the internal insulation work, they think about the aesthetic design. Sheets of plasterboard are attached to the insulation, which level the surface and improve the quality of sound insulation. The fasteners are self-tapping screws and dowels. Instead of gypsum boards, fiberboards are sometimes used. The last stage is finishing the cabin according to the owner’s preferences.
For a summer residence, you can visit the official website. Product quality is guaranteed!
A special frame made of metal parts makes our cabins reliable and durable, and galvanized cladding on the outside makes the cabins durable and increases their service life. It also protects against precipitation and high humidity. Insulated metal cabins
are equipped with insulation, which makes them reliably protected from the cold, so our
insulated metal cabins
can be used perfectly at extreme temperatures. In conditions of constantly low temperatures, this proposal will be an ideal solution for business and personal needs.
Insulation materials
A change house without insulation will not perform all the functions and tasks for which it is intended. Therefore, you should carefully consider and select the insulation technology, as well as select a suitable insulator.
The modern market provides a variety of thermal insulation materials. Let's look at the most common ones in detail.
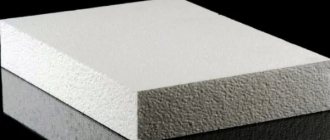
This type of heat insulator is mainly used to insulate the walls of outbuildings. Foam insulation is beneficial when finishing wooden cabins. The material is resistant to moisture, simple and easy to install. Foam insulation has disadvantages: short service life and large volume for good insulation, and with low-quality products - significant heat loss. Several layers of polystyrene foam will reduce the area of the room, and improper use of the structure will lead to a fire.
Mineral wool and fiberglass
The advantages of the materials are fire safety and excellent thermal insulation characteristics, subject to all the requirements of the technological process. If you install several layers of heat insulation, the acoustic properties of the rooms will increase. Disadvantages - the components are harmful to health.
Such fibers are produced through careful processing of basalt rocks. On the construction market, a common form of material is slabs, which can be easily cut to size and laid. The heat insulator is completely resistant to fire and does not undergo deformation processes for a long time. The easy-to-use material will not take up much free space, so the area of the shed will remain almost the same. The disadvantage is the many seams that remain after installing thermal insulation.
This thermal insulation material is the most common and effective for insulating commercial buildings. There are 2 types: liquid and hard. Experts recommend using the second option to increase the heat capacity of the building’s exterior. It is excellent for strengthening roofing systems and exterior walls. Using the unique structure of polyurethane foam, it is possible to mask possible defects in the roofing system and increase the temperature in the structure.
Polyurethane foam is sometimes used in another way - by spraying it onto indoor cladding. It fills all the places where cold air penetrates, thereby providing maximum thermal insulation.
Advantages
:
- high level of heat resistance;
- the material quickly becomes hard, which instantly stops heat loss;
- laid flat, without seams or fasteners;
- does not contain chemicals, is safe for health;
- protects the coating from mechanical and other influences;
- service life - from 30 years with proper use.
To carry out proper insulation, you need to know detailed technology and act in strict accordance with all stages of the thermal insulation process.
General rules for thermal insulation
To properly insulate a wooden outbuilding, certain rules are followed.
- First, we prevent heat loss through the roof - we cover the structure with a special film. Only after this can the roof be laid in the form of corrugated sheets or ondulin.
- To increase heat resistance, MDF panels are used, installed on special profiles. We fill the free space with a heat insulator of your choice.
Change houses made of metal are highly resistant to mechanical and other influences. The metal frame is completely protected from moisture by a special covering. But the roof of an outbuilding is often susceptible to corrosion processes. To prevent corrosion, it should be treated with a polymer-based coating or paint and varnish products.
Wall structures are sheathed with clapboard, block house or plastic panels. Thermal insulators are mineral wool or polyurethane foam. To prevent heat loss, cracks and joints are sealed with tongue and groove boards. Combined outbuildings are insulated in the same way.
Where to start insulating a cabin
If you are just planning to purchase a cabin for winter living, then first of all you need to pay attention to the material from which the structure is made. There are three main types of cabins: metal, wood and combined
- The metal structure is a frame covered with profiled galvanized iron. The design is resistant to moisture penetration and therefore exhibits better heat retention ability.
- A wooden change house is very vulnerable to the penetration of cold and moisture into the room, and therefore requires more careful thermal insulation.
- A combined cabin is a structure made from several materials. Insulation must be carried out taking into account the material of the cabin in its individual areas.