When creating an artificial reservoir, be it a pond, a swimming pool or a well, you cannot do without digging a pit.
But when excavating soil on different types of water bodies, certain nuances must be observed.
In this article we will look at what a pit for a lake, a swimming pool or a well is. What does the procedure for digging a pit for a pond include and what stages is the work divided into?
Digging features
A pit under a pond is an artificially created depression in the ground, intended for subsequent filling with water and use for certain needs.
The peculiarities of pits for reservoirs are that their boundaries must be resistant to the volume of water with which they will be filled. The profile, shape, size and depth of the pit are determined by the functional purpose of the future reservoir.
Excavation pits for reservoirs can be divided into 3 main groups:
- under lakes and ponds;
- for swimming pools;
- under the wells.
Let's look at each of them in more detail.
Under an artificial pond
Pit pits for artificial reservoirs can be classified according to their main purpose as:
- Decorative. As a rule, small pits located in a semi-shaded place where the sun hits in the morning and evening. This is important for maintaining the vital activity of all microorganisms in the reservoir. It is more appropriate to make the profile stepped.
- For fish farming . Usually a large pit with a depth of at least 1.5 meters. The relief should be divided into zones of different depths, including a wintering pit, the bottom of which will be 150 cm below the soil freezing level.
- For swimming. The most common option is a smooth descent to a depth of up to 3 meters. If the pond is shallow, it may begin to bloom. The deeper, the colder the water below, and therefore flowering does not occur. You can make a sandbank for easy entry, where the water will warm up.
- For recreational use. Such reservoirs must be large enough, with a high water exchange coefficient.
The main differences between the types of lake reservoirs are the bottom topography, depth and size.
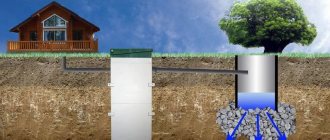
Under the well
Mine wells, which can be of three types, require digging pits:
- Imperfect.
- Perfect.
- Perfect with a sump.
They are very similar to each other in structure and pit depth. These wells differ in the methods of water supply and some construction nuances.
Under the pool
The shapes of pools are:
- square,
- rectangular,
- trapezoidal,
- round,
- oval,
- decorated to look like natural bodies of water,
- with straight walls,
- with inclined walls.
Also for their installation, bowls of different compositions are used:
- concrete,
- plastic,
- polypropylene,
- composite compositions.
Concrete bowls are the strongest and most durable, but they take a long time and are expensive to install.
Choosing hydrolysis
MikeFORUMHOUSE user
Waterproofing is necessary. Otherwise the water will not hold. It is a very rare case when there are hydrogeological conditions for a natural reservoir.
Before artificial materials for waterproofing ponds appeared, it was made from clay. FORUMHOUSE users still make the so-called clay castle now, mainly when creating so-called eco-ponds, or when the size of the reservoir forces them to do so - covering it with film is too expensive. A clay castle is three layers of clay 15 cm high, applied to the bottom of a pit. This old-fashioned method has several subtleties - to repel worms, before applying the first layer of clay, the bottom of the pit is first sprinkled with a layer of soot, etc. This is a complex and labor-intensive technology. To prevent the bottom from cracking over time, the clay for the castle is “greasy”, with a minimum sand content, each layer is well compacted and completely dried, and only then the next one is applied. Large stones are poured onto the clay castle, small stones are poured onto them, and river sand is placed on them.
Mike
The complexity of the work on constructing a clay castle exceeds even reinforced concrete work. Each piece of clay must be well pressed and smeared. Otherwise, the water will find a hole and escape.
If we talk about artificial waterproofing, then on our portal preference is given to different types of geomembranes; there are also adherents of concrete pits. The most affordable material remains high-pressure film (HPF), but this is the least reliable type of waterproofing, although many pond owners speak of this material as durable and resistant to mechanical damage. Next, in ascending order of cost, service life, winter hardiness and reliability, are:
- PVC film, service life 10-15 years;
- Butyl rubber film, service life up to 50 years. This material is recommended for deep reservoirs (deeper than 2-3 meters) due to its high strength and ability to stretch three times without loss of performance;
- Liquid waterproofing. But we are not talking about a pond that specialists will make for us on a turnkey basis, but about a reservoir that we will make with our own hands, so we will not consider this option. We will also leave options for rigid waterproofing - ready-made “bathtubs” of ponds of almost any size and with terracing, which are installed in a prepared pit.
DreiWFORUMHOUSE user
I’m thinking about how to waterproof... butyl is expensive, HDPE/LDPE film is unreliable, concrete is both expensive and cannot be altered (in case you want to change the shape). Maybe compact several layers of clay through textiles?
When choosing a material for waterproofing, it is recommended to pay attention not only to its cost. It is equally important that the composition does not contain dangerous chemical additives, that the material is resistant to ultraviolet radiation, frost-resistant, resistant to mechanical damage and durable (when purchasing, check it for tearing).
Size calculation
The size of the future depression in the ground must be calculated in advance; the practical volume of work on excavation and removal of soil depends on this. There are various methods and calculation formulas that are selected depending on the characteristics of the relief and methods of carrying out work.
In order to calculate the size of the pit
you need to know:
- Depth.
- Length and width along the bottom.
- Length and width at the top.
To perform calculations for recesses of complex shapes, you need to break them down into simple geometric bodies, count them separately and sum them up.
Here is an example of calculating a rectangular pit:
V = (H/6) (ab + cd + (a + c)(b + d)), where
- H - depth;
- a and b - width and length along the bottom;
- c and d – width and length at the top.
It is easier and faster to calculate the dimensions using special calculators for calculating earthworks. All parameters must be specified in meters to avoid possible errors during automatic calculation.
You can use the calculator not only at the work planning stage, but also in the process of adjusting the parameters of the object during the digging process.
To make soil volume calculations as accurate as possible, you can use additional tools:
- Topographic survey.
- Office processing to establish additional points and correct calculations.
- Assessment of the geological parameters of the site.
Next, a technical report is drawn up, which indicates all the errors and calculation results.
For artificial lake
The size of the pit for a pond or lake must be selected based on the size of the area on which it will be located.
The larger the area, the more spacious the lake or pond can be.
It is recommended to calculate the size of a water body in a ratio of 1:30 to the area of the territory . Such a pond will look harmonious and will not require unnecessary labor.
The depth of the pond should be at least 0.5 m, for decorative ponds it is optimal 0.8–1 m, and for fish farming - at least 2 m. If you want the pond to look natural, it is better to avoid strict straight lines.
For a well
The well is an elongated pit 5-15 m deep with reinforced walls. To understand how deep a well is needed in a particular area, you can check the dimensions of similar structures in nearby areas, or pre-drill a well.
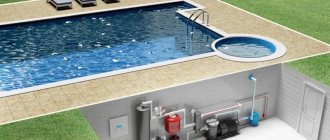
For the pool
The pit for the pool must contain, in addition to the bowl itself:
- sand cushion,
- formwork,
- pipes,
- embedded elements.
Accordingly, the pit is made approximately 0.5-1 m wider than the size of the bowl along the entire perimeter.
This size also depends on the material of the bowl. For example, concrete walls are wider than composite walls.
Types of reservoirs
Before digging a pond on a site, it is necessary to accurately determine its purpose. This is not an exaggeration, since the requirements for water and the functioning of the facility are completely different.
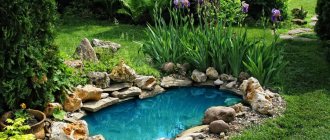
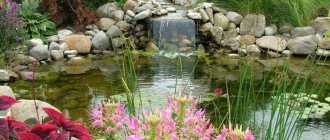
Decorative pond - can have the smallest dimensions, any shape and, as a rule, natural circulation of water. It serves for decoration, so maximum attention is paid to the stone on the bottom and for lining the sides.
An indispensable part of such a reservoir is decorative emergent plants. Fishes are not required, and if you live periodically and not permanently at the dacha, they are also undesirable. Breeding requires constant attention and participation. The photo shows a decorative pond with a fountain.
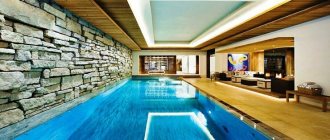
- Swimming pool - with small volumes, requires the organization of proper water circulation and periodic disinfection. Water must meet hygiene standards, and with small sizes this is not so easy. Actually, it is not a pond - it is correct to call it a pool in which microorganisms are purposefully destroyed.
- A reservoir for raising fish with your own hands - if it is intended to be populated only by decorative species, the structure should also be classified as decorative and care should be taken to ensure its beautiful appearance. If they want to eat fish, the issue must be approached differently. This will require time, effort, and extensive knowledge of fish farming.
Another classification of reservoirs is related to their shape and method of arrangement.
- You can dig a pond with a geometric shape. This is the easiest way, especially if you are going to use an excavator.
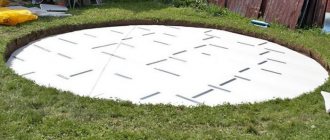
- A raised pond with a small size looks very elegant. In addition, sufficiently high sides eliminate possible danger for small children. It’s easier to care for a pond, and you don’t need to dig a pit. However, such a pool warms up very easily, which can damage the plants, and in winter it risks freezing to the bottom - the earth does not protect it.
- Natural - in this case, the features of the relief are used under the reservoir. An undoubted advantage is the naturalness of the form and, again, there is no need to dig a pit. The downside is that the shape of the reservoir can be quite complex, making maintenance difficult.
Requirements for slopes
There are certain requirements for pit slopes. Deviation from the norms may lead to the collapse of the walls of the recess.
The determining parameters are the depth of the hole and the density of the earth:
The length of the recess is a minor factor. Large straight sections can also collapse, which is rare for short distances.
Pond care at different times of the year
Pond care will definitely be required, but with the right approach, it will not take you much time and effort and will definitely pay off with positive emotions, peace and harmony in the space around you.
| If the pond is medium or large in size, then after some time, after its creation, a biobalance appears in it and it cleans itself |
In summer and autumn, it is necessary to weed the coastal zone and thin out plants that are growing strongly.
To remove filamentous algae and overgrown duckweed from the water, this can be done with a rake, a net, or any convenient equipment you have.
There are also special chemicals for cleaning ponds. They are safe for wildlife and very effective at keeping your pond clean.
If water evaporates strongly, new water must be added.
Fallen leaves must be promptly removed from the surface of the water, otherwise they will sink to the bottom and rot there.
Small ponds require more frequent attention.
Before winter, we remove the plants in containers for wintering in the basement or cellar.
If there are any pumps or fountains, everything is purged and, if necessary, removed for the winter.
The surface of the water is covered with a special mesh, which will protect it from debris falling to the bottom and into the water.
With the arrival of warmth, we clean the walls and bottom of silt. We start up the equipment (fountain, pumps, etc..).
Work on creating a hole for a lake or pond
The first thing you start with when constructing an artificial reservoir is planning. It is better to draw a sketch on graph paper.
Planning
The planning procedure proceeds as follows:
- Using a compass, the south and north sides are determined and markings are made on the plan.
- Objects that cast shadows (buildings, large trees, fences) are marked. This should be done in sunny weather during the day every 2 hours, reflecting on paper places of partial (blessed for 4-6 hours) and full shade. Partially sunny locations are ideal for placing ponds. Under such conditions, flowering can be avoided without harming the vegetation and inhabitants of the reservoir.
- The optimal location on the site for the pit for the pond is selected. There should be no underground communications or large objects laid nearby.
- The type of pond is determined by its purpose.
- The dimensions of the pit, its depth, shape and profile are being worked out. Data to scale is plotted on the plan.
- The pit zones are being worked out, taking into account their purposes and design.
Land works
After developing the plan, you can begin preparing the territory and excavating the soil. These works are carried out sequentially in several stages:
Preparing the site for the pond.- The area is marked according to the sketch. You can use twine and pegs for this.
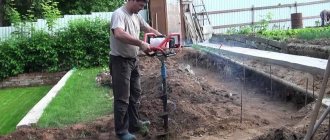
- Excavation of soil with an excavator or shovel.
If the work is carried out using an excavator, then it must be a tracked one with a rotating tower and a 1-2 cubic meter bucket. It is better to start digging from the edge, gradually moving towards the center, going deeper in the right places. During work, you need to check the uniformity of heights using a level. The banks should be at the same height relative to each other. You can adjust the height using the soil left over from digging the pit.
The overall result and quality of the reservoir depends on the correct implementation of each stage.
What shape to make a pond on the site
The depth of the bottom should be at different levels.
The shape of the reservoir on the site has no practical significance. The only important condition is that the bottom has different levels. Thanks to this relief, in small areas the water will warm up more strongly and microflora will multiply more actively. In deeper areas the fish will spend the winter.
The configuration of the banks is determined only by aesthetic considerations. Most often, they try to make the pond resemble a natural one. Usually it has an oval outline, one gentle bank. An elongated shape is allowed - it is more convenient for organizing the relief. Rectangular or round is found in the garden with the appropriate landscape.
Under the well
Not any time of year is suitable for excavating a well. It is better to do this in the summer, when the aquifer is at a low level. This will help avoid erroneous determination of the groundwater level.
Planning
As when digging pits for a pond or lake, you need to start by drawing up a sketch, which will take into account the following nuances:
- Choosing a location. The pit for the well must be located at least 5 m from large buildings, otherwise there is a risk of soil being washed out from under the foundation. Also, at a distance of 50 meters from the well there should be no places where manure and other impurities are located. This may affect water quality.
- Planning a method for strengthening the walls of the well. The walls can be strengthened using materials such as:
- A wooden frame is inexpensive, but short-lived.
- Monolithic concrete is expensive, but reliable.
- Brick takes a long time to install, but, like concrete, it is reliable.
After drawing up the plan, the selected area is cleared and markings are made on the ground. Next, you can begin land work.
Land works
A pit for a well can be dug either manually or mechanized using an excavator. Let's look at the features of these methods separately:
- When digging with an excavator:
Temporary placement of the excavated earth should not be close to the pit, so as not to collapse its walls. - It is necessary to monitor the depth of the pit and the condition of the walls, and pay attention to any delamination. If the delamination turns into a series of collapses, stop work, fill up above the collapse level and contact professionals.
- If the influx of groundwater is insignificant, the walls must be strengthened and work continued manually.
- When digging manually:
- Ideally, the work is carried out by three people: the first is in the pit and removes soil, the second is at the top, scraping soil from the edge of the pit, and the third monitors the condition of the pit system and the worker inside. If they change roles every half hour, the work will go quickly and without stopping.
- The pit should be round, with a diameter 20-30 cm larger than the outer diameter of the rings. Round walls are more stable.
- If the pit is deeper than 2.5 meters, then its walls need to be strengthened: when this depth is reached, 2 rings are lowered into the pit - they become natural protection for the person working in the pit. Then the soil under the lower ring is gradually dug in a circle, and it lowers under its own weight. If the expected depth to be dug is greater than the height of one ring, then you need to fasten the rings together with plates using anchor bolts. Otherwise, the upper ring may be pinched by the ground and will stop settling along with the lower one.
After digging by mechanized or manual means, the bottom must be leveled and cleaned. Then the pit is checked and, if necessary, the depth and slope angles of the walls are adjusted.
DIY fish pond without film
The simplest fish pond that you can build with your own hands is a structure with a dirt bottom and walls. The pit must be carefully compacted, but still this structure is considered not strong enough and comfortable for fish, so it is better to use film as the main covering.
Figure 6. Bottom drains: a – regular (1 – grate, 2 – riser, 3 – flaps, 4 – dam, 5 – sun lounger), b – simplified (1 – head, 2 – sun lounger, 3 – valve gate, 4 – winch, 5 – fish catcher), c – drainage without riser (1 – hole, 2 – shield, 3 – rod for lifting the shield, 4 – grooves for the movement of the shield, 5 – concrete head, 6 – dam slope)
In fact, the technology for constructing a pond for breeding fish from film and without it is practically no different at the initial stage. Differences appear only at the end, when the bottom and walls of the pit are covered with polyethylene.
Peculiarities
The most important feature of creating and arranging a pond is the correct choice of location. It is desirable that the soil be clayey, since such soil retains water well (Figure 
Figure 7. Types of fish traps
In addition, it is better to build a reservoir on the southwest side so that the water is warmed by the sun for at least 4 hours a day. It is not advisable to locate the pond under the shade of deciduous trees, as falling leaves will pollute the pond.
It is important to correctly calculate the depth of the reservoir. The optimal depth is considered to be one and a half meters, but it is better to increase this figure to two meters, and if you are going to grow carp, then up to 2.5 meters
This feature must be fulfilled so that the fish can be in the pond not only in summer, but also in winter.
Construction technology
To make a pond on a fish breeding site, you need to follow a clear sequence of actions.
Step-by-step instructions for building a pond include the following steps:
- Mark the territory of the future reservoir by scattering sand over its intended territory. Uneven terrain must be leveled so that the water in the pond is approximately at the same level.
- Dig a pit, and its depth should be slightly greater than planned. This is necessary so that in the future you can arrange the bottom of the reservoir. All large boulders and plant roots are removed from the bottom, and the coastal, shallow and deep zones are marked for further development.
- We create artificial differences in water level using soil from the bottom of the pit. It is at this stage that the amount of film required is calculated. Cords are placed along the perimeter of the pond, their total length is calculated and 50 cm are added on each side. If you are not planning to make a pond out of film, you can skip this step.
- We equip and strengthen the bank by filling it with crushed stone or strengthening it with pipes and boards. This will prevent the banks from collapsing in the future. It is also advisable to make a small fence to prevent rainwater from washing the soil into the pond and polluting it.
Figure 8. Stages of constructing a pond without liner
At the final stage, landscaping of the pond is carried out. A special substrate is placed at its bottom, in which aquatic plants are planted. You can also decorate the bottom with stones or broken pots if you plan to grow not only fish, but also crayfish. After this, you can begin installing the pump, filling the pond with water and stocking the fish.
Under the pool
It is necessary to draw up a schedule of earthworks taking into account seasonal changes in groundwater levels. It is recommended to start work in the summer, when groundwater is at its maximum depth.
Planning
Before planning begins, it is necessary to conduct engineering studies that will provide information about the properties of the soil.
Next, a sketch is drawn up, following the following recommendations:
- The location for the pit must be chosen outside the area where utility networks are located. It is worth considering the location of the place relative to the buildings. If proximity to them cannot be avoided, then the soils of existing structures must be strengthened.
- If the groundwater level is high, you need to consider ways to reduce water on a temporary or permanent basis. To temporarily lower the water level, a depression is made with a slope below the bottom of the pit. For permanent – drainage.
- When choosing the shape of the pool profile, you need to consider the following nuances: It should ensure the stability of the bowl and prevent its erosion.
- The optimal slope configuration is stepped. The height of the ledges is about 30-40 cm. This ensures maximum operating safety and increases the service life of the pool.
As a base for the pool, ready-made polypropylene bowls of various sizes and shapes, butyl rubber or reinforced concrete can be used.
Land works
Excavation work is very labor-intensive and, to facilitate this task, it is better to use an excavator. When using mechanized excavation, it is recommended to select a volume of soil commensurate with the volume of the pool with a small margin and complete the excavation manually.
Main stages of earthworks:
- Marking the shape and dimensions of the pit.
- Removing the top soil and plant layer to a depth of 20-30 cm.
- Removing the second layer with an indentation of 30-40 cm from the edge. This is done to create an indentation that will serve as the edge of the pool, preventing erosion of the coastline. In the future it can be decorated.
- Deepening the pit to the design level. The bottom and slopes are leveled, compacted and protected from erosion by a layer of sand 5-10 cm thick and waterproofing material.
If stones or thick roots are found during the excavation process, they must be removed to protect future waterproofing.
Digging pond from the perspective of water legislation
To properly understand the issue, it is necessary to define the terminology.
According to clause 4 of Art. 1 of the Water Code of the Russian Federation (hereinafter referred to as the Water Code of the Russian Federation), a water body is a natural or artificial reservoir, watercourse or other object, the permanent or temporary concentration of water in which has characteristic forms and characteristics of the water regime.
Clause 3, Part 2, Art. 5 of the Water Code of the Russian Federation provides a closed list of reservoirs - lakes, ponds, flooded quarries, reservoirs.
The terms pond and reservoir are given in GOST 19179-73 “Hydrology of land. Terms and definitions" (hereinafter referred to as GOST 19179-73), which establishes the terms and definitions of basic concepts in the field of land hydrology used in science, technology and production. GOST 19179-73 gives the following terms:
– A reservoir is a body of water in a depression of land, characterized by slow movement of water or its complete absence. There are natural reservoirs, which are natural accumulations of water in depressions, and artificial reservoirs, which are specially created accumulations of water in artificial or natural depressions of the earth's surface;
– Reservoir – an artificial reservoir formed by a water-retaining structure on a watercourse for the purpose of storing water and regulating flow;
– Pond – a shallow water reservoir with an area of no more than 1 sq. km.
Based on the terms given in GOST 19179-73, a pond is a shallow artificial reservoir formed by a water-retaining structure on a watercourse for the purpose of storing water and regulating flow with an area of no more than 1 square. km.
GOST 19179-73 also gives the concept of “Pond-dig” - a small artificial reservoir in a specially dug depression on the surface of the earth, intended for the accumulation and storage of water for various economic purposes.
In practice, there are different classifications of ponds.
By origin it is customary to distinguish:
- dug reservoirs (digging ponds)
- created by blocking a permanent or temporary watercourse with a dam (river ponds).
Depending on the purpose, there are cooling ponds, settling ponds, storage ponds, evaporation ponds, etc.
Thus:
POND is a shallow artificial reservoir formed by a water-retaining structure on a watercourse or in a specially dug depression on the surface of the earth, intended for the accumulation and storage of water for various economic purposes with an area of no more than 1 square. km.
Possible mistakes
Inaccuracies and flaws in the design and excavation of pits can lead to deformation and deterioration in the functional qualities of the reservoir.
The most common mistakes include:
- The right angle of slope of the walls of the pit for the reservoir. In winter, with such a steep slope, the freezing soil will put pressure on the walls of the bowl, deforming them. The slope should be 45°, then optimally distributed pressure prevents the occurrence of landslides. Also, with such a slope, the decorative elements of the inside of the bowl do not slide anywhere.
- Lack of gas drainage in pits for decorative ponds. Leads to pressure of subsoil gases on the membrane and raising of the film. It is necessary to remove subsoil gases.
- Subsidence of the pool bowl after filling with water. Occurs due to insufficient soil density. It is necessary to remove all loose soil from the bottom of the pit.
- Lack of water flow in low-lying reservoirs. Low-lying reservoirs can overflow with melt and rainwater. If there is a lower place on the site, then you can dig a trench under the drainage pipe and release excess water through it.
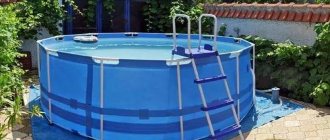
Plastic fish pond
Have you already bought a plastic frame? With it you will make a pond very easily and quickly!
To do this you need:
To begin with, it is important to understand what dimensions your plastic base has. You will need its height, as well as its diameter, therefore, if it has a rectangular shape, it is important to understand what its length and width are. Boundaries should be drawn on the ground according to the dimensions of the bottom of the purchased container. A hole is dug for the frame, and an allowance of 5 cm is made for each side. Holes are dug for the tubes. The frame is placed in the hole, then the tubes themselves are inserted. The distances between the plastic container and the soil should be covered with earth.
To make a pond, equipping it with film, no such instructions are required. It is enough to dig a hole, arrange holes for the tubes, stretch the film, strengthening it on top with sharp pegs/bricks, and insert the tubes through which water will be collected/drained.
Materials and designs
Surface drainage systems differ in design features, standard sizes, permissible load, and materials. For use in the country, gutters with a width of 100-130 mm are optimal; for places with increased intensity of water collection, channels up to 200 mm wide are suitable.
Gutters can be made from various materials. To organize the drainage of a suburban area, structures made of polymeric materials are convenient, frost-resistant, durable. Plastic drainage trays are easy to install: they can be shortened to the desired length right on site. Durable and frost-resistant products made from polymer concrete and fiberglass reinforced concrete are also good.
Decoration with plants
Ideal design - creating a natural picture. Naturalness is the most aesthetic and attractive. They use different plants that live in the depths and grow in the swamp.
They create an expressive landscape, taking into account the number of crops required for a given size. 2-3 types of plants get along well with each other, it’s not worth taking more.
Calamus irises, dwarf reeds and cattails, marigolds, and swamp forget-me-nots are suitable for mobile ponds. When the depth of the reservoir is shallow (10 cm), pennyroyal in baskets, sword-leaved rush, water hyacinth, and Mexican azolla are placed.
Stage #4 – starting the water
Now you can start the water. I threw a hose into the pit and pumped water from the well. The water took several hours to collect. As the film was filled, the folds became confused and had to be straightened. But in the end the tension turned out to be quite uniform.
Latest posts How to keep carrots fresh and juicy until summer on your own. Garden plants that summer residents have been rushing to get rid of lately. How to protect your favorite garden from misfortunes if there is very little snow in winter
A pond filled with water must settle for some time to establish a biobalance
And one more important detail that is worth mentioning. Along with clean water from the well, I poured a bucket of water from a natural reservoir into the pond. This is necessary to accelerate the formation of biobalance. In other words, water from a reservoir with an existing biosphere will help to quickly install the same one in a new pond. There will be no balance, the water will become cloudy and green in a matter of days. And soon it will resemble not a pond, but a swamp with greenish slurry. Activation of the biosystem will also be facilitated by plants planted in water on the bottom.
I immersed the pump to a depth of 0.5 m; it supplies water to the upper cascade of the waterfall and to a small garden fountain. The water division is adjusted directly on the pump.
Water circulation in the pond occurs due to a fountain and a waterfall
Liquid rubber application technology
Liquid waterproofing of a pond, created using specially applied rubber, does not require a lot of time and large financial investments. However, this work should be performed by experienced craftsmen familiar with the technology of spraying bitumen polymer onto the pit structure.
Materials you will need:
- geotextile for the base;
- ready-made liquid rubber composition;
- enamel for painting waterproofing.
Further work will take place in the following order:
- The bottom of the pit is thoroughly cleaned and geotextiles are laid on it, which is secured along the edges of the future reservoir.
- Spray liquid rubber onto the base in a uniform layer of the required thickness.
- Allow the film to polymerize for 24 hours.
- Paint the bottom of the pond with enamel in the desired color.
In this way you can obtain reliable waterproofing of any pond. There are many advantages to this type of coverage. Basic:
- liquid rubber does not allow water to cool quickly, as it has low thermal conductivity;
- sprayed polymer fills all cracks and defects based on waterproofing;
- liquid rubber has a high degree of adhesion to materials of any kind;
- the ability to create seamless fabrics of any configuration;
- The polymer material does not absorb water and is resistant to climatic factors.
Popular articles Description, application and composition of the grass mixture of a universal rolled lawn
Choosing a location is very important
It is very important to choose the right place for the future pool. Initially, decide what kind of design the pool will be: metal covered with special plastic, frame with metal plates or a concrete bowl
This is necessary in order to decide what shape the pit for the pool will be. Since prefabricated and ready-made bowls have standard shapes in the form of ovals, circles, squares, rectangles and eights. But a concrete pool can have any shape that you give it yourself. Based on the shape and size of the future pool, decide where it is convenient to place it on the site. But the pit for the pool must be located not only in the area where it is placed, but also meet a number of other requirements:
- Groundwater should be 1.5 meters below the dug hole. Don’t forget that there will be a drainage hole under the pool, another couple of meters deep. If groundwater is located too close, then even a concrete bowl will deform when moving, not to mention other types of structures.
- There should be a water supply next to the future pool to quickly fill the bowl. Electricity for connection to the pool equipment.
- It is advisable that there is no vegetation nearby, as this is additional debris in the form of leaves that will fall into the water. In addition, the growing roots will also gradually destroy the foundation of the pit. Located in an open space, it will warm up faster from the sun's heat.
It is important to understand that any pool must stand on an absolutely flat and horizontal surface to avoid distortions that can lead to destruction.