Home / DIY furniture / Kitchen furniture
5
Reading time: 5 minutes
A
A
Currently, furniture panels are used for the manufacture of furniture in the middle price segment. They are more expensive than conventional laminated chipboards and cheaper than solid wood. In terms of their operational parameters, they fully meet the requirements of most consumers.
Making your own kitchen set is not very easy; these are quite complex designs. To do this, you need to have a full set of carpentry tools, a workshop, basic furniture making skills and a great desire.
In this article we will give step-by-step instructions for making one of the simplest options for kitchen furniture; the work requires only a minimum set of special tools, and practical skills may be limited to the experience of making a bench for a suburban area.
But before this, it is necessary to obtain initial theoretical knowledge, without it it is impossible to understand certain features of the technology. And in each production process you have to make your own decisions, for which you need to understand the characteristics of wood, the characteristics of furniture panels, and the rules of working on woodworking equipment.
DIY kitchen from furniture panels
- What are furniture panels
- General tips for calculations
- Kitchen furniture layout options
- Step-by-step instructions for making Video - DIY kitchen from furniture panels
How to choose the right furniture panel for the kitchen
Before you start developing a design or drawing up a diagram, you need to decide how to choose the optimal wood. Today, manufacturers offer a wide range of tree species used in the manufacturing process of furniture panels. In most cases, property owners prefer pine, oak, cherry, beech, poplar, and yew.
Most people mistakenly assume that furniture board is made from waste wood products or pressed wood.
IMPORTANT! Softer material is intended for creating interior elements that will not be subject to heavy loads, for example, facades, decor, top cabinet lids. Hardwoods (yew, beech, oak) are intended for the construction of frames.
Its production is based on the process of gluing wood lamellas, which subsequently undergo several stages of surface polishing.
The selection of furniture panels based on the type of wood depends on the required functions, financial capabilities and purpose of the finished product. In addition to these characteristics, it is important to pay attention to the following parameters:
- absence of knots, cracks, chips on the surface of the workpiece;
- uniform distribution of annual rings.
Furniture made from furniture panels belongs to the category of deep-processed products.
An equally important parameter is the grade of furniture panels, which is determined depending on the number of defects on their surface. Traditionally, products are divided into varieties such as Extra, A, B, C. Sometimes the sides of the shield are represented by two varieties, in which case a double meaning is used. According to the requirements for the quality of furniture, the use of class “C” products is prohibited, so we suggest considering the features of only the first three types.
The final product is not inferior in density even to solid wood.
"Extra"
These furniture panels are characterized by the absence of visible defects and damage. They are made from a single lamella. Property owners can select products based on appearance and texture, which significantly affects the overall appearance of the room.
A rich assortment will allow you to choose the material that best fits into your existing interior.
"A/B"
This designation indicates that one side of the product is represented by grade “A”, and the other “B”. A shield with such characteristics in terms of the number of damages, on the one hand, is practically not inferior to the “Extra” category. When choosing, you must remember that solid or spliced lamellas can be used. The second side of the product may be represented by small defects, knots and minimal cracks.
Furniture made from this material is considered durable and of high quality, its service life is very long.
"IN"
This type of material can be made from spliced or solid lamellas. The presence of minor errors is allowed, for example, knots, cracks and other types of defects that do not significantly affect the quality of the board. The selection of products is made exclusively by color.
Wooden furniture panels are extremely resistant to moisture, while the surface structure is completely preserved.
Hidden fastening of shelves in the closet
If the side of the cabinet remains visible and you want to maintain the integrity of the coating, then you can use hidden, invisible fasteners to install shelves.
Furniture dowels
The most affordable, but no longer as popular as before, is a furniture dowel. It can be made of solid wood and plastic. For better grip, the side surfaces of the dowels are made ribbed.
Why do furniture makers dislike fastening to dowels? Fasteners of this type are quite specific and require gluing. This means that additional clamps (clamps) are needed to fix the position and glue. And, of course, allotted time for the glue to dry. All this slows down the build.
Eccentric coupler
More modern hidden fasteners for shelves and tabletops are an eccentric (minifix) and a conical tie. This type of fastening requires a certain skill for installation and therefore a novice master may get a little stuck. You will have to drill several holes of different diameters for the sleeve and the dowel itself. Moreover, all of them must be performed strictly in the center relative to each other; moving left/right/sideways is unacceptable.
There are many varieties of eccentric couplers, but the principle is always the same. There is a dowel with a head and a sleeve that clings to the head. The sleeve can be rotated (as on minifixes and conical couplers), inserted and snapped into place.
The advantages of the eccentric are obvious - the possibility of quick dismantling, the permissibility of repeated assembly and disassembly, and “invisibility”. Only the upper part of the sleeve is visible, which is located on the inside of the side of the cabinet and can also be hidden with a self-adhesive plug.
This type of hidden shelf fastening can also include rafix, which is a kind of symbiosis of an eccentric and a shelf holder with fixation.
Kitchen drawings and diagrams with dimensions
Creating kitchen drawings from furniture panels with your own hands is an important process that can subsequently become a lifesaver for any craftsman. The plan of the kitchen space must be created taking into account the dimensions of the furniture. The document displays information about the size of the room, communication diagram, ventilation system, electrical wiring, and the presence of sockets.
To draw up a drawing, you need to take measurements of the kitchen.
It is also important to indicate in the drawing the location of the entire furniture set, indicating their sizes, for example, a table, a wardrobe with shelves for storing food, chests of drawers and bedside tables, a refrigerator, a gas or electric stove, a sink and other components.
You should always start from these initial data when developing the sizes and names of furniture.
Dresser
This type of furnishing item can be ideal for the kitchen area. For this reason, it is necessary to consider its location in the room, design features, size and number of shelves, compartments, and dimensions of the upper surface. All these parameters are indicated in the diagram in order to avoid problems and troubles later.
When choosing a specific option, consider all factors.
Closet
Many craftsmen believe that creating a wooden cabinet is difficult and time-consuming. But with sufficient experience and carpentry skills, its production will take very little time. The drawing must indicate the type of structure and its dimensions (height, width). It is very important to include in the diagram information about each element that makes up the cabinet - depth, width, height of shelves, doors, partitions and other components. This approach will allow you to clearly calculate the amount of material needed, as well as correctly carry out all planned work so that the product fits harmoniously into the room.
You immediately need to make a list of elements indicating their quantity and material of manufacture.
Table
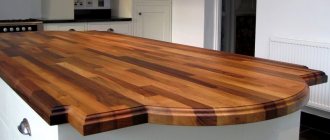
A DIY table made from furniture panels or any other material is one of the most important elements of the kitchen. It can be made in the form of a square, rectangle, circle, corner shape, as well as folding or sliding. A prerequisite for this piece of furniture is a flat tabletop. On the kitchen diagram, it is necessary to indicate the shape and dimensions of the table; for example, in most cases, rectangular structures have dimensions of 270x60 centimeters.
Not only the list of items, but also the comfort of use also largely depends on the location of the furniture.
Useful videos
In this video you can see how to solve the problem if you want to install a bar counter outside, within an open summer kitchen. It is enough to find a snag in the forest, as well as dry thick branches and install a board on them.
BAR COUNTER MADE OF WALNUT SLAB, STABILIZED WITH EPOXY, PRIMER AND VARNISH
Many people are interested in the question of how to make a countertop for a bar counter yourself. The next video shows a tabletop in the form of a mosaic. Here it is shown and explained how it is done.
9 mistakes in a kitchen with a breakfast bar
Preparation of all materials and tools
An equally important step is creating a work plan. This document specifies such important parameters as:
- the type and composition of the future furniture set;
- list of fittings and accessories;
- necessary tools and materials.
You need to have a full set of carpentry tools, a workshop, basic furniture making skills and a great desire.
In most cases, the following components may be required:
- furniture panels in the required quantity to create all planned interior items;
- special impregnation, varnish, stain, paint;
- plywood sheets;
- fittings, doors, handles and other decorative details;
- sandpaper or grinder;
- electric or conventional drill;
- wood saw or electric saw;
- screwdriver;
- boards;
- screws, nails;
- measuring instruments (large ruler, centimeter);
- a pen or pencil for recording measurements;
- screwdrivers, hammer.
It is possible that other adaptations may be required. The final list depends on the preferences of the master, the planned design of the kitchen and the assembly features of the furniture set.
Types of construction
First, let's decide which type of bar counter is suitable for your apartment. In general, all designs are divided into varieties according to the following parameters:
- location;
- type of base.
The rest of the differences are in the little things: shape, color, etc. These parameters depend solely on your taste and the style of the room, so we won’t dwell on them. But let's look at the items from the list in more detail.
Let's start with the location. The stand can be:
- insular. This is a free-standing element of the interior that can be approached from all sides. Thus, you can set up a full-fledged bar. It looks very stylish, but is only suitable for large rooms, because this type of placement requires a lot of space;
- adjacent to the kitchen unit. In this case, the counter can be placed in two ways: either to serve as a continuation of the kitchen unit, or to be located at an angle to it (usually perpendicular). The first approach is good because it does not require a lot of free space. And with the help of a corner stand you can perfectly zone a room;
- adjacent to the wall. Most often, the long side of the rack is used for fastening. This interior element is good for its increased stability due to its fixation to the wall. In addition, the wall rack can be folded - this is an excellent method of saving space if necessary.
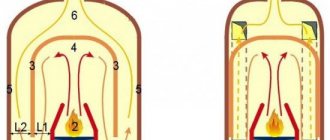
As for the reasons, there are two options:
- open. The base is represented by either a support pipe or legs. The space under the countertop remains open;
- closed. The tabletop is located on the body, inside of which there may be cabinets with shelves, niches for built-in appliances, etc.
The first option makes the stand visually light and airy. And the second makes it possible to save space by arranging an area inside the base for storing various things or for installing equipment.
Cutting panels to required sizes
Cutting must be carried out taking into account safety precautions in order to prevent injuries and other troubles. When buying furniture panels, it is important to remember that they can be available in different thicknesses. In most cases, manufacturers offer 15, 20 and 25 millimeters.
Products that are 15 mm thick are used to decorate the back wall of a furniture set. Products with parameters of 25 millimeters are intended for creating more complex design structures; other types are used for other elements of a rack or cabinet.
Cut the furniture board to size. You can work with an electric circular saw, but it is better to do this operation on a circular saw.
The wood is cut according to the created drawing. It is important to carry out cutting very carefully and carefully, because even a slight inaccuracy can lead to deformation of the entire furniture. An electric jigsaw is used for this.
INTERESTING! There are construction stores that offer their clients an additional service - cutting the board into the necessary components. This option is ideal for beginners who have not worked with a jigsaw or have not carried out such work.
After completing this procedure, the master must have all the components for each cabinet and shelf, as well as doors, countertops, fittings, and sink.
If you do not have the opportunity to do the cutting yourself, then do it in the store.
Hanging shelves
Wall-mounted bookshelves carry a heavy load and must be securely fastened. Choose a shelf hanging system with strong vertical metal fastening elements, into the slots of which the corresponding brackets are inserted - this will distribute the load across all fastening points.
If possible, screw screws into the frame posts; otherwise, use suitable cavity fasteners, such as spring anchors or butterfly dowels.
1. Attach shelf brackets directly to studs. 2. Or use metal folding anchors
If the racks are located at a distance of 400 mm from each other, you can place fasteners on them one at a time, at an interval of 600 mm - on each.
In another option, you can attach the shelves to sections of aluminum profiles, which are fastened with screws to several racks at once.
We assemble the kitchen and install it
Now you can assemble the kitchen furniture set. Before you begin this important event, you need to make sure that all additional components are present: handles and door hinges, guides, legs and other elements.
The cabinets can be coated with wax or varnish; painting is not recommended so as not to hide the beautiful structure.
Next, each detail of all modules is laid out step by step. Be sure to do this in the order in which the connection will occur. This approach will avoid confusion and troubles with the loss of elements. The process should be carried out from below, from the base, and then proceed to creating a frame and filling it with components.
Now that you have a little furniture making experience of your own, you can begin making more complex base cabinets with drawers, desks and tabletops.
A kitchen made from furniture board is a great opportunity to add a creative touch to the room. The creation and assembly of such a furniture set can be implemented in any living space. The quality of the material contributes to the durability of the kitchen, functionality and compliance with any interior design style.
The main thing is not to be afraid of work and carefully calculate the consequences of each step.
Conical coupler
The conical tie is often used for fastening thick chipboard panels (25 mm, 38 mm) and assembling frame facades on tie bars.
One of its advantages is the absence of visible caps on the front side of the panels. Unlike the screw in a screw tie, the rod used in a tapered tie is screwed into the panel. The screed itself has 2 holes. One is for the rod, which is screwed into the panel layer. The second is for the conical tie screw. The disadvantage of this type of fastener is the small tightening stroke. Under heavy loads, the holes for the rod screw may become loose over time. Then the screed will simply stop working!
How to successfully choose a place to place a closet?
Regardless of whether a person lives in a large high-rise building or in a private house, the issue of final installation of the cabinet is equally complex in both cases. Where can you place your wooden friend so that it does not interfere and at the same time creates the most cozy comfort?
Firstly, if there is a niche in the house, then the question of installing a cabinet disappears by itself. If there is no such niche, then you can create it artificially. The niche can be used not only for installing any structures into it, but for installing, for example, a plasma diagonal.
Thirdly, use the pantry for this purpose. This is one of the economical options, since minimal effort will be more than enough. In this case, the closet wall will serve as a housing for the closet, and a person will only need to clean up the interior of the room.
Types of tables for sewing machines
The range of functional sewing and craft furniture is truly impressive. You can choose from the following popular types:
- specially designed sewing table-book;
- cabinet table;
- side table;
- table for industrial sewing machine.
The last option is suitable for those who decided to open their own tailoring and clothing repair shop (albeit in a mini format). For household use, you can purchase a simpler option.
Advantages of special furniture for a sewing machine
Without exaggeration, a table for a sewing machine and overlocker is the right choice for starting your sewing journey. The design is already so well thought out that everything can be placed in such furniture (from numerous spools of thread to an overlock machine). The width and height of all devices that should stand in such a place have already been verified in calculations. After work, the machines are removed together with the platform, and the table itself can be folded.
In this regard, “books” are very popular, which consist of three sections - the central one turns out to be stationary, and two “wings” resting on legs will open on both sides.
It is better to purchase models with an existing compartment for the machine - in this case, the body of the device will be at the level of the working surface. This solution will significantly simplify the problem of storing the device. Here are the options:
- Simple, when the sewing equipment is inserted manually and then pushed in with special bars.
- A table with a special lift. Such a lifting mechanism will raise and lower the machine itself. There are both mechanical and electrical models.
Sewing machine cabinet: even more space saving
In cases where the square footage of the room leaves much to be desired, you should look for even more compact options. Here it is worth taking a closer look at the table-cabinet for the sewing machine. Its difference is that in this case the sections will rest on opening swing doors. Such furniture has a number of the following advantages:
- There are shelves on which you can place all the little things.
- Very often there are pockets on the doors (again for various accessories).
- There is also room for an overlocker, which can be placed on one of the shelves.
- It is not necessary to unfold the entire cabinet; you can use only one wing.
Industrial sewing machine table
If you plan to open your own business, then this option will be the most suitable. At home, this option may not be very suitable - after all, designs of this type are most often bulky, and they are not at all intended for home devices (because they are designed for professional equipment).
Most often, such a professional sewing machine with a table is already built into it and, accordingly, is a bulky structure. Although if you remember the old type of devices, most of them came with a cast metal structure.
For domestic use, simpler options with adjustable table top height are sold. Everything here is provided so that there is plenty of space under the table and it is convenient to use the pedal. In this case, the machine platform will be flush with the tabletop.
Side table for a sewing machine: maximum benefit at minimum cost
But what to do when the square meters of living space do not allow the purchase of excess furniture? An attached option will come to the rescue. This device is a small platform with supports on which you can perform various sewing operations.
It is best to purchase an extension table for your sewing machine from the same manufacturer as the device itself. This guarantees an accurate fit in all respects, and, therefore, will provide the greatest comfort in work.
Table for a sewing machine from improvised options
And finally, when there is space, but no money to purchase specific sewing furniture, such a device can be made from improvised materials. For example, define a regular computer desk as it. The drawers are perfect for storing accessories, and the shelves above the tabletop can simply be removed.
Solid wood furniture is the best natural material for making furniture
Currently, the following species are used to make furniture from solid wood with your own hands: oak, beech, pine, maple, walnut and others.
The cheapest option is pine, but it is quite soft, so it is not suitable for furniture that will be subject to physical impact (for example, in a child's room). The most durable species: oak and walnut.
Advantages of solid wood furniture:
- Environmentally friendly (only natural materials are used in production).
- Durability (the main thing is that the production technology is followed).
- Visual appeal.
Next, look at the annual rings; they should fit snugly against each other.