It is not for nothing that a lot of attention is paid to maintaining air humidity in a living room, as it affects human health. But what's the point of paying for an expensive device if you can assemble a humidifier yourself? It will not be inferior in performance to its factory counterpart.
There are several types of devices that can be made literally “on the knee”. In this article, we examined the principles of operation of household humidifiers and how to make them yourself.
Popular and effective methods of creating conditions for better evaporation associated with heating water and exposing it to air flow are considered. We will also show you how to assemble a homemade device based on an ultrasonic nebulizer.
Humidifier - DIY Kit
We will assemble a humidifier from a DIY kit. This kit consists of a fog generator module and a power supply.
Power supply and fog generator module - DIY kit from ultrasonic humidifier module and power supply
The module's performance of 7 liters per hour allows it to be quite rightly called an industrial fog generator. By assembling these modules into clusters, manufacturers make industrial air humidifiers. Well, we will make a powerful air humidifier at home with our own hands.
Advice:
Please also note that the module operates at 45 volts and consumes 300 watts. It requires a special power supply that produces 45-48 Volts with a current of at least 7 A. This is the power supply that is included in the DIY kit.
Filling expanded clay and installing a pump
To pour expanded clay into the installation body, you should cut off the bottom of the bucket from the top container. You can also use a knife to cut a hole wide enough for filling the filler.
It is important to choose expanded clay of such a diameter that it does not fall out through the mesh walls of the bucket.
- Next, you should take a twelve-liter bucket and place an aquarium pump on its bottom.
- The pipes coming from it are connected to the top of a prefabricated installation made of buckets with wide grooves in the walls.
- Then a plastic ring with holes is mounted on top.
To assemble an industrial air humidifier we will need:
- Ultrasonic humidifier module 7 l/h.
- Power supply AC220 - DC 45V - 350W
- Plug and cord for connecting to a 220V network - 2 pcs.
- Plastic container with a capacity of 16 liters with a lid - 1 pc.
- Fan with a capacity of 105 cubic meters per hour - 1 pc.
- Ventilation pipe with a diameter of 100 mm - 1 pc.
- Ventilation pipe corner 100 mm - 2 pcs.
- Bases for installing pipes in the lid - 2 pcs.
- Float valve - 1 piece
Ultrasonic humidifier assembly:
Plastic container
Plastic container for fog machine with a capacity of 16 liters - Container for an air humidifier with a capacity of 16 liters
Since we are making an industrial air humidifier, the performance of the device will correspond to the performance of the ultrasonic humidifier module - 7 liters per hour. A constant supply of water to the container is simply necessary. Otherwise, after 10 minutes the module will produce 1 liter of water and the automation will turn off the module. We will have to add water again above the sensor level.
A float valve is installed at the middle height of the container - Install the float valve in the container
Drill a hole in the wall of the container approximately in the middle of its height. Install a float valve into the hole.
Advice:
Purchase a float valve with the ability to continuously adjust the shutdown level. Such floats have a screw-star connection to the valve. This will allow you to very accurately set the water level.
Adjustable Mist Float Valve - Adjustable Humidifier Float Valve
Container lid
Hole in the fog generator cover for the wire outlet - Hole in the humidifier cover for the wire
Drill a hole for the humidifier module wire output.
We seal the outlet with a special rubber seal PG9, otherwise fog will come out of the hole.
Advice:
Be sure to choose a container with an airtight lid, otherwise mist will come out from under the lid and there will always be high humidity around the humidifier. We also recommend sealing the container lid with a special soft seal to prevent mist leakage.
Pipe base.
Bases installed on container lid using silicone sealant - Pipe bases installed on container lid
Cut a hole in the lid.
We install the base for ventilation pipes in the cover.
We seal the gap between the container lid and the pipe bases with silicone sealant.
Ventilation pipes
Ventilation pipes 100 mm and fan 105 – Set of ventilation pipes and fan
Let's cut the ventilation pipe into 2 parts. The length of each part must be at least 30 cm.
The first part will be installed between the ultrasonic humidifier cover and the blower fan.
We install the second part of the pipe at the outlet. The higher the pipe, the better. In a tall pipe, larger drops fall down. Only the lightest droplets are blown out of the nozzle, resulting in a dry mist. Fine droplets of “dry fog” will evaporate very quickly and will not condense on walls and equipment.
Advice:
The larger the diameter of the outlet pipe, the better. In a large pipe, the air will be thinner, droplets will collide less, which means there will be less condensation of fog into droplets. This will increase air humidity more effectively.
Fan installation
Install the fan on the pipe - Install the fan 20 cm above the water surface
The humidifier fan must be installed so that there is at least 20 centimeters from the surface of the water to the fan blades. This is done in order to prevent splashes from getting on the fan blades. Splashes from the humidifier module can quickly damage the fan.
Advice:
Install the fan at maximum power. This will remove more mist from the humidifier. This will increase the performance of the humidifier.
Installing the fan at an angle
If the container is small in volume and installing long pipes on it is problematic, then it is possible to use a different arrangement of the fan in the humidifier.
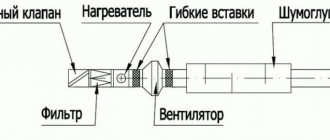
Fan installation at an angle - Different fan layout in the humidifier
The diagram shows that the humidifier fan is installed through the elbow. This way we completely prevent splashes from getting on it.
Humidifier top cover assembly - Procedure for assembling the humidifier top cover
Advice:
At the “input” you can install a grid, as in the picture. It is possible to install a padding polyester under the mesh, which will trap large particles of dust and fungal spores.
Ultrasonic humidifier module
Screw the bolts into the eyes of the ultrasonic humidifier module as shown in the figure.
To avoid overheating, raise the fog generator module by 10 mm - Raise the ultrasonic humidifier module by 10 mm
Secure the bolts with nuts. This will allow the humidifier module to rise above the bottom of the container. This must be done to better remove heat from the ultrasonic humidifier module housing.
The fog generator is installed in a container - Install the ultrasonic humidifier module in the container
Install the ultrasonic humidifier module into the container.
We adjust the float valve so that it maintains the water level 10 mm higher than the switch-off sensor of the ultrasonic humidifier module (black ball).
The water level should be 10 mm above the sensor - Pour water 10 mm above the sensor
Advice:
Set the water level in the humidifier exactly as recommended by the manufacturer. Water levels higher than recommended will reduce the performance of the humidifier. And the water level below normal will lead to overheating and failure of the fog generator. Please note that the temperature of the water in the container should not exceed 45 degrees.
The bolts raise the humidifier above the bottom by 10 mm - The ultrasonic humidifier module is raised above the bottom
Ultrasonic humidifier power supply
We connect the module wires to the power supply - We connect the ultrasonic humidifier module to the power supply
We connect the ultrasonic humidifier module to the power supply. Maintain polarity!
Connect the 220V voltage to the power supply - Connect the 220V wire to the power supply
We connect the 220V cord to the power supply connectors.
We adjust the output voltage of the power supply with a variable resistor (yellow chip to the left of the contacts). Set the output voltage to 45V. This operation is carried out under load.
Advice:
Attention! The power supply must be in a moisture-proof place!!!
The simplest ways to increase indoor humidity
Ventilation
Try to ventilate the room several times a day. Why breathe stale, stuffy air? In the morning, as soon as you get out of bed, open the window and go about your morning routine. The air from the street will fill your home with humidity and freshness.
Open a window when exercising or cleaning. Be sure to ventilate well before going to bed. And it’s easier to breathe, and your sleep will be deeper.
Many people believe that frosty air is already too dry and therefore will not be beneficial. When it enters the room, it mixes with warm water, creates condensation and provides sufficient humidity.
Wet cleaning
Cleanliness is the key to health! Who doesn't know this? Regular wet cleaning will only benefit both the apartment and its inhabitants.
Wash the floor, wipe off the dust with a damp cloth, and spray curtains and curtains with a spray bottle. And always with the window open - you won’t feel hot from physical work, and the stagnant air will disappear.
After cleaning, sit in a chair and take a deep breath. Do you feel the freshness and pleasant smell of dampness? Wet and clean!
Water tanks
Sometimes, in severe frosts, central heating radiators simply fry mercilessly. Of course, the house is warm, but at the same time unbearably dry. And now the grandfather began to cough, and the child began to sniffle. Opening the window is not an option; the frost will quickly freeze the room.
Take a basin or wide pan of water and place it under the heating system. Fasten a wide bandage or gauze with one end to the battery, and lower the other into water. The wider the fabric, the greater the volume of evaporation. Who's stopping you from hanging entire garlands of gauze?
If you don’t want to bother with basins and clutter up your apartment with them, use your imagination. Take out transparent vases and crystal from the sideboard, fill them with water and decorations - pebbles, seaweed, flowers. Beautiful compositions will fit into the interior and be beneficial. The main thing is not to forget to change the water with fresh water from time to time and wash the containers well.
Damp cloth on batteries
Wet a large terry towel and place it on the hot radiator. You will immediately feel how the air is humidified by evaporation from a large surface. The big disadvantage is that you will constantly have to run to the bathroom to wet a dry towel. But you will lose extra calories!
After washing, some of the laundry can be dried on the central heating radiators. Here you get double benefits - quick drying and good moisture. You need to look for benefits in everything!
Ventilation
If ventilation is a daily habit, then you can forget about problems with the microclimate. After all, the air becomes not only moisturized, but also fresh. In this case, the atmosphere inside the house will be directly influenced by the indicators outside. Therefore, the best effect can be achieved after rain, when the air outside is as humidified as possible. However, you should not keep the window open all day.
Especially in winter, when the temperature outside is low. It is enough to ventilate for 10-15 minutes. And do this 1-3 times a day. During cold months, you should not be near an open window - drafts and cold can lead to the occurrence of acute respiratory infections. For the same reason, it is best to ventilate when there are no children or pets nearby.
Pros:
- does not require much effort or time;
- accessibility;
- the air inside the room is humidified and filled with freshness.
Minuses:
- in winter, ventilation leads to drafts and a sharp decrease
- temperatures;
- in the summer, due to the heat, the air in the room remains dry;
- the result greatly depends on the atmosphere outside the window;
- When the window is open, extraneous sounds can be heard from the street, which can distract you from your work.
Fountain
Fountains have long ceased to be the privilege of wealthy houses. Today this cute decorative element is available to any family. It will not only decorate any room, but also humidify the air in it. Fountains come in different sizes and styles, so choosing the right option is not difficult. This solution will allow you to keep the air moist without making any effort. After all, all that is required from the fountain owner is to add water to the reservoir on time and clean it periodically. An additional bonus is that the sound of water is calming. However, it is worth considering that not everyone will like these extraneous sounds.
Pros:
- a fountain is not only functional, but also a decorative element that will decorate the room;
- no time or physical expenditure is required from the owner for
- fountain maintenance;
- The sound of water relaxes.
Minuses:
- takes up space;
- you will have to spend time searching for a suitable model;
- The sound of water can be distracting.
Need a cheap humidifier?
If your tasks require lower equipment performance, then it is possible to make a cheaper air humidifier.
Fog generator module 4 liters per hour - Ultrasonic humidifier module and power supply
For this we will use a 6-disk fog generator module. Its productivity of 4 liters per hour is quite sufficient for many tasks. And the benefits from the purchase are significant!
For example:
Ultrasonic humidifier module 6 discs 4 l/hour - 7,000 rub.
Waterproof power supply - RUB 4,500.
Bucket body layout
At the initial stage of assembling such a structure, it is necessary to glue smaller buckets together. This is done using a hair dryer, and if you don’t have one, plastic staples will do just fine.
The result was an empty housing inside, consisting of two connected cylinders. Larger buckets are glued together in the same way, but first you need to install two previously glued small buckets in them.
The cheapest air humidifier
The cheapest humidifier - The cheapest humidifier
For this we will use a 4-disk fog generator module. Its productivity is 3 liters per hour. This is quite enough for an area of 50-100 square meters.
DIY fog generator 3 liters - DIY air humidifier 3 liters
Connecting automation to an ultrasonic humidifier
Time relay
fog generator turn-on timer – Ultrasonic humidifier time relay
If desired, you can install a time relay. It consists of segments. Each segment is 15 minutes.
Selecting the modes for turning on the fog generator - Setting the modes for turning on the ultrasonic humidifier
By clamping a segment, you activate the relay for the clamped period.
The price of this device is 500 rubles.
Smart plug with humidity sensor
Humidity regulator smart socket
A smart plug allows you to control humidity. The device has 3 displays. The middle display shows the current humidity value in large red numbers. On the left display, green numbers indicate the lower humidity value, on the right display, the upper humidity value.
Through the double we connect the power supply of the humidifier and the fan to the smart socket. The built-in controller will turn on the humidifier when the humidity drops below the lower limit (left display value) and turn off the humidifier when it reaches the upper limit (right display value).
We recommend: An article about making do-it-yourself humidifiers of different capacities.