Good afternoon - today I have prepared a BIG and NECESSARY article to help everyone who has seriously set out to make a wooden canopy adjacent to a private house with their own hands. That is, I will tell you step by step what simple steps (and they are really simple) consist of building a canopy against the wall of a house. We will make wooden sheds with a polycarbonate roof. We will look at different design options for the same canopy model for a house - that is, we will learn how to create different canopy designs based on one drawing - for any home, for any needs. And after reading the article, you will not only LEARN how to make canopies , but you will also be able to implement any design of a wooden canopy for a private home.
After all, when you understand the ESSENCE of the design, you will be able to modify this design according to your creative imagination. And who knows, maybe you will even earn a living later as a master of an attachment craft.
We will consider the following questions in turn.
- A canopy for a house - its basic elements
- How to change the design of basic elements and get different canopy designs for your home.
- How step by step .
Let's first look at the classic wood canopy.
CLASSIC SHAPE
CANNOT TO THE HOUSE
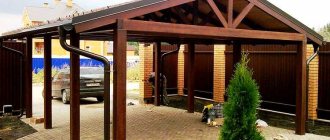
So, here (photo below) is a sample of what we will learn to do with our own hands. We see a classic lean-to canopy against the wall of the house. Such a canopy for a house can be made not only at a blank wall - exactly the same canopy structure can be made at the front entrance of the house, in the back yard for gatherings and anywhere, it doesn’t matter, the principle is the same.
THE GENERAL PRINCIPLE OF ALL CANOPIES is that one edge of the canopy is attached to the wall - and the other edge stands on support posts. That is, the canopy to the house must have two types of support - on poles and on the wall.
This is the essence of all hanging buildings... however, making holes in the wall to nail a support beam to it is NOT NECESSARY - below you will see models of canopies where the fasteners do not need to be driven into the wall, but you can install the same SUPPORT POSTS at the wall of the house as on the outer edge of the canopy. So, if you don’t want to make holes in a beautifully plastered wall, don’t rush to leave the article, there will be canopy options for your case too.
Description of species
The structure of a wooden canopy can be cantilevered, attached or free-standing. And they are called wooden because of the material of the posts, roof sheathing and rafters.
- A canopy over the porch part of the house, which is fixed to the wall and has no other supports, is the simplest gable canopy.
- On one side the attached canopy rests on 2 pillars, and on the other it adjoins the wall of either a house or another yard structure: a summer kitchen, a barn, a garage.
- A canopy that stands alone is a completely independent structure, which is a roof supported on posts (pergola).
Depending on the type of roof, the canopy can be of the following types:
- tent;
- single slope;
- gable;
- flat;
- dome;
- multi-forceps.
The awning is compatible with any type of roof, but the most common types of awnings are arched, shed and gable, as they are the easiest to construct. But at the same time, they guarantee high-quality drainage and relief from the midday heat when correctly positioned relative to the cardinal points.
The purpose of the canopy is more extensive than that of a garden gazebo:
- protection of the recreation area and the garden furniture located in it from precipitation and sunlight;
- shelter for the dining area - near the house (summer kitchen near the barbecue area);
- protection of the terrace or porch from rain and dirt;
- car roof over car parking;
- shelter for children's play area;
- protection of the firewood supply, as well as garden equipment;
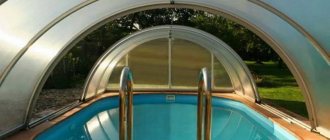
- pool cover.
Of the various types of canopies, the most popular is still the wooden one, and this does not surprise anyone, since the cost of construction is quite affordable and the quality is high. That’s why it’s worth telling how to build a wooden canopy yourself.
Wood canopy
There is an easier option to build a canopy over the porch for the house yourself - a canopy. A simple small structure that can be simply assembled on the floor and then nailed over the porch. The shape of the visor can be different, it is described in the project:
Installing a simple wooden canopy over the porch
- Arched.
- Single-pitch.
- Curly.
- Gable.
But if you are not a master in this matter, then it is better to make a single-pitch canopy. Dimensions are calculated according to the drawing, which must be drawn up in advance. The width of the canopy should be half a meter larger than the porch. The length of the slope is 80 cm. For consoles it is better to use 7.5x7.5 cm timber, for sheathing - use thinner material, for example, 5 cm. The angle of inclination will be 30 degrees. All parts must be painted or treated with water-repellent impregnation.
The attached structure consists of 3 bars:
- vertical - needs to be fixed to the wall - this will be the basis for fastening the strut with the crossbar;
- fasten the support beam to the crossbar, the sheathing will be mounted on it;
- build a strut to support the roof.
Variant of the design of a wooden canopy
The beam support, located behind the canopy, is attached to the risers. The rafters and supports are connected to each other by slats, forming a triangle. Attached using self-tapping screws. This canopy can be covered with any roofing material.
To minimize noise from precipitation, you need to put roofing felt or insulation under the roofing sheet.
Anchors can be used to secure the structure to the wall of the building. The fasteners must be long so that they fit two-thirds into the wall - otherwise the canopy may move away from the wall. The video shows the step-by-step process of making a wooden canopy over the front door.
Construction and installation work
During any construction there are usual work algorithms. The early stages are practically the same; the differences begin during the construction of the structure.
Clearing the area for construction. This includes cleaning the soil (if the site is filled), clearing debris, tools, and other things.
Site marking. Performed according to the drawing (sketch).
At the site of future support pillars, it is necessary to dig holes about a meter deep (for structures with a height of no more than 3 m in the center). Pit dimensions: 40 by 40 cm, depth 1 m. Usually, there are 6 such holes, but sometimes 8 are made.
Installation of support posts for the canopy frame. There are some nuances here. When constructing supports made of metal or pipes, they must be anchored and concreted. In this case, the hole expands. The anchor must be no shorter than half the length of the underground dimension of the structure. All pipes must have the same length and must be aligned using a level or level.
The pillars must be fastened together to improve the rigidity of the structure. To do this, frame elements are mounted on top, but of a smaller diameter along the entire perimeter at the same level.
Roof installation. The rafter system, prepared in advance, is welded right on site, level. Usually they take a step of 1 m, the angle is selected in the sketch and it is advisable to calculate it. But most often there are designs with an angle of 30-40 degrees.
The rafters are welded at the joint with the external contour so that the flooring protrudes beyond the structure, providing good waterproofing and protection from excess moisture.
The final stage of installation will be roof sheathing. More often they use polycarbonate or profile flooring. If we talk about corrugated sheeting, it is laid overlapping, from bottom to top (hitting the edge). The overlap is about 15 cm. It is trimmed at the ridge, after which it is sheathed with tin.
In cases with polycarbonate, the sheets are laid end-to-end, after which they must be coated with waterproofing (acrylic, silicone). Both elements are attached to self-tapping screws with washers.
It is advisable to attach them to a small dab of silicone for better insulation and to prevent oxidation of the thread at the joint. What to make the canopy from is up to you.
Advantages of metal tiles
Quite often, when building a lean-to shed with your own hands, you use metal tiles, which are also made from galvanized steel sheets. Unlike corrugated sheeting, the material has the following advantages:
- High strength and reliability.
- Resistant to the formation of corrosion spots and mechanical damage.
- Excellent soundproofing and thermal insulation properties.
- Large selection of colors and profiles.
When choosing between metal tiles and corrugated sheeting, it is worth remembering: the first material is laid on a roof with a slope of more than 12 degrees, the second roofing covering has no restrictions of this type.
Material
Here you can highlight popular options for stone and wooden extensions. Sometimes polycarbonate or a combined technique is used for installation.
Metal racks are the most reliable way, and wooden elements are much more environmentally friendly.
For a long time, metal tile and slate components were used for roofing, but now almost everyone prefers polycarbonate. Such demand for this material is due to its flexibility and ease of installation, resistance to mechanical stress and the vagaries of weather. When constructing a canopy near a house using polycarbonate, it is very easy to cut this material into parts of any shape. To perform such an operation, it is enough to have a stationery knife or jigsaw.
It will not be difficult to attach sheets to a wide variety of bases made of wood, plastic or metal. Polyurethane glue perfectly holds polycarbonate parts together.
When working with this material, all structural elements are installed with vertical-type channels in them due to the possible accumulation of condensate.
So what can you use to make an original canopy for your home at the lowest cost? Let's look at the two most popular methods.
Drawing conclusions
The purpose of this article was to answer the question of what is best to make a canopy in the yard near the house or in the country. I tried to describe the advantages and disadvantages of most popular roofing materials. And you will have to draw a conclusion about which one to give preference to. For the reasons that it will depend on your financial capabilities and preferences.
But in any case, I approve of your desire to make your life more comfortable and wish you good luck in this.
Sincerely, Tkachenko Alexander.
Types of supporting structures
The nature of the supporting structures depends on the configuration and size of the building, although generally 4 supports are used in the form of metal pillars, which are fastened together along the perimeter by metal elements. Depending on the design, the distance between the supports is chosen to be one and a half meters, for greater reliability. The following options for supporting structures are possible:
- From stone.
- Made of concrete.
- Made of metal.
- Made of wood.
- Made of brick.
In any case, you will have to fork out money, since any options require serious capital investments. You will need not only supports, but also elements for communication, as well as a frame for the roof
It is very important to choose the right thickness of metal supports so that they look harmonious against the general background. The good thing about the metal construction is that it makes maintenance easier in the future.
Canopy with support posts made of 8mm metal pipe
A good-quality large canopy will require a significant area, as well as the use of special construction machinery and equipment. It is hardly possible to do without additional help even when installing supports. If you use additional building materials and cover the canopy, you can get a protected structure in the form of a garage.
As a rule, pipes with a diameter of 8 centimeters or more are selected. They are filled with concrete mortar and also coated with anti-corrosion compounds.
Supports made of brick, stone or concrete look good and do not require additional protection measures, while their durability is decades. The use of wood is considered a cheaper option, despite the fact that wood requires high-quality protection and is not durable. The roof is not necessarily made of the same material as the columns. This approach allows you to have a unique design that combines incompatible design elements. As a rule, everyone wants to get away from templates in order to get their own, unique building.
Wooden supports
Wooden support structures are installed without the use of special equipment and you can often get by with just one assistant, having first dug the hole yourself or by hiring one worker.
Wooden structures have one significant drawback - they are afraid of moisture. To increase their service life, wooden structures must be treated with antiseptics, and such actions must be carried out regularly, every year. Naturally, only hard trees are suitable as supports.
Wooden pole option
If you pay attention to the table, you can make the right choice:
| Breed | Brinell hardness) | Density (kg/m3) | Note |
| Birch | 3,0 | 600 | Stability is average. Over time the color will deepen. |
| Larch | 2,6 | 500 | After a few years, a gray coating will appear. Regular treatment will be required. |
| Oak | 3,7 | 700 | After a couple of years the tree will become darker. |
| Ash | 4,0 | 700 | Fade quickly. Treatment with impregnation twice a year will correct the situation. |
| Pear | 3,3 | 680 | After a couple of years, a reddish tint will appear. If the house is made of red brick, it will look organic. |
| Cherry | 3,0 | 580 | Excellent stability. The color will become deeper in the future. |
| Pine | 3,5 | 550 | Features increased stability. Practically does not change color. |
When choosing structural elements made of wood, it is very important to understand that after several years of use, building elements made of wood will have a completely different appearance. If there are cracks, you should understand that the wood will dry out over time.
The best combination of factors such as price and quality is found in species such as pine and larch.
Standard variation of an open wooden canopy
It is important to know! The part of the support that is dug into the ground is especially susceptible to external influences. To extend its service life, this part is tarred or covered with a special impregnated material.
Stage IV. Frame assembly
Now we are installing the pillars of the future canopy. To do this, use the same 50x150 boards. It is better to make jibs at the top and bottom so that they do not interfere with the operation of the building:
Here's how to properly build a shed from a profile pipe: here the ready-made element of the shed roof will be a truss. You will need to cook it from metal on the ground. As a result, you will have an equilateral triangle with a central element that will go from the top of the triangle to the middle of its crossbar. If you remember your school geometry course, this is the altitude of a triangle.
To make the rafters themselves, you will need a profile pipe with a cross-section of 20x20 millimeters, or an iron rod with a diameter of 10 millimeters. For light weights, the second option is more suitable, since it is easier to work with: you will not need to cut at an angle. But for a good canopy it is better to use, of course, a profile pipe.
So, we build a metal shed with a pitched roof step by step, with our own hands:
- Step 1. Making the foundation. For this purpose, we dig holes in the ground a little more than a meter deep, and narrower ones up to one and a half meters. We fill these holes with gravel to a depth of 20 centimeters.
- Step 2. Insert pipes with a cross section of 25x25 millimeters into these holes.
- Step 3. Install supports in the pits, fill them with medium gravel and concrete them.
- Step 4. Next, check the height of the racks - it should correspond to the angle of inclination of the future roof.
- Step 5: Now weld the pipes to the tops and post. Now check and clean all seams. Prime the surface and paint. It is better to use modern anti-corrosion paint for this purpose.
- Step 6. Lift and install the finished firms, and make movable jumpers between the trusses at a distance of 50 centimeters.
In addition, you can visually close such a canopy from the entire other area, but without blank walls, using a pergola:
What should you pay attention to when purchasing a substrate?
Planting material should be purchased at trusted specialized retail outlets. Preference should be given to sawdust, which contains fungal spores - they are more resistant to disease.
Also, a sawdust substrate is much more fruitful than others, because it allows the root system of fungi to take root and spread better.
Features of corrugated sheets
Corrugated sheeting is a material for the manufacture of which galvanized steel sheets with a thickness of 0.5-1.2 mm are used.
The use of corrugated sheeting as a roofing material for single-pitched metal canopies provides the following advantages:
- The canopy will be durable, resistant to moisture, ultraviolet radiation and mechanical stress.
- The work of covering the canopy will be completed as quickly as possible without any particular difficulties.
- The material is lightweight, which allows minimizing the cost of lathing.
- The reasonable price of corrugated sheeting will also help you save money.
The material also has disadvantages. Firstly, poor thermal insulation characteristics, secondly, low sound insulation, thirdly, not very attractive appearance.
How to make a canopy over the porch?
In this case, everything starts with a drawing, in which even the slopes, which cannot exceed 35 degrees, must be carefully thought out. The design is drawn in such a way that any of the people living in the house feels comfortable under the canopy and is not forced to bend down.
Having prepared the necessary wood derivatives and tools for working with it, mark the area, outlining the places for digging in supports and the general contours of the future canopy. If the groundwater in this place comes quite close to the surface, be sure to treat future supports with waterproofing compounds. In most cases, it is enough to dig them into the ground some half a meter deep, but on loose soils it makes sense to also concrete the holes for increased stability.
If you nevertheless choose the method of pouring concrete into the supports, no further operations can be carried out until it hardens. Here you will have to be patient, because it may take a couple of weeks for the concrete to fully set. It is impossible to engage in tying and creating sheathing before complete hardening, otherwise the “reliable” concrete supports will turn out to be skewed and unstable.
Rafters and sheathing can be attached to the supports with nails or the more popular self-tapping screws today. In this case, upon completion of assembly, the entire structure must be immediately treated with special means that protect against rot and mold. Only after this should you proceed to the installation of roofing materials, which are fastened in the same way - with self-tapping screws or nails.
The following video shows how to make a wooden canopy for your house.
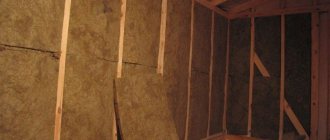
Stage VI. Roofing pie device
What is insulation? First of all, it is a waterproofing film, which is located directly under the roofing. The main task is to prevent moisture from getting in after rain or from melted snow through problem areas in the roofing.
If this is planned, you will do everything in the following sequence:
- Step 1. Place a vapor barrier film on the finished canopy joists and nail it in place using nails or a construction stapler.
- Step 2. Place thermal insulation on the film.
- Step 3. Cover it all with another film - waterproofing. Also nail it to the joists.
- Step 4. Nail the batten and roofing on top.
Ventilation of such a roof is mandatory. Forced, if you install a special fan, or natural, if you position the dormer window correctly or leave a mandatory gap between the waterproofing film and the insulation so that the air takes moisture droplets from it.
Projects
As is the case with any other buildings on the site, before erecting a canopy it is important to develop a competent plan for the future structure. First, the master must draw up detailed drawings indicating absolutely all dimensional parameters and nuances of the structure
Only having a carefully drawn project at hand can you count on its high quality and quick construction without unnecessary errors.
You can draw up a project for a future building yourself, but this can be difficult to do if the home craftsman does not have extensive experience in such matters. In order not to waste time and avoid serious shortcomings in the drawings, it is advisable to use ready-made plans for canopies for parking spaces on the site. Let's look at several optimal projects.
A good gable canopy for a parking space can be built from bars with a section of 100x100 and 50x100. The height of the structure can be 2 m, and the width – 2.7 m. The structure will be neat and will be quite enough to accommodate one car.
General recommendations from professionals
Before starting work on self-construction of a wooden canopy, you should carefully study the land plot and choose the location for installing the structure.
If you are installing a carport, take the trouble to construct the floor with a slope of two or three degrees towards the drainage area.
When installing a wooden canopy for a summer kitchen, you should prepare a foundation for the stove. The flooring is carried out after the installation of the canopy is completed.
The space of a wooden canopy for a family holiday can be decorated with original lamps on support posts and bright decorative flowers in hanging pots.
Cover the side walls of the homemade wooden canopy with thick curtains. Country furniture wicker from wicker will be appropriate for evening gatherings with friends by the fireplace by candlelight.
The rule of good form is to plant climbing plants that create shade along the perimeter of the canopy.
Rules for constructing a wooden canopy
Regardless of the chosen material, the dimensions of the carport are first determined. This takes into account the height, which depends on the height of the car itself. But there is a so-called standard parameter that is suitable for all types of vehicles, even trucks. This is 2.5 m.
As for the width, the minimum parameter is the width of the car plus 1 m. It is believed that half a meter on each side will make it possible to park without problems. The length is chosen in the same way. That is, the length of the car plus 1 m. If you are concerned about the possibility that slanting rain will still fall on the car, then there are no restrictions on making the canopy wider and longer. But if the site does not allow this, then take these minimum parameters as a basis.
Now we move on directly to the construction of a wooden carport. We need to start by laying the foundations. Their number is determined by the number of pillars that will support the roof. Typically, foundations for beams are concrete mortar poured into prepared pits. They can be round or rectangular
It is important to choose the right depth. It is believed that this should be below ground freezing
But not always. Much will depend on the weight of the canopy itself. The greater the mass, the deeper the foundation is laid.
Foundation for a wooden canopySource stroykarecept.ru
A wooden beam is not a metal pipe, so an embedded part is needed to attach it to the foundation. The photo above shows one of the varieties of such parts. It is laid at the concrete pouring stage
Please note that all mortgages are set level and in the same plane. And although the support pillars can be leveled in height by trimming, the foundation for the canopy must still correspond to a certain levelness
The next operation is the installation of beam supports. They are simply installed vertically and attached to the embedded parts using self-tapping screws or bolts through and through. Next, the strapping is made along the upper edges, for which the same timber of the same section is used. Fastening is carried out with self-tapping screws and special metal parts in the form of corners, as shown in the photo below.
Connection of support posts with the top trimSource banya-expert.com
After installing the top frame, they proceed to the construction of the roof. Standard technology is used here, depending on the chosen form. That is, a frame is assembled from rafters and sheathing, on which the roofing material is laid. The ceiling is usually not hemmed, although this can make the structure more beautiful.
The very last stage is the formation of the floor. There are no restrictions here either. More often concrete floors are poured, less often asphalt floors. The floor is often covered with paving slabs or paving stones. A stone will do. It all depends on financial capabilities. The only thing that should be noted is that if the canopy is part of the composition, then both its roof and its floors are covered with materials that were used throughout the entire site.
For example, the roofing material that covers the house must also be laid on the canopy. If the garden area and alleys are laid with stone tiles, then you should not highlight the floors by covering them with some other building material.
Roof of the house and canopy in the same style from the same roofing materialSource remont-book.com
Polycarbonate canopy
Let's look at how a polycarbonate carport is made. There are many nuances to laying this material. And the quality of the final result depends on whether they were completed or not.
So, what you need to pay attention to:
- polycarbonate sheets are laid with the protective film facing up;
- panels can be cut to size easily, for which you can use a hacksaw or a jigsaw;
- the sheets on the roof are connected with special profiles, that is, first the profiles are laid, then the sheets are inserted into them on both sides;
- the profiles are pre-attached to the wooden roof elements with self-tapping screws;
- after laying all the roofing material, the protective film is removed from all polycarbonate panels;
- The edges of the sheets along the perimeter of the roof are covered with protective tape to prevent moisture from getting inside the honeycombs, where it will eventually become moldy.
There are two types of polycarbonate on the market: monolithic and cellular. The first is stronger, but much more expensive. To cover the canopy roof, it is better to use polycarbonate with a thickness of 16 mm.
Wooden carport covered with polycarbonateSource twoidvor.com
Stage III. Construction of the foundation
So, we’ve decided on the material – it’s time to start construction:
- Step 1. So, we dig cylindrical holes. Make the depth from 60 centimeters to 90. In total, for this option we will need 6 holes.
- Step 2. We prepare the concrete separately, for example, in an old bathtub, where it is easy to mix cement and sand with gravel. Take the proportions 1:3:5. Add water.
- Step 3. Mix well and pour a layer of concrete into the holes so that the thickness is 5 centimeters, and lower the pipes there. They will serve as formwork for the foundation.
- Step 4. Now we fix the pipes from the outside. Fill with concrete.
- Step 5. Level the pipes and make shelves for them from boards.
- Step 6. Now we wait three days for the mixture to harden. The easiest way to install wooden posts on such a foundation is with an anchor, which is installed on completely hardened concrete.
- Step 7. Now we connect the support beams to this pillar. We screw the boards with self-tapping screws so that they protrude about 3 centimeters beyond the edges of each post. And on the side these protrusions will be needed to fasten the crossbar of the sheathing.
- Step 8. To give the entire structure greater rigidity, especially if the anchors have come loose, use spacers. The spacers are cut at an angle of 45 degrees and screwed with self-tapping screws.
That's all! The hardest part is behind us.
Types of canopies
There are different types of canopies and they are divided either by location, or by shape or by the materials from which they are made.
The shape of the canopy depends on the builder’s imagination and needs. Straight, curved or inclined - you can choose any, the main thing is that it is beautiful and functional.
Let's look at the situation with awnings using an example. We are the owners of a house near the city and decided to develop the territory. The canopy can be built from various materials, be it brick, wood, polycarbonate or mixed.
We decided to make a wooden canopy for our suburban home. You can build from any wood, but pine will do the job best. Its timber is not expensive, and it will last much longer than other types.
So we purchased materials and thought about the shape of the canopy. There are a lot of photos of wooden canopies on the Internet; you can choose several types and arrange yours according to an individual plan. We draw a plan on paper and begin to implement it.
First, we must prepare the wells for installing the pillars. The installation depth should not be less than 500 mm, but there is no need to dig deeper, since the height of the building will decrease. Before installing the pillars, they will need to be treated from exposure to moisture and other negative factors.
You can strengthen the pillars with cement mortar or crushed stone, but it is better to combine them. The distance between the pillars is about a meter. When installing, we need to check the diagonals and levels so that our structure does not sag or be crooked. When the pillars are installed, you need to give the mixture time to harden.
If we are building a canopy attached to a house out of wood, then the pillars should be placed only on three sides. The rafters from the pillars will go to the wall of the house, where they will be attached. If there are already special brick inserts in the wall of the house, then we are very lucky and we will be able to lay the rafters on them.
If there are no inserts, then we attach the rafters to the wall of the house with metal corners, preferably on all four sides for strength. Don’t forget to make a slight slope so that when it rains, water rolls off the canopy and does not remain on its roof.
After completing the roof sheathing, we select the material for the covering. The most budget-friendly is polycarbonate, but it can be covered with tiles and slate. The advantage of polycarbonate is its lightness and budget price. It is attached to the sheathing with self-tapping screws.
Do not forget that the edges should extend less than 15 centimeters from our posts. Here is our canopy in its rough version ready. Now let's move on to the finishing touches.
Single-pitch canopies, permanent and collapsible
The canopy can be made temporary or for decades. If you are planning a temporary structure, then the easiest way is to install a prefabricated canopy. Ready-made solutions can be found on construction markets. However, it should be remembered that such canopies are shaky and fragile structures. They cannot withstand snow loads or gusts of wind. But the cost of such structures is several times lower than capital ones.
If the canopy takes its place for a long time, you need to take care of the mounting methods and strengthen the structure. How to install a canopy yourself, read the article: “Do-it-yourself canopy.”
Frame materials
Mostly, wood is used for supports - timber or logs, metal pipes of round or rectangular cross-section. Sometimes the supporting columns are made of brick or stone. They are more massive, attract more attention, and therefore must fit into the style of the building that is located nearby.
There are also options when the bottom of the support column is made of brick, and the top is made of wood or metal. And in this case, everything is determined by the style of the house and the site. You should not make brick supports if there are restrictions on the size of the site: they are quite massive and take up a decent amount of space.
All materials (except brick) are processed before use. Wood is necessarily coated with fire retardants (reducing the flammability of the material). Then it is impregnated with compounds that will protect it from damage by wood-boring insects, as well as from all weather conditions.
Interesting polycarbonate carport project
Its implementation
Particular attention should be paid to the processing of wood that will be buried in the ground. It can be impregnated with special compounds for wood in contact with the ground (for example, Senezh Ultra and its analogues). Impregnation performed well in testing
The ends of the pillars that will be buried are immersed in a container with mining for a couple of days. After drying, they can be used without additional measures. 10 years is enough.
The second option is to pour a concrete pillar into the ground, and install a mounting plate, shoe or pin into it, to which a wooden beam is then attached.
Metal poles are cleaned of rust and coated with primer. After welding, the seams are additionally processed and everything is coated with paint in two layers. The second is applied after the first layer of paint has dried to a touch-touch state.
How to cover a carport
When choosing a canopy, you should focus on the general architectural style of other buildings
It is important to decide on the materials. The important point is covering
The choice of material also depends on the type of roof. The following options are often used:
the single-pitch option is the easiest to install. It is recommended for the construction of free-standing buildings;
Shed roof
gable structures are also used for autonomous structures and tent buildings;
The gable roof is excellent at getting rid of precipitation.
Arched roofs are used for attached and separate sheds.
An arched canopy not only protects the surface well from precipitation, but also serves as a decorative element when decorating a yard area.
For the construction of structures with a gable roof or a pitched roof, materials such as metal tiles, slate, corrugated sheets, ondulin or polycarbonate are used. To make arched structures, rolled metal and polycarbonate are used.
The simplest option is a pitched roof. In this case, the slope of the slope is approximately 25 degrees. Rigid sheet material is excellent for pitched structures.
Watch this video on YouTube
Polycarbonate carports
Polycarbonate can be used to build durable structures for two cars or one. This material has many advantages, for example, affordable prices. Polycarbonate can be placed over any carport. At the same time, simple designs for the dacha can be easily done with your own hands.
Polycarbonate is an excellent material for creating any hanging structures. In this case, it is used to cover a large area of the yard area
When deciding how to make a structure, it is necessary to take into account the material of the frame, and the thickness of the polycarbonate is also important. In the photo you can see what similar structures made of this material look like for 2 cars or for one.
Polycarbonate is placed on the frame structure and secured using special fasteners. Using this material, you can build a garage with a carport.
Carport made of corrugated sheets
A carport made from corrugated sheets is one of the most popular. This coating can be easily done with your own hands. In addition, this design is lightweight. It can be firmly fixed to the frame, which will ensure its stability in strong gusts of wind.
This material can also be used as an awning cover. You can see what a canopy made of corrugated sheets looks like in the photo.
Corrugated sheeting is a fairly popular material for creating shelters.
Before work you need to make at least the simplest drawings. Installation is quite simple. Regardless of the design option, corrugated sheets must be laid from bottom to top. First, the first part is attached, and its edge is screwed with self-tapping screws. You can also use clamps with a rubber gasket. After this, another overlapping sheet is installed. Two more self-tapping screws are screwed at the joints.
Drawing for an arched structure
Carport made of metal tiles
In the photo you can see options made of metal tiles. With drawings at hand, you can make simple designs with your own hands. If the roof for the main building is made of such material, then you can make an attached canopy under one roof. In this case, you can make a completely closed structure for installing a car.
If a shed roof is used for an autonomous canopy, then the walls can be placed on a solid foundation made of tiles, cement or concrete. Often different manufacturers offer turnkey designs. The price depends on the size of the building and the materials used.
Metal tiles allow you to create an original design
Market news and unusual technologies
There are more interesting and unusual ways to construct a canopy. For example, German students managed to create shadows using drones! Their system is autonomous and is called Cyber Physical Macro Materials.
The essence of the idea is that drones independently select places that need to be protected from the scorching sun (for example, with people on vacation), and rally for this purpose. It looks simply amazing, and savvy summer residents are trying to repeat something similar using cheaper and more readily available materials.
For example, by installing umbrellas or large plastic crafts on a long cane that is easily stuck into the ground, and creating rest areas in the country simply by a cluster of such umbrellas, easily regrouped in the right place. Or they hang such elements in the air on thin ropes attached to the frame of the canopy.
What kind of canopy do you have at your dacha? Share your ideas!
Description of species
Hanging structures may vary depending on various factors. For example, according to the location of buildings, they are divided into the following types.
Attached to a house or other object, it may have one or two walls. Most often, such a canopy is closed. In this case, when attaching timber to already finished walls, you can save some money on materials.
Awnings may also differ in roof type:
flat is most often made simply rectangular, without any tricks;
According to their purpose, canopies differ as follows.
for a car, as one or more parking spaces;
According to the organization of the roof, the suspended timber structure can be divided into:
single slope;
The lean-to option is most often presented in the form of an open structure. It can also be used as an extension or used as a utility unit. The gable version is somewhat more convenient and practical. It also fits better into different types of designs. It can be either a separate building or adjacent to residential or other facilities.
Design
The shelter must fit into the overall composition of the yard in size and design. The canopy should not stand out too much from the surrounding buildings with its dimensions, but also not get lost among them. The materials and decorative elements of the main structures and small buildings must match each other.
To add airiness, lighting is used in different combinations - around the perimeter and center of the building
Forged parts go well with brick or stone masonry walls of the house
Wooden gratings will look impressive when designing a canopy in an “eco” style.
Flowers in pots and climbing plants will decorate and add elegance to even the simplest, inexpressive structure
Designer-made barbecues and barbecues can decorate a gazebo and terrace and give a cozy look
Design
Quite often a situation arises when it is necessary to erect a canopy or canopy over a building. This is a fairly simple design that any man can build without any special skills. There are many ideas for this building on the Internet. However, it is necessary to take into account certain design features to ensure that the canopy lasts a long time and properly.
It is necessary to take into account the climatic features of the area in which the canopy is created, the location of the building on the cardinal points, and the features of the foundation of the building
It is equally important to choose the right coating
The easiest way to create a canopy or canopy is when it is attached to an already finished building. The more thoughtful the project, the easier it is to make all kinds of calculations of the required material. There are no small details in construction, and absolutely everything needs to be taken into account. If the calculations are made correctly, and the project includes a variety of little things, then construction will proceed with ease.
Size of a lean-to canopy (functionality);
Carports are made to size to suit individual needs. To hide one passenger car from the rain, the canopy must be at least 4*6, for two cars the size 6*6 is suitable.
A carport is often used as an additional structure to temporarily hide garden furniture and equipment from rain or sun. If space allows, it is better to make a canopy with a reserve. When installing, you should pay attention to the slope and height of the roof. The canopy should be user-friendly - so that there is no need to bend down or stand under dripping drops when exiting the car.