If you are going to get a dog or you already have a pet, then your four-legged friend needs his own corner in which he will relax, hide from the weather and warm up on a cold winter night. The article talks about options for making a dog house - its dimensions, materials used, construction stages, drawings. Examples of beautiful and practical ready-made structures are given - interesting ideas for design.
A dog house is its home, which will protect the animal from the weather and allow privacy, and it must be reliable Source fanvid-recs.com
Size
Let's look at how to decide on the size of the booth based on the fact that your pet has already grown:
- to determine the width of the structure, you need to measure the dog in height to the tips of the ears and add 5 cm;
- the depth of the structure is the length of the dog from the tail to the tip of the nose with an addition of 5 cm;
- To properly arrange the hole, measure the dog at the withers and add 5 cm.
If you got a puppy who will live on the street from the first days, you should refer to the table below, which gives reference sizes of kennels for dogs of different breeds:
| Dog size | Width mm | Length mm | Height mm |
| Large breeds | 1200 | 1000 | 1000 |
| Medium dogs | 1000 | 800 | 1000 |
| Small pets | 800 | 600 | 800 |
Attention ! The dog house should be of such a size that the pet can sleep and relax comfortably in it at any time of the year. You should not make a structure that is too large, as the dog will freeze in it in winter.
It is better to make the entrance to the structure closer to the corner, so the dog will have a small closed nook.
Kennel for German Shepherd
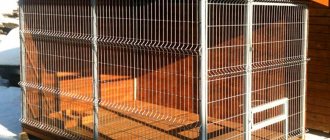
Comfortable enclosures for dogs: do it yourself without waste or mistakes
Building a brick booth
The brick booth is distinguished by its strength and durability. This kennel is suitable for a large dog. The materials for building such a booth can be cinder blocks, bricks and foam blocks. Stages of building a brick kennel:
- First you need to clear and level the area for the booth. Then they dig a trench under the foundation of approximately 250x250 mm, which is filled with concrete and left for several days.
- When laying out walls, you must carefully monitor the level and observance of right angles in the structure. For the manhole, the required number of bricks are passed along the width. When the masonry reaches the height of the hole, a wooden beam must be laid across it. They continue to lay bricks on top of it all the way through.
- To insulate the inside of such a booth, its walls and floor must be lined with wood.
- A wooden floor is installed on the roof and a slate roof is installed on it.
Drawing and diagram
Before you build a kennel, you need to submit a drawing of it! It is not necessary to draw up a special drawing for the booth, since the design is not complicated. You can simply draw a diagram on a simple sheet of paper and determine the dimensions of the structure on it.
If you want to build a booth with exact dimensions, then a drawing is necessary. To complete the drawing correctly, you need to consider the following nuances:
- the interior space should be spacious enough for the dog to turn around freely. If a kennel is made for a puppy, then you need to understand that he will grow up very soon, so it is better to build a large kennel right away;
- if you plan to build a warm kennel, then it is better to use wood as a material - it is practical, environmentally friendly and is an excellent heat insulator;
- if there are frosty winters in your region of residence, then it is better to prefer a kennel built as a sandwich panel with insulation between the walls;
- if a booth is being built for a large dog, then it is installed inside a special enclosure for a four-legged pet;
- It is also advisable to decide on the shape of the roof when drawing up the drawing. For a large dog, it is better to build a kennel with a pitched roof. Dogs love to lie on it in the summer. A gable roof is suitable for a small booth when you need to increase the usable area of the internal space.
Developing a drawing will help to provide for all the nuances of construction and the kennel for your four-legged friend will turn out to be of high quality and comfortable.
Tools
Before you start building the structure, you should prepare the necessary tools:
- screwdriver;
- hacksaw;
- hammer;
- marker;
- ruler or tape measure;
- plane - if unplaned material was purchased;
- metal scissors.
Also, before starting work, prepare the material:
- fasteners - screws, nails;
- bars, boards, lining;
- roofing material;
- insulation;
- plywood or chipboard;
- impregnation to protect wood from external influences.
Important ! All boards and beams should be sanded before building the kennel so that the dog does not get hurt. Only the outer walls of the structure are treated with impregnation, otherwise there will be an unpleasant smell in the booth, which the dog may not like.
You also need to take care of the thermal insulation material before starting assembly, and choose the best option in terms of environmental friendliness, practicality and affordability.
Care
Let's also find out such an important question - how to care for a doghouse after an animal has already safely lived in it.
It is important to understand that hygienic cleaning of the dog’s “house” must be carried out regularly. Usually once a month is enough. During the cleaning process, it is necessary to remove food debris, bones, dirt, and also objects that the dog has dragged into its “shelter” from the kennel.
To disinfect a building, it is necessary to use safe insecticides without a pungent odor, and the procedure itself should be carried out once a month in warm weather, and once every three to four months in cold weather.
Attention: after disinfection with formaldehyde or cryolin, the animal must not be allowed into the kennel until the solution has completely dried.
Material
The material deserves special attention, because its choice will determine how comfortable the dog will be. We recommend building the kennel out of wood. To construct the structure, you should prefer larch or pine wood . Pine material, if properly processed, lasts up to 13 years. Larch lasts much longer, but is also more expensive. Which of these two breeds is preferred depends on the financial capabilities and preferences of the owner.
As for roofing material, it is better to give preference to natural materials, such as tiles.
Floor
The floor in the kennel must be made of warm materials; it is unacceptable to build concrete, stone or brick flooring if you do not plan to install a heated floor system to warm the kennel. The best option would be dry, planed boards, fitted to each other. When laying the floor, it is advisable to make a technological slope to simplify cleaning in the kennel.
Walls
The walls in the booth should not be blown through, so it is better to use plywood for interior decoration. The ideal option would be walls made of the sandwich panel type; it is worth choosing the right insulation material, otherwise there is a high probability that rodents and parasites may live in it. The entrance to the structure is covered with thick fabric in the winter.
To prevent your pet's kennel from breaking down prematurely - the wood rots in a humid environment - consider a good system for removing moisture from the structure. Do not treat wood with impregnations that help repel moisture - this will have a detrimental effect on the dog’s health.
Roof
Which roof to install on the booth: single or gable, depends on the preferences of the owner. We will analyze the pros and cons of each option.
Simple lean-to
Dogs love to spend time in a kennel, especially during warm periods, so a kennel with a pitched roof is most preferable. The roof should be made with a minimum slope. It is advisable that it be on hinges - this will allow you to clean it without much effort and disinfect the structure if necessary. Even at the construction stage, you need to insulate the booth to protect the dog from the winter cold.
Let's look at step-by-step instructions with photos on how to build such a kennel yourself:
- Construction of the flooring To create the flooring, you need to take a 4x4 cm block, cut two elements in length and 2 in width. Lay the bars on a flat surface and use self-tapping screws and corners to build a frame. For greater strength, install crossbars made of timber of the same size. Sew boards onto the frame on one side.
- Assembling the frame of the booth For the frame you will need 4 bars 5x5 cm. Two bars should be equal to the height of the structure, and the second two should be 10 cm higher. Sections of bars are installed in the corners of the bottom and secured with self-tapping screws. There will be long posts in the front of the booth, short ones in the back. Check all bars for level. To strengthen the structure, additional elements are installed in the center of each wall, and in the place where the opening is arranged, two parallel bars are placed at the required distance from each other, equal to the width of the entrance.
- Sheathing the walls As soon as the frame is ready, the front side is sheathed with a rail car. The interior of the structure is covered with plywood or chipboard. The inner lining is attached with self-tapping screws, and the caps must be recessed into the plywood by 1-2 mm, otherwise the pet may be injured.
- Making the roof For the roof, 4x4 cm bars and OSB are used. The components are used to assemble a frame, which is equal in size to the inner perimeter of the kennel. OSB is cut out and sewn onto the inside of the flooring. The roof is insulated. Then a sheet of material is cut to the outer size and the roof structure is sewn up. It is worth remembering that the top OSB sheet should protrude beyond the booth - 10 cm from the sides, 25 cm from the front. The roof is hinged on one side, and roofing material is laid on top.
- Finishing The booth is almost ready, all that remains is finishing. To do this, the bottom of the booth needs to be covered with roofing felt with a bend on the walls to prevent getting wet and rotting. Treat external walls with antiseptic . Using platbands, line the opening.
- Installing the kennel Once the structure is ready, you should install it in a previously prepared place. To do this, choose a flat hill near the house and with a good view.
Floor construction
Interesting ! Booths with a pitched roof are much simpler in design and lighter in weight, but the useful space in them is less than that of similar structures with a roof on two sides.
Photo of a typical, comfortable dog kennel:
Gable
If you are planning a small booth, then you simply need to install a gable roof. The disadvantage of such designs is that they have a high specific gravity - dragging and lifting such booths is very problematic when cleaning.
Step-by-step instructions on how to make a gable house:
- Frame For the frame you need to take 4 50x50 mm bars and build a bottom frame. Install racks made of bars of the same section in the corners. Place a harness on top of the posts. To strengthen the structure, install crossbars on all sides and along the bottom. Install the bars along which the hole will be formed.
- Roof In this case, you need to construct two frames that are connected to each other at an angle of 40 degrees - the roof slopes. Place the workpiece on the frame for temporary fastening. Connect the upper part of the blanks with a ridge block. Install the rafter system.
- Frame cladding For external cladding, lining is used; it is worth making sure that there are no cracks or gaps between the slats. The bottom is sewn up with a board and waterproofing is installed.
- Arrangement of the roof The frame, which was temporarily fixed, is removed. The inside of the roof is covered with plywood. Roofing material is stuffed on top.
Rafter system - marking and installation
“I told you, master, install a lean-to!”
Which technology is optimal?
It is best to build a booth using the frame principle. For these purposes, timber 50x50 mm is optimal. A frame is built from it, which is sheathed on the outside with boards. By the way, pine boards from pallets are excellent for external cladding. They also cover the floor and sheath the roof. The inside walls are covered with thin plywood - you can also use boards, but this will eat up excess internal space. It is advisable to use FK or FB plywood; it is quite waterproof and does not emit toxic phenolic compounds. Read more about the intricacies of choosing plywood here. Again, bothering with the inner lining makes sense if you need a warm booth.
About insulation
The air cavity between the wood and plywood sheathing serves as an excellent heat insulator. For the middle zone it will be more than enough. If you live in regions with harsh winters, you may want to consider additional insulation. To do this, foam plastic or mineral insulation is placed in the wall cavity. In this case, it is also better to insulate the roof. If it is planned to be gable, you can simply make a plywood floor, thus creating something like an attic with an insulating air layer. The kennel should be installed on bricks or raised on logs - this will reduce heat loss, and the kennel itself will not be destroyed by contact with the ground.
Warm for the winter
You understand that if a dog’s house is located on the street, it needs to be made warm! How to insulate a booth? To build a winter insulated kennel, in addition to other materials, you need to prepare insulation. The cheapest is polystyrene foam.
How to make a warm kennel (with drawings):
- Kennel base. Cut the 5x5 cm bars into 2 pieces of 700 mm and two of 900, resulting in a booth 900x700 mm.
- Niche for heat insulator. You will need 4 bars - 2 x 900 mm and 2 x 600 mm using self-tapping screws to secure them to the base.
- Insulation . Cut the insulation to size and place it between the blocks.
- Floor arrangements . Cut boards 900 mm long and place them on the frame from the outside of the kennel.
- Side walls. We arrange the side walls. To do this, take boards 650 mm long and bars 400 mm long, assemble a frame to which you can screw the boards. Install the walls and screw them to the floor at the corners.
- Front and back walls. We construct a hole in the front wall using bars and screw it to the frame. Install the back wall last. Fasten the walls with self-tapping screws. Install insulation, cut to the size of the walls. We cover the insulated walls with boards or plywood.
- The roof of the booth . Screw plywood to the walls and sew bars on it. Lay insulation. Sew up the roof insulation with boards. Lay roofing material.
Frame for floor with insulation
Floor insulation
Insulation of walls with foam plastic
The construction is complete, all that remains is to install the insulated structure in place.
Photo of a booth insulated according to all the rules:
Pet shelter
To create a canopy you will need several metal, metal-plastic pipes or wooden blocks. Plastic sheets, corrugated sheets or slate may be suitable for a canopy. It is better to cut out pieces of the canopy, such that they will cover the roof of the booth.
At a distance from the side or front wall of the kennel, dig 2 pipes or long, thick bars that will serve as a support for the canopy on one side, and on the other side the support is the roof of the kennel.
For a stand on the ground, you can place a wooden pallet under the roof, which is leveled with a sheet of plywood. If the roof is triangular, then the canopy is attached at a large angle from the junction of 2 roof sheets or is fixed under its overhang. This is necessary to prevent water from pouring between the joints.
What can and cannot be insulated?
When choosing insulation, do not forget that the dog relies on its instincts. It’s impossible to tell her that you shouldn’t chew the rug, or that you shouldn’t tear off the canopy that covers the hole.
Let's consider several options for insulating a dog house for the winter, their pros and cons:
- the first thing to remember is that the insulation must be closed on both sides, otherwise the dog will simply tear it apart;
- if mineral wool is used for insulation, then perlite should be laid between the wall and the heat insulator. It will not only preserve the properties of cotton wool, which can absorb moisture and lose its properties, but will also protect the dog’s respiratory tract from irritation;
- The canopy should be chosen from a dense and durable material, otherwise your pet will quickly tear it apart;
- If possible, the thermal insulation material should be natural.
Electric heating
It is possible to perform forced insulation if wiring is carried out to the booth. A warm heated kennel (such as a mat) has the following advantages:
- the temperature in the kennel is constant, even in extreme cold;
- Electric heating dries the air in the structure, which is important.
But there are also disadvantages that cannot be ignored:
- The dog is an active and curious animal, and can get to the electric heating elements. There is a danger of electric shock.
- If there is constant dampness, a short circuit may occur.
- You can try and protect your dog from these troubles, but then the cost of the kennel will increase significantly.
Felt
The simplest and most inexpensive insulation that can be installed in a matter of hours:
- Using a stationery or construction knife, cut out the elements of the required size;
- Secure the material to the inside of the kennel using a stapler and staples.
The result is high-quality insulation with natural material that is not afraid of wind and frost. An important point is that this heat insulator has high vapor permeability.
Mineral wool
It is better not to use this heat insulator, since for high-quality insulation you will have to build a structure with thick walls, and you will have to install a vapor barrier. It is also worth noting that mineral wool has the ability to settle and get wet at high humidity, and this reduces its insulating ability by almost half.
Styrofoam
This thermal insulation material has many advantages:
- provides high-quality insulation of the structure from outside cold;
- the material does not absorb moisture, does not shrink over time, and its properties will not be lost over time;
- It’s not difficult to insulate the booth; just cut out the heat insulator boards and install them. In this case, there is no need to use a vapor barrier.
Available means
But you can also insulate the structure with available materials, such as old sweatshirts or a blanket. The insulation will be no worse than with the above methods. The only downside is that this insulation is short-lived, and the quilted jackets can harbor rodents.
Or just invite the cat