Low ambient temperature significantly reduces labor productivity and living comfort. Therefore, heating domestic and industrial premises performs an important function that requires significant financial costs for the purchase of special equipment. To save money on heating appliances, you can assemble a heater yourself. Which is especially important for those rooms and locations where there is no need to care about its aesthetic appearance and design.
Operating principle of the heating cable
The operating principle is that electrical energy is converted into thermal energy. The peculiarity of such a heating system is that, without the use of an oxidizer or fuel, it receives energy and converts it into heat. The heating system heats up from the electricity passing through it and prevents freezing of communications. Therefore, it is necessary to purchase a heating cable ; it will help to avoid failures in the operation of water supply networks during the cold season.
Read also: Auto ru Hyundai Getz
To heat the external pipeline, wires are used with a seamless, sealed and damage-resistant sheath that is not afraid of temperature changes. The heating element is located inside the outer layer. When the air temperature drops, the heating cable is connected to electricity. The heating element starts working and heats the entire system. If the air temperature rises, the wire is disconnected from the power supply and the pipeline operates as usual.
[Your opinion] Concrete battery with heating element inside
Infrared and straw are not compatible things. These lamps do not heat the air, but the body in front of them.
A dry heating element of low power was placed in the concrete. Click to expand.
Nothing difficult to make.
Should the ends of the heating element be filled with concrete or should they be released outside? Click to expand.
There are enough contact ends and everything will work, if you release it with a reserve - there is an option to get a heated surface that is not protected, or to fence the casing.
The concrete will be damp and will conduct current. Click to expand. It won’t stay damp forever, it usually dries out, and also has shadows inside))) I don’t see anything wrong with removing all the connections in the slab and bringing out only the wire, provided the installation is reliable. Moreover, replacing an element in this design is not possible.
Why should you use a heating cable?
The main advantages of using cable heaters:
- Safety. Excellent insulation system. Reliable protection from external chemical, mechanical and thermal influences.
- Versatility. The heating cable can be equipped with a pipeline located both underground and outside.
- Easy to use.
- Saving. After connecting the cable heater, it is possible to adjust the heating power when the air temperature changes.
Types of cable heater
There are two types of heating cable:
Resistive . It has low cost. Quite easy to install. It is usually used in everyday life for heating pipes with a diameter of up to 40 mm and for equipping a heated floor system. The operating principle of this element is to lay special sensors and wires along the entire length of the pipeline. Sensors react to any temperature changes and periodically connect and disconnect the heating system.
The wire can be laid in a spiral or strip method. It is attached to the pipes using aluminum tape. During installation, under no circumstances should you allow it to be over-tensioned. To distribute heat evenly, you can wrap wires and pipes with aluminum foil. You also need a reliable thermal insulation system. Mineral wool is suitable for thermal insulation.
Self-regulating . It is used for heating pipes with a diameter of more than 40 mm, containers, roofs, electrical panels, drains and other things. This heating wire consists of 2 insulated conductors located in a polymer, which, under the influence of temperature changes, changes the resistance. This means that as the air temperature decreases, the resistance of the polymer decreases and the current increases, which leads to an increase in the heat produced. This does not require any temperature controllers or electronic sensors.
If the air temperature rises, then this process goes in the opposite direction. The self-regulating heating cable has a long service life . The cost-effectiveness and safety of the cable is ensured by reliable insulation.
Advantages of self-regulating cables
- A self-regulating cable has a higher resistance to voltage surges. If the voltage is increased for a long time, the cable will not burn out.
- The self-regulating cable can be cut into pieces of the desired size. But resistive ones have a fixed length.
How to make a heating cable with your own hands?
A cable heater can be bought at hardware stores , but they are not cheap. If you have certain technical skills, you can try to make a heating cable with your own hands. For this you will need suitable materials. For example, a power telephone cable (field cable) can replace a branded heating cable, since they are very similar in characteristics and shape. This wire is quite strong, rigid and thin. It is suitable for use in damp environments as it has reliable insulation.
Please note that a heating system made from telephone wire will lack some functions . For example, there will be no possibility of self-regulation. There is also no special food insulation in the system. But all these qualities are not really needed, so you can safely use a cable heater made by yourself.
It is very easy to install it yourself. First you need to determine the location of the wire. If the wire is on top of the pipe, then the wire must be attached to the surface as tightly as possible. It is recommended to wrap the pipe with the “field” in foil, then wrap aluminum tape on top of it, it will press the heating element well. Such heating can be done not only for water pipes, but also for sewerage. It is important to ensure that the heating cable is well protected from moisture. For this purpose, hydro- and thermal insulation is used.
If the installation of the “field wire” is carried out inside the pipe, then in order not to expose the wires, it is better to unravel the cable into 2 wires . Next, you need to bend a single wire in half and double it again. At the 2 open ends of the wire it is necessary to build a sealed connection, which can be made from a flange from a flexible hose. In order for the input to be sufficiently sealed and not allow a drop of moisture to pass through, it should be filled with epoxy glue and the fitting should be slightly flattened. A home-made heating cable can be used in places where people do not live permanently, for example, in the country.
A heating cable is necessary for the full functioning of the water supply and sewerage system, especially in winter.
Skeptics claim that IR rays are harmful to humans. At the same time, they willingly bask on the beach, forgetting that the Sun is the most powerful emitter of these rays. Our star has been warming the Earth for billions of years, and nature exists. But there is also some truth to the skepticism. We've all gotten burns while sunbathing on the beach; touching a hot frying pan, boiling water or any highly heated substance will inevitably lead to injury.
To avoid this natural risk, a heater made of infrared film has been developed, which is not difficult to make with your own hands. A distinctive feature of heating with infrared rays is the fact that it is not the air that is heated, but objects. Thus, the consumer begins to feel warmth almost instantly after turning on this heater. In traditional heating systems, heaters must first raise the temperature of themselves, then the air in the room, and only after that we begin to warm up.
Device
A heater made to use radiation does not have a coolant fluid, which can leak or freeze if you go away for a few days in the winter and turn off the system. The boiler, pipe pump and batteries are missing. All its components.
- Heating element - a lamp, coil or filament that produces thermal energy.
- A reflector that distributes heat throughout the room.
- Wires.
- Thermostat with which the heating level is set.
Read also: Receipt for receiving a deposit for a car
A child can make a simple infrared heater with his own hands. To do this, just place a sheet of foil behind the radiator. There are a lot of circuits for making electrical devices of this type. Various heat sources can be used - from a spiral for an electric stove to glued sheets of plastic with a graphite layer. A wide range of reflectors, even chocolate foil, and an adapted voltage regulator.
Infrared film
The most modern material for making a heater with your own hands is infrared film. Consists of three layers.
- The basis. Electrical polymer with high fire resistance parameters.
- The middle, working, layer is a carbon non-woven fabric, which is a heating element. Silver and copper contact bars.
- The outer lamination is made of the same material as the film base.
Since installation does not require special surface preparation, and the material itself is flexible, it is easy to mount such a heater made of infrared film with your own hands on any profile and material of a wall, floor or ceiling.
Work order
Repair
Now that the question of how to make a heater with your own hands has been resolved, let’s consider the possible causes and methods of repairing such a system.
One of the main advantages of this heating scheme is its survivability. Carbon strips work over their entire surface, and their contact with the tires is carried out over the entire length of the material. Due to this, even in the event of a breakdown in one or more places, the remaining area of each section or strip of film will continue to work.
This effect can be compared to a sheet of metal to which an electric current is applied. You can make a hole at any point, but the sheet itself will still remain under tension. If such damage occurs, repair of the infrared heater is not required.
Let's assume that a wire breaks and one or more sections stop working. With such a defect, the remaining area of the heater will continue to heat, because each fragment is connected in parallel.
It is impossible to eliminate this damage without dismantling the decorative layer. The only method of dealing with the problem may be preventive measures. During installation, try to avoid large fragments, then failure of a small section will not affect the heating level. Attach the contacts securely. Do not overload the wire. In addition, such a malfunction has an extremely low degree of probability. We boldly install plasterboard on the ceiling, under which the wires to the chandelier pass, or remove the cable under the plaster.
- The surface that transfers heat to the room must be covered with a significant heat-insulating object. As an example, imagine a mattress thrown on the floor. If the heater is mounted on a wall or ceiling, this naturally cannot happen. The threat exists only for the floor version.
- When the temperature reaches 70°C, the thermostat should operate and turn off the heating part. This means that at the same time they threw a warm blanket on the floor and the regulator broke. The principle of its operation is based on the laws of physics. As it heats up, the substance in the sensor expands and opens the contact. Defect is not possible. If such a substance is not there, it will be detected during the initial check.
- All materials used in the production of film have high heat resistance. The base can withstand temperatures tens of times higher. Carbonite, silver and copper are able to heat up more and not be harmed by it.
- Even if a miracle happens and the sheet overheats, it will only lose its shape and will continue to function, but with a slightly lower efficiency.
Is it worth making a heater from infrared film with your own hands? Technologies do not stand still. Just 100 years ago, the vast majority of the population of our planet did not know about the existence of electricity, and they could simply be afraid of cars. But is life today possible without these things? Remember the cell phone from 1990 that was a walkie-talkie in the president's suitcase. Look at the current smartphone that every schoolchild has. This is progress.
A simple homemade panel heater: assembly diagram, photo of production.
With the onset of cold weather, the topic of heating residential premises becomes relevant, and many are wondering how to additionally heat a living room, work space, cottage or garage using a heater. In this article we will look at how to make a simple, cheap and at the same time safe electric heater.
A simple DIY heater.
To make this heater you will need a minimum of materials:
Fiberglass panels of the same size, thickness 1 – 1.5 mm – 2 pcs. The shape of fiberglass sheets can be square or rectangular. The size of the sheets must be selected based on the number of turns of nichrome wire. For a 500 W heater, the size of the sheets will be no more than 50 x 50 cm.
The cross-section and length of the wire must be selected based on the required power of the heater; you can use the table provided.
If you need a 500 W heater, you will need nichrome wire with a cross section of 0.4 mm and a length of 9.7 meters.
To calculate the length of the wire, you can use the table.
You will also need materials:
- Epoxy adhesive.
- Bolts, washers, nuts – 2 pcs.
- Wire and plug.
Electrical diagram of a homemade heater.
Let's start making the heater.
Each sheet of fiberglass needs to be cleaned on one side with a grinding machine, this will be the inside of the heater.
We take one sheet of fiberglass, we will lay nichrome wire on it. Depending on the size of the sheet, you need to calculate the number of turns of wire, taking into account the distance from all edges of the sheet of 20 - 30 mm. The optimal distance between turns is 10 - 15 mm.
For example: if our fiberglass sheet is just over a meter long, then to lay 24 meters of wire you will need to make approximately 24 turns.
For convenience, before laying the wire, it is advisable to draw a frame for the turns on the sheet.
Now you need to lay the wire in coils along the frame; you can fix the coils with paper strips and Monolith glue.
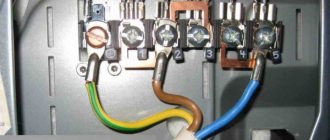
At the point where the wire exits, you need to drill two holes in the fiberglass, make terminals and connect the cord to the plug.
We check the integrity of the circuit with the device.
Now you need to glue the second sheet of fiberglass to the first using epoxy glue. Epoxy glue is applied along the edges of the sheet and between the turns of wire.
We glue the sheets together so that the sheets stick together evenly, they need to be laid on a flat surface, pressed on top with a sheet of chipboard or plywood and pressed down with a weight. After a day, the sheets will be firmly glued together, and the heater will be ready.
Read also: Lamps for painting booths
A homemade heater can be hung on the wall, and it will not take up space in the room.
The heater itself is safe, since the heating element is hidden in fiberglass, which is an insulating material, but you still need to follow safety precautions and not leave the heater unattended.
You can protect your water supply and sewerage systems from freezing in winter using a heating cable that is installed outside or inside the pipes. The heating element prevents the accumulation of ice ridges, which can lead to quite negative consequences. In any case, these consequences will have to be eliminated - either to replace broken pipes, or to repair the resulting damage.
Idea N1: Making a local mini-heater
For this design, you will need two rectangular pieces of glass, metal foil, a paraffin or stearin candle, a wooden block (or a block of other dielectric material), an electrical cord with a plug, and sheet metal for contacts.
The manufacturing procedure for such a mini heater is as follows:
- Take two identical pieces of rectangular glass, in this example the dimensions are 4x6 cm, but this is not critical, you can take a different ratio, the main thing is that the area is about 25 cm2. Clean and degrease their surface.
- Using a lit candle, carefully apply a layer of soot to one surface of the glass. Make sure that the carbon black is evenly coated and distributed, as it will act as a conductive material.
Figure 1: elements for making a heater - Using cotton wool or an ear stick, clean the edge of the smoked glass, approximately 5 mm.
- Cut a piece of foil the same width as the soot-covered glass surface. In length it should protrude 3–4 cm beyond the edge of the glass. Place the foil on the glass.
- Coat the edge of the glass with sealant and align the two halves together with the foil in between.
Rice. 2: Combine two glasses
Fold the edges of the foil under the glass to one side.
- Attach metal contacts to a wooden block and solder the ends of the electrical wires with a plug to them. Place the glass on the block - the heater is ready.
Rice. 3: Fix the contacts on a wooden block
It should be noted that the maximum temperature of such a heater should be about 40ºC. Naturally, you won’t be able to heat a house, cottage, or garage with such a homemade heater; it is suitable for heating tents, a work area in front of a workbench, or other space directly in front of the work surface. If the device gets too hot, you will need to reduce the resistance of the conductive elements; for this you can use thicker foil or increase the thickness of the soot.
Operating principle of the heating cable
The operating principle is that electrical energy is converted into thermal energy. The peculiarity of such a heating system is that, without the use of an oxidizer or fuel, it receives energy and converts it into heat. The heating system heats up from the electricity passing through it and prevents freezing of communications. Therefore, it is necessary to purchase a heating cable ; it will help to avoid failures in the operation of water supply networks during the cold season.
To heat the external pipeline, wires are used with a seamless, sealed and damage-resistant sheath that is not afraid of temperature changes. The heating element is located inside the outer layer. When the air temperature drops, the heating cable is connected to electricity. The heating element starts working and heats the entire system. If the air temperature rises, the wire is disconnected from the power supply and the pipeline operates as usual.
Idea N4: Heater with a spiral
The classic version of a spiral-type heater involves connecting heating coils to the network. Heat-resistant dielectrics were used as the basis for installing the spiral in such models. But these are quite simple options, so in this article we will look at the principle of manufacturing a device whose characteristics are not inferior to a gas heater. It uses the same principle as a heat gun, but with less heat output.
To make it, you will need a heating coil, an electric fan, a metal pipe or box for the housing, a dielectric heat-resistant frame, and a power cord. The heater manufacturing process includes the following steps:
- Cut the asbestos cement pipe to the required length (in this example it will be used to make the supporting frame).
Rice. 17: Cut the pipe to the required length - Drill several holes in the pipe from different sides so that you can insert a nichrome spiral into them.
- Insert a spiral into the holes, in this example they are made in the form of a lattice, but this is not important, it is important that the heating elements have a different angle of inclination.
Rice. 18: position of the spiral in the pipe
If you are assembling several pieces of spiral, connect them together on the outside of the pipe.
- Place a fan on one side of the pipe to force air flow. The direction of the blades should ensure the movement of air towards the spirals stretched in the pipe. The distance from the fan to the heating element must ensure safe operation so that the blades do not melt. For additional cooling, the fan and asbestos pipe can be separated in the housing.
Rice. 19: separation of fan and pipe with heater - Insulate the electrical connections both from the fan to the power cord and from the nichrome spiral. To insulate the spiral joints, you can use micanite tape, which is wound directly onto the asbestos surface.
- Place the finished heater in the most suitable housing. In this example, to protect against accidental contact with the spiral, an additional grill is installed in front of the pipe.
It should be noted that the fan power should not be too high so that the coils have time to warm up. In practice, you should achieve a blowing effect, and the heating performance can be adjusted by the length of the spiral. It is also advisable to coat the inside of the asbestos pipe with heat-resistant varnish to prevent asbestos particles from entering the air. It would be a good idea to ground the heater body to a ground loop.
Why should you use a heating cable?
The main advantages of using cable heaters:
- Safety. Excellent insulation system. Reliable protection from external chemical, mechanical and thermal influences.
- Versatility. The heating cable can be equipped with a pipeline located both underground and outside.
- Easy to use.
- Saving. After connecting the cable heater, it is possible to adjust the heating power when the air temperature changes.
Types of cable heater
There are two types of heating cable:
Resistive . It has low cost. Quite easy to install. It is usually used in everyday life for heating pipes with a diameter of up to 40 mm and for equipping a heated floor system. The operating principle of this element is to lay special sensors and wires along the entire length of the pipeline. Sensors react to any temperature changes and periodically connect and disconnect the heating system.
The wire can be laid in a spiral or strip method. It is attached to the pipes using aluminum tape. During installation, under no circumstances should you allow it to be over-tensioned. To distribute heat evenly, you can wrap wires and pipes with aluminum foil. You also need a reliable thermal insulation system. Mineral wool is suitable for thermal insulation.
Self-regulating . It is used for heating pipes with a diameter of more than 40 mm, containers, roofs, electrical panels, drains and other things. This heating wire consists of 2 insulated conductors located in a polymer, which, under the influence of temperature changes, changes the resistance. This means that as the air temperature decreases, the resistance of the polymer decreases and the current increases, which leads to an increase in the heat produced. This does not require any temperature controllers or electronic sensors.
If the air temperature rises, then this process goes in the opposite direction. The self-regulating heating cable has a long service life . The cost-effectiveness and safety of the cable is ensured by reliable insulation.
Advantages of self-regulating cables
- A self-regulating cable has a higher resistance to voltage surges. If the voltage is increased for a long time, the cable will not burn out.
- The self-regulating cable can be cut into pieces of the desired size. But resistive ones have a fixed length.
Serial connection of light bulbs
Very simple. Simply connect two light bulbs of the same wattage in series and the voltage on each will be halved.
Of course, they will glow less brightly.
How will the energy consumption of such a beam of light sources change? Measurements can be taken with a multimeter.
Suppose, for example, at a constant voltage of 240 V for two 100 W light bulbs, the current is 290 mA.
Based on the formula for calculating power, we get:
P = I * U = 0.29 A * 240 V = 69.6 W
As you can see, consumption has decreased. But at the same time, heat generation per watt of power increased.
How to make a heating cable with your own hands?
A cable heater can be bought at hardware stores , but they are not cheap. If you have certain technical skills, you can try to make a heating cable with your own hands. For this you will need suitable materials. For example, a power telephone cable (field cable) can replace a branded heating cable, since they are very similar in characteristics and shape. This wire is quite strong, rigid and thin. It is suitable for use in damp environments as it has reliable insulation.
Please note that a heating system made from telephone wire will lack some functions . For example, there will be no possibility of self-regulation. There is also no special food insulation in the system. But all these qualities are not really needed, so you can safely use a cable heater made by yourself.
It is very easy to install it yourself. First you need to determine the location of the wire. If the wire is on top of the pipe, then the wire must be attached to the surface as tightly as possible. It is recommended to wrap the pipe with the “field” in foil, then wrap aluminum tape on top of it, it will press the heating element well. Such heating can be done not only for water pipes, but also for sewerage. It is important to ensure that the heating cable is well protected from moisture. For this purpose, hydro- and thermal insulation is used.
If the installation of the “field wire” is carried out inside the pipe, then in order not to expose the wires, it is better to unravel the cable into 2 wires . Next, you need to bend a single wire in half and double it again. At the 2 open ends of the wire it is necessary to build a sealed connection, which can be made from a flange from a flexible hose. In order for the input to be sufficiently sealed and not allow a drop of moisture to pass through, it should be filled with epoxy glue and the fitting should be slightly flattened. A home-made heating cable can be used in places where people do not live permanently, for example, in the country.
A heating cable is necessary for the full functioning of the water supply and sewerage system, especially in winter.