When building private houses, the question often arises whether it makes sense to install additional balconies. Be that as it may, a house with a balcony has a more attractive appearance. By arranging it in a private home, we not only get a place where you can admire the appearance of the area and breathe fresh air, but also get an original design for your home.
Speaking of multi-storey buildings, many of them do not have such structures on the ground floor, and getting additional space would not be a bad idea. Based on this, let's talk about how to implement plans for its installation.
Do-it-yourself balcony in a private house – is it possible?
The balcony is a beautiful addition to the facade, a place to be in the fresh air. It is possible to install the structure with your own efforts, subject to scrupulous adherence to installation technologies.
Advantages of self-building:
- regulation of deadlines;
- independent choice of materials;
- varying possible designs;
- regulation of construction costs;
- correction of building design.
Construction work begins with choosing the type of structure in accordance with the design and style of the dacha.
Rules for constructing a balcony
The construction of a balcony room is subject to a number of requirements that determine its location, length, height, type of fencing, and material.
When constructing a balcony room, the following requirements are taken into account:
- the building contains at least two floors;
- the loggia is mounted on the side of the house with access to the garden, park, quiet part of the street;
- the structure must support the weight of several people;
- installation of supports is required;
- the decision on glazing is made taking into account the possible weight of the house;
- The material of the loggia must match the main material of the house.
The balcony room is also an exit for additional evacuation in case of fire, so it is built in accordance with all safety standards.
Basic materials
A loggia in a private cottage is built from natural, artificial materials with high strength, load-bearing capacity, and long service life:
- tree;
- metal;
- concrete;
- glass.
Balcony with concrete floor
The design, type, and choice of material for the balcony room depend on the type of decoration of the house and its material. It should fit into the overall design, without standing out or resonating.
Construction safety requirements
A balcony room in a country house is subject to a number of technical requirements that guarantee the safety of the structure. The loggia must withstand the assigned load, not sag, or deform.
To do this, it is built in accordance with the following requirements:
- the base plate is designed for a minimum of 200 kg, the outer strip - 400 kg;
- permissible vertical load on the balcony parapet – 100 kg;
- permissible horizontal load on the parapet – 40 kg;
- standard parapet height is 1 m;
- ensure that the structure is adjacent to a load-bearing wall without a window, with a minimum length of 1.2 m;
- laying a drainage system;
- the minimum slope angle of the base slab is 3 degrees;
- length/height parameters of the structure in accordance with the housing design;
- installation of additional racks, supports, columns for a large loggia area.
After studying the basic requirements for a balcony room, they move on to choosing the type of structure, materials, and measurements.
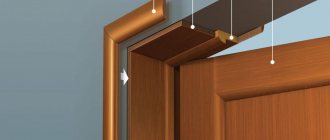
Finishing window and door slopes
Window and door slopes can be finished with plasterboard, plaster and plastic (sheet material, sandwich panels). Work technologies also vary.
Decorating slopes with plaster
Plastering is one of the most affordable and simplest options for finishing slopes. The plaster has a low price, is easy to apply, forming a smooth coating ready for final painting. However, this material has a low heat saving rate, can crack under the influence of external factors and is susceptible to mold formation. In addition, the process of working with plaster itself is quite dirty.
But if you decide to save your budget, then plaster the slopes as follows:
- Prepare your work surface thoroughly. Eliminate unevenness, degrease and remove dust.
- Check the evenness of the slopes using a building level. The permissible deviation along the axes is 2 mm per 1 m of the finished surface.
- Apply a layer of deep penetration primer.
- Attach a reinforcing corner along the edges of the slopes to “stumps” made of mortar or along the edge of the inner wall - a wooden rule (slat).
- Using a spatula, apply the solution to the work surface. This should be done as if throwing it.
- Distribute the solution along the slopes, making movements from bottom to top.
- Make a temperature gap between the frame and the slope in the form of a furrow 3-5 mm wide. Fill it with silicone sealant.
- After the plaster has dried, finish it with grout. To do this, use fine-grained sandpaper.
Distributing the mortar along the wall
When plastering, it is important not only to obtain a smooth surface of the walls, but also to evenly distribute the solution and maintain the slopes. It is for this purpose that a special tool is used - a malka. You can make it yourself from plywood, boards, timber or even leftover PVC panels.
The optimal width of the fry is 130-150 mm, and the length is 80-100 mm greater than the width of the slope. On one side of the tool you need to make a notch that should correspond to the thickness of the window frame. The mortar is pressed against the wall, one end resting it against the frame, and the mortar is leveled. It must be laid 5-6 mm thick.
Notch at the end of the fry
Perforated corner and window frame - beacons for distributing putty using a hammer
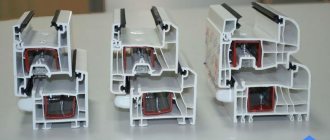
Installation of plastic slopes
Plastic slopes are resistant to moisture and mold, easy to maintain, aesthetically pleasing, and affordable. Their main disadvantage is fragility under directed mechanical influence.
The material for covering the opening can be a sandwich panel with insulation or a simple PVC panel. You can install them in two different ways - with or without a starting profile.
In the first case, the work is performed as follows:
- The starting U-profile is screwed along the entire length of the frame with self-tapping screws.
- A wooden batten is installed along the edges of the slopes. At the junction of the top and side elements, a gap of 10 mm should be left. The protruding parts (“spikes”) of the panels will go into it.
- A plastic slope pre-cut to the required size is installed with the end into the starting profile.
- Insulate the slope with mineral wool or polyurethane foam.
- The second end is fixed to the sheathing using “bug” self-tapping screws.
- An F-profile is installed along the edge of the inner wall, fixing it with glue or liquid nails. It is overlapped in the corners and then cut off.
- The junction of the slope and the window structure is insulated with liquid plastic or silicone sealant.
Fastening the starting profile around the perimeter of the frame
The space between the panel and the wall is filled with polyurethane foam
The second option - installing a plastic slope without a starting profile - involves performing similar actions, but with one exception. The PVC panel is inserted with a “spike” directly into the mounting foam, which was used to install the balcony block. To do this, it is cut to a depth of 10 mm. The width of the cut should not exceed 1 mm.
Note! If you use a sandwich panel, you can make the “spike” yourself. To do this, the product is first cut along the edge to ½ thickness. Then an incision is made across. The result is an L-shaped edge of the panel.
Features of working with drywall
The opening for a balcony block is rarely lined with plasterboard.
- Firstly, this is a labor-intensive process that involves working not only with this material, but also with plaster, primer, and glue.
- Secondly, you need to use only moisture-resistant drywall. But even with this, the entire skin will need additional protection from moisture.
- Thirdly, under the influence of external factors, drywall can swell and delaminate.
It is convenient to use gypsum board when you are sheathing internal walls. In this case, working with slopes will look like this:
- A metal UD profile is fastened along the window frame with self-tapping screws.
- A plasterboard blank is inserted into it, starting from the top of the opening.
- The formed cavity is filled with insulation, leaving 10 cm free from the edge.
- An adhesive composition is applied to the edge of the slope and the drywall is pressed against it.
- All joints are additionally coated with glue.
- After it dries, the slopes are puttied.
Adhesive method of fastening plasterboard slopes
Note! To obtain a smooth and durable base for subsequent finishing, you need to apply at least two layers of plaster to the drywall.
Types of balconies
The range of loggias includes various designs for summer cottages and private houses. The choice of design depends on the size, style, dimensions, and design of the cottage.
Loggias are divided into types based on materials and location.
Depending on the loggia material, there are:
- wooden;
- forged;
- concrete.
Wooden balcony
According to the method of arrangement there are:
- hanging;
- attached;
- attic;
- console
Constructive solutions are distinguished by design, weight, method of construction and fastening of balcony slabs in relation to the load-bearing wall.
Documenting
Before proceeding with calculation and construction work, it is necessary to obtain permission to build a loggia.
Documents for installing a balcony in a country house with your own hands include:
- permission from the company on whose balance sheet the house is listed;
- official written agreement of the residents of the house for construction;
- a finished loggia project from an architectural agency;
- construction agreement from supervisory and municipal services of the city;
- ownership of the house;
- BTI certificate;
- owner's application for redevelopment;
- photo of the cottage.
For advice and a detailed list of documents for the construction of a balcony room in your home, contact the planning inspection in your city.
Preparation of necessary documents
The most reliable way is to first consult with familiar architects and lawyers. They will tell you who is best to contact in order to quickly obtain a building permit from the appropriate authority. Most likely, you will need the following list of documents:
1. Papers confirming that you are the owner of the apartment or ownership.
- Information from the Technical Inventory Bureau containing the floor plan.
- Consent of housing and communal services.
- It is also necessary to collect signatures from neighbors, thereby confirming that the other residents are not against the addition of a loggia.
- Redesign drawing or diagram.
- Your actions must also be coordinated with the utility service.
- Obtain permission from your city's Department of Architecture.
- Submit a corresponding application to the district administration.
How to make a balcony in a private house - help for beginners
The construction of a balcony structure begins with studying the installation technology and its stages.
When installing a loggia it is important:
- design begins at the cottage construction stage;
- calculate the maximum load on the load-bearing wall;
- when building a balcony on the roof, take into account the load the roof can withstand;
- think over the laying of the rafter system;
- designate places for laying waterproofing material, insulation, screed;
- A mandatory requirement for an extension is an adjacent wall made of massive, insulated material.
Thinking through the design of a future extension taking into account the design of the dacha eliminates the risk of unforeseen errors in the work.
Preparation for construction
The first stage of the start of construction work is the selection of material, its purchase, the design of the future extension, and the preparation of tools. The material for the loggia is selected taking into account the design of the entire house. The material should fit into the overall style of the cottage, not stand out, not resonate against the general background.
Necessary construction tools include:
- metal fittings;
- wire;
- plywood, boards, metal profile;
- concrete solution;
- hammer;
- putty knife;
- channels for the frame;
- metal pipes.
The type of equipment varies depending on the type of balcony, material, and main construction project.
Detailed design and calculations
The preparatory stage of construction work begins with the development of a detailed design of the future loggia and calculation of the dimensions of the material.
The working draft includes the following details of the balcony:
- marking the installation of supports on the ground;
- marks for the depth of entry of support pillars into the ground;
- marking the future frame of the loggia;
- marking the location of sheets of material on the sheathing;
- layout of the balcony room relative to the living rooms;
- type of cladding;
- location of window opening, door;
- glazing decision;
- type of roof and its fastening;
- detailed diagram of fastening corners.
Correctly carried out, detailed calculations eliminate the risk of irreparable errors during construction, damage to the material, and additional payments due to incorrect calculation of materials.
Video master classes on the topic
Detailed videos that will help even a beginner install a balcony block with a window sill and slopes on their own:
Tuning the opening and installing the BB:
Independent installation of a window and door unit on a balcony is a labor-intensive process that requires a lot of time and financial costs. Directly installation is preceded by a large amount of preparatory work. Both are based on certain theoretical knowledge and practical experience. If you are not willing to risk a PVC structure by installing it yourself, consider hiring a professional.
YOU MAY ALSO BE INTERESTED
Main stages of construction
After obtaining permission for construction and planning work, choosing the type of structure, preparing tools, you can begin work. The construction of a balcony includes several stages.
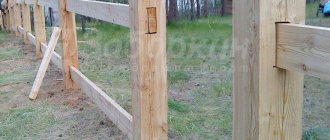
Stage 1 - installation of struts, foundation
Base frames and struts are the basis on which the entire structure is supported. They are made by hand from galvanized metal, or purchased in a specialized store. The size of the struts is 50x50 mm.
There are a number of requirements for the installation of struts:
- one side of the slope protrudes up and down by 50 mm;
- the distance between the struts corresponds to 100 cm;
- Anchors are used for fastening;
- tying the struts with metallurgical angles;
- mandatory jumpers are created across the triangles;
- Additional anchors are attached to the adjacent wall.
A metal frame made of struts is a reliable basis for a hanging or attic balcony.
Stage 2 - installation of floor, frame
The floor of the future loggia is laid on the base frames. Due to the limited load-bearing capacity of the frame, casting a concrete base is excluded.
The floor of the structure is performed in two ways:
- Fastening metal sheets under base frames. A layer of expanded clay is poured inside, a reinforcing mesh up to 5 mm thick is attached with wire, and welded around the perimeter. A layer of cement mortar is poured on top.
- Sheets of rigid material are laid on the base frame, a waterproofing layer is laid, and covered with wooden boards secured with self-tapping screws. Logs are attached to the top, an insulating layer with a vapor barrier is laid, and a subfloor is laid.
The metal frame is welded on the ground, then placed on the prepared base. The side edges of the frame and the top lintel are secured to the wall with anchors. This increases the durability of the structure and reduces the load on the base.
Stage 3 – insulation, finishing
The finished balcony frame is sheathed with profiled sheet material. The type of finishing material depends on the type of construction and design of the house. After cladding, an additional insulating layer and sealing are laid to prevent moisture from penetrating into the room.
Stage 4 - roof construction
A support-cantilever roof is mounted on the finished frame. Attached to the wall with metal corners with lathing. The roofing material must be strong, reliable, withstand heavy loads, resistant to temperature fluctuations, and have a high reflection coefficient. Corrugated sheeting, seam roofing, and metal tiles are suitable for this.
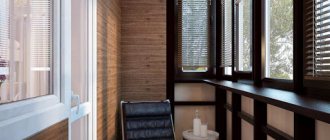
Stage 5 – glazing, cladding, wiring
The final stage of construction and planning work is interior decoration, cladding, glazing of the balcony (in most cases, laminated plastic windows with a wood look are used). Finishing material is laid on top of the insulation for additional comfort indoors.
For internal lining use:
- lining (more details in the article “lining a balcony with lining“);
- drywall;
- plastic panels (discussed in detail in the article “finishing a balcony with plastic panels“);
- MDF, chipboard, plywood;
- Tiles (we recommend the article “tiles for the balcony“);
- PVC.
At the stage of covering the loggia, electrical wiring is installed, electricity is supplied, and heating is connected inside the room.
Balcony roofs
Basically, balcony roofs are divided according to the method of their installation: dependent and independent.
- a dependent roof is installed in balconies that have glazing. The use of this roof option makes it possible to provide high-quality insulation indoors and also ensure reliable sealing. It can withstand significant loads;
- The peculiarity of the independent roof structure is that it is attached to the wall. This significantly reduces the load on the balcony glazing. Such a roof can also be installed on non-glazed structures. The disadvantage of an independent roof is the fact that it is impossible to provide a warm balcony. To cover such a roof, lightweight roofing materials should be used.
As you can see, there are many ways to install and improve balconies and loggias. Installation work will require a lot of effort, but with perseverance and diligence, this task is quite doable. Don’t forget the main points: correct calculations, reliability and modern design, and you will get an original creation that can decorate any building.
Construction of balconies of different designs
There are many variations of balcony buildings, differing in appearance, type and method of construction. Depending on the chosen design, different requirements are imposed on it. Let's consider the nuances of building different types of loggias.
Made of wood
The wooden suspended structure has an attractive design, ease of installation, and accessibility.
Among the features of a wooden building:
- using wooden beams as the main support;
- load-bearing beams enter the wall to a depth of at least 25 cm;
- impregnation of wood with an antiseptic agent is mandatory;
- metal corners and strips are used to secure beams;
- the racks are secured with M12 bolts;
- for greater rigidity and stability of the structure, grooves are made at the intersection of the beams;
- wooden boards are used to create the floor;
- The preferred fencing material is wood.
Strength and durability of the finished building can be achieved by using antibacterial impregnation and coating the elements with a layer of hydrophobic paint.
Installation of a loggia on the first floor
The problem of lack of additional space is relevant in most cases for owners of apartments on the lower floors. Often, installing a balcony with your own hands is simply a necessity.
Self-installation of a balcony
In this case, two types of extensions are used - suspended and attached structures.
Suspended Balcony Structure
To install such a balcony on the ground floor, you will need a metal frame, which will be fixed to the wall of the house. This frame is made from corners of a certain size. The base will be products 60X60 mm, for the railings you will need corners 45X45 mm. In this case, the base should be an isosceles right triangle.
After completing the welding process, you need to screw the base to the wall using anchor bolts. Reinforcement should be attached to the protrusions of the base on top. This metal frame will become the basis for the floor of the loggia. Then the fence is attached, the window is dismantled and a doorway is created in the wall. When the base of the suspended balcony is ready, proceed to the construction of the floor. This will require wooden logs. It is better to immediately insulate the floor, and then lay out a decorative coating. You should also weld a sheet of metal underneath for greater strength. Professional sheets are suitable for external finishing. The next stage is glazing. This process is no different from installing windows on ordinary balconies.
Standard balcony on the ground floor
If it is necessary to increase the area of the extension, install a balcony structure with an extension. In this case, you need to take into account the appearance of the future loggia. Therefore, it would be useful to appropriately design or finish the supporting frame.
Extended balconies
Most often, installing a loggia with your own hands is done using an attached type of structure. An extension is made to the facade, and the entire structure of the balcony is supported by the foundation.
Attached structures have their advantages: they allow a large reach from the wall and allow you to increase the area of the loggia.
Work is being carried out from the foundation. First, markings are applied. It is important to avoid mistakes and check all parameters with the diagonals. After this, they dig a hole under the foundation and strengthen the standard foundation blocks in it. It must be taken into account that the depth of the pit will be greater than the depth of freezing of the ground. The height of the foundation of the balcony and the building itself must be at the same level. In terms of external cladding, the foundations of the superstructure and the house must also be in harmony. It is necessary to maintain unity of style.
Then the walls of the loggia are made of brickwork. The height should coincide with the balcony board of the house. The ideal thickness is 250 mm. The brickwork itself is adjacent to the wall as closely as possible.
The second floor balcony slab can form the basis of the roof. In the case where the extension is much larger in size, it is necessary to install a separate roof.
After this, an entrance is cut, a balcony block is installed, and the room is insulated. When designing the opening, do not forget that the balcony door always opens into the room.
Common problems during construction
When building a loggia yourself, a number of problems often arise that interfere with the progress of construction. Most problems arise due to lack of experience and knowledge of performing such work. Therefore, before starting construction and planning work, it is recommended to familiarize yourself with the installation technology of various balcony structures and recommendations for them.
How to attach a loggia to a wall?
Connecting the extension to the load-bearing wall is carried out in two ways:
- fastening beams with support on support boards - the construction principle is similar to the cantilever structure; the beams are supported on support boards, and not on the wall;
- mounting the second support row close to the wall is done by installing wooden slopes with an additional transverse beam.
An extension supported by support beams is not reliable and cannot withstand heavy loads, so installing furniture on such a loggia is not recommended.
How to install a fence?
Balcony railings are made of metal, wood or sheet materials manually, or purchased at a hardware store.
Installation of the fence is carried out according to the following scheme:
- Marking the future building.
- Installation of fence supports according to the project plan.
- Applying markings for fastening railings;
- Fastening reference points along the markings using anchors;
- Assemble and secure the fence.
- Final painting, decoration.
The installation method differs depending on the selected type of fencing and material.
Technology
When deciding to install a balcony yourself, you need to understand that this is quite labor-intensive work. And given the fact that this must be a very durable structure, the technology for installing a balcony or loggia should be strictly followed.
To realize all your ideas, listen to the advice of experts below.
Tools and materials
Any business begins with the preparation of all the materials that are necessary for its implementation, and the tools that will be difficult to do without. So, to install loggias and balconies you will need:
- pipes, channels, fittings, binding wire;
- formwork boards or plywood sheets;
- concrete mixture;
- Master OK.
Preparatory work
Work should begin with the layout of the future structure being built. The location of the balcony, size and type are determined. If the balcony structure is planned on the second floor, then the concrete slab must be installed at the level of the reinforcing belt. To learn how to obtain permission to add a balcony, watch this video:
It is best to pour the channel into the reinforcing belt in advance. This will significantly increase the strength of the structure.
Also, for the stability and strength of the base, it is advisable to arrange supports on which the slab will rest. These supports can then be finished as columns. An alternative method could be supports that rest against the wall of the building. In this case, the placement of the supports should be designed so that they rest not on the wall, but on the corners of the house.
Step-by-step instruction
To facilitate the work required by installing a balcony, we provide a detailed step-by-step algorithm. So, the sequence of installation of the balcony structure:
- We place the channel on the edge in increments of up to two meters. Their number depends on the length of the balcony. The length of the channel should not exceed one meter, since the width of the balcony, according to regulatory data, is about 80 cm.
- The channels are fixed and poured together with the reinforcing belt so that they subsequently form a single structure.
- Start laying the reinforcement. This process must be carried out along the length of the balcony at a distance of 10 cm and the rods must be connected to the channels using metal wire.
- Then the reinforcement is laid along the width of the balcony structure with a similar spacing. Connections are also made using wire.
- Next, formwork is installed along the perimeter of the reinforcing mesh. It is better to knock it down in advance, and once installed, secure it with supports made of boards or pipes.
- We begin pouring the balcony slab with concrete. To give greater strength and even distribution of the mixture, it is better to use a vibrator.
- The concrete is given time to harden, and after that the formwork is dismantled.
- The installation of the balcony slab is completed by installing the supports using any method described earlier. For more information about adding balconies, watch this video: