Cladding materials have always been in great demand. One of their varieties is lining. It has established itself as a high-quality product with many positive properties. There is a wide variety of profiles on the market, which allows you to create different textures and attach panels anywhere. Almost any type of wood can be used as a primary raw material. Lining has become a common material for finishing steam rooms, but it can also be found in expensive private homes. The styling pattern is selected individually. It can be horizontal, vertical, diagonal, combined. Complex configurations are popular these days. Eurolining has a good reputation. It has a neater appearance and improved properties. If you have basic knowledge, clapboard cladding can be done on your own.
Advantages and disadvantages of finishing
Initially, lining was used to decorate train interiors. Even then, people paid attention to its ability to soften changes in humidity and temperature. It was quickly attached with profiled joints - this is another plus. Then the lining was improved: the shape and grooves changed, and the design characteristics improved. Finishing with modern lining has many advantages. First of all, this is the convenience and speed of installation thanks to the tongue-and-groove system. Another advantage is environmental friendliness. And one of the main advantages can be considered a low price with a fairly presentable appearance. Clapboard finishing has several negative aspects. The material can be spoiled by parasites. Rotting also causes deterioration in the appearance of the cladding. Wood also absorbs a lot of moisture and heat and deteriorates because of this. However, in doing so it improves the indoor air.
Nuances to consider
Lining is a board (of different thicknesses) that is made from various types of wood. The material got its name because of its original place of use. Namely, train cars, the internal surfaces of which were lined with small wooden slats, which created an excellent microclimate. Currently, wood products are returning to their former popularity, which decreased slightly when plastic and MDF options began to appear.
The modern construction market offers a wide range of types of lining
It is necessary to take into account that covering walls with clapboard with your own hands requires a balanced approach.
Therefore, it is important to pay attention to the product at the stage of its purchase. Pay attention to the following points:
- Correct storage of purchased goods. Packages must be stored horizontally on a support.
- The humidity level of the warehouse should be within normal limits.
- It is not allowed to place the product in an open space, exposed to sunlight.
You should also pay attention to the expiration date on the label. All information about the storage and shelf life of the lining must be indicated on the packaging of the material
All information about the storage and shelf life of the lining must be indicated on the packaging of the material
This precaution is necessary in order to mitigate possible risks. The fact is that work with the lining is carried out only after they are completely convinced that the material meets all standards
It is necessary to purchase material with a margin of 10%
Types of lining
Conventional lining is characterized by the following dimensions: thickness - 1.2-2.5 cm, width - up to 15 cm and length - up to 6 m (this is basically what it was in the old GOSTs). Standard lining has a smaller tenon - 4-6 mm, compared to 8-9 for Euro lining. The humidity of ordinary material is 8-12%, 25-35%, the European version is up to 12%. The old type of lining is made from material with natural moisture. Eurolining is a high-quality cladding board for external and internal wall decoration. It masks imperfections well and is capable of leveling surfaces. In addition, it performs sound and heat insulating functions. Eurolining has certain fixed parameters. The thickness is 1.3, 1.6 and 1.9 cm. The width is 8, 10, 11 or 12 cm. The maximum length of the board is 6 meters, but this figure depends on the manufacturer and varies greatly in different cases.
Types of wood from which eurolining is made:
- oak;
- Linden;
- pine;
- spruce;
- aspen.
Fastening wood sheets
To determine the exact height from floor to ceiling, you need to use a tape measure and a water level. It is necessary to cut a fragment of a suitable length from a sheet of lining, attach it to the corner of the wall, while maintaining the vertical level. After this, you need to insert a fastening bracket into the groove of the lock and secure it to the frame using nails or small self-tapping screws.
The same operation must be done for each frame strip. If the first sheet was installed correctly - in a strictly vertical position, on powerful fasteners, then the probability of successful completion of the repair is 90%. Subsequent sheets are installed flush against it, and first you need to make a rocking movement to fasten the lock, and only then install the bracket holders.
It is important to know that some craftsmen skip the holding brackets on every second sheet to save on material. This will lead to rapid destruction of the structure. If it is necessary to save material or time, fasteners are used in a “checkerboard” order - the first sheet is attached to 1,3,5 slats from the ceiling, the second - to 2 and 4, the third - again to 1,3,5, etc.
Types of lining profiles
Variety is important in finishing, so manufacturers produce different variations and modifications of the lining. Traditional eurolining forms distinct seams after installation. If this type of lining has a rounded chamfer, then it is “Softline”. Its outer part is devoid of corners, which allows you to protect the wood from burrs and chips for a long time. "Softline" is well suited for saunas. The Shtil lining does not have a chamfer near the tenon, and, as a result, there will be no pronounced seams after assembly. The thickness reaches 2.5 cm, so it can be used for decorating facades. “Landhouse” is a lining with a complex rounded shape at the edges. Finishing with this coating will make the interior more “expensive”. Another interesting option is “Blockhouse”, which features a rounded front side. This material can be used to finish the surfaces inside log houses and facades.
Several more types of lining:
- "American". Has a sloping surface. The elements are overlapped.
- Double-sided. Both sides are obverse. It is used not only for finishing walls, but also for constructing partitions.
Common questions about installation and their answers
- How to place sockets in the bathroom and make nests for them in the lining?
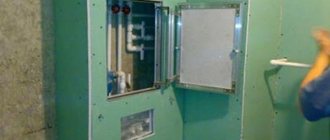
- A: According to TB, there should be no outlet at all in the bathroom. However, modern materials make it possible to conduct electricity and protect it from moisture. The socket should be placed as far as possible from the water source (shower, tap), located 1-1.5 meters above the floor level and protected by a “curtain” - a plastic cover. To install the socket, before installing the lining, it is necessary to run the wires along the wall to the required location. Afterwards, mark the space for the box on the sheets of lining and carefully cut out (plastic) or drill (wood) this hole. After installing 1-2 sheets of lining, it is necessary to assemble the box (so that it can be accessed from the side), and then continue installing the sheets. Finishing a bathroom requires careful calculation of communications. It is easier to place the rosette between two sheets. This way you can avoid cracks when there is a through hole in one sheet.
- A couple of years after installing the finishing coating, the lining began to “spin.” What to do?
- A: One or two sheets can simply be replaced. The process will not take more than one day, taking into account the complete dismantling of the fragments and reinstallation. When replacing damaged boards, it is worth inspecting the frame. It is quite possible that the reason for the rotation of the sheets was a loose frame or improper distribution of the load on the fasteners.
- Is it worth covering the ceiling with clapboard?
- A: This can be done, but is not required. A simple painted ceiling will last longer and better than one covered with clapboard. A lightweight, durable frame is simply necessary for such a design, so it’s worth thinking about a high-quality profile.
- Q: How can I use leftover clapboard?
- A: The remains of plastic lining are of little use. With wooden lining everything is much better - it can be used to construct simple cabinets, shelves and other fittings. Many craftsmen, along with the walls, sew up the space from the edge of the bathtub to the floor. There you can also make a secret door behind which to store household chemicals. Thus, you can rationally use every corner of the room.
- Tired of the monotony. How to add colors without changing the paneling?
- Wooden lining can be repainted at any time. Wood paints are good for adding color. It is not worthwhile to completely paint over the lining with enamel - the material will become unusable.
For plastic lining there is a technology for applying patterns. Finishing the bathroom with PVC clapboard has a “photo design” function. Using regular glue, you can apply a printed design, photograph or pattern. Thus, it will be possible to update a boring interior without serious financial investments.
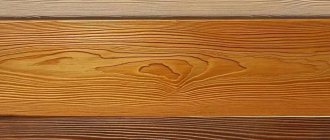
Type of lining depending on the type of wood
The lining is made from coniferous and deciduous trees, as well as from exotic species (for example, mahogany). Among the coniferous species, it is worth highlighting spruce, pine, larch and cedar. Spruce is endowed with softness, which is important for making boards with rounded shapes. This material looks great in a modern interior. Pine lining is a budget option that has many important qualities, including high strength. Larch is one of the most expensive coniferous species. Cedar boards have a pleasant natural smell that has a beneficial effect on the body. Among hardwoods, the most popular are oak, alder and linden. Oak wood is a durable and sought-after material. Lining made from this wood is considered a classic option. Alder is suitable for use in damp rooms as it does not absorb moisture. Linden is very resistant to deformation and mechanical damage. Lining from it is relatively inexpensive.
Examples of cladding
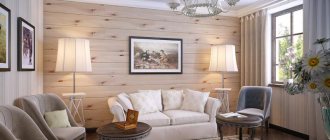
- There is an opinion that lining is more suitable for a bathhouse or cottage than for an apartment or cottage. This misconception is successfully refuted by designers who harmoniously integrate wood cladding into a wide variety of trends and styles.
- Wood lining in the interior harmoniously combines with wallpaper, tiles, and plaster. With a professional combination of textures, you can create a stylish and elegant interior.
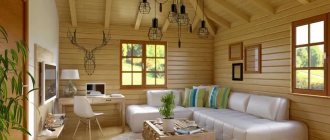
- Lining can become an integral part of an interior in Scandinavian style. In this design, it is in harmony with artificial or natural stone and large beams on the ceiling.
- Anyone who is in love with Provence will certainly suit the walls made of wood in natural tones. In this option, the combination of wood with plaster and rough board floors looks nice and relaxed.
- Another style that requires the use of natural wood cladding is Russian. The walls, lined with a block house, look like the walls of a log house.
- You can also use lining in high-tech style. In this version, the materials are painted in neutral white or gray colors and are used as a background for rich accessories.
- Fans of minimalism will most likely like the combination of lining with a strict cladding made of ceramics and stone.
See below for more details.
Type of lining
There are 4 varieties:
- Extra;
- Class A;
- Class B;
- Class C.
The boards are sorted depending on the presence of resin pockets, pronounced blueness, knots, cracks, and roughness (poorly treated areas). The extra grade is characterized by the complete absence of prostrog or minor defects on the front side. There may be one light knot per linear meter. For class A, the presence of microcracks and small untreated areas is allowed. At the longitudinal ends, cracks no longer than the width of the board are allowed. There should be no more than a fifth of all boards made of core profiles. It is acceptable to have 3 knots on one linear meter. As for class B, the presence of 2 falling knots is allowed on one such board. Cracks up to 3 cm are allowed on the front side, and cracks of any size on the front and back sides. All panels can be made from core, with resin pockets. Class C includes all boards that are not included in the categories from extra to class B, but are suitable for use. Rottenness is not allowed.
Where to apply
Clapboard finishing is often used in steam rooms and other bathhouses. In this case, choose panels made of linden and alder (for steam rooms) and coniferous wood (for other places). These types of wood are endowed with healing properties, thanks to substances that are released when heated. Boards with knots cannot be used in steam rooms, as the corresponding areas become hotter. For a good aroma, it is recommended to install several pine boards in the area of the stove. The lining treated with protective compounds is suitable for cladding facades; the type of wood in this regard is not particularly important. Interior decoration is a complex task; panels in a uniform color scheme are required. Mahogany lining is used for cladding walls in expensive mansions. The panels are also used to make partitions to divide space: both in apartments and in open areas.
Which one is better to choose?
For the interior decoration of saunas, it is recommended to purchase deciduous wood , which does not allow moisture to pass through and does not release heat outside the room. A house decorated with softwood will be filled with a pleasant aroma.
There is an opinion about the fragility of wood and the influence of external factors on it. A few decades ago, one could agree with this opinion, but not today, when stores are filled with a huge selection of various wood care products.
When choosing suitable wood, its class is extremely important :
- Extra - has no defects or chips, is considered an ideal option for repair;
- A - has no core, knots and resin pockets are allowed on it (no more than two);
- B - material with two knots, two pockets, one spot of contrasting paint and two cracks can be classified;
- C - is already less suitable for finishing work, as it has a number of the above-mentioned disadvantages.
Two cladding options are especially popular
- horizontal cladding - fastenings are carried out from the ceiling to the floor, which prevents the ingress of debris and moisture;
- vertical sheathing is done from the corner, and on the back side of the board the clamp is placed in the groove, then attached to the sheathing.
Sheathing schemes
There are two ways - using external fastening and hidden. With the external method, the boards must be fixed with fasteners. In the second case, the panels are attached to the sheathing from the groove side, where there is a joint with a tenon. The appearance with this option will be more aesthetic. The lining can be mounted vertically, horizontally and, if necessary, in a non-standard way. When laying panels horizontally, the teeth must be directed from the lower element to the upper one, and not vice versa. When sheathing a log wall, staples and nails for them and lathing are used. To clap a room with smooth walls, you need to use bars. They are placed at a distance of no more than 50 cm between adjacent elements and perpendicular to the panels. The cladding is framed with decorative skirting boards and fillets
Basic fastening methods:
- nails;
- screws;
- staples;
- kleimers.
Material calculation
To avoid unnecessary leftovers or the need to urgently go to the store for an additional batch of lining or fasteners, first calculate the consumption of the necessary materials.
Lining
As a rule, finishing lining is sold individually, but sometimes stores offer lumber in cubic meters. For interior work, lamellas up to 16 mm thick are used. The width of the wooden boards is 60-200 mm, the length is from 600 mm to 3000 mm. When calculating, take into account the working surface of the board without a tenon. Conversion from volumetric indicator to area is carried out by dividing by the thickness of the element.
Dimensions of PVC lining – 100-250 mm width and length – 3000 mm. MDF panels are produced in dimensions 150-325 by 2400-3700 mm. In product labeling, thickness is indicated first, then width and length.
The determining value is the working surface area of one product, which is found by multiplying the width by the length. For example, for a 12x120x3000 mm lamella it is 0.36 m².
The surface area of the cladding is determined as the sum of the areas of all the walls of the room (ceiling) minus the window and door openings.
To determine the required number of panels for cladding, the finishing area is divided by the area of one element. Take into account the height of the room, since the lining may have to be cut to the required size.
The remaining pieces can be useful for installation above window or door openings.
In order to provide a reserve for defects, defects or accidental damage during installation, the amount of material obtained as a result of the calculation is increased by 15%.
Lathing
The lining is attached to a frame made of wooden bars, treated against rotting, with a cross-section of 30x30 mm. In rooms with high humidity, profiles made of aluminum or galvanized steel are used.
The pitch between the guides is 400-600 mm. When installing linings vertically, they are placed horizontally, and vice versa. It is necessary to install slats near the floor and ceiling or internal and external corners in order to securely fasten the plates in the plane of the walls and avoid deformation.
When calculating the material for the sheathing, the length and height of the walls, the presence of protruding elements, and openings are taken into account.
Fasteners
The lining is secured to the frame with self-tapping screws, nails, staples or clamps.
Self-tapping screws are used in damp areas. After screwing in by hand or with a screwdriver, close the cap with a pin to avoid corrosion.
Nails are rarely used, since when driving in there is a high risk of damaging the finishing surface. Use furniture pins with decorative caps.
The horizontal elements are secured with staples. They are hammered in at an angle so that the tenon can easily penetrate the groove of the already mounted board.
Kleimer is an auxiliary element in the form of a curved plate with a hook for fixing the lining and two holes for nails or self-tapping screws. This fastening is safe for the material and allows you to reliably and quickly install the panel in the desired position.
Fastener consumption is calculated approximately. For 1 m² of panels you will need 15-25 clamps, 30-50 screws or 30-60 nails.
How to sheathe it yourself
You will need to complete the following stages of work:
- Prepare the lining.
- Prepare the wall.
- Assemble the sheathing.
- Attach the clapboard to the lattice frame.
- Finish the covering with skirting boards and, if necessary, other elements.
The panels are processed first. Depending on the place of application, any class of lining can be processed. It is always necessary to prepare the surface of class C products. The same applies to lining made by yourself. Preparing the walls consists of leveling them and applying markings for the sheathing. It is not necessary to level it; instead, you can do other manipulations. The crucial point is the installation of the sheathing. The timber itself and the distance between the elements are selected. The configuration completely depends on the planned method of laying the lining. Different approaches are used to fix the panels. The main thing in the work is caution, because inaccurate driving of the fastener can lead to the appearance of serious defects in the material. When the sheathing is ready, installation of baseboards and finishing begins.
How to prepare the lining
If necessary, the panels are treated with fine-grained sandpaper to eliminate roughness. Further processing begins with cleaning the surface of the material. If you plan to apply wax or varnish to the lining, stain is first used. It will preserve the color of the wood for a long time. There are 3 types of stain: oil-based, alcohol-based and water-based. Antiseptics will protect the wood from moisture penetration and mold. If the installation location is a bathhouse, waxing will be required. It is applied in small quantities, in the direction of the fibers. This procedure must be repeated several times. Then the products are polished. Among other things, the color of the boards will become deeper. There is a large selection of wax impregnations on sale, which are also suitable for preparing lining. The last stage is applying varnish. You will need at least 2 layers. The material must be perfectly dry before installation.
Grease stains can be removed using a 25% acetone solution.
Preparing the walls
You will need to make markings on the wall for the sheathing. This action is performed using a pencil and level. The configuration of the cladding and the direction in which the lining will be placed are determined in advance. The bars are always placed perpendicularly. If everything has already been decided about this nuance, you can start treating the walls with antifungal agents and marking the surfaces. If something happens, the pencil is replaced with chalk. The width of the sheathing step is selected depending on the purposes. For strength, it is advisable to make it as small as possible. Usually this figure is in the range of 35-60 cm. If in the future it is planned to insulate a room, the step is determined based on the size of the insulating material and should be slightly less than it. To ensure that the frame structure is level, you will need to use a plumb line and fishing line. A visualization is created, along the edges of which bars are then placed.
We create a sheathing for fasteners
This is one of the most important stages, which has a significant impact on the final result. Only sometimes the lining is attached directly to wooden walls; in other situations, lathing is necessary. At the very beginning, we select the timber. For this sheathing, a block with a cross section of 40×20 mm is the best option. We install the frame one level at a time. If necessary, we level each individual wall. You can use another method - determine the most protruding place on the wall. Then a small piece of timber is placed there and the sheathing is mounted from it. From this point the thread is pulled parallel to the planned direction of laying the panels. At the extreme points of the wall, 2 load-bearing beams are placed. If necessary, install spacers between the wall and the beam. If a row of lining will be mounted from 2 boards, another beam is needed at the junction.
Other important nuances:
- when securing the structure, you need to check the level;
- if there are door or window openings, the beams must be fastened around them;
- Installation of lathing on the ceiling is done in the same way as on the walls.
Fixation methods
The lining is secured using staplers, clamps or fasteners (screws, nails). During installation, care must be taken to avoid splitting the wood and causing cracks. Full insertion of the nail head into the material and accuracy of work are ensured with the help of a hammer. When installed in a hidden way, the panels are nailed to the frame at the junction of the tongue and groove. The simplest and easiest assembly method is to fasten with small nails in any places, but it is better to prefer a neat method that involves hammering nails into the grooves to hide the connection. The highest quality fastening is ensured by metal clamps. They come in different sizes, shapes and are designed for a certain board thickness. The fasteners are connected to the sheathing on one side, and cut into the grooves on the other.
Fastening the lining to the ceiling requires careful steps, so it is better to do this together with a specialist!
The process of fastening the lining
If the sheathing is installed correctly, the process of installing the lining will go without complications. A level may be needed when attaching the first panel. The first question before installation is which side to start laying the boards on. You can determine the answer by finding out how smooth the surface is. If it corresponds to the level, then you can start laying from any side: top, bottom, right, left, corner. The first board is then placed level. If the surface is slightly “overwhelmed” or some corner is uneven, the boards cannot be installed this way. Otherwise, they will visually emphasize the curvature. The lining will need to be assembled in a different way. The first board is attached flush to the corner, the rest - with a slight inclination in the desired direction. Sooner or later some panel will become level. All boards “fill up” to the same extent. The first one needs to be placed with the spike towards the corner.
Rules for installing skirting boards on a wall with lining
For an aesthetic appearance, the sheathed walls are decorated with floor and ceiling skirting boards. Sometimes they need to be mounted on the wall (corner). When finishing corners, they are guided by the following rules: if there is an adjacent unsheathed wall, then the plinth is installed on it, and when placed between two sheathed ones, it should be attached to the shorter one. These measures should not prevent thermal deformation and drying out of surfaces that are most susceptible to them. If the wall is decorated with clapboard, then the baseboards are fixed using finishing nails. They hammer it through the body, the narrow cap goes into the mass. These areas are then treated with a wax pencil. If the surface is not flat (for example, log), nailing a regular baseboard will not always be possible. Gaps may remain. It is likely that in the corners the baseboards will not meet at all. Instead, you can use flat platbands. They fit tightly on the wall, and you can make them yourself, including from clapboard.
Wood panel installation technology
Before installing the lining, the wooden surface must be treated with special protective agents. There are a huge number of them in construction markets. Prices range from high to low thresholds. You also need to make sure that there are no nicks or protruding knots on the front of the board. If they are present, they must be removed with a grinding machine.
After the work has been done, the next step will be installation of the sheathing. A profile is used for this. It comes in wood and metal. It is worth considering that one of the advantages of lining is the alignment of walls. The lining itself is fastened using the tongue and groove type, that is, its tongue snaps into the groove. You can't do it without an assistant.
The next step is to stretch the line from one end of the platform to the other end. The distance between the frame parts should be no less than 50 centimeters. If you want to do less, then keep in mind that it may not be enough to lay the mineral wool seal.
Before installing the lining, it should be dried in the sun or indoors. If you dry it in the open air or where finishing work will take place, it is advisable to leave the material for a longer time. After these recommendations have been completed, proceed to tiling the room.
The lining fabric has a tenon on one side and a groove on the other. During installation, the groove should be located at the bottom to prevent moisture from occurring at the bottom of the structure.
Decorating the inside of a house with wooden lining begins from the ceiling, although assembly from the floor is possible. In this case, the gaps can be hidden under the baseboard. The slats of the structure are attached with nails or with a clamp, which is more aesthetically pleasing and beautiful.
Decorative finishing methods
If installation is carried out in a hidden way, it is recommended to use decorative fasteners. A hammer will ensure accurate fixation and decoration of the nail in the wood. You can decorate the corner between the boards using treated timber - this way there will be no gaps in the opening. If the natural color of the wood does not fit into the interior or does not add any color, then the lining is coated with paint. It’s better to match the decor or white. The nail heads that secure the starter board are covered with decorative corners. If there are no decorative slats, then the tops of the fasteners are removed with side cutters. All joints, internal and external corners must be closed. Bottom and ceiling plinths are also used for decoration. The interior can be radically changed by installing false beams on top of the lining.
Which coating to choose: paint or varnish?
After successfully fixing the product, it is recommended to varnish or paint it. Indoors, the tree has every chance of being eaten by a tree beetle or covered with fungus. To avoid this, the following types of impregnation are used:
- alkyd;
- acrylic;
- linen
Impregnation will significantly extend the service life of the Blockhouse, reduce the occurrence of cracks on the surface, and, most importantly, give the wood fire-resistant and bioprotective properties.
In the event that naturalness is an important point, and you want to preserve the appearance of wood, an alternative to painting is varnishing. The surface for varnish must be perfectly clean and free of foreign irregularities.
To work on the walls you will need a roller or a regular paint brush. The coating is carried out in several layers , not counting the first tonic impregnation with stain.
Which covering method to choose will depend on the wishes of the owner of the premises. If he is a traditionalist and wants to preserve the natural look of his walls, he will need a varnish solution.
If the room is planned as a youth room or the walls should become a bright accent, of course, preference should be given to paint. If the finishing is done at the highest level, the room will look noble and presentable.